
To send email in NextAuth, you’ll need to configure the Email provider with either SMTP via Nodemailer or an Email API. Both approaches deliver passwordless magic link emails to authenticate users.
Most serverless Next.js deployments fail on SMTP because Vercel blocks outbound port 25. After setting up email auth across several Next.js apps, I’ve found the API method sidesteps that entirely. SMTP is the simpler setup when you control the server.
In this tutorial, I’ll show you how to set up NextAuth to send magic link emails through SendLayer using the method that best fits your deployment.
- What Is the NextAuth Email Provider?
- How Do You Send Email in NextAuth Using SMTP?
- How Do You Send Email in NextAuth Using an Email API?
- Should You Use SMTP or an Email API With NextAuth?
- How Do You Customize Your NextAuth Verification Email?
- How Do You Troubleshoot Common NextAuth Email Errors?
- Frequently Asked Questions
What Is the NextAuth Email Provider?
The NextAuth Email provider lets users sign in with a magic link sent to their inbox. No password needed. The user enters their email, receives a link, and clicking it creates an authenticated session.
How Does Magic Link Authentication Work?
Here’s what happens when a user signs in:
- User submits their email on your sign-in page
- NextAuth generates a one-time verification token and stores it in your database
- NextAuth emails a link containing that token to the user
- User clicks the link; NextAuth validates the token and starts a session
- Token is deleted to prevent reuse

The email step is where your SMTP or API config comes in.
What Are the Prerequisites?
You need three things before adding the Email provider:
- A database adapter: NextAuth stores verification tokens in a database and deletes them after use. Prisma is the most common choice. See the NextAuth adapter docs for the schema.
- NextAuth installed. Run
npm install next-auth@betaif you haven’t already.
If you prefer a traditional flow with usernames and passwords, our guide to implementing password reset in Node.js covers that instead.
Note: These examples use Auth.js v5 (next-auth@beta), which works with the Next.js App Router. If you’re on NextAuth v4 with the Pages Router, differences for v4 are noted in each section.
How Do You Send Email in NextAuth Using SMTP?
NextAuth sends magic link emails via SMTP using Nodemailer as the transport layer between your app and your email server. Here is a step by step guide
Step 1: Install Nodemailer and Set Up Your Database
Install the required packages:
npm install next-auth@beta nodemailer @auth/prisma-adapter @prisma/client
Also, install some of the dev dependencies:
npm install -D prisma @types/nodemailer
Note: If you’re on NextAuth v4, use @next-auth/prisma-adapter instead of @auth/prisma-adapter.
Note: Pin Prisma to v6 (prisma@^6 and @prisma/client@^6) for this guide. Prisma v7 moves the datasource URL out of schema.prisma and into a separate prisma.config.ts, which doesn’t match the schema below. Upgrade once Auth.js documents the v7 path.
If Prisma isn’t set up yet, initialize it:
npx prisma init --datasource-provider sqlite
Once the installation completes, add the NextAuth schema to prisma/schema.prisma. The Auth.js Prisma adapter docs include the exact models to copy. Then run migrations:
npx prisma migrate dev --name add-auth-tables
Now, let’s create the lib/prisma.ts file to reuse the client across hot reloads in development:
import { PrismaClient } from "@prisma/client"

const globalForPrisma = globalThis as unknown as {
  prisma: PrismaClient | undefined
}

export const prisma = globalForPrisma.prisma ?? new PrismaClient()

if (process.env.NODE_ENV !== "production") {
  globalForPrisma.prisma = prisma
}
Step 2: Configure Your Environment Variables
It is best practice to store sensitive credentials as environment variables. For this, create or edit your .env.local. Then add the following configs to the file.
# Auth.js v5 requires a secret key. Generate one with `openssl rand -base64 32`
AUTH_SECRET=your_random_secret_string

# Database connection (Prisma reads this)
DATABASE_URL=file:./dev.db

# SendLayer SMTP credentials (Domains » Your Domain » SMTP Credentials)
EMAIL_SERVER_HOST=smtp.sendlayer.net
EMAIL_SERVER_PORT=587
EMAIL_SERVER_USER=your_sendlayer_smtp_username
EMAIL_SERVER_PASSWORD=your_sendlayer_smtp_password

# Must match your verified sending domain
[email protected]
I’m using SendLayer SMTP credentials for this tutorial. But the steps are similar regardless of your SMTP provider.
You’ll need to retrieve your SMTP credentials from your email provider’s account dashboard. For SendLayer users, log in to your SendLayer account and select the Settings sidebar menu. Then select the SMTP Credentials tab.
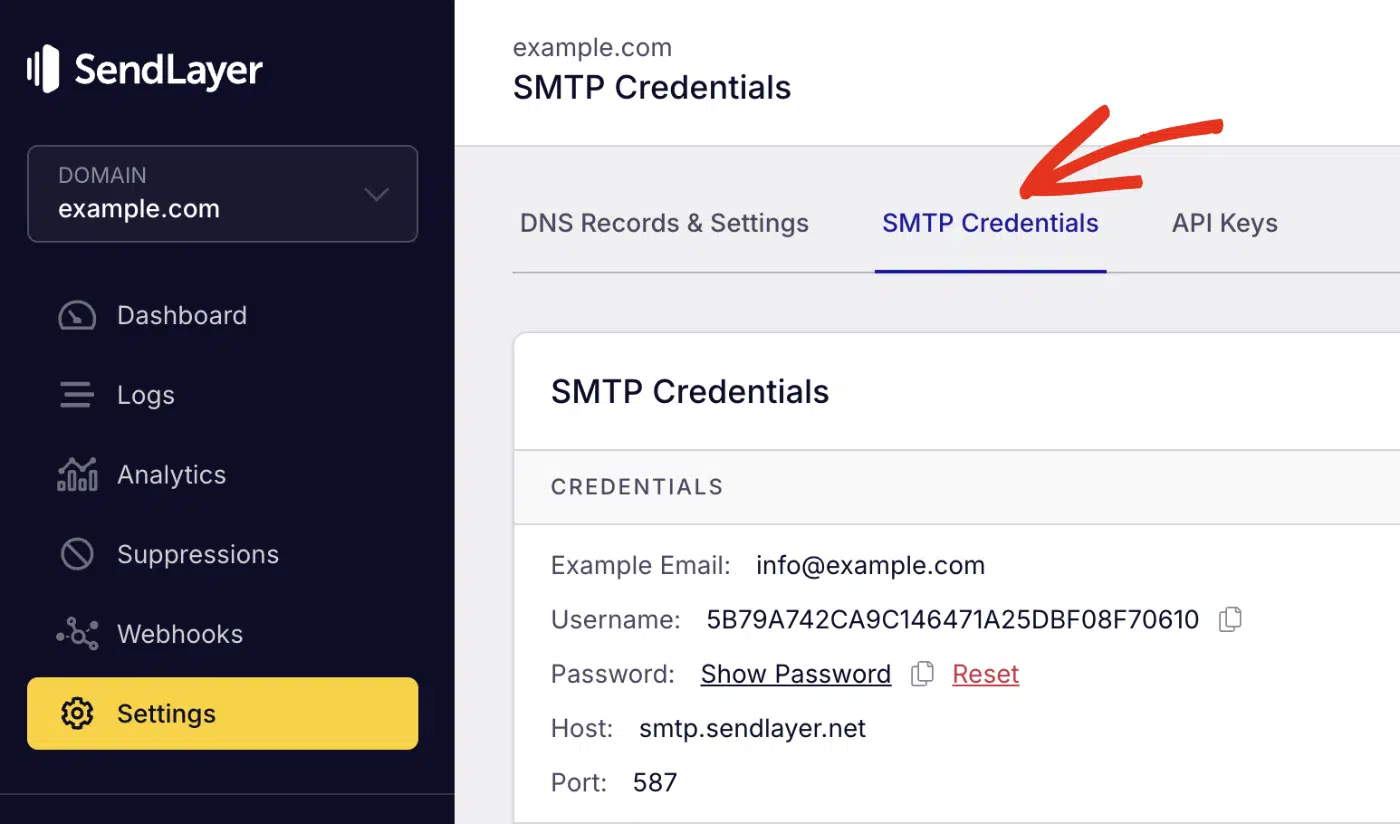
Go ahead and replace the dummy credentials in the .env.local file with your actual SMTP details.
Pro Tip: Port 587 uses STARTTLS, which encrypts the connection automatically after it’s established. Avoid port 25. Vercel and most cloud platforms block it.
Alternatively, collapse the SMTP settings into a single connection string:
EMAIL_SERVER=smtp://your_smtp_username:[email protected]:587
[email protected]
Step 3: Add the Email Provider to NextAuth
Now, let’s implement the email provider logic. For this, create or update auth.ts in your project root with the following snippets:
import NextAuth from "next-auth"
import Nodemailer from "next-auth/providers/nodemailer"
import { PrismaAdapter } from "@auth/prisma-adapter"
import { prisma } from "@/lib/prisma"

export const {
  handlers: { GET, POST },
  auth,
  signIn,
  signOut,
} = NextAuth({
  adapter: PrismaAdapter(prisma),
  providers: [
    Nodemailer({
      server: {
        host: process.env.EMAIL_SERVER_HOST,
        port: Number(process.env.EMAIL_SERVER_PORT),
        auth: {
          user: process.env.EMAIL_SERVER_USER,
          pass: process.env.EMAIL_SERVER_PASSWORD,
        },
      },
      from: process.env.EMAIL_FROM,
    }),
  ],
})
Code breakdown
In the code above, I imported NextAuth for authentication, the Nodemailer provider for email-based login, the PrismaAdapter to connect authentication to the database, and the Prisma client instance.
The NextAuth function is initialized with two main options: the PrismaAdapter, which stores users, sessions, and verification tokens in your database via Prisma. Then the Nodemailer provider handles sending magic link emails via an SMTP server configured with environment variables.
The auth, signIn, and signOut utilities manage authentication states for the entire application.
After adding the snippet, export the route handlers in app/api/auth/[...nextauth]/route.ts:
export { GET, POST } from "@/auth"
Note: NextAuth() returns handlers as an object, not a function. Destructure it as handlers: { GET, POST } in auth.ts so the route file can re-export both methods directly. Re-exporting handlers themselves will throw a route-handler error.
v4 note: Use import EmailProvider from "next-auth/providers/email" and export default NextAuth({ ... }) instead of named exports. The route file is pages/api/auth/[...nextauth].ts.
Step 4: Test the Magic Link Flow
Start your dev server using the command below:
npm run dev
Once the server is running, open the dev server (usually localhost:3000) in a browser and go to your sign-in page.

Once there, enter a real email address and click Email me a sign-in link.

Check your inbox for the magic link, then click it.

Your session should be created. Check your database. The VerificationToken table should show that the record was consumed.
Pro Tip: Use Ethereal Email during local development. It’s a fake SMTP inbox that catches all outgoing emails so they don’t reach real users. Swap in the Ethereal credentials as your SMTP env vars while testing locally.
How Do You Send Email in NextAuth Using an Email API?
The Email API method replaces Nodemailer’s SMTP transport with the SendLayer Node.js SDK. Your app calls SendLayer’s API over HTTPS instead of opening an SMTP connection. This works on Vercel and every serverless platform.
Step 1: Install the SendLayer SDK
npm install sendlayer
You still need the Nodemailer provider package — Auth.js v5 uses it as the typed wrapper for email providers even when you deliver over HTTPS. Add your credentials to .env.local:
AUTH_SECRET=your_random_secret_string
DATABASE_URL=file:./dev.db
SENDLAYER_API_KEY=your_sendlayer_api_key
[email protected]
To get your API key, log in to your SendLayer account. Once you’re logged in, click the Settings menu and select the API Keys tab.
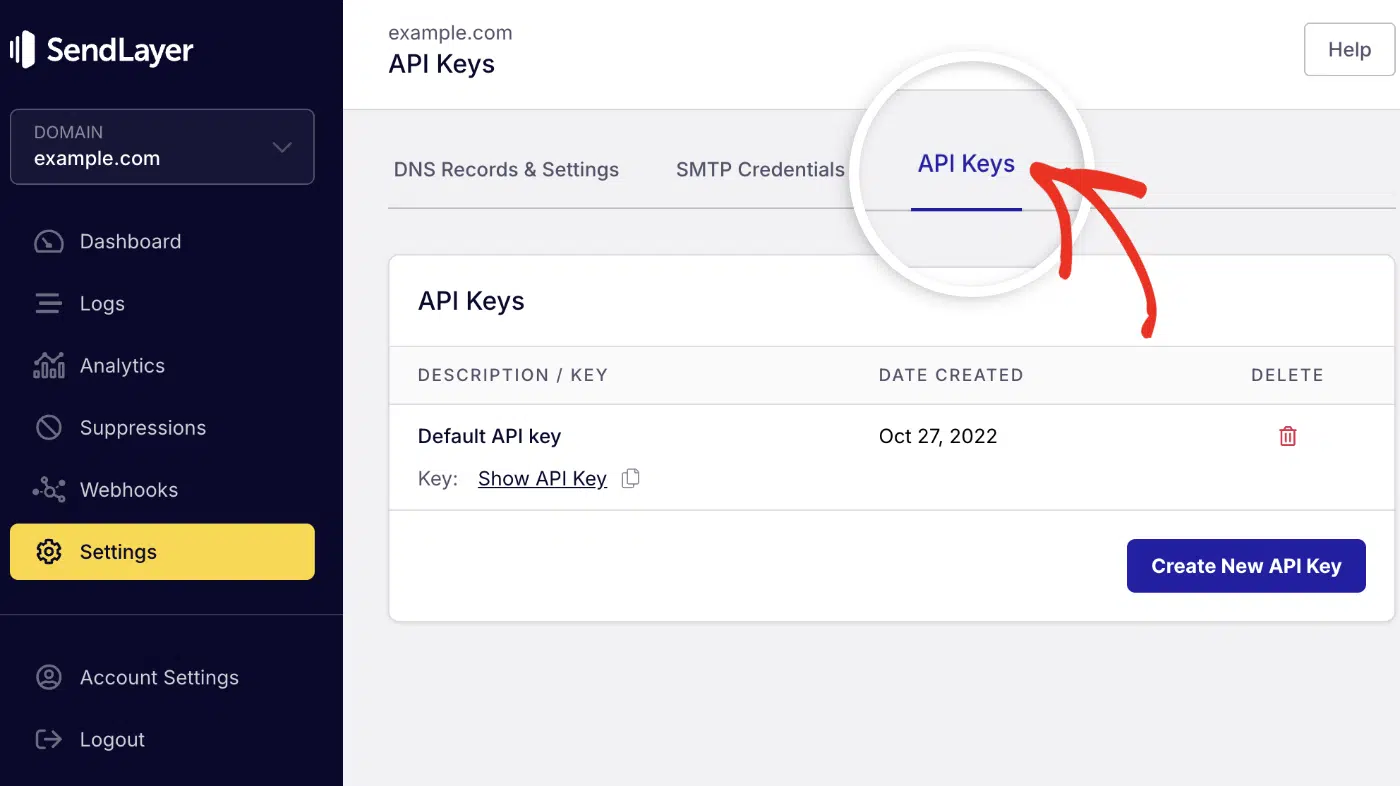
Then click the copy icon next to Default API key to copy it.

After copying your API key, return to your code editor and paste the key into your .env.local file.
Step 2: Write a Custom sendVerificationRequest Function
Let’s create the verification request function to handle email delivery.
To start, create lib/sendVerificationRequest.ts and add the following code snippets:
import { SendLayer } from "sendlayer"

const sendlayer = new SendLayer(process.env.SENDLAYER_API_KEY ?? "")

export async function sendVerificationRequest({
  identifier,
  url,
  provider,
}: {
  identifier: string
  url: string
  provider: { from?: string | null }
}) {
  const { host } = new URL(url)
  const from = provider.from ?? process.env.EMAIL_FROM
  if (!from) throw new Error("Missing EMAIL_FROM")

  await sendlayer.Emails.send({
    from,
    to: identifier,
    subject: `Sign in to ${host}`,
    html: `
      <div style="font-family:sans-serif; max-width:600px; margin:0 auto;">
        <h2>Sign in to ${host}</h2>
        <p>Click the button below to sign in. This link expires in 24 hours.</p>
        <a href="${url}"
           style="display:inline-block; padding:12px 24px;
                  background:#4F46E5; color:#fff;
                  text-decoration:none; border-radius:4px;">
          Sign In
        </a>
        <p style="color:#666; font-size:13px; margin-top:24px;">
          Didn't request this? You can safely ignore this email.
        </p>
      </div>
    `,
    text: `Sign in to ${host}\n\n${url}\n\nThis link expires in 24 hours.`,
  })
}
Code breakdown:
identifier: the user’s email addressurl: the full magic link NextAuth generatedhost: extracted from the URL for the email subject and headingsendlayer.Emails.send(): delivers the email via SendLayer’s API
Note: To learn more about the SendLayer API, be sure to check our developer documentation.
Step 3: Add the Provider to NextAuth
Update auth.ts to plug your sendVerificationRequest into the Nodemailer provider:
import NextAuth from "next-auth"
import Nodemailer from "next-auth/providers/nodemailer"
import { PrismaAdapter } from "@auth/prisma-adapter"
import { prisma } from "@/lib/prisma"
import { sendVerificationRequest } from "@/lib/sendVerificationRequest"

export const {
  handlers: { GET, POST },
  auth,
  signIn,
  signOut,
} = NextAuth({
  adapter: PrismaAdapter(prisma),
  providers: [
    Nodemailer({
      from: process.env.EMAIL_FROM,
      maxAge: 24 * 60 * 60, // 24 hours in seconds
      // `server` is required by the Nodemailer factory at construction time,
      // even when sendVerificationRequest is overridden. The values are
      // never read because our override bypasses SMTP entirely.
      server: { host: "unused", port: 587, auth: { user: "x", pass: "x" } },
      sendVerificationRequest,
    }),
  ],
})
Note: The Nodemailer factory throws “Nodemailer requires a server configuration” if server is missing, even when you override sendVerificationRequest. The placeholder above satisfies the check without opening an SMTP connection.
Export the route handlers in app/api/auth/[...nextauth]/route.ts:
export { GET, POST } from "@/auth"
Important: The database adapter is still required. sendVerificationRequest handles delivery only. NextAuth still stores and validates tokens in your database.
Once you’ve configured the email API, make sure to test the implementation to ensure it works correctly before pushing it to production.
Should You Use SMTP or an Email API With NextAuth?
Use SMTP if you’re deploying to a VPS or self-hosted server. Use the API method if you’re on Vercel or any serverless platform.
| SMTP (Nodemailer) | Email API (SendLayer SDK) | |
|---|---|---|
| Works on Vercel | Partial (port 587 only) | Yes |
| Extra packages | nodemailer | sendlayer |
| Setup complexity | Medium | Low |
| Custom templates | Yes | Yes |
| Best for | VPS, Docker, self-hosted | Vercel, serverless |
Both methods use SendLayer for delivery. The difference is only in how your app connects to it.
How Do You Customize Your NextAuth Verification Email?
By default, NextAuth sends a plain-text email with a raw link. You can send a branded HTML email by overriding sendVerificationRequest.
For the SMTP method, add the callback to your Nodemailer config:
Nodemailer({
  server: { /* ... */ },
  from: process.env.EMAIL_FROM,
  sendVerificationRequest: async ({ identifier, url, provider }) => {
    const { host } = new URL(url)
    // Use the sendlayer.Emails.send() pattern from the API method above,
    // or call nodemailer.createTransport(provider.server).sendMail()
    // for full SMTP control.
  },
})
For the API method, edit the html string in lib/sendVerificationRequest.ts to match your app’s branding.
Pro Tip: Keep magic link emails simple. One heading, one button, one short disclaimer. Users just need to click. They don’t need a designed email. See how to design transactional email templates for ideas beyond the basics.
The same principles from our guide to password reset email best practices apply: clear CTA button, 24-hour expiry notice, and an ignore-if-not-you disclaimer at the bottom.
How Do You Troubleshoot Common NextAuth Email Errors?
“Email server did not accept our request”
Your SMTP credentials are wrong or the host/port doesn’t match. Double-check smtp.sendlayer.net, port 587, and your username and password in the SendLayer dashboard. Watch for trailing spaces in .env.local values.
“Nodemailer requires a server configuration”
Auth.js validates the Nodemailer provider at construction time and requires a server object even when sendVerificationRequest is overridden. Pass a placeholder server like the one shown in Step 3 of the API method.
“There is no email provider configured”
The database adapter is missing. The Email provider won’t function without one. Confirm adapter: PrismaAdapter(prisma) is in your NextAuth config, and run npx prisma migrate dev.
“This sign in link is no longer valid”
The token expired. The default is 24 hours. Extend it with maxAge: 48 * 60 * 60 on the provider config. You can also shorten it for tighter security.
Magic link email landing in spam
Your sending domain isn’t authenticated. Log in to SendLayer, go to Domains, and confirm that all DNS records show green checkmarks. If they’re red, re-add the DNS records at your domain registrar. Allow up to 48 hours for propagation.
FAQs – Send Auth Emails in NextAuth
Below we’ve answered some of the top questions developers ask about setting up authentication using NextAuth.
Does NextAuth email authentication require a database?
Yes. NextAuth stores the verification token in a database and deletes it after the user clicks the link. Without a database adapter, the Email provider won’t work. Prisma with PostgreSQL or MySQL is the most common setup. SQLite works for local development.
Can I use the NextAuth email provider on Vercel?
Yes, with the Email API method. Vercel blocks SMTP on port 25. Port 587 sometimes works, but it’s not guaranteed. The reliable option on Vercel is sendVerificationRequest with the SendLayer SDK, which sends over HTTPS with no port restrictions.
What is sendVerificationRequest in NextAuth?
It’s a function NextAuth calls to deliver the magic link email. By default, NextAuth uses Nodemailer over SMTP. Override sendVerificationRequest to use any delivery method: the SendLayer SDK, AWS SES, or any HTTP-based email API.
How do I change the duration of a NextAuth Magic Link?
Set maxAge (in seconds) on your email provider config. The default is 24 * 60 * 60 (24 hours). To set it to 1 hour, use maxAge: 60 * 60.
What email services work with NextAuth?
Any service that supports SMTP works with Nodemailer. For the API method, any service with an HTTP API can be used via sendVerificationRequest. SendLayer, Resend, SendGrid, and Postmark all support both approaches.
That’s it! Now you know how to set up and send authentication emails in NextAuth.
Ready to send more than just magic links? See how to send transactional emails in Next.js via SMTP with Nodemailer for order confirmations, notifications, and more.