
Are you looking to customize and enable email sending from your Auth0 account? You can set up and send email in Auth0 by connecting a custom SMTP provider.
Auth0’s built-in email service is fine for testing. But it sends from [email protected] and caps you at 10 emails per minute. That’s a real problem when your app sends verification emails to thousands of new signups.
In this tutorial, you’ll learn how to customize the email option in Auth0. By the end, you’ll have Auth0 sending transactional emails through SendLayer. You’ll also know how to customize templates and trigger custom emails with Auth0 Actions.
- What Is Auth0’s Built-In Email Provider, and Why Isn’t It Enough?
- What Do You Need Before You Configure Email in Auth0?
- How Do You Set Up a Custom Email Provider in Your Auth0 Email Account?
- How Do You Customize Auth0 Email Templates?
- How Do You Send Custom Emails with Auth0 Actions?
- How Do You Troubleshoot Email Delivery in Auth0?
- Frequently Asked Questions
What Is Auth0’s Built-In Email Provider, and Why Isn’t It Enough?
Auth0’s built-in provider works automatically when you first create a tenant. You don’t configure anything; verification and password reset emails just work out of the box.
But it has hard limits you can’t override:
- Sends from
[email protected](not your domain) - Capped at 10 emails per minute
- No custom email templates
- Not supported for production use
These limits are by design. Auth0 expects you to connect a real email provider for any live app. The setup takes a few minutes and gives you full control over delivery and branding.
What Do You Need Before You Configure Email in Auth0?
You’ll need a verified sending domain and SMTP credentials from SendLayer before you start. Here’s a full checklist.
Prerequisites
- An Auth0 account (free tier works fine)
- A SendLayer account with a verified sending domain
- SPF and DKIM records published for your sending domain
- Admin access to your Auth0 dashboard
Note: You’ll need to verify your domain in SendLayer before you can send email. Go to Domains in your SendLayer dashboard and follow the verification steps.
How Do You Set Up a Custom Email Provider in Your Auth0 Email Account?
You set up a custom SMTP provider like SendLayer as your Auth0 provider by entering your SMTP credentials under Branding » Email Provider. Here’s how to do it in 4 steps.
Step 1: Get Your SendLayer SMTP Credentials
Log in to SendLayer and go to Settings » SMTP Credentials.
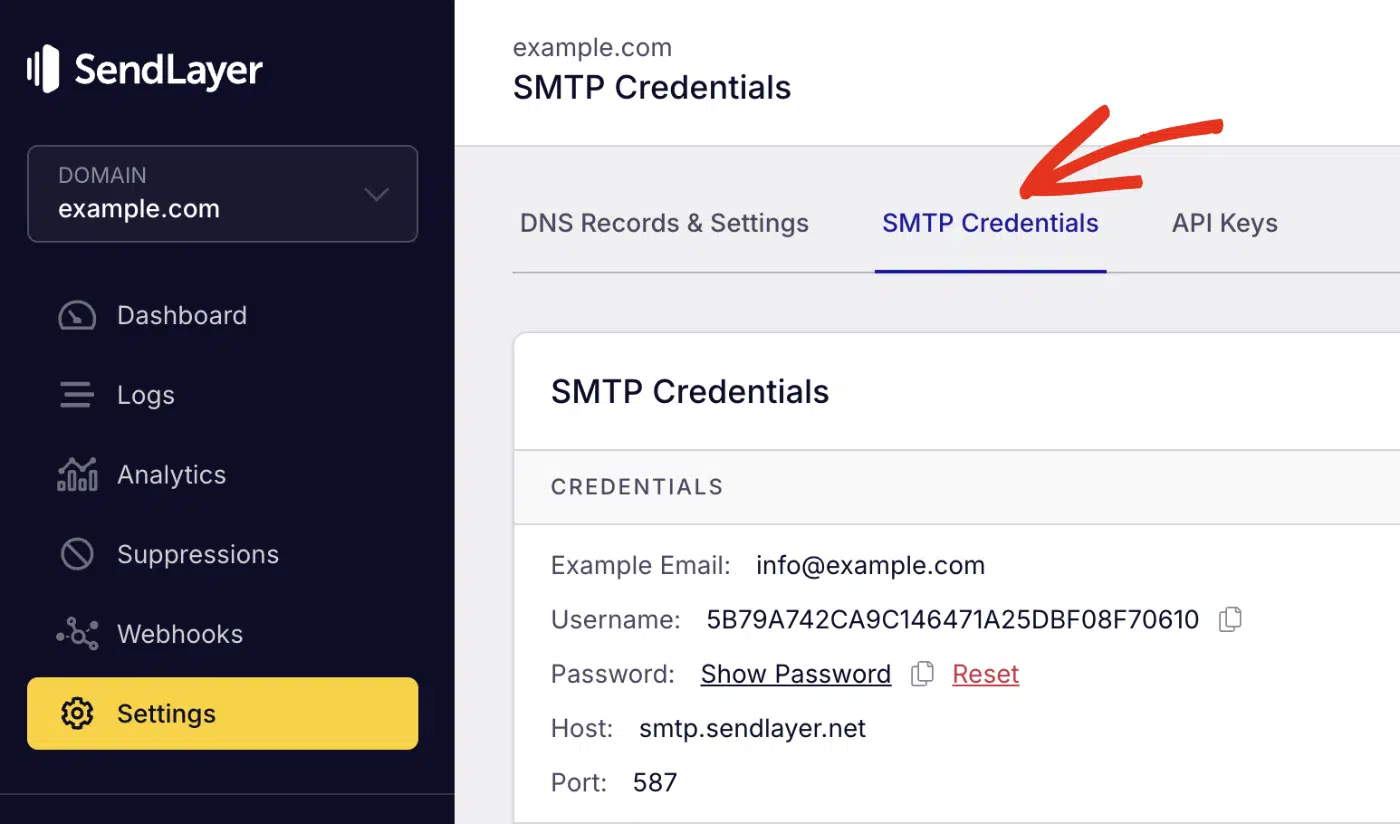
You’ll see the following credentials:
| Field | Value |
|---|---|
| Host | smtp.sendlayer.net |
| Port | 587 |
| Username | Your SendLayer username |
| Password | Your SendLayer API key |
Copy these values. You’ll paste them into Auth0 in the next step.
Step 2: Enable a Custom Email Provider in Auth0
Now, let’s configure the email provider settings in Auth0. Start by logging in to your Auth0 dashboard.
Once you’re logged in, navigate to Branding » Email Provider.

Then toggle on the Use my own email provider option.

Next, select SMTP Provider from the provider list.

Step 3: Enter Your SendLayer SMTP Settings
After that, additional fields will appear. You’ll need to fill out the SMTP form with your SendLayer details:

| Auth0 Field | Value |
|---|---|
| From Address | Your Name<[email protected]> |
| Host | smtp.sendlayer.net |
| Port | 587 |
| Username | Your SendLayer username |
| Password | Your SendLayer API key |
Once you’re done entering the details, click Save.

Step 4: Send a Test Email in Auth0
After saving your email configuration, scroll to the bottom of the Email Provider page and click Send Test Email.

If it worked, you’ll get a confirmation email from your verified domain.

If you don’t, go to Monitoring » Logs in Auth0 to check for errors.
How Do You Customize Auth0 Email Templates?
Auth0 email templates let you control the content of every email it sends, from account verification to password resets.
To customize your email templates, go to Branding » Email Templates and choose the template you want to edit.

Each template uses Liquid syntax to dynamically pull in user and app data. You can find the full list of template types in the Auth0 email templates docs. For ideas on what to include, see our guide to password reset email best practices.
What Variables Can You Use in Auth0 Email Templates?
Here are the most useful built-in variables:
| Variable | What It Returns |
|---|---|
{{ user.email }} | The user’s email address |
{{ user.name }} | The user’s display name |
{{ url }} | The action URL (for example, verification link) |
{{ application.name }} | Your Auth0 application name |
{{ tenant.name }} | Your Auth0 tenant name |
Pro Tip: Keep template HTML simple. Heavy inline styling breaks across email clients.
How Do You Send Custom Emails with Auth0 Actions?
Auth0 Actions let you trigger emails that aren’t part of the standard auth flow. You can send a welcome email on signup, a login alert, or any custom notification your app needs. If you need inspiration, our collection of welcome email examples is a good starting point.
Example: Trigger a Welcome Email After Signup
This example uses the Post User Registration trigger to send a welcome email via the SendLayer API.
In your Auth0 dashboard, go to Actions » Triggers. Once there, select the post-user-registration trigger.

Next, click the Create Action button to configure a new action.

In the overlay that appears, you’ll need to enter a name for the custom action. This name is for internal purposes only.
For this example, I’ve named it “Send Welcome Email”. After that, choose the Post User Registration trigger.

Once done, click Create to proceed.
You’ll be directed to a code editor. Go ahead and paste the code below into the custom snippet editor:
const https = require("https");

exports.onExecutePostUserRegistration = async (event) => {
  const payload = JSON.stringify({
    From: { email: process.env.SENDLAYER_FROM, name: "Your App" },
    To: [{ email: event.user.email, name: event.user.name || "" }],
    Subject: "Welcome to Your App",
    ContentType: "HTML",
    HTMLContent: `<p>Hi ${event.user.name || "there"}, welcome aboard!</p>`,
  });

  await new Promise((resolve, reject) => {
    const req = https.request(
      {
        hostname: "console.sendlayer.com",
        path: "/api/v1/email",
        method: "POST",
        headers: {
          "Content-Type": "application/json",
          Authorization: `Bearer ${process.env.SENDLAYER_API_KEY}`,
          "Content-Length": Buffer.byteLength(payload),
        },
      },
      (res) => {
        res.on("data", () => {});
        res.on("end", resolve);
      }
    );
    req.on("error", reject);
    req.write(payload);
    req.end();
  });
};
The snippet above connects to the SendLayer email API and dynamically adds the user’s email and name to the request parameter.
Notice that we reference the sender email and API key from an environment variable. It is good practice to use environment variable to manage sensitive credentials.
Now, I’ll need to add the environment variables. To do so, click Add Secret.

In the overlay that appears, set the environment variable Key as SENDLAYER_API_KEY. Then paste your API key into the Value field and click Create.

Repeat the same process and add the SENDLAYER_FROM value. This is the sender email address and should use the domain you verified in your SendLayer account.
To retrieve your API key, log in to your SendLayer account area and navigate to Settings » API Keys.

After adding the environment variables and configuring the action, click Deploy to publish it.

Note: Auth0 Secrets are encrypted at rest. Never hardcode your API key directly in the Action code.
For a full walkthrough of password reset flows, see how to implement password reset in Node.js.
How Do You Troubleshoot Email Delivery in Auth0?
If emails aren’t arriving, work through these checks in order. In my experience, mismatched SMTP credentials cause more than half of all delivery failures.
Check Auth0 Logs
Go to Monitoring » Logs in Auth0. Filter for failed events. Look for type fs (failed send email) for error details.
Verify your SendLayer credentials
Re-check your API key and username in Settings » SMTP Credentials in SendLayer. Re-enter them in Auth0 to rule out typos.
Confirm SPF and DKIM records
Use a tool like MXToolbox to check your domain’s DNS records. Auth0 email delivery depends on these passing. For a deeper look at email authentication records, read our guide to improving email security.
Check SendLayer delivery logs
In SendLayer, go to the Logs section. You’ll see whether SendLayer received the request from Auth0 and the result.

Check IP allowlisting
Some SMTP setups require you to allowlist Auth0’s outbound IPs. Go to Branding » Email Provider in Auth0. You’ll see a list of the required IP addresses there.
FAQs – Send Email in Auth0
Below, we’ve answered some of the top questions developers ask about setting up and sending emails in Auth0.
What SMTP Providers Does Auth0 Support?
Auth0 has built-in integrations for SendGrid, Mailgun, Mandrill, SparkPost, Amazon SES, Azure Communication Services, and Microsoft 365. It also supports any generic SMTP server, including SendLayer and Gmail.
What Is the Auth0 Built-In Email Provider Limit?
Auth0’s built-in provider sends up to 10 emails per minute. All emails come from [email protected]. You can’t set a custom From address or use email templates with the built-in provider.
Can I Send Custom Emails with Auth0 That Aren’t Part of the Auth Flow?
Yes. Auth0 Actions let you send custom emails for events such as user registration, login, or password changes. You call SendLayer’s API directly from the Action code.
How Do I Find My SendLayer SMTP Credentials?
Log in to SendLayer and go to Settings » SMTP Credentials. You’ll find your hostname, port, username, and API key there.
That’s it! Now you know how to set up and send emails from your Auth0 integration.
Are you implementing a custom password reset flow? Be sure to check the following guide for your specific framework: