If you’re looking for a flexible and affordable option for teaching courses and hosting learning resources online, Moodle could be the answer.
Moodle LMS is an open-source online learning platform that’s a popular choice with schools, universities, and businesses.
But to get the most out of the platform, it’s crucial to install and configure Moodle in a way that’s optimized for your individual needs. Neglecting to configure Moodle properly can result in several issues including:
- Performance: Incorrect settings can lead to slow loading times and a frustrating user experience. Optimal configuration ensures your Moodle site runs smoothly.
- Security: Misconfigurations can leave your LMS vulnerable to security threats. Well-considered settings help protect your valuable course data.
- Functionality: Certain features and plugins may only work correctly with specific configurations.
In this tutorial, I’ll take you through all the steps of installing and setting up Moodle, including configuring a custom SMTP email service to improve email deliverability and reliability and help your Moodle emails avoid spam filters.
What is Moodle?
Moodle is a powerful open-source Learning Management System (LMS) used by educators and institutions worldwide to create dynamic online learning environments. It’s a highly customizable and flexible platform designed to support a wide range of teaching and learning styles.
Core Benefits of Moodle:
- Adaptability: Moodle can be tailored to fit the specific needs of schools, universities, businesses, and non-profits alike due to its flexibility.
- Cost-effective: As an open-source solution, Moodle eliminates licensing fees, providing a significant cost advantage.
- Community-driven: Moodle benefits from a large, global community of developers and users, ensuring continuous improvement, support resources, and innovative plugins.
- Feature-rich: Moodle offers a vast array of tools for course creation, communication, assessment, and student tracking.
Installing Moodle
Before you begin installing Moodle, it’s essential to ensure your server environment meets the necessary requirements. While many web hosts offer one-click Moodle installations (often the easiest way to get started), it’s good to understand the underlying requirements for both one-click and manual installations.
Moodle needs 200MB disk space for the Moodle code itself, plus ample space for your course content (at least 5GB.)
You can install Moodle on a Windows server, although the most common environment is on an Apache or Nginx server with a mySQL/MariaDB/PostgreSQL database and PHP
If you’re installing Moodle on your own server, you’ll need to download and copy the files, create a database, and run the installer script. There are detailed instructions for this process in the official Moodle documentation.
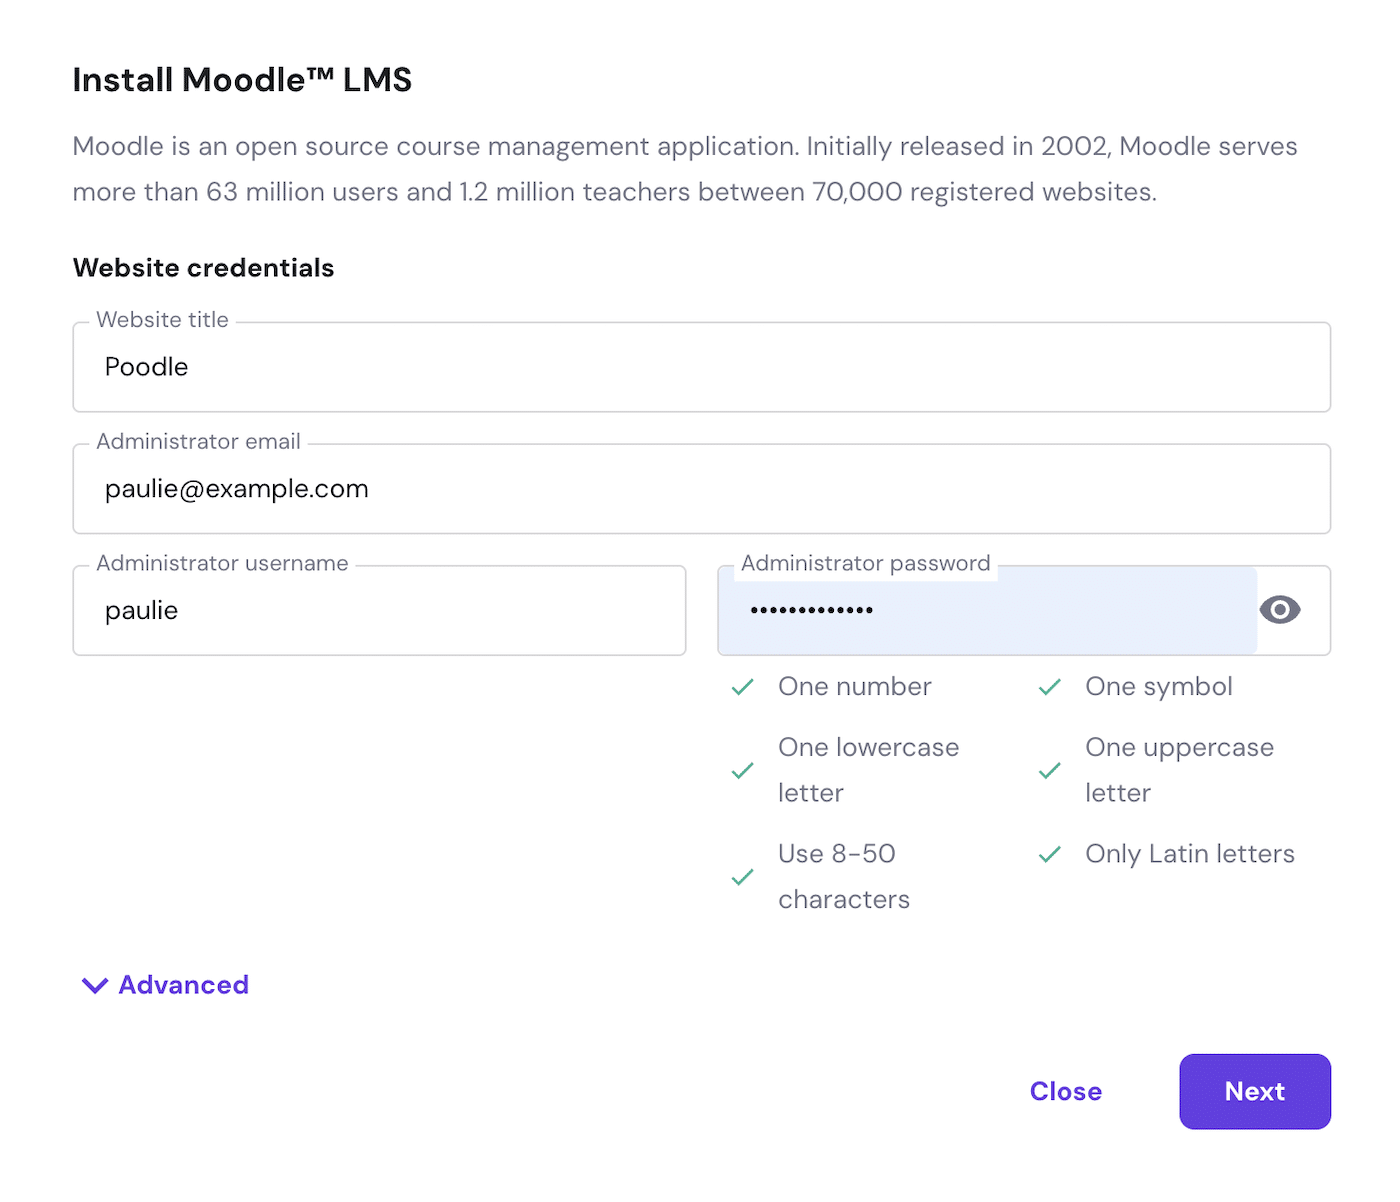
On the other hand, the one-click installer option available from many web hosts will handle all the initial setup and installation for you. All you need to do is provide a title for your website and administrator login details.
How To Configure Moodle
After successful installation, it’s time to personalize and shape your Moodle instance. Here’s where you’ll turn it from a fresh platform into a tailored learning environment.
First, log into your Moodle site with the administrator credentials you set during installation.

Navigate to the Site Administration tab in your dashboard.
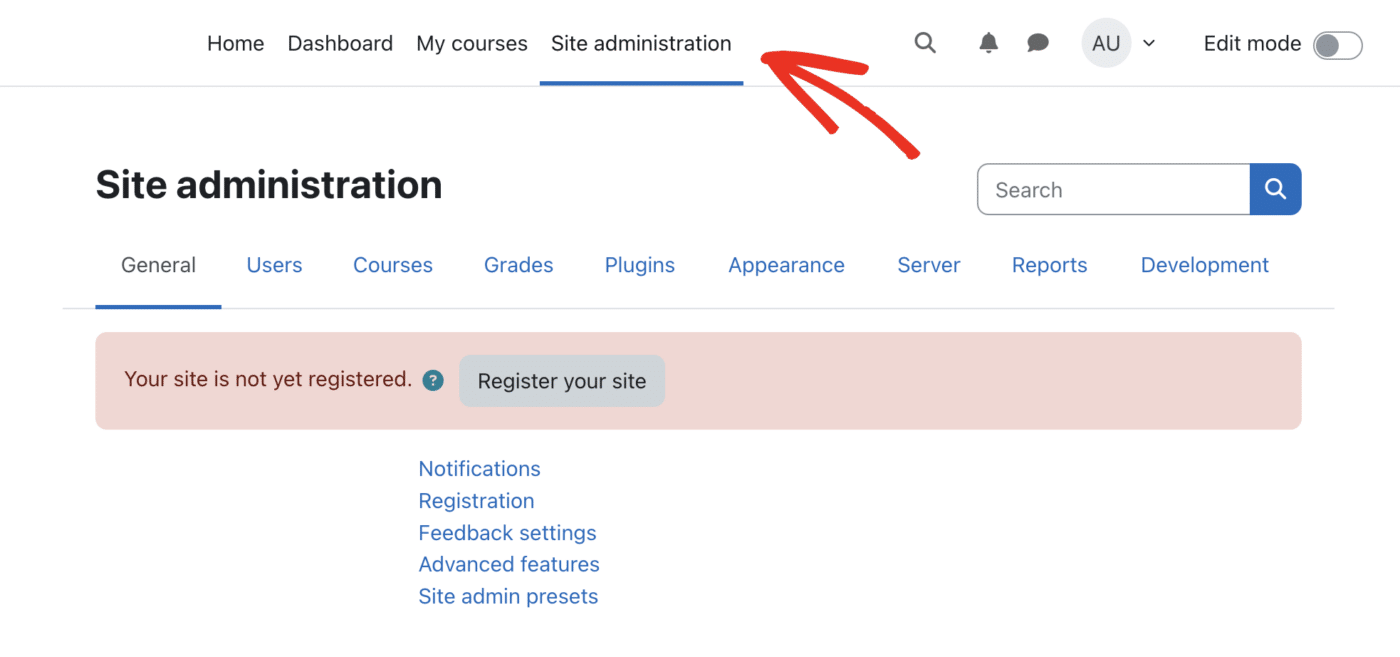
You’ll see a warning message that your site is not yet registered.
While optional, registering your Moodle site with moodle.org offers several benefits:
- Visibility: Your site can be listed on the official Moodle Sites directory (https://moodle.org/sites/), making it discoverable by other educators and potential users.
- Security Updates: You’ll receive timely notifications of important security patches or updates directly from the Moodle team.
- Community: You become part of the global Moodle community, where you can connect with other users and get support.
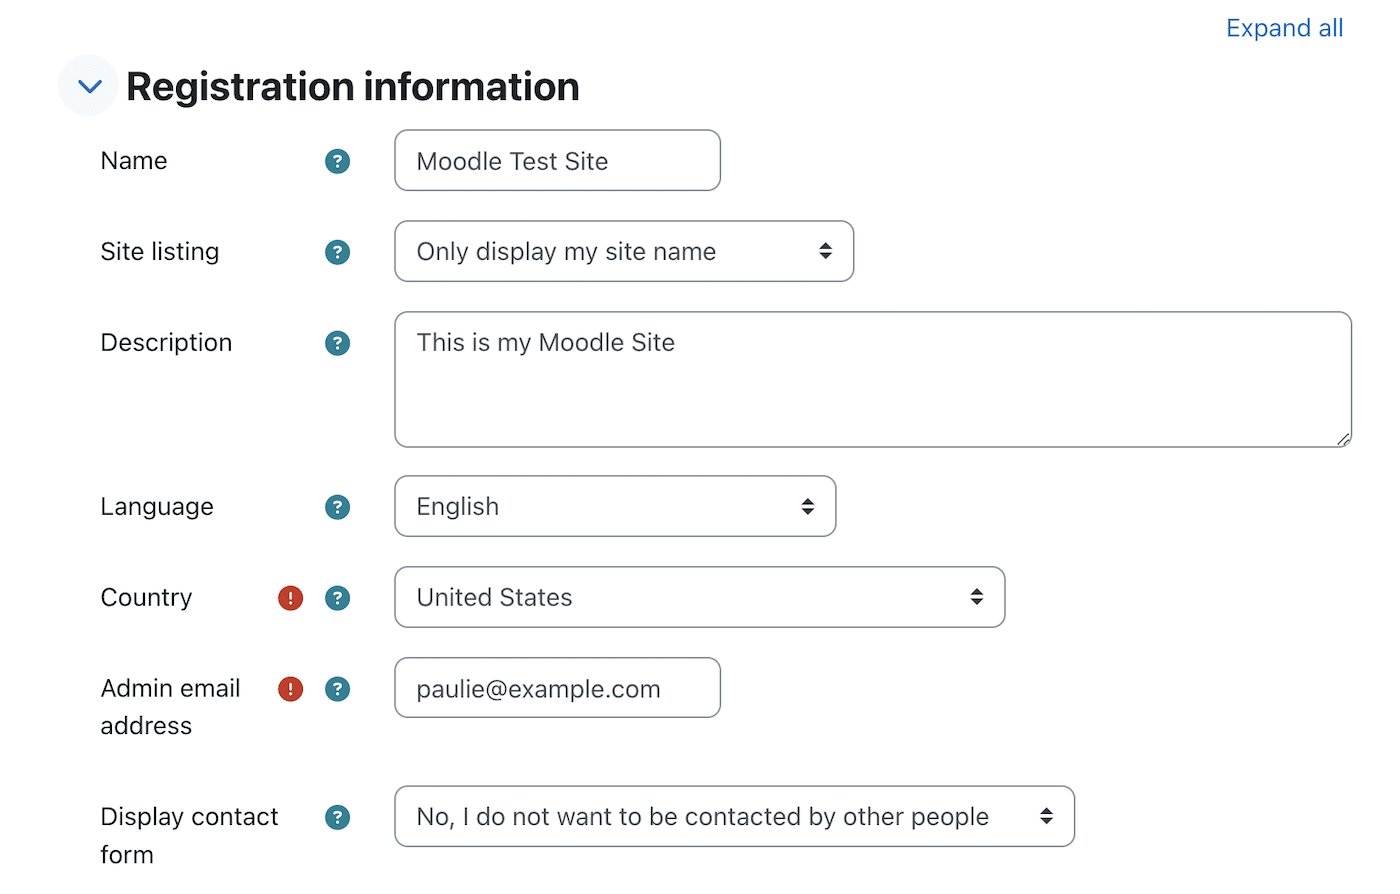
Click the Register your site button and complete your site information.
Moodle Email Configuration
Moodle can send emails for course enrollments, notifications, forum updates, and more. While it has a built-in mail function, switching to a custom SMTP service provides substantial advantages.
Why use custom SMTP?
Moodle relies on email heavily for essential communications, but its default email sending method can be unreliable. Using custom SMTP for your Moodle emails helps to ensure your emails reach their intended recipients and offers several benefits.
- Improved deliverability and reliability: Dedicated SMTP providers like SendLayer specialize in email delivery, optimizing infrastructure to reach user inboxes successfully. They manage technical complexities, so you don’t have to worry about your important notifications getting lost.
- Avoidance of spam filters: Established SMTP services have good reputations, minimizing the chances of your Moodle emails being flagged as spam. This ensures that crucial information reaches your users.
- Branding and professionalism: Use an email address that matches your domain name, which reinforces your institution’s identity and builds trust.
Why Choose SendLayer for your Moodle Emails?
You can choose any SMTP email provider to manage your Moodle emails, but we recommend SendLayer if you’re looking for affordability, ease of use, and excellent deliverability.
- Beginner-friendly: SendLayer’s intuitive interface and clear documentation make it exceptionally easy to set up and manage, even if you’re not a technical expert.
- Cost-effective: SendLayer has generous free plans for smaller Moodle sites and affordable pricing that scales with your email sending volume, ensuring you get the best value.
- High deliverability: SendLayer focuses on maintaining strong sender reputation and implements best practices in email infrastructure to ensure your Moodle messages reach their intended inboxes.
- Reliable Support: SendLayer provides accessible and helpful support channels should you have any questions or need assistance.
- Extra Features: SendLayer also allows you to track essential email stats like opens, clicks, and bounces, providing you with insights into your Moodle communications.
Obtaining Your SMTP Credentials
If you’ve chosen SendLayer as your SMTP provider, you can easily find the email credentials you need in your dashboard.
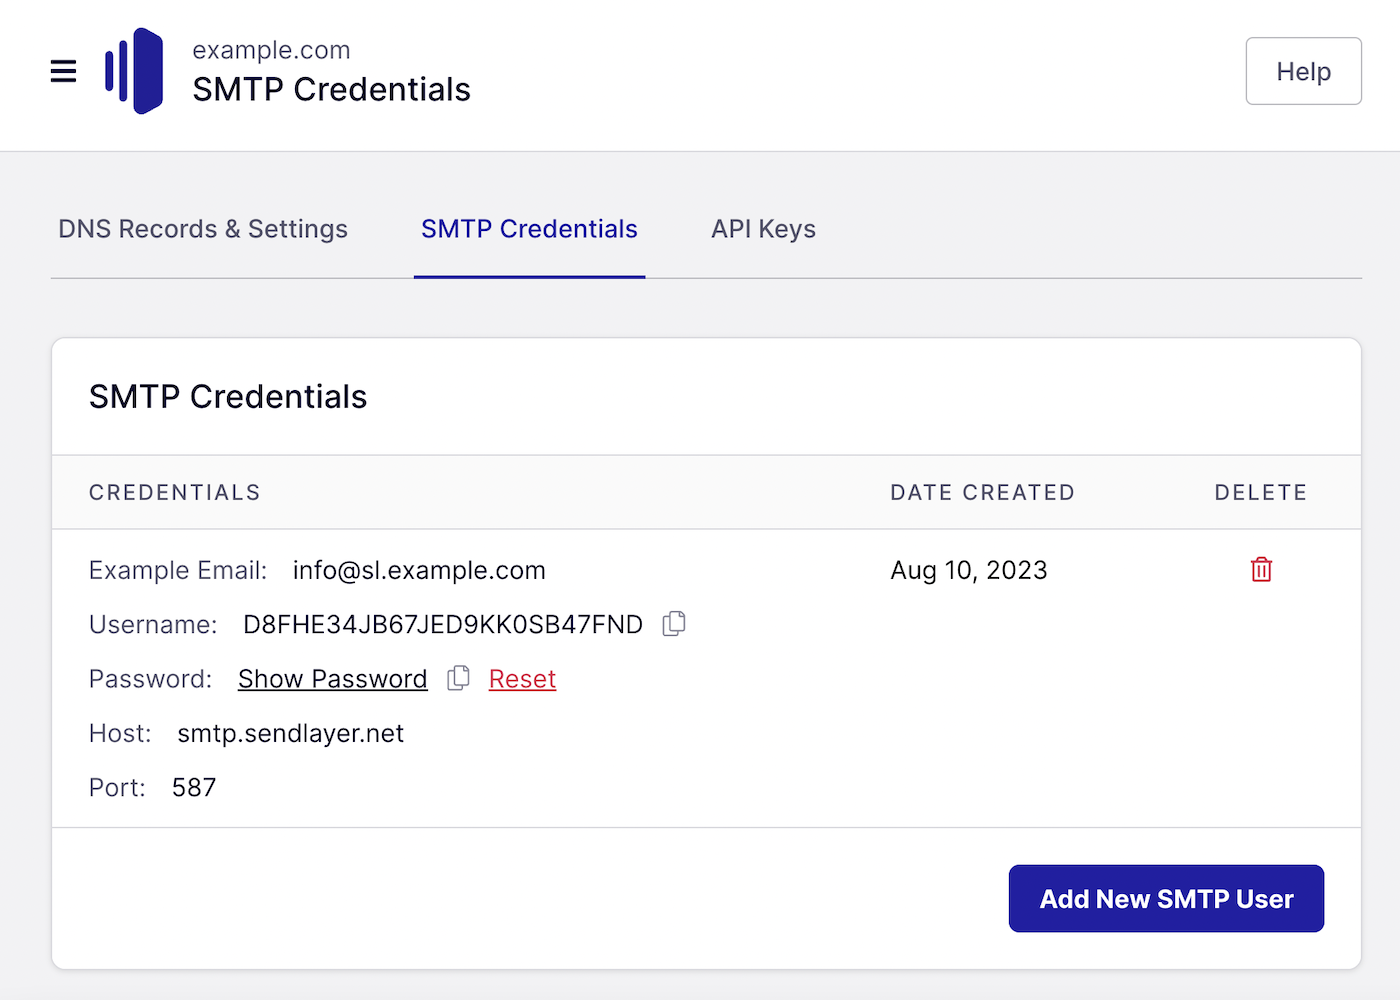
If you’re using another email provider, you may need to contact support to ask for the following details:
- SMTP Hostname: The server address to use in Moodle
- Port: The designated port
- Encryption: The encryption protocol used
- SMTP Username: A unique username for authentication
- SMTP Password: The associated password
Configuring Moodle’s Email Settings
You can access Moodle’s email settings on the Server tab of the Site Administration dashboard, in the Email section.
Click the Outgoing mail configuration link to enter your SMTP credentials.

Here, you can enter your SMTP credentials as follows:
- SMTP hosts: smtp.sendlayer.net:587
- SMTP security TLS
- SMTP Auth Type: LOGIN
- SMTP username: copy and paste the username from your SendLayer dashboard
- SMTP password: copy and paste the password from your SendLayer dashboard
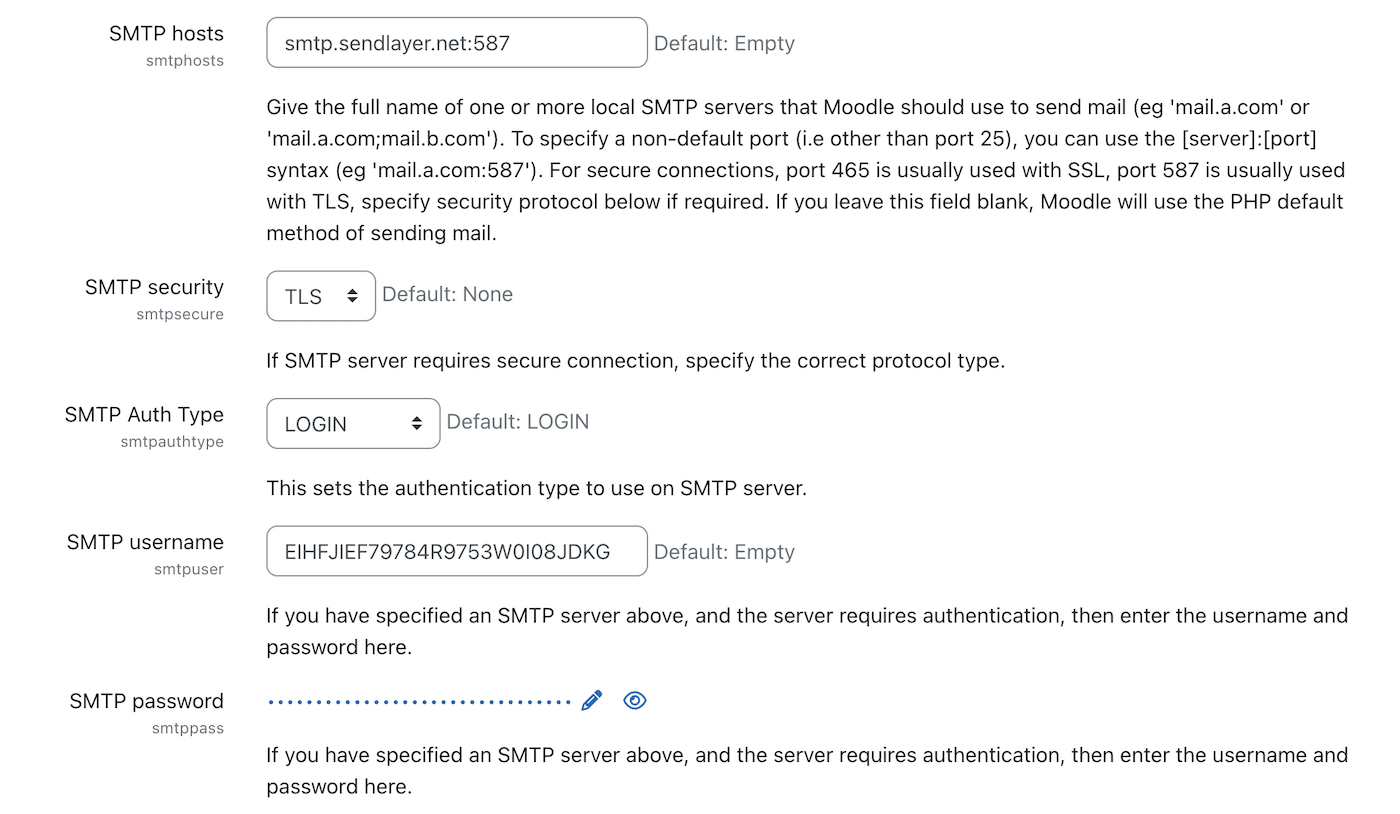
Scroll down and click the link to test outgoing mail configuration to ensure you’ve set up custom SMTP email correctly.
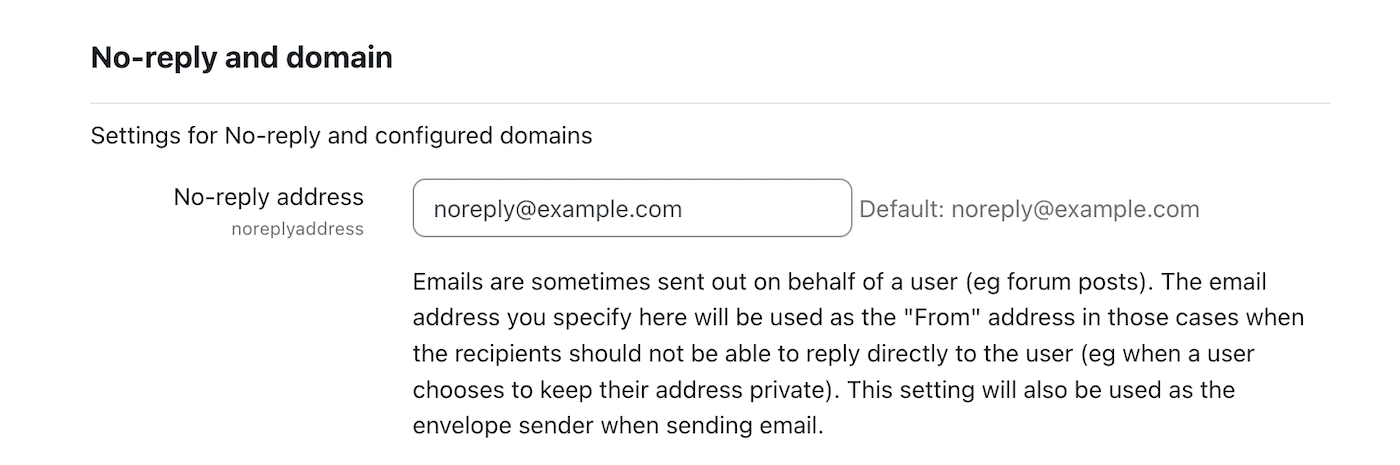
Setting a “No-Reply” Address
A “no-reply” address (like [email protected]) is specifically designed for sending outgoing emails while discouraging direct replies. It signals to recipients that the message is automated or informational, and responses aren’t expected.
You can set up a dedicated “noreply@” address for your Moodle notifications to avoid clutter in your support inbox. However, if you choose to set this up, you should always make sure that it’s clear how users can get in touch if they need help.
Allowed Email Domains
Moodle’s “Allowed email domains” setting lets you control which email domains are permitted for specific actions within your site. For example, you might restrict forum posting to only your institution’s official email domain.
This helps limit potential spam attempts from external addresses. It can also be a way to ensure users register with a valid email address at your school or institution. However be aware that this will prevent students from registering using personal email addresses.
Managing Courses and Users
Now that your Moodle site is configured and you’ve ensured deliverability for your email notificaitons, it’s time for the core elements: adding courses and enrolling users.
Creating Courses
Moodle provides flexibility in how you structure your courses. Here’s a quick overview:
- Course Categories: Organize your courses into logical categories (e.g., by department, subject area, or level).
- Individual Courses: Within each category, you’ll create individual courses. Provide a clear name, description, and consider the format that best suits your content.
- Course Content: Start populating your courses with activities (quizzes, assignments, etc.), resources (files, links), and build out the structure according to your lesson plans.
Managing Users
There are several ways to get users into your Moodle courses:
- Manual Enrollment: Administrators can add users one by one to specific courses.
- Self-Enrollment: Enable a self-enrollment method so students can add themselves with a course key.
- Bulk Upload: Use CSV files to upload and enroll groups of users.
- Cohort Sync: If you have pre-defined groups (cohorts), they can be automatically synced into courses.
Moodle’s documentation offers in-depth guides on both course creation and user management. But once your site is set up, take the time to explore, and you’ll soon be on your way to having a fully functioning online course platform.
That’s it! Now you know how to set up Moodle
Next, would you like to understand what a list-unsubscribe header is? Check out our tutorial on adding a list-unsubscribe header to your emails for more information.
0 comment on "How To Install and Configure Moodle (Step-by-Step Tutorial)"