
WooCommerce sends many automated emails, such as order confirmations, receipts, and password resets. By default, they’re plain, unbranded, and easy to miss. The good news is you can customize all of them to match your store.
There are three ways to do it: WooCommerce’s built-in settings, a drag-and-drop customizer plugin, or editing the template files directly. I’ll walk through all three below, from easiest to most advanced.
One thing first. Customizing your emails only helps if they actually arrive. WooCommerce sends emails via WordPress’s default wp_mail() function, which often ends up in spam or fails to send.
So I’ll also show you how to route them through a dedicated SMTP service before we style them.
How Do I Set Up Email in WooCommerce?
The WooCommerce plugin includes an email settings page where you can set basic email options such as the From name and email address, and adjust the color and image used in the email templates.
However, to ensure you and your customers receive store notification emails, WooCommerce recommends connecting your email address to your domain and using a dedicated SMTP email server.
The easiest way to do this is to sign up for a transactional email provider like SendLayer and install a third-party SMTP plugin like Easy WP SMTP to send your WordPress emails reliably.
How To Set Up and Customize WooCommerce Emails
After completing this tutorial, you’ll have successfully configured your WordPress site and WooCommerce to send emails via a reliable SMTP service.
You’ll also be able to see your WooCommerce email logs so you can see at a glance which emails were sent from your site, opened, and clicked.
Finally, we’ll go over how to customize your WooCommerce emails to make them more consistent with your brand.
Before you get started, you’ll need a WordPress site with WooCommerce installed. If you’re ready, let’s go ahead and set up your WooCommerce Emails!
Step 1: Sign Up for an SMTP Email Provider
WooCommerce recommends signing up for an account with a dedicated SMTP email provider, as this is more reliable than relying on the mail-sending function of your own server.
A dedicated SMTP service lets you send emails from your own domain and connect your email to external websites and apps like your WooCommerce store.
Create a SendLayer Account
You can use any SMTP provider, but we recommend SendLayer. SendLayer is an SMTP email delivery service that’s designed to be easy to set up, reliable, and powerful. Plus, it offers affordable plans, starting at just $5 a month, which are more accessible to small businesses than some other SMTP providers
SendLayer’s superior SMTP and API email relays ensure your emails hit the inbox, instantly every time. Designed specifically for sending transactional emails from platforms like WooCommerce, SendLayer also includes a detailed email log, open and click analytics, an email suppression list, and other useful features to ensure optimal deliverability and easy email management.
If you want to try out SendLayer, you can sign up for a free account to get started. The simple interface and detailed documentation mean setup is a breeze and you can verify your domain and start sending emails within minutes.
For more guidance on how to sign up for SendLayer, you can follow this quickstart guide on creating a new account.
Configure Your SendLayer Account and Authorize Your Domain
Once your SendLayer account is up and running, you’ll need to connect your domain so that SendLayer can send emails on your behalf.
First, add the domain of your WooCommerce store to your SendLayer account. Click the Add Domain button in the top right to start the configuration.

Type in your domain and click the Add Domain button.

SendLayer will then generate 5 new DNS records for your domain. These records will set up the authentication protocols SPF, DKIM, and DMARC, and specify an email subdomain to protect the reputation of your domain. These records ensure emails from your WooCommerce site aren’t marked as spam.

You will need to add SendLayer’s DNS records to your domain. To set this up, you’ll need to access the DNS records of your domain. You can usually find these records in your domain management dashboard. Our guide to authorizing your domain includes specific instructions for popular hosting providers, or you can contact your web host if you’re having trouble finding your DNS settings.
Once you’ve added the records to your domain, go back to SendLayer, tick the box, I have added these DNS records and am ready to proceed, and click the Verify DNS Records button.

Before you can use your SendLayer SMTP settings, make sure your domain has been authorized. You can do this by clicking on Settings in the sidebar menu of your SendLayer dashboard and scrolling down to the DNS Records & Settings section.
If your domain is authorized and ready to send email, you should see a green checkmark in the Status column.

Note: changes to your domain DNS settings can take time to propagate across the internet. You may need to wait up to 48 hours until SendLayer can verify your DNS settings.
The next step is to integrate your WooCommerce site with SendLayer to send your site emails.
Step 2: Install a WooCommerce SMTP Plugin
To send emails from WooCommerce or any WordPress plugin, you’ll need to install an SMTP plugin.
You can use any SMTP plugin for this, but we recommend Easy WP SMTP. This plugin is built to be the simplest WordPress SMTP plugin to set up, and its easy setup wizard means that you can set up your WooCommerce emails within just a few minutes.
Download and Install Easy WP SMTP
You can install the plugin from within your WordPress dashboard. Navigate to Plugins » Add New and search for “Easy WP SMTP”. Then, click the Install Now button next to the plugin.

Wait a few moments for the plugin to install. Once it’s finished installing, click the Activate button to activate the plugin on your site.

And that’s it! The Easy WP SMTP plugin should now be installed and ready to use on your site.
Configure Easy WP SMTP Settings
In your WordPress dashboard, navigate to Easy WP SMTP » Settings.

This will take you to the plugin settings page, where you can connect it to SendLayer. As SendLayer and Easy WP SMTP are designed to work together, this process is very quick and simple.
Under Mailer Settings, choose SendLayer.

To connect to SendLayer, all you need is the API Key for your SendLayer account. You can find your API Key by switching to the browser tab where you have your SendLayer dashboard open and going to Settings » API Keys.

Click the clipboard icon next to your API key to copy it. If you have multiple API keys or you want to use SendLayer with other apps, see our guide to managing your API Keys.
You can now paste your key into the API Key field in your Easy WP SMTP settings.

Scroll down again until you see the General Settings section.
The Force From Email option is optional but we recommend enabling it. This will set the same address as your From Email across the whole site for all plugins (including WooCommerce).

Scroll down further to find the From Name field. You can set this to any name that you prefer. You may also want to enable the Force From Name Replacement option if you want to use the same name for all emails sent from your site.
However, if you want your WooCommerce emails to come from your shop name and other site emails to come from another name, you may prefer to leave this option disabled.


Give yourself a pat on the back because your WordPress and WooCommerce SMTP connection should now be active.
Test Your WordPress SMTP Connection
Before we finish, it’s a good idea to send a test email to make sure everything is set up correctly.
You can easily do this by navigating to Easy WP SMTP » Send a Test.
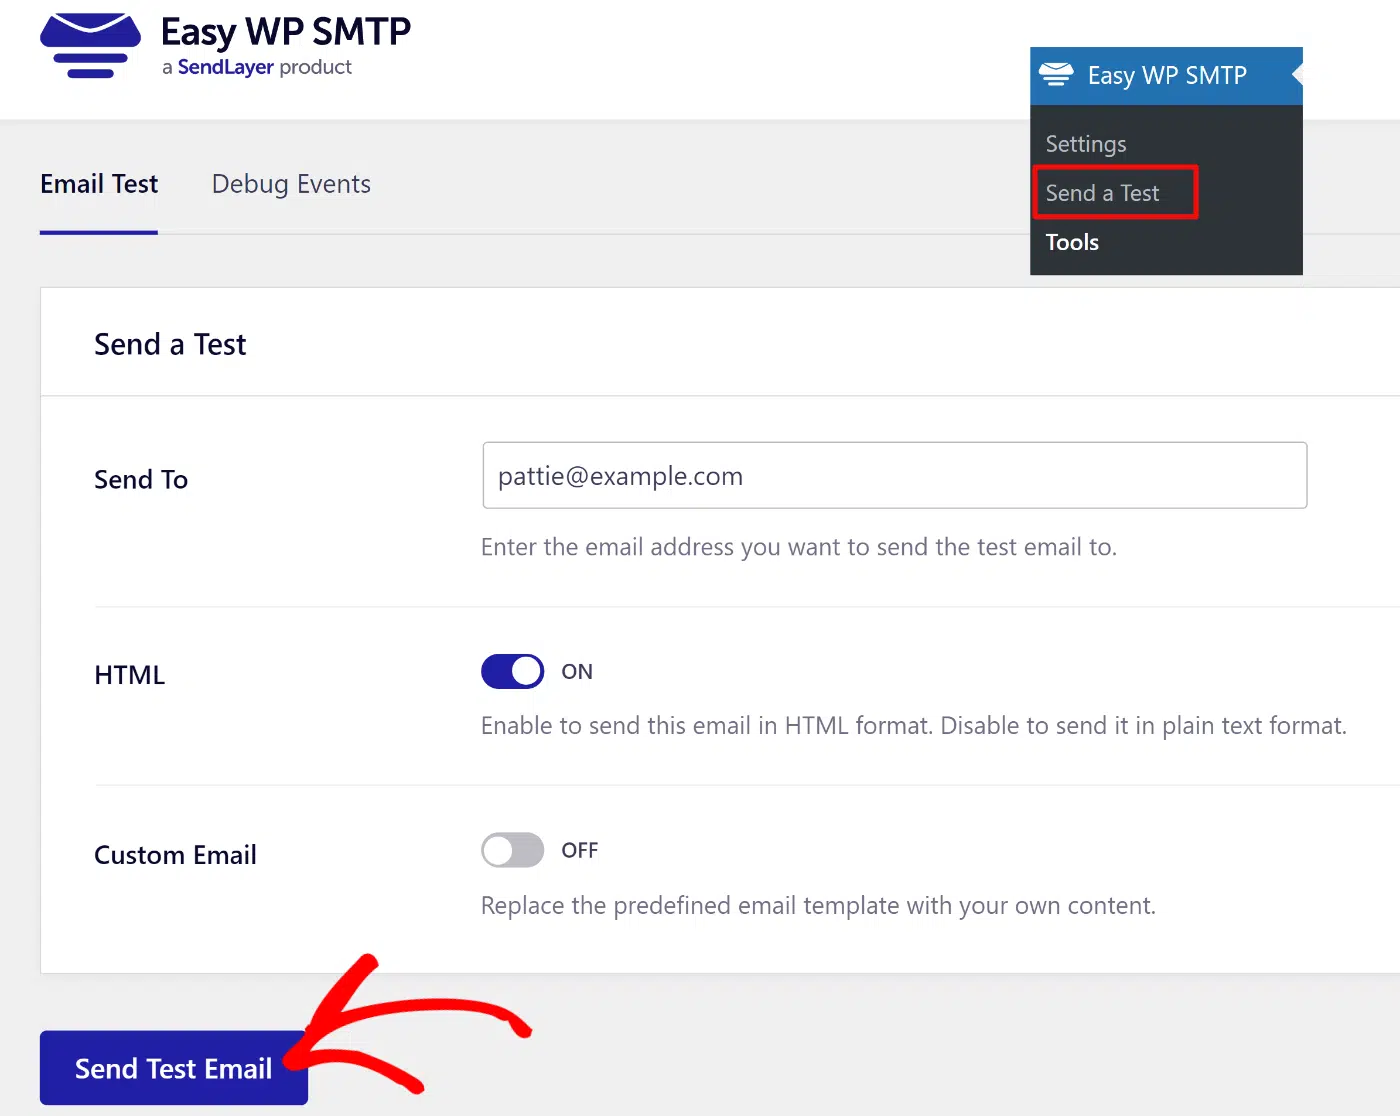
After clicking the button, you should see a notification appear on the top of the page confirming that the email test was successful.

You should also make sure you received the test email. Check your inbox to ensure the email arrives. In most cases, this should take only a few seconds.

Once you’ve received the test email, you’re all set! But if you want to make extra sure that everything is working ok, you can also send a test WooCommerce email.
The easiest way to do this is to place a dummy order on your store. To avoid needing to make a payment, you can temporarily activate Cash on delivery or Check payments as a payment option.
You can find this setting in WooCommerce » Settings » Payments

Once you’ve activated an alternative payment option, you can go to the front end of your site and complete checkout to place an order.
When you’ve completed the order, check your inbox to make sure you received a new order notification from WooCommerce.

Now you’re confident your WooCommerce emails are being delivered, you can go ahead and make some changes to how they look.
Step 3: Customize Your WooCommerce Emails
WooCommerce comes with some basic customization options built into the plugin. You can find these settings by navigating to WooCommerce » Settings » Emails in your WordPress dashboard.
There are three ways to customize WooCommerce emails. Here’s how they compare, so you can pick the right one before you start:
| Method | Best for | Effort | Flexibility |
|---|---|---|---|
| Built-in WooCommerce settings | Logo, colors, footer text, subject lines | Low | Basic |
| Customizer plugin (drag-and-drop) | A fully branded design with no code | Low–medium | High |
| Template file overrides (code) | Full control, custom layouts and logic | High | Full |
Most stores only need the built-in settings or a plugin. Reach for template code when you need something the other two can’t do.

Customize WooCommerce Emails Without a Plugin
If you’re comfortable with code, you can edit the email templates directly. WooCommerce stores them in the plugin folder at woocommerce/templates/emails/.
Don’t edit those files in place, because an update will overwrite them. Instead, copy the template you want into your theme, keeping the same folder structure:
yourtheme/woocommerce/emails/For example, copy customer-completed-order.php into yourtheme/woocommerce/emails/customer-completed-order.php, then edit your copy. WooCommerce loads the theme version automatically, and your changes survive plugin updates. Use a child theme so they survive theme updates too, and test on a staging site before going live.
Customizing WooCommerce Order Emails
The first thing you’ll see is a list of all the email notifications that WooCommerce generates and sends.

The email notifications that WooCommerce sends out and the purpose of each email is as follows:
- New order: Generated and sent to the store admin when a customer places a new order.
- Cancelled order: Sent to customers to confirm that their order has been cancelled.
- Failed order: Generated if an order placed by a customer was not successful.
- Order on-hold: A notification sent to customers if their order is on hold due to pending, cancelled, or failed order status.
- Processing order: An email containing the order details that is sent to customers after the payment has been processed.
- Completed order: This also acts as a shipping notification to inform customers that their order is complete.
- Refunded order: A notification sent to customers when their payment for an order has been refunded.
- Customer invoice/order details: A message that is sent out manually for orders that are not paid for directly with details on how to make payment.
- Customer note: If you add a note to an order, this information is emailed to the customer.
- Reset password: Includes a password reset link for customers who are unable to log into their account.
- New account. A welcome email sent to customers when they register for an account on your store.
For each email, you can see the name of the email, whether it’s enabled or not, if it’s set to display as HTML or plain text, and the recipient of the email.
To adjust the text of each email, click the Manage button. This will take you to a screen where you can:
- Enable or disable the email (disabling it means it will not be sent automatically by WooCommerce and you’ll have to send it manually from the dashboard.)
- Set the email type as HTML, plain text, or multipart.
- Change the recipient’s email address
- Change the email subject, heading, and optimize email content.
You can also view the code version of the email template being used and see the file path so you can override the template file with a new template if you wish.
If you go back to the main email settings page, you can adjust the general email settings that are used for every email.
Scroll down to the Email Sender Options

Here you can adjust the From name and email address of emails sent from your WooCommerce store. However, to ensure deliverability, you should make sure the email address matches the domain you authenticated in SendLayer (which should also be the domain of your WooCommerc site.)
Customizing WooCommerce Email Templates
Scroll down until you see the Email Template options. Here you can make some basic customizations to the appearance of your WooCommerce emails.

You can add a header image if you wish, adjust the footer text, and choose your own background color and text colors.
You can see how your customized template looks by clicking the “Click here to preview your email template” link.
The default email template looks like this:

For most online store owners, adding a custom graphic and changing the colors to match their brand will be sufficient customization.
Customize WooCommerce Emails Without a Plugin
If you’re comfortable with code, you can edit the email templates directly. WooCommerce stores them in the plugin folder at woocommerce/templates/emails/.
Don’t edit those files in place, because an update will overwrite them. Instead, copy the template you want into your theme, keeping the same folder structure:
yourtheme/woocommerce/emails/For example, copy customer-completed-order.php into yourtheme/woocommerce/emails/customer-completed-order.php, then edit your copy. WooCommerce loads the theme version automatically, and your changes survive plugin updates. Use a child theme so they survive theme updates too, and test on a staging site before going live.
Advanced WooCommerce Email Customization
If you want access to more customization options, you can use a plugin like ThemeHigh Email Customizer for WooCommerce or YayMail for a drag-and-drop email builder with more styling options and the option to use custom CSS.
Some of these plugins also enable you to send additional emails from WooCommerce, such as abandoned cart emails or coupon codes to reward customer loyalty. There are also plugins designed specifically for email marketing with WooCommerce such as MailPoet, which offers automation of sales newsletters and other marketing emails.
If you’re comfortable with coding, you can also customize each WooCommerce email template file directly to create fully custom transactional email templates . However, this option is only recommended for advanced users, and you should test your templates to ensure they display correctly in all the main email clients.
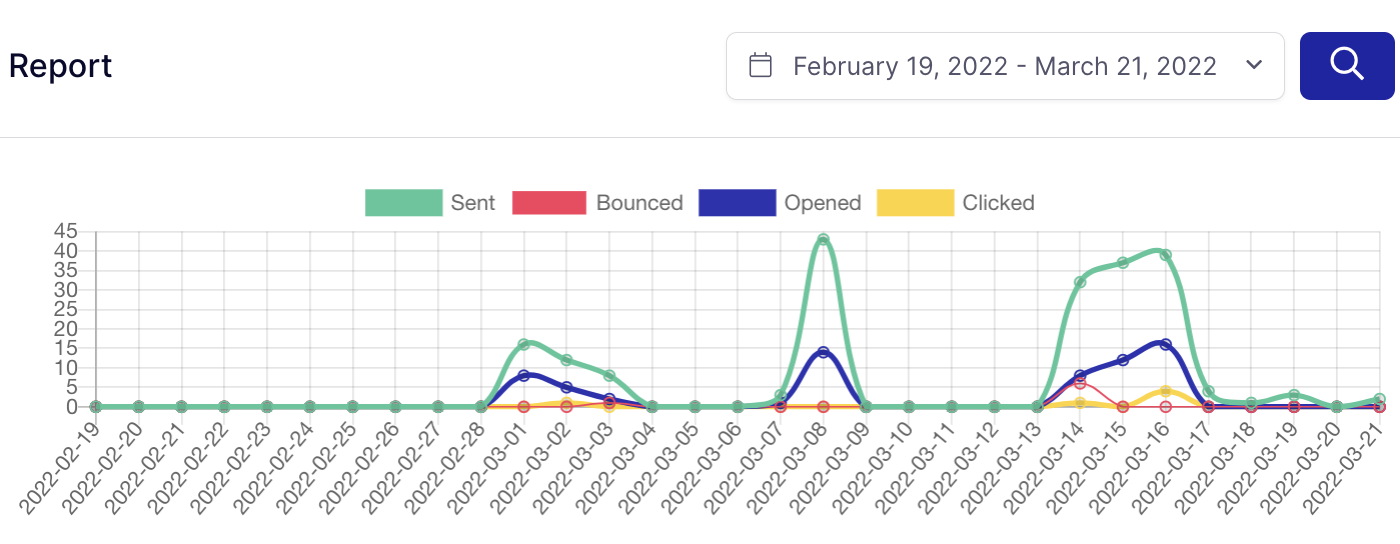
Monitoring Your WooCommerce Emails
Easy WP SMTP includes an email log so you can see all the emails that have been sent from your WooCommerce store and other plugins installed on your WordPress site.
To see your email log, navigate to Easy WP SMTP » Email Log

Here you can see all the emails that have been sent to your site, who they were sent to, their delivery status, and whether they were opened or clicked.
You can search for individual emails or email addresses, view the content of each email, and even resend emails directly from the dashboard.
This feature comes in really handy for customer service and troubleshooting issues with your transactional emails.
Ready to Send WooCommerce Emails!
Congratulations! You’ve now set up and customized your WooCommerce emails to ensure they look great and reach your customers’ inboxes without any waiting around.
Web users expect instant notifications when they shop online, so taking the steps in this tutorial to configure your WooCommerce emails correctly is sure to increase trust in your brand and boost sales in the long term.
FAQs About WooCommerce Emails
Here are some of the most common questions our support team is asked about setting up emails in WooCommerce:
Can WooCommerce send emails?
WooCommerce uses Wordpress’s native email functionality, which uses the PHP wp_mail() function. This function looks for a mail server on the server the website is hosted on and instructs it to send the email. This doesn’t always work because some web hosts disable the function. Even if it does work, it’s not a very reliable way to send emails and isn’t recommended if your site is generating a lot of orders and emails. It’s better to use an SMTP plugin to ensure the deliverability of emails from your WooCommerce store.
What is a WooCommerce email template?
WooCommerce email templates consist of a pre-built email layout and style that are used as a template when generating emails. You can adjust your WooCommerce email templates on the email settings page or by using a third-party plugin.
How do I find my WooCommerce email address?
WooCommerce defaults to your WordPress admin email address. If you’re not sure what this is or you want to change it, you can find it on your WooCommerce email settings page. Certain emails such as New Order emails will be sent to the email address of the website admin or store owner. On the email settings page, you can see this email address and change it if you wish.
Why isn’t WooCommerce sending emails?
If you or your customers aren’t receiving emails from WooCommerce, the first step is to make sure that all relevant emails are enabled for automatic sending. You can find this setting in your WooCommerce email settings as described earlier. Next, you can use an email log plugin like Easy WP SMTP to monitor the emails sent from your site and their deliverability status.
How do I customize WooCommerce emails without plugins?
Use the built-in settings under WooCommerce » Settings » Emails for your logo, colors, and text. For deeper changes, copy the email template files from woocommerce/templates/emails/ into yourtheme/woocommerce/emails/ and edit your copies. That gives you full control with no plugin.
Where are WooCommerce email templates stored?
WooCommerce email templates live in the plugin folder at woocommerce/templates/emails/. To customize one safely, copy it into your theme at yourtheme/woocommerce/emails/ (ideally a child theme) and edit it there, so updates don’t overwrite your work.
How do I set up SMTP in WooCommerce
To set up SMTP email on your WooCommerce store, you’ll need to install an SMTP WordPress plugin. You’ll then need to configure the plugin with details of your SMTP server or transactional email service provider.
That’s it! Now you know how to set up and customize your WooCommerce emails.
Next, would you like to learn why SendLayer sets up a subdomain when you add a domain to your account? Check out our guide on why you should send email from a subdomain for more information.
