
Do you need help setting up your WordPress website?
While completing your website setup can take a while, it’s not as difficult as you think.
In this guide, you’ll learn how to create a WordPress site from scratch, choose a theme, publish content, and configure SMTP so your WordPress emails always reach the inbox.
Is WordPress Easy to Set Up?
Yes, WordPress is easy to set up. Even if you’re a beginner and have never set up a website before, you can still build your site and use WordPress fairly easily. Not only that, you can easily install plugins directly from your dashboard to extend the functionality of your site.
How to Set Up a WordPress Site
In the following steps, you’ll learn to build a complete WordPress site from scratch.
Before we start, we want to make it clear that this WordPress tutorial covers creating a self-hosted WordPress site using the free, open source software available at WordPress.org. This is different from the website builder at WordPress.com, which is less flexible and has a monthly fee.
WordPress Setup Checklist
- Choose hosting
- Install WordPress
- Choose a theme
- Create pages
- Install plugins
- Configure SMTP
- Test email delivery
1. Choose a Web Hosting Service
Before you can create your website, you need a web hosting provider to ‘house’ your website online. The web host is a server that will store your necessary website files to make it run.
There are various WordPress hosting service providers, but we recommend Bluehost. WordPress also officially recommends Bluehost as one of the best WordPress hosts because it’s super affordable and incredibly easy to get started with.

Visit the Bluehost WordPress hosting page and scroll down to see the plans.
You can choose any plan that suits your needs. All Bluehost plans, besides the Basic plan, include free SSL and a free domain name, so you won’t have to purchase it separately.
Bluehost also offers managed WordPress hosting, which includes regular maintenance, backup, and updates to save you time.

Once you’ve selected your plan, you’ll need to create a domain. The domain name is your website address that people will need to type to visit it.
We recommend using a .com domain, keeping the name short and memorable (and preferably matching your brand or company name).
After you’ve chosen a domain name for your site, click on the Next button.

Bluehost will now require you to enter your account and payment details to complete the purchase of your hosting plan.

When you’ve made the purchase, create the password for your Bluehost account. Your Bluehost account will now be ready.
Great!
With the domain name and web hosting sorted, it’s time to install WordPress.
2. Install WordPress
One of the best things about Bluehost is that it installs your WordPress site for you as soon as you log into your Bluehost hosting account dashboard for the first time.
After you’ve created your password, Bluehost will redirect you to the login screen. Enter your account credentials here to log into your dashboard.

Once you log in, you should see a Create your Website button at the bottom. Press this button to start the installation process.
You may see a bunch of steps at this stage. We recommend pressing the Skip this step button at the bottom to skip through these steps until you reach your Bluehost dashboard. It’s better to get some practice customizing your website from within your WordPress dashboard now so you can easily make additional changes later as your site grows.
When you reach your Bluehost dashboard, click the Log into WordPress button.

This will take you to your new WordPress site’s admin menu while finalizing your WordPress installation.
It’s time to start customizing your site!
3. Select a Theme for Your Site
Adding a theme to your WordPress site is one of the most crucial parts of the website-building process. The overall appearance of your site will be determined by the theme you’re using.
If you visit the frontend of your website at this stage, you’ll see the default WordPress theme (Twenty Twenty-Five) looking something like this:

While you can use the default theme, it’s a good idea to explore available themes and personalize your website.
Once you’ve logged into your website, hover your cursor over the Appearance item in the left sidebar menu and click on Themes.


You can browse thousands of free themes on this page. We’re going to use the Astra theme for demonstration in this tutorial, but you’re free to choose any that works for you. Later, you may want to explore some premium themes that offer extra features and flexibility.
When you’ve found the theme you want to use, hover your cursor over it and press the Install button.


Excellent! The theme is installed on your site. Now, it’s time to customize it. Go ahead and click the Customize button under Appearance in the sidebar menu.

This will take you to your site’s homepage, allowing you to edit different elements of your page, including adjusting colors, fonts, and spacing.

When you’re happy with your page’s appearance, press the Publish button on the top of the left-hand pane.
Some themes also allow you to edit in-page content directly from the Theme Customizer, but Astra doesn’t support this feature.
But there’s no need to worry. You can easily edit all the content and sections of your website from the WordPress editor.
4. Configure Email Settings
Unfortunately, WordPress’s default email settings often lead to delivery failures. WordPress uses the PHP mail system by default for its email function, which is a slow, outdated, and unreliable method of delivery.
To eliminate email delivery issues from your site, we strongly recommend setting up SMTP in WordPress. SMTP is a superior method for sending emails because it adds authentication to your messages. This allows mail servers to verify the authenticity of your emails, so they always land directly in the inbox.
I’ll show you how to configure your email settings properly for your new WordPress site.
How do you set up WordPress SMTP?
Setting up SMTP in WordPress involves the following steps:
- Install an SMTP plugin
- Choose an email provider
- Authorize your domain
- Add your API key
- Send a test email
Install Easy WP SMTP
The first thing you need to do is to install Easy WP SMTP. It’s a WordPress plugin that allows you to install an SMTP email service to your site.
To install the plugin, open your WordPress admin area and click on Plugins » Add New. Then, search for Easy WP SMTP and click the Install Now button next to the plugin.

The plugin will take only a few seconds to install. Once it’s finished installing, the same button you pressed above should now read “Active“. Press this button to activate the plugin on your site.

Great! The Easy WP SMTP plugin should now be ready on your site.
Before we move on to configuring Easy WP SMTP for your site, we must ensure we have an active account with an SMTP email provider.
Create a SendLayer Account
Easy WP SMTP supports several mailer services that will fix your deliverability issues by adding SMTP authentication. You’re free to choose any of the supported mailers, but we recommend using SendLayer.
SendLayer is the easiest mailer to set up, is exceedingly reliable, and is super affordable for small businesses.
If you don’t already have a SendLayer account, please see our doc guide on getting started with SendLayer.

After you’ve created your account, the next step is to get your domain authorized.
Authorize Your Domain in SendLayer
Domain authorization is vital for ensuring successful email delivery and avoiding the spam folder. An authorized domain allows email servers to verify that you’re the legitimate owner of that domain. As a result, your emails are sent without any obstacles and are readily accepted as trustworthy.
To authorize your domain, first, log in to your SendLayer account. Once you’ve done that, you’re ready to begin the domain authorization process. You can see our detailed guide to authorizing your domain for help.
In the next step, we’ll connect your site with SendLayer using the Easy SMTP plugin.
Configure Easy WP SMTP Settings
Return to your WordPress dashboard and hover your cursor over the Easy WP SMTP icon to expand the menu options, and then select Settings.

This will take you to the plugin settings page, where you can configure a mailer to send your outgoing WordPress emails through.
Click on SendLayer to see additional settings appear.

Connecting to SendLayer only requires you to add your SendLayer account’s API Key. You can find your API Key by switching to the browser tab where you have your SendLayer dashboard open and going to Settings » API Keys.

Pressing the clipboard icon next to the key will allow you to copy it. For more detailed instructions, consult our guide to managing your API Keys.
Once you have the API Key, you can paste it into the API Key field in your Easy WP SMTP settings.

Scroll down further to access the General Settings.
We also recommend enabling the Force From Email option because this will set the same address as your From Email across the whole site, overriding the email settings of other plugins.

Scroll down further to find the From Name field. You can set this to any name that you prefer. You may also want to enable the Force From Name Replacement option if you want to use the same name for all emails sent from your site.


If you followed the steps above correctly, your WordPress SMTP connection should now be ready.
But it’s always wise to test things out first, which we’ll be doing next.
Test Your WordPress SMTP Connection
To test if everything is working as expected with your new SMTP connection, go to Easy WP SMTP » Send a Test.
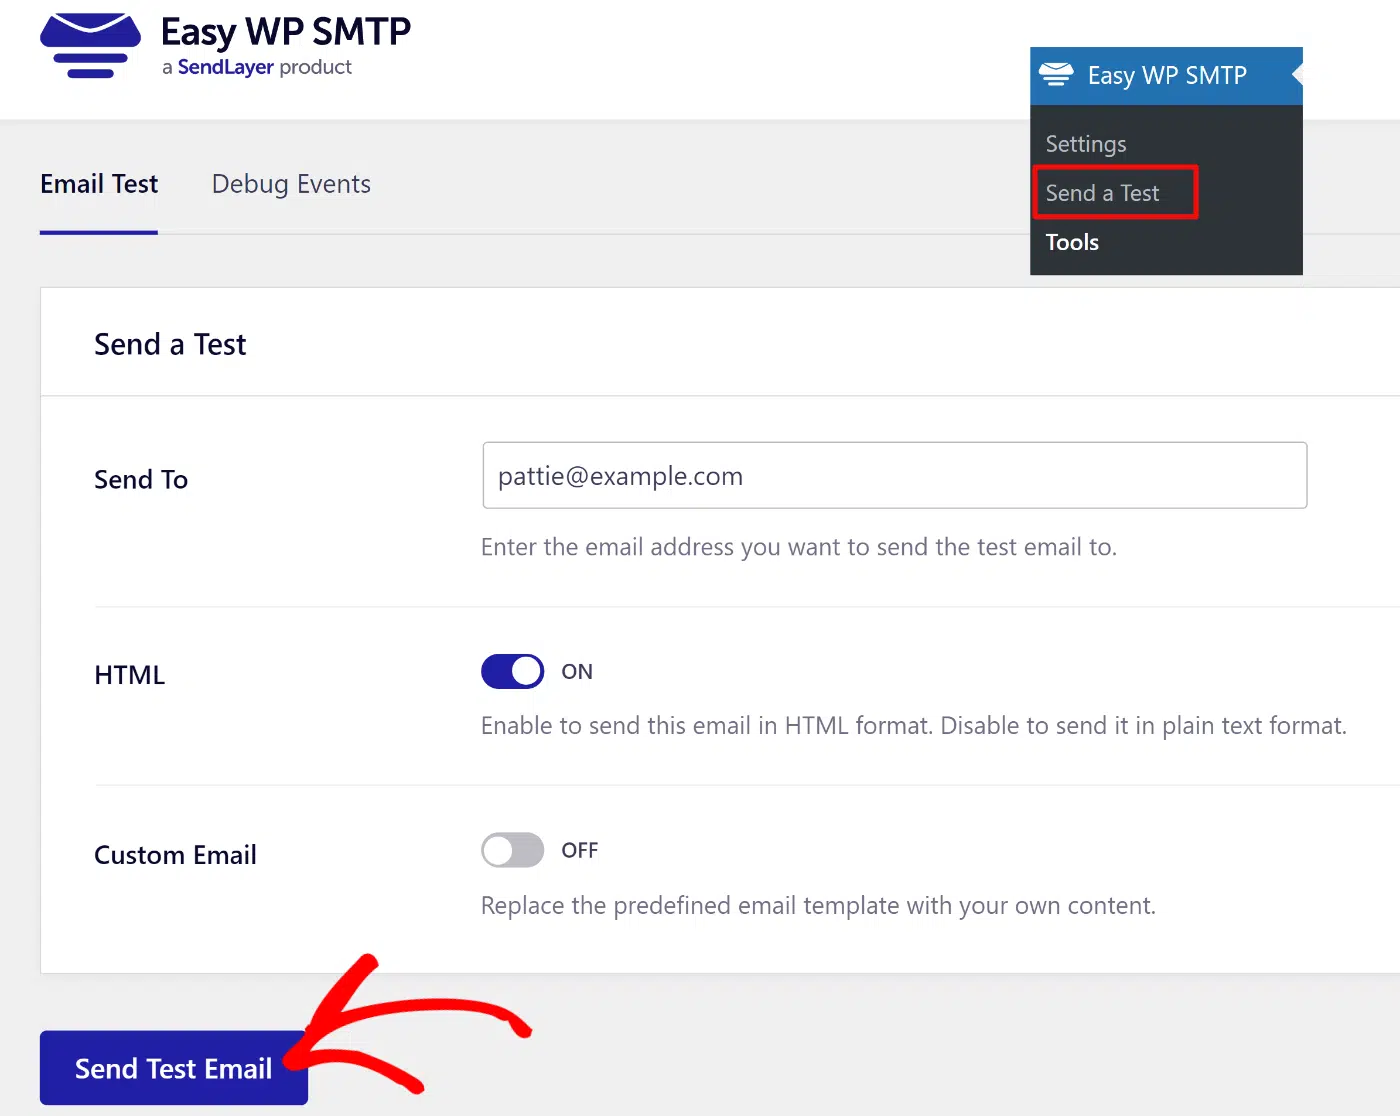
As soon as you press Send, you should see a notification appear on the top of the page confirming that the email test was successful.

To ensure that the email was sent properly, check the inbox of the email address you provided. It should reach you within a few seconds.

Excellent!
Next, I’ll show you how to add new posts and pages to your site.
5. Add Content to Your Posts and Pages
In WordPress, all your content is categorized as one of two types: posts and pages.
Posts are a part of the blog section of your site. This is content that you’ll likely be adding, editing, and updating frequently on your site as it grows.
Pages include content that’s “evergreen,” which is unlikely to change frequently. The homepage, privacy policy, and about us are some of the most common pages found on almost every WordPress site.
The default WordPress theme uses your blog section as the front page of your site. But you’re free to add a separate blog page so that your front page serves as the ‘home’ of your site. You can also remove the blog section entirely if you’d like.
First, let’s add a homepage. To do that, go to your WordPress admin area by hovering your cursor over your site’s name on the top toolbar. Then, click on Dashboard.

Now, go to Pages » All Pages.

If you’re using a theme like Astra, you’ll already see a Homepage created for you here. In this case, you can edit the content of your homepage by clicking on the page with “Front Page” written next to it.

If you don’t yet have a homepage created, then you can press the Add New button at the top to make one.

You’ll find yourself in the WordPress block editor screen now. Here, you can edit any existing content on your page or add new content, including text and media, using appropriate blocks.

Repeat the process to create any additional pages for your site, such as privacy policy, about, blog front page, and any other landing pages.
When you’ve added the needed pages, you can move on to creating your first blog post.
From your WordPress admin area, click on Posts » Add New.

You should see the WordPress block editor open, just as when you created the homepage.

Start by adding a title for your new post, and then move on to adding content with text and images as you need. The sidebar also offers additional options to set a featured image for your post, assign categories, tags, and more.
It’s a good idea to keep saving your draft as you work on it by pressing the Save Draft button on the top. You can also Preview your post to see how it appears from the frontend. When everything is ready, go ahead and press Publish to launch your first blog post.
If you need to learn more about creating posts, see this guide on how to add a new post in WordPress.
6. Customize Site Settings
By this point, you’ve already built the main parts of your site. All that remains is a few tweaks and fine-tuning depending on how you want your site to look.
Changing the Site Title
Firstly, you may want to check your site title and tagline. The site title is your website’s name, like SendLayer is ours.
You can change your site title by opening your WordPress dashboard and navigating to Settings » General.

This will bring you to your WordPress general settings page. The first two fields you’ll find here are Site Title and Tagline. Simply enter the values you need to see for these fields.

Go to the bottom and press Save Changes.
Setting a Homepage
You may also want to change your homepage display settings. Earlier, we showed you how to create a home page. However, some themes use your blog as the front page by default.
If you want to separate your blog from your home page, you’ll have to go to Settings » Reading.

Here, you can choose WordPress to show your latest blog posts on your homepage or display a separate static front page.
If you created a dedicated homepage earlier, select A static page option. Then, use the dropdown next to Homepage to choose the page of your site you want to use as your front page.
Similarly, use the Posts page dropdown to select your main blog page.

As before, make sure to press Save Settings at the bottom when you’re done making these changes.
Customizing Navigation Menus
Next, you may want to create or customize your navigation menu. Most WordPress sites have a navigation menu, allowing visitors to access different sections of your website easily.

The Astra theme automatically adds a navigation menu, but you may still need to customize it or create a new one.
To access the navigation menu settings for your WordPress site, go to your admin area and then select Appearance » Menus.

In the Menu Name field, give a title to your menu and then create the blue Create Menu button at the bottom.


Next, we’ll add a few more plugins to expand the functionality of your new site.
7. Add Useful WordPress Plugins
WordPress has thousands of plugins that allow you to do even more with your site and customize it in various ways.
You can install plugins to create almost any kind of website or add functionality to a basic site. These are a few examples of what you can do with plugins include:
- Speed up your site and make it load faster with a caching plugin
- Build an online store
- Improve the security of your site and protect it from hackers
- Lock web pages as members-only content
- Build an online course
- Automate tasks and workflows
In fact, it’s the availability of so many awesome plugins that makes WordPress the most powerful Content Management System (CMS) on the market.
You can install plugins directly from your WordPress dashboard by going to the Plugins page. You can also download paid plugins from the developer’s official website and then upload them to your site. See this guide on adding WordPress plugins if you need help.
While the plugins you need depend on the specific nature of your website and your business, some are almost vital for almost every type of website.
We recommend starting with the following essential plugins:
- WPForms Lite – A beginner-friendly drag-and-drop form builder for creating fully customized contact forms with dozens of ready-made templates.
- Easy WP SMTP – This free plugin ensures your outgoing WordPress emails reach the recipient’s inbox every time.
- MonsterInsights – Pull only the most useful Google Analytics data for your site to your WordPress dashboard and get insights for each page.
- SeedProd – Create beautiful maintenance mode pages and coming soon pages, and customize the web design of your WordPress site using a drag-and-drop builder.
- All-in-One SEO – Use this plugin to perfect on-page search engine optimization, dominate search results, and outrank competitors.
- Duplicator – Create backups of your WordPress site and restore them at will.
8. Publish Your WordPress Site
Up to this point, you’ve been quietly setting up your website behind the scenes, but it’s not published yet for online users to visit.
It’s really easy to publish your new website. First, log in to your WordPress dashboard. You’ll see a notification on the top stating that your site is currently displaying a coming soon page.
Click on the Launch Your Site link near the end of the notification to publish your new WordPress site.

It’s as simple as that!
FAQs — Setting Up a WordPress Site
Here are some of the most common questions we’re asked about installing WordPress and configuring WordPress emails with SMTP.
Can you create a WordPress site for free?
Yes, you can create a WordPress site for free. WordPress.org allows users to self-host their sites because the WordPress CMS can be installed and used without any charge. However, you’ll still need to purchase web hosting and a domain name separately in order to make your site visible to other visitors online.
Can a beginner build a WordPress site?
Yes, a beginner can build a WordPress site. WordPress can take a while to get used to. But it also has an immense amount of resources available in the form of video guides as well as written tutorials for help. And once you’re familiar with WordPress’s interface, it’s super easy to use and manage your website on your own without any help.
How do I publish my WordPress site?
You can publish your WordPress site by going to your admin area and then pressing the Launch Your Site link on the top notification. Once you do that, your website will go live, and any online user can visit it by typing in your domain name.
Why does WordPress emails go to spam?
WordPress uses the PHP mail() function by default. Many hosting providers disable or limit this feature, which often causes emails to fail or be marked as spam. Fortunately, WordPress SMTP plugins extend the default WordPress behaviour by allowing configuration with SMTP servers and API based providers.
Do WordPress sites make money?
Yes, WordPress sites can be easily monetized in a variety of ways. Thanks to the incredible versatility of WordPress, you can turn your website into a membership site or an eCommerce store or sell digital products, SaaS tools, and anything else you can think of. You can even create a site as a regular blogger and monetize it with advertising and affiliate links. SendLayer itself is a WordPress website, and we earn revenue by selling our mailer service through it.
Does WordPress require coding?
No, it’s not necessary to know how to code to operate a WordPress site. You can build even advanced websites in WordPress and manage them without working with a single line of code. At the same time, you’re free to use code to operate your WordPress site if you’re comfortable with HTML, PHP, and CSS.
How do I resolve ‘WordPress emails not sending’ issue?
To fix your WordPress site’s email sending issue, you’ll need to install an SMTP plugin and set up an SMTP server to handle your site’s email. We’ve created a detailed guide on how to resolve WordPress not sending email issues.
That’s it! Now you know how to set up your WordPress site.
Next, would you like to learn about domain names? For more information, check out our documentation on domain names, which includes information on connecting your domain name to your website and sending emails from your domain.
