Are you looking for a beginner’s PrestaShop tutorial to help you set up an online store? Well, you’ve come to the right place!
PrestaShop is an open source eCommerce platform. It’s highly customizable, supports multiple payment gateways, has built-in marketing tools, and offers unlimited product options, making it an appealing option for small businesses on a budget.
Unfortunately, one of the downsides of PrestaShop is that it’s not as simple to set up as other platforms like Shopify. But don’t worry! I put together this step-by-step guide based on my own experience installing and setting up PrestaShop to help you get your online store up and running in no time.
Introduction to PrestaShop

PrestaShop is not as well known as other open source eCommerce platforms like WooCommerce but that doesn’t mean you should discount it without trying it out for yourself.
The PrestaShop CMS has been around since 2007 and there are currently over 270,000 online stores built on it. PrestaShop is particularly popular in Europe, and is used by some huge corporations including Fujitsu and Ebay.
The main attraction of PrestaShop is that it’s completely free to download and use, making it an attractive option for keeping running costs down. PrestaShop is also purpose-built for eCommerce, which may be preferable if you’re not already familiar with more general alternatives like WordPress.
Prestashop Tutorial: Preparing for Installation
Before you get started, you’ll need to make sure you have everything you need to install and run Prestashop.
Prestashop Hosting
Prestashop needs a server with PHP and MySQL installed. If you plan to run it locally, the easiest way to install everything you need is to run a bundled installation package like XAMPP, which includes the Apache web server.
If you’re choosing a web host for PrestaShop, most PHP-based web hosting is suitable. You can install PrestaShop on shared hosting but a VPS or cloud hosting is preferable for better performance and security.
SSL Certificate
Most websites these days should have an SSL certificate, particularly online stores. If your web hosting does not provide an SSL certificate, you can purchase one or generate a free one (the disadvantage of using a free SSL certificate is that you usually need to regenerate it every 90 days.
Email Provider
Choosing a fast and reliable email provider is essential when you’re setting up an online store.
eCommerce sites generate and send emails to communicate critical information such as user login details, order confirmations, shipping notifications, and payment receipts.
While PrestaShop can be configured to use the PHP mail() function, this is not recommended. PHP mail is unreliable and may even be blocked by some web hosts, preventing these important messages reaching the inbox of your customers.
Instead, I recommend using SMTP mail with PrestaShop so you have the peace of mind your emails will be delivered every time.
If you don’t already have a good SMTP email provider, you may want to consider signing up for a SendLayer account. SendLayer is a transactional email provider, which means it’s designed to meet the needs of online stores and other websites that generate transactional emails.
Using SMTP for your store emails reduces the risk of them ending up in the spam folder. SendLayer also includes extra features such as sending emails from a subdomain to protect your domain reputation and email analytics so you can see exactly when your emails are delivered and opened.
Installing PrestaShop
Many web hosts offer one-click installation of Prestashop, which makes the process really quick and easy. Check in the control panel of your web hosting account or get in touch with the support team to see if this is available.
If easy Prestashop installation is available with Softaculous or Installatron, you’ll just need to provide a name for your website, and an admin username and password, and the installer will do the rest.

For web hosts where this isn’t available or you’re installing PrestaShop on your own server, you’ll need to install manually.
To do this, download the latest version of PrestaShop from PrestaShop.com, upload the .zip file to your server and unzip the file to extract the installation files. Next, you’ll need to create a database for your PrestaShop store, before running the installation assistant in a web browser, which will walk you through the rest of the installation. You can find detailed instructions for manual installation on the PrestaShop website.
Configuring Your Store
Now PrestaShop is installed, your store should be up and running!
PrestaShop comes with sample data so you can get an idea of what your online store should look and work like when you’ve uploaded products.

To continue with configuration, click the Sign in link at the top of the page to access the backend of your store.
Navigating the PrestaShop dashboard
The PrestaShop dashboard is your HQ for setting up and managing your online store, so take some time to explore.

In the top menu, you’ll find a Quick Access menu with links to useful pages, a search bar to find what you need quickly, and a link to view the frontend of your store.
In the side navigation there are various links to different management areas of your site, organized into three main categories:
- Sell: Manage your orders, invoices, shopping cart, product catalog, and customers and access store statistics.
- Improve: Add modules to extend the functionality of your store, customize the design, set shipping preferences, manage payments, and localization options.
- Configure: Basic store setup, product and customer settings, improve SEO, and add and manage users.
The main workspace gives you a handy, at-a-glance overview of how your store is performing, including:
- Traffic and sales
- Current site visitors and active shopping carts
- Pending orders and returns
- Total customers and newsletter subscribers
- Recent orders, best-selling products, most viewed, and top searches.
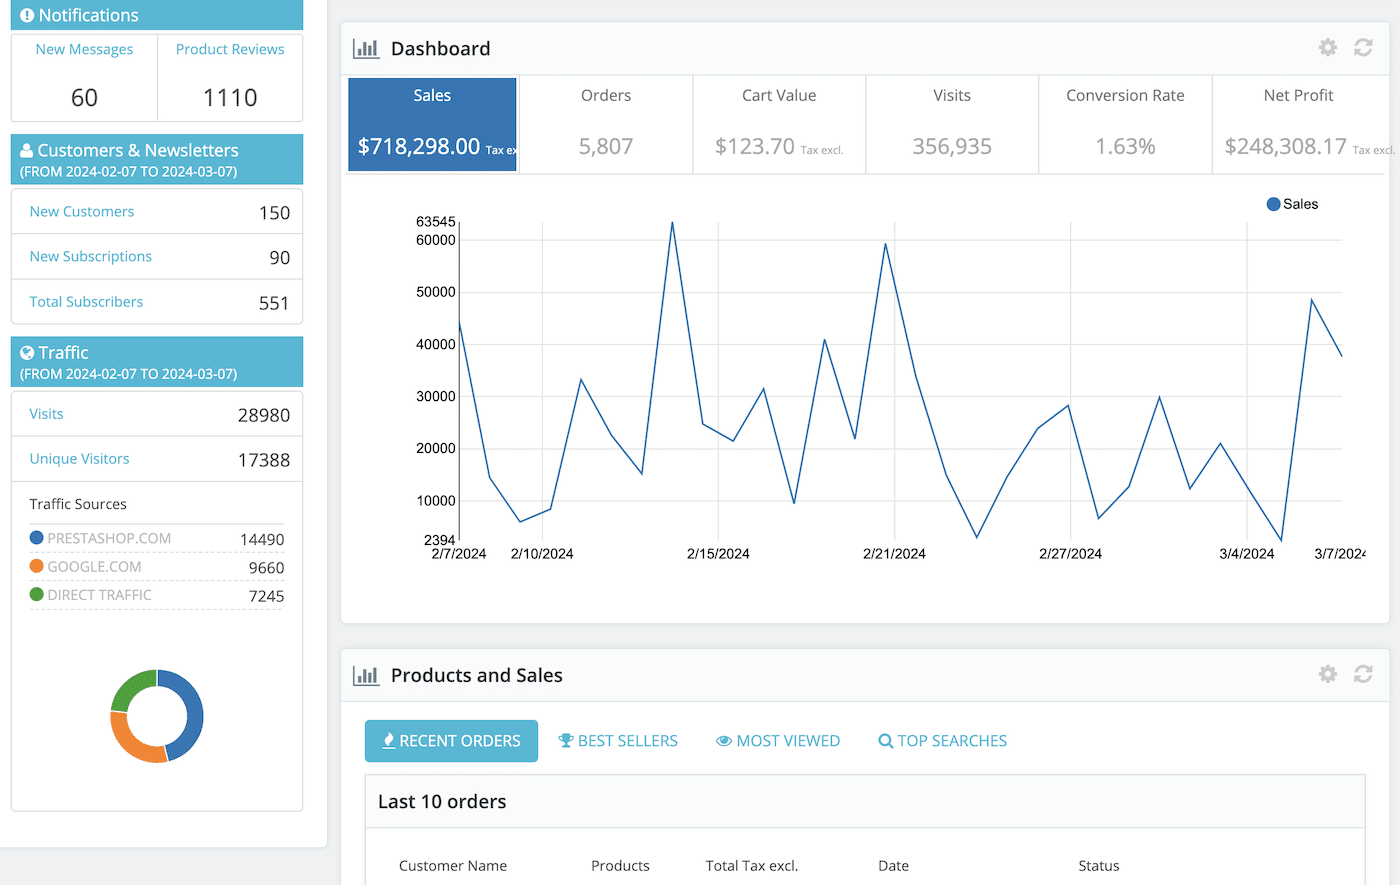
You can also adjust the time period of data shown so you can view trends by day, month, or year.
Configuring Email Settings
Next, you want to make sure that the emails sent from your PrestaShop site reach their intended recipient.
Navigate to Advanced Parameters » E-mail to access the email settings for your online store.
Select the option Set my own SMTP Parameters.

Once you select this option, you’ll see new settings appear. To complete this section, you’ll need the SMTP settings for your email provider. If you’re using SendLayer, you can find this information in your SendLayer dashboard by navigating to Settings in the sidebar menu and clicking the SMTP Credentials tab.
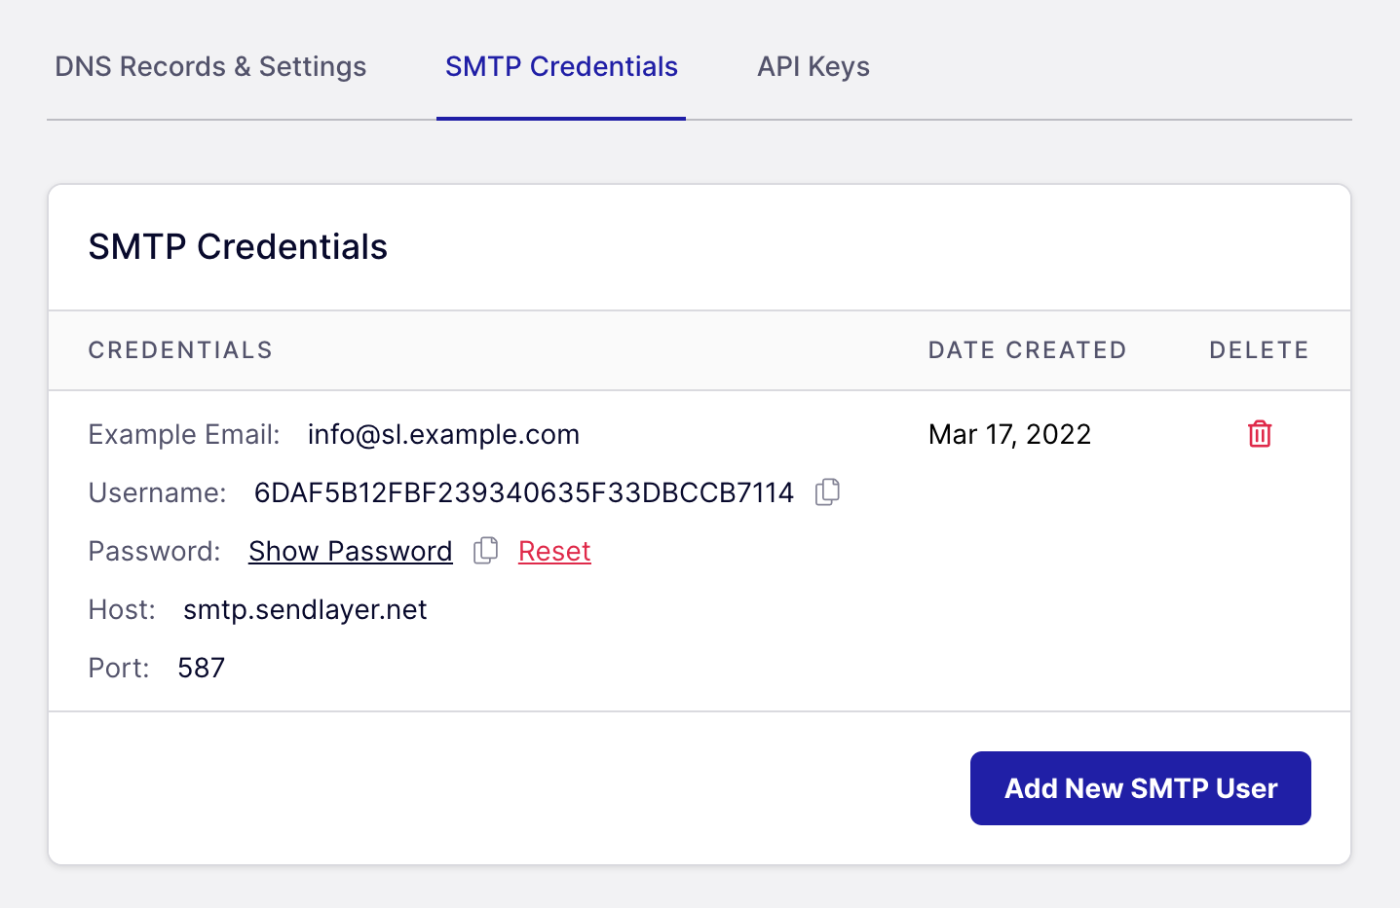
Fill out the settings on your PrestaShop dashboard as follows:
Before getting started, be sure to:
- Email domain name: the domain name you’ll be sending email from (this should match the domain of your store) – example.com
- SMTP server: smtp.sendlayer.net
- SMTP username: Copy and paste the username from your SendLayer dashboard
- SMTP password: Copy and paste the password from your SendLayer dashboard.
- Encryption: TLS
- Port: 587

You can leave the rest of the settings as their default and click the Save button when you’re done.
To make sure your email is set up correctly, enter an email address to send a test email to and click the Send a test email button.

You should immediately see a confirmation message.

Check your inbox to make sure you received the email.

You can now continue with your store setup in the confidence that no important messages sent from your online store will be lost.
Configuring Currency and Language Options
Navigate to International » Localization and scroll down to the Configuration section.
Set the default language, country, timezone, and currency for your store.

If you wish, you can also customize the units used for product options (kg, lbs, etc.)
If you want to provide a localized experience for shoppers in multiple locations, you can import a localization pack. This will import states, currencies, taxes, currencies, languages, and units for each location.

Setting Up Shipping and Payment Methods
Navigate to Shipping » Carriers to choose the shipping options you want to make available in your store.

In Shipping » Preferences, you can set a handling fee and requirements for free shipping.

To set up accepted payment methods, navigate to Payment » Payment Methods. The default available payment methods are cash on delivery, check, and bank transfer.
If you want to set up credit and debit card payments, you will need to add the official PayPal module (other checkout modules are available, but this one is free.) Download the file and then go to Modules » Module Management and click the Upload a module button.

Upload the PayPal module you just downloaded and it will install automatically. Then, click the Configure button to continue to set up the module.
First, you’ll need to sign into your PayPal account to connect it to your PrestaShop site.

Continue through the steps of the setup wizard to configure your checkout options. When you’re done, PayPal will be an option in your payment methods.

There are many more configuration options to explore in PrestaShop. I recommend taking your time to go through all the settings and make sure your store is set up to your liking.
Designing Your Store
Now it’s time for the fun part – customizing the design of your online store!
PrestaShop installs with a default theme but you’ll probably want to customize this theme or choose a different theme if you want your store to look unique.
Choosing and Installing a Theme
Browse the PrestaShop Addons Marketplace to find themes that best suit your industry and style preferences.

Most of the PrestaShop templates listed here are premium themes, but there are some free options available.
Once you’ve purchased or chosen a free theme, download the theme files. In your PrestaShop admin panel, navigate to Design » Theme & Logo, then click on the Add new theme button to upload your theme zip file.

Follow the prompts to install your new theme.
Customizing the Theme to Fit Your Brand
You can access theme customization settings under Design » Theme & Logo. Here, you can upload your logo and adjust the layout of individual pages in your store.

For more advanced customizations, you can edit the theme’s CSS and template files directly. It’s recommended to create a child theme for this purpose to prevent losing customizations when updating the theme.
To edit your theme files, click the Advanced Customization tab and follow the instructions there to download your theme files and upload a child theme.

You can further customize the layout and appearance of your homepage and other pages on your site by adding modules for different content formats, product carousels, banners, and sliders.
Adding Products
Once you’re happy with how your store looks, it’s time to add some products!
Creating Product Categories
In your PrestaShop dashboard, go to Catalog » Categories. Here you can see all the current categories in your store.

To add a new category, click the Add new category button and fill out a name and description for your category. You can also choose a parent category, add images, and meta information for SEO.

Adding Products and Product Details
To add products to your store, navigate to Catalog » Products in your dashboard menu. Here you can see a full list of all products currently listed in your store.

Click the New product button to add a new product.
Choose your product type. The options are:
- Standard product: A physical product with no variations such as size or color
- Product with combinations: a product with variations such as size or color
- Pack of products: A collection of multiple products
- Virtual product: A digital product that doesn’t require shipping.

When you’ve chosen your product type, click the Add new product button.
Fill in the essential details:
- The product name as it should appear in the store.
- A detailed description of the product, including features and benefits. Use the short description for quick overviews.
- Price: The retail price of the product. You can also enter the wholesale price if it applies.
- Images: Upload high-quality images of the product. You can add multiple images to showcase the product from different angles.
Make sure to click on the other tabs to enter further details about the product such as stock levels, shipping weight and dimensions, pricing, and SEO descriptions.
Once all details are entered, click the Save button to add the product to your catalog.
Now you’ve set up your store and added some products, you’re pretty much ready to go! Make sure to explore the further features of PrestaShop to get the most out of the platform and get ready to sell online!
That’s it! Now you know how to set up PrestaShop.
Next, would you like to try out an alternative eCommerce platform? Check out our tutorial on how to set up a BigCommerce store for more information.
0 comment on "PrestaShop Tutorial: How To Build an Online Store in Minutes"