Do you want to know how to set up a BigCommerce store?
BigCommerce is a fully-hosted eCommerce platform that offers superior flexibility, scalability, security, and SEO features, making it a popular alternative to Shopify and other online store solutions.
While BigCommerce offers many features, it’s also user-friendly and simple to get started with. To help you get your store up and running as quickly as possible, we’ve put together this step-by-step tutorial which will take you through the entire process of setting up your BigCommerce store from signing up for an account to configuring design and email settings, adding products, and setting up payment options.
Step 1: Sign Up for a BigCommerce Account
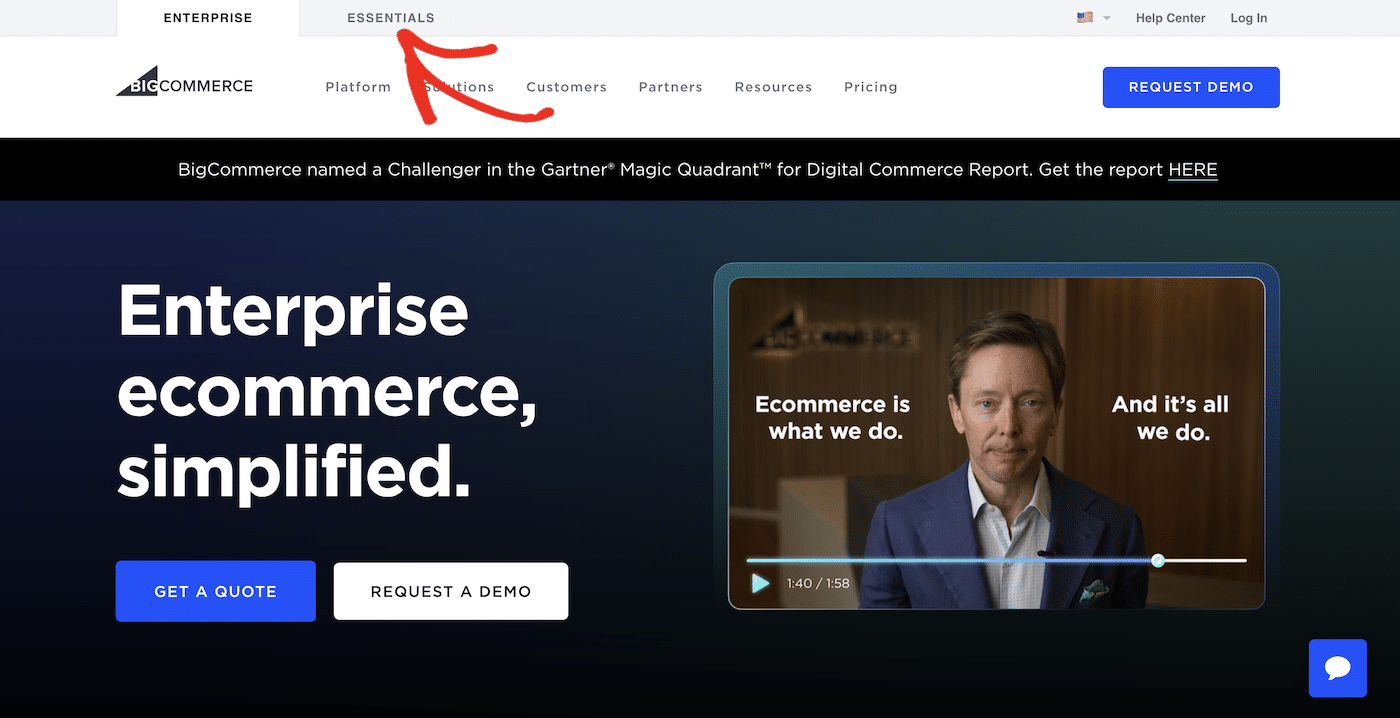
Start by navigating to the BigCommerce website. A lot of major brands (including BMW, Ted Baker, Fujitsu, and Lavazza to name a few) run their online stores on BigCommerce, and at first glance, it appears BigCommerce is a solution aimed at large enterprises.
However, BigCommerce also offers affordable price plans aimed at smaller businesses. You can access these plans by clicking the Essentials tab at the top of the screen.
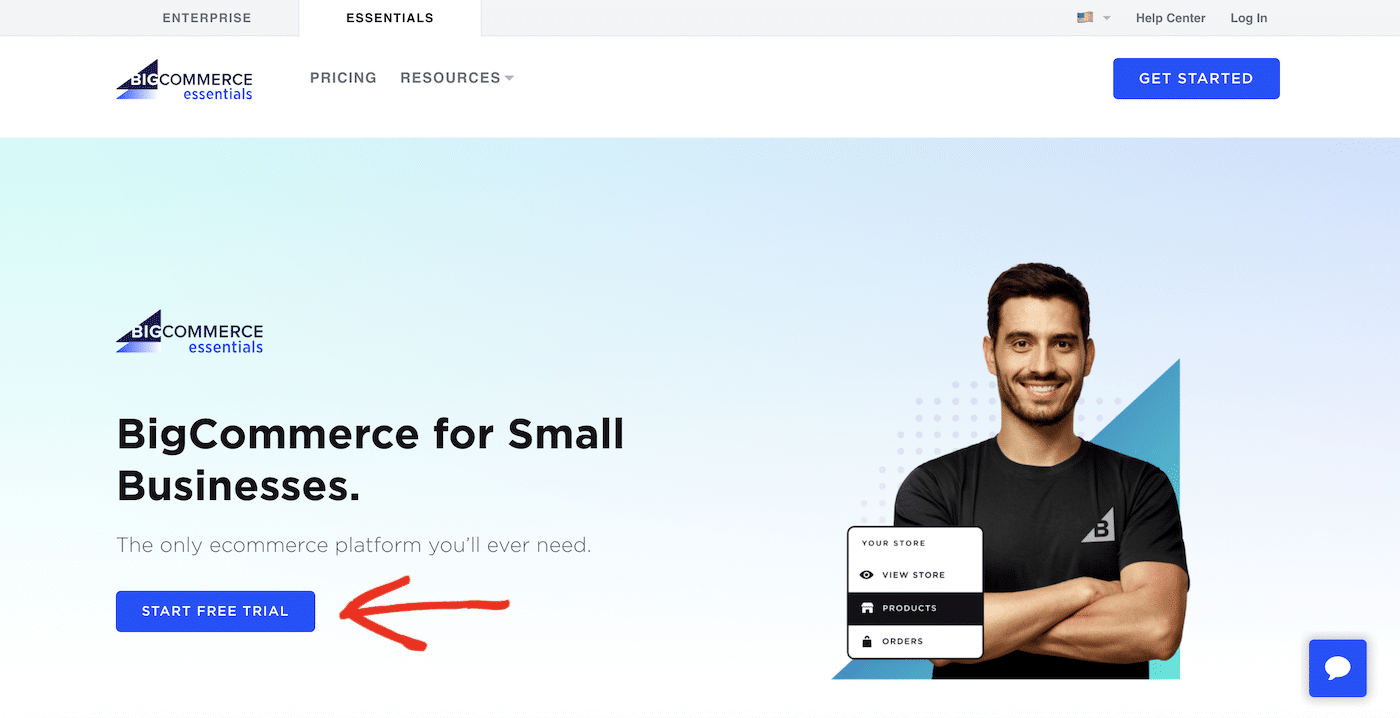
BigCommerce offers several plans for smaller businesses, starting at $29 a month.
You can try out the platform for free for 15 days by clicking the Start free trial button.
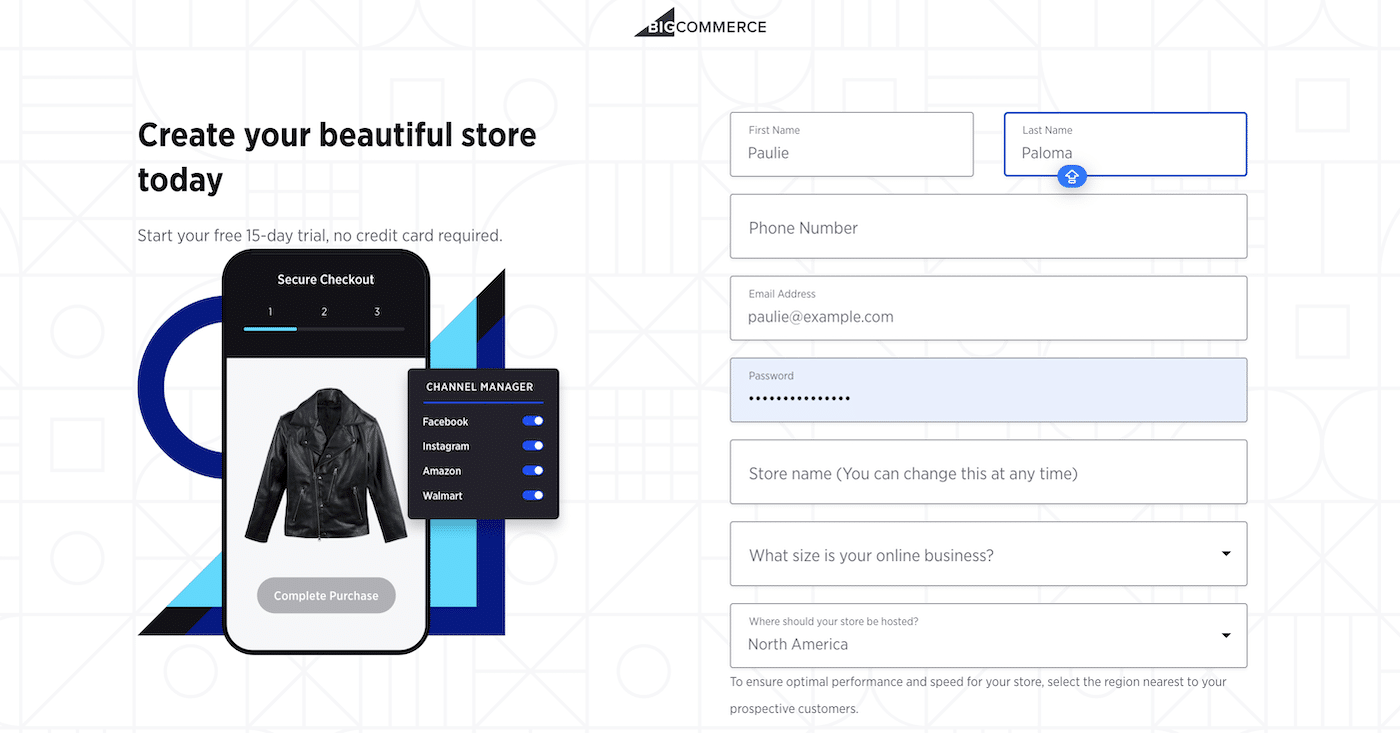
Fill out the form with information about you and your business, choose a name for your store, and after submitting the form, BigCommerce will start setting up your new online store.
After your store has been created, BigCommerce will send you an email with your login information. You can then go straight to your store dashboard and start setting up your BigCommerce store.
Step 2: How To Set Up a BigCommerce Store
Once your account is set up, you will have access to the BigCommerce dashboard.
This dashboard is where you will manage your products, orders, customers, and store settings.
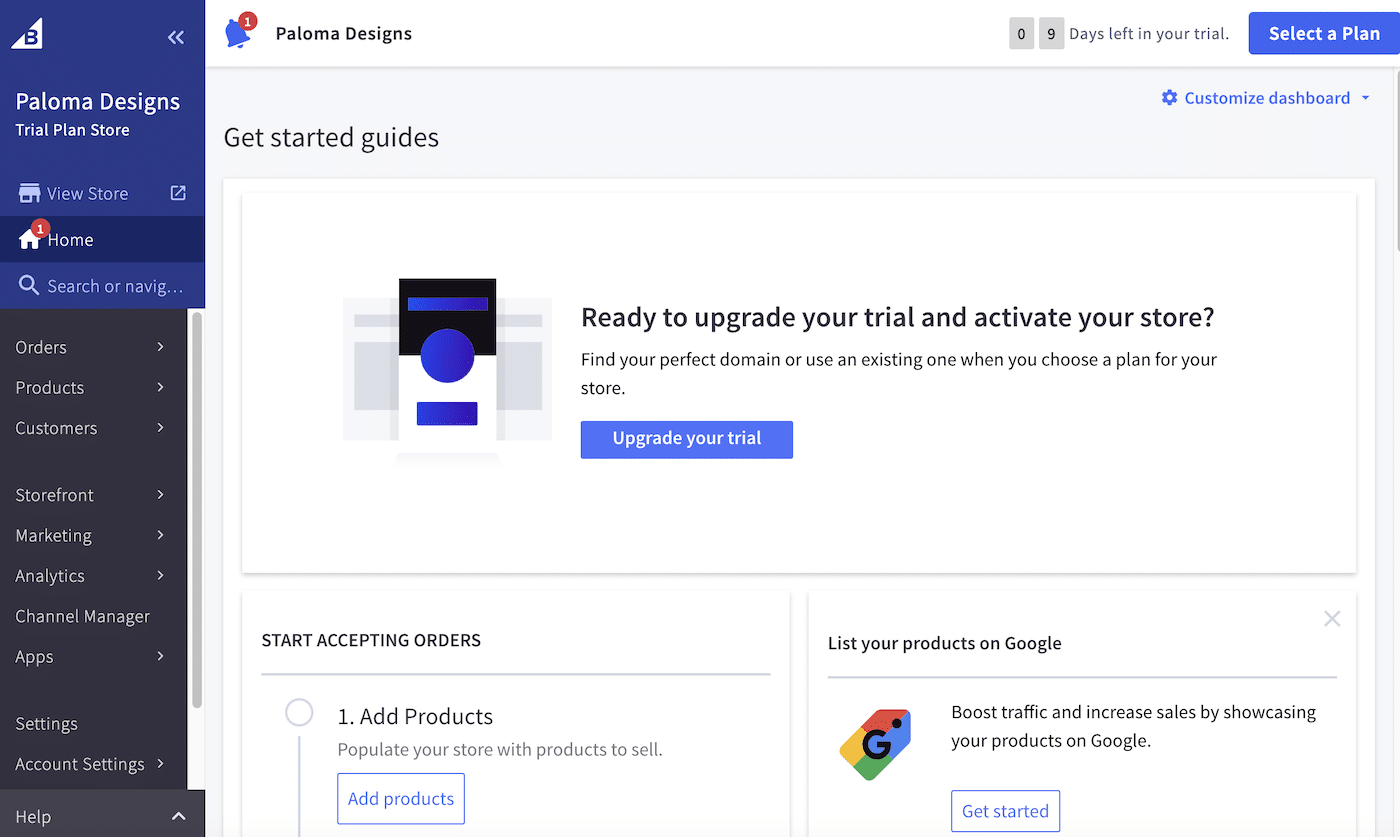
Take some time to familiarize yourself with the dashboard. BigCommerce provides helpful quick links to areas of the dashboard that will help you get your store ready to start accepting orders including adding products, customizing your theme, customizing your About page, and more.
Configuring Your Domain Name
By default, BigCommerce will set up your domain on a subdomain in the format yourdomain.mybigcommerce.com.
Your store will look a lot more professional if you set up a custom domain like mystore.com
Note: this feature is not available on the free trial. You will need to upgrade to a paid plan to connect a custom domain to your BigCommerce store.
Alternatively, you can purchase your domain directly from BigCommerce, which will automatically be pointed to your store.
To purchase a domain from BigCommerce, navigate to Settings » Domain name and click Purchase under Buy a new one.
You can enter your requested domain, check the availability, choose the length of time you want to register it for, fill out the domain contact information, and complete your purchase.
If you have an existing domain name, navigate to Settings » Domain name and click the Add new button under Add an existing.
Enter your domain and follow the instructions to edit your DNS settings with your domain provider to point it to BigCommerce.
Configuring SMTP Settings
Before doing anything else, it’s important to configure your email settings.
BigCommerce generates and sends emails both to you, the store owner or manager, and to customers. These emails include important information about account details, orders, and more, so it’s critical you receive them and they don’t get lost or end up in spam.
By configuring SMTP for your BigCommerce store, you ensure that all outgoing emails, such as order confirmations, shipping notifications, and marketing communications, are reliably sent and delivered to your customers.
Using SendLayer as Your SMTP Service
BigCommerce is compatible with most email services but it’s advised to use a dedicated SMTP service designed for transactional email like SendLayer.
SendLayer not only improves the deliverability of emails sent from your online store, but also includes additional features such as advanced email logging. This makes it easy to monitor all the emails sent from your BigCommerce site and quickly troubleshoot any issues.
To get started with SendLayer, follow these instructions for getting started.
Once you’ve signed up for a SendLayer account, you will need to authorize your domain for sending email.
This authentication is critical as several email providers, including Gmail and Yahoo, are introducing new sender requirements and will start blocking unauthenticated emails in early 2024.
If you don’t set up email authentication, your customers using Gmail and Yahoo email addresses may not receive important store emails such as order confirmations and delivery notifications
Add SendLayer SMTP Credentials to BigCommerce
Once you’ve completed domain authentication, you’re ready to start using SendLayer as your SMTP server.
You can find the credentials you’ll need to add to your BigCommerce store on your SendLayer dashboard.
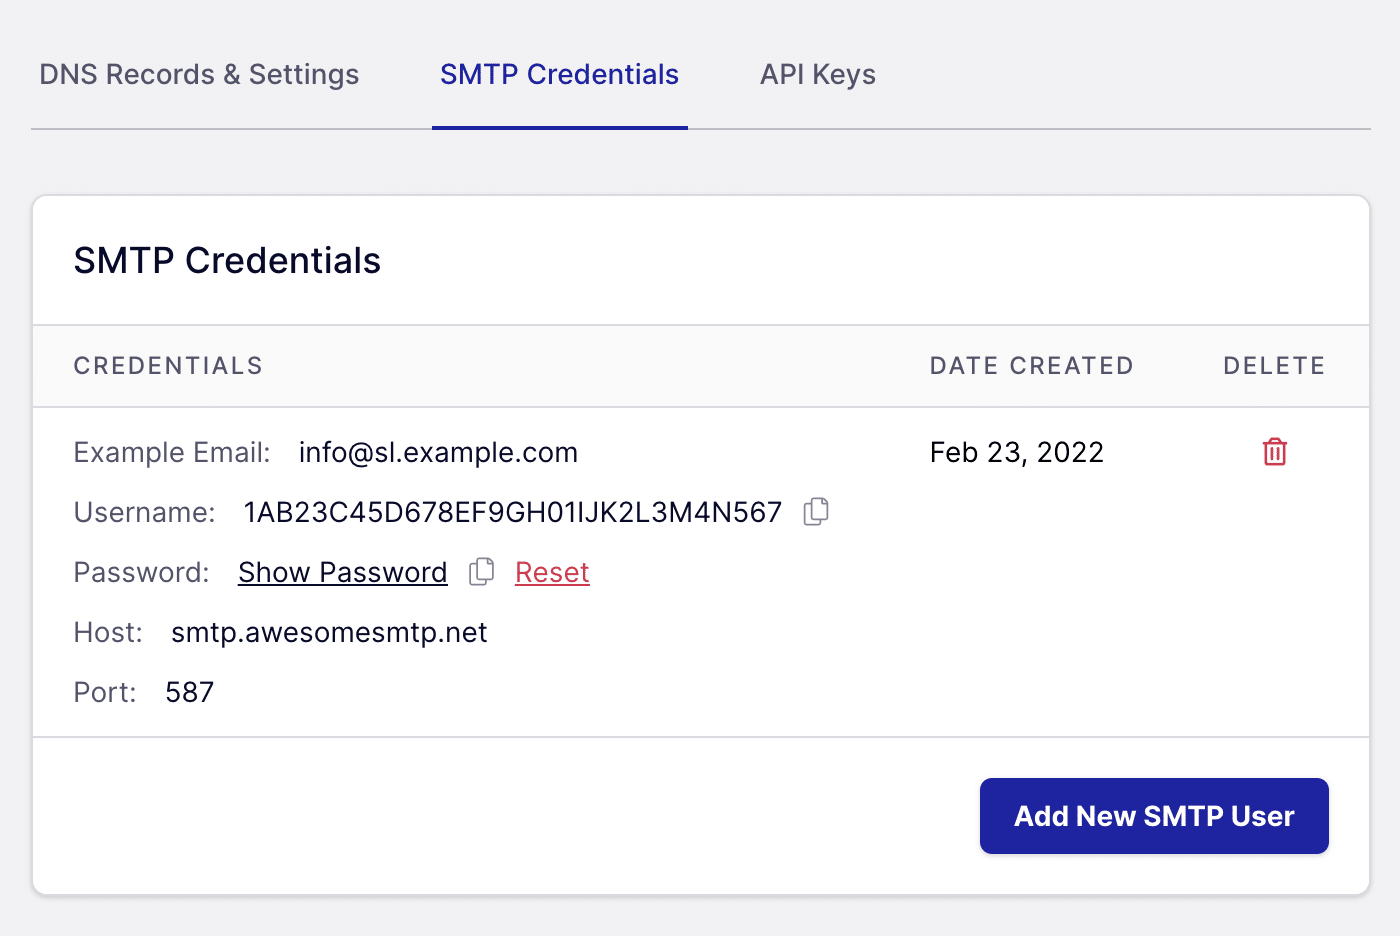
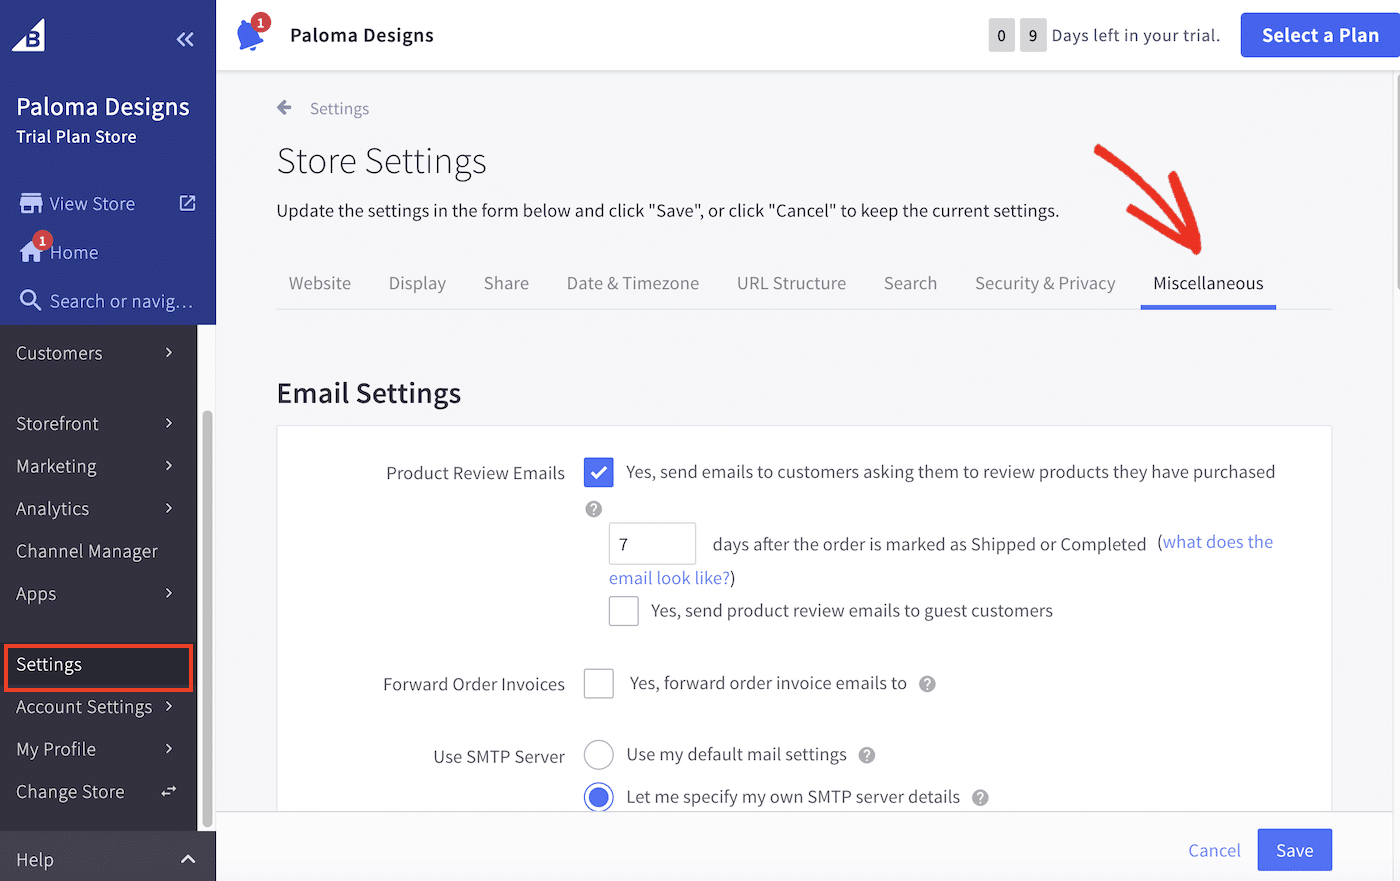
To access the SMTP settings in your BigCommerce dashboard, navigate to Settings » miscellaneous. You should see the email settings at the top of the screen.
Scroll down to the Use SMTP Server setting and select Let me specify my own smtp server details. This will open up some additional settings for you to fill in.
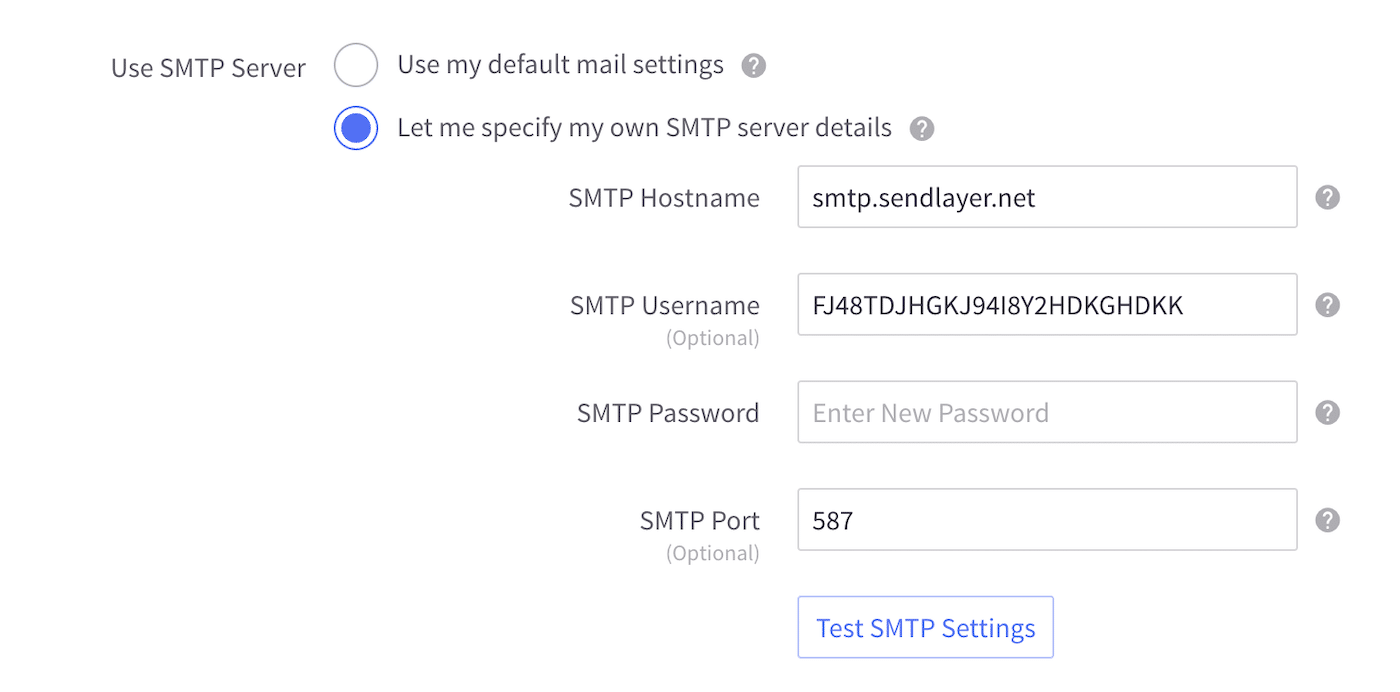
Fill out the details as follows:
Before getting started, be sure to:
- SMTP Hostname: smtp.sendlayer.net
- SMTP Username: Copy and paste the Username from your SendLayer dashboard
- SMTP Password: Copy and paste the Password from your SendLayer dashboard
- SMTP Port: 587
When you’ve finished entering your credentials, click the Test SMTP Settings button to make sure BigCommerce can connect to your SMTP server.
You should see a confirmation popup that a message has been sent to your administration address. Check your mailbox to make sure it arrived. The email should look something like this:

Step 3: Customizing the Design of Your Store
Go to the Storefront section in your dashboard menu to select a theme for your store.
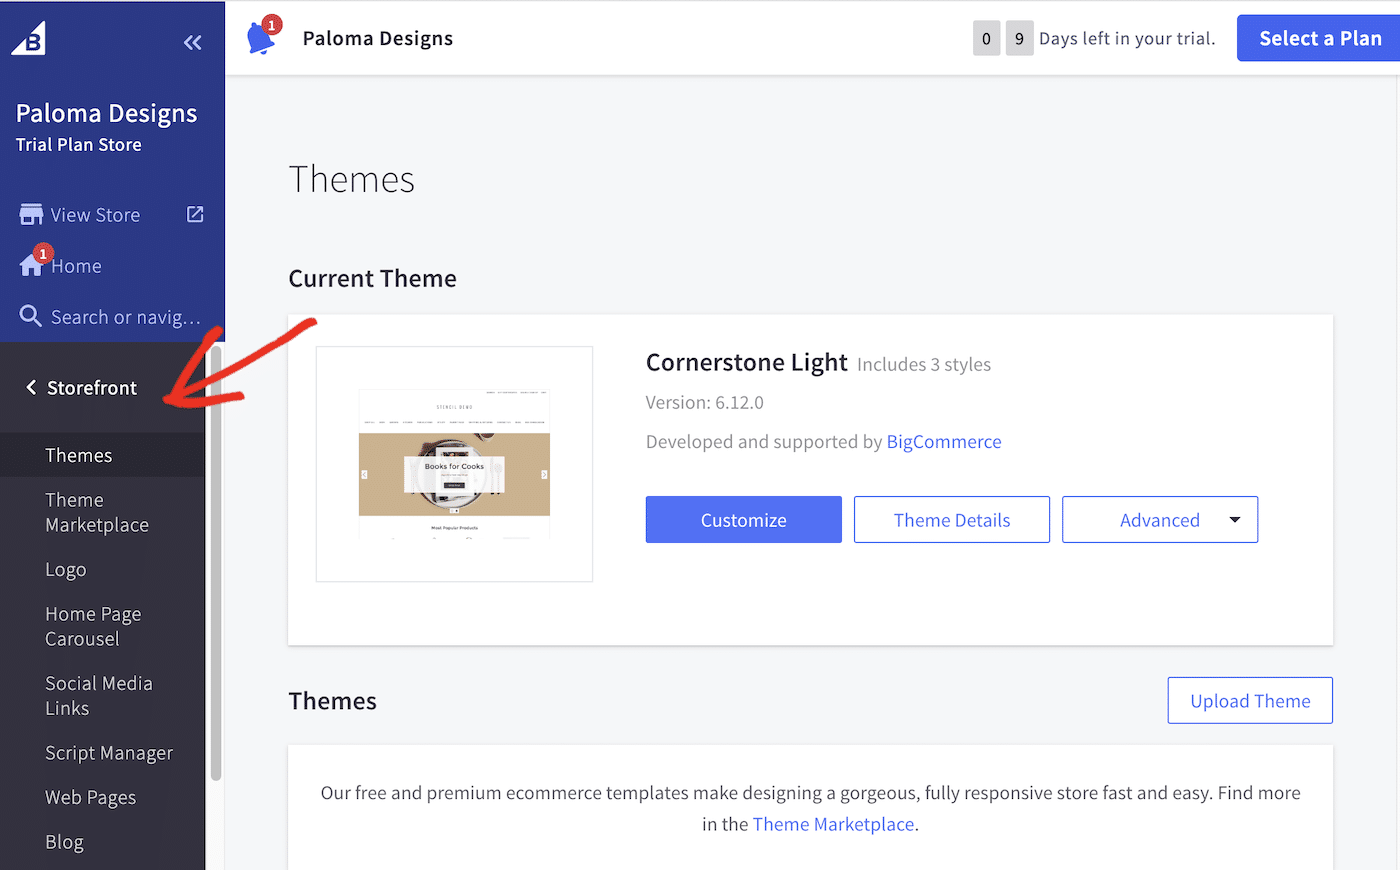
You can opt to customize the default theme or upload a new theme.
Click Theme Marketplace to browse the available themes. There are both free and premium themes available. You can also browse by category.
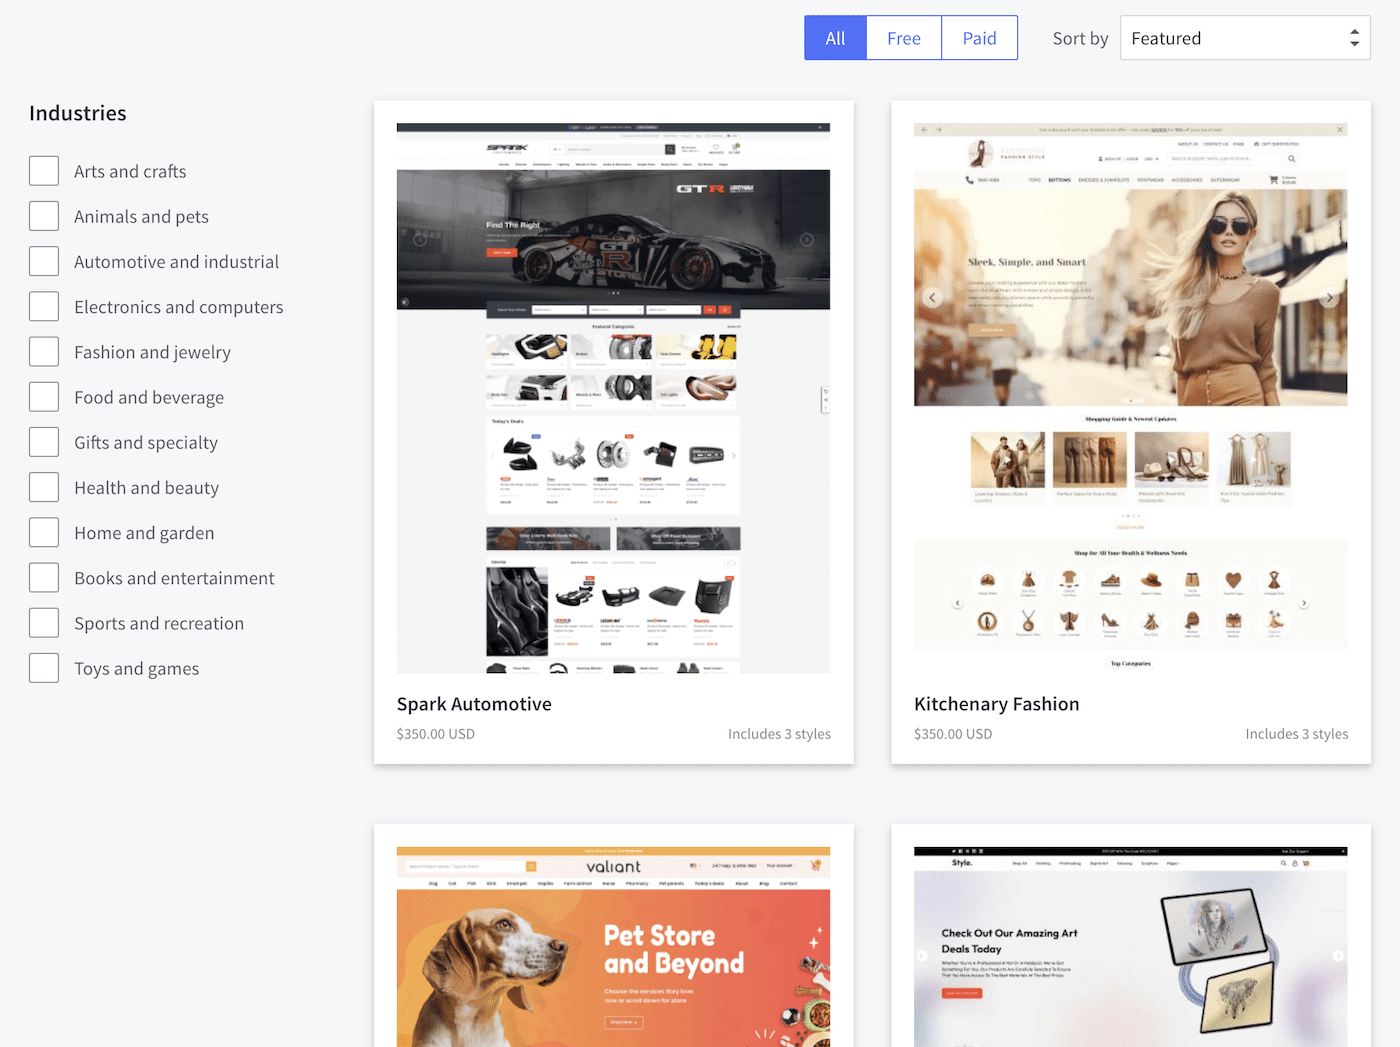
When you find a theme you like, click on it to see more details and click the Add theme button to apply it to your store.
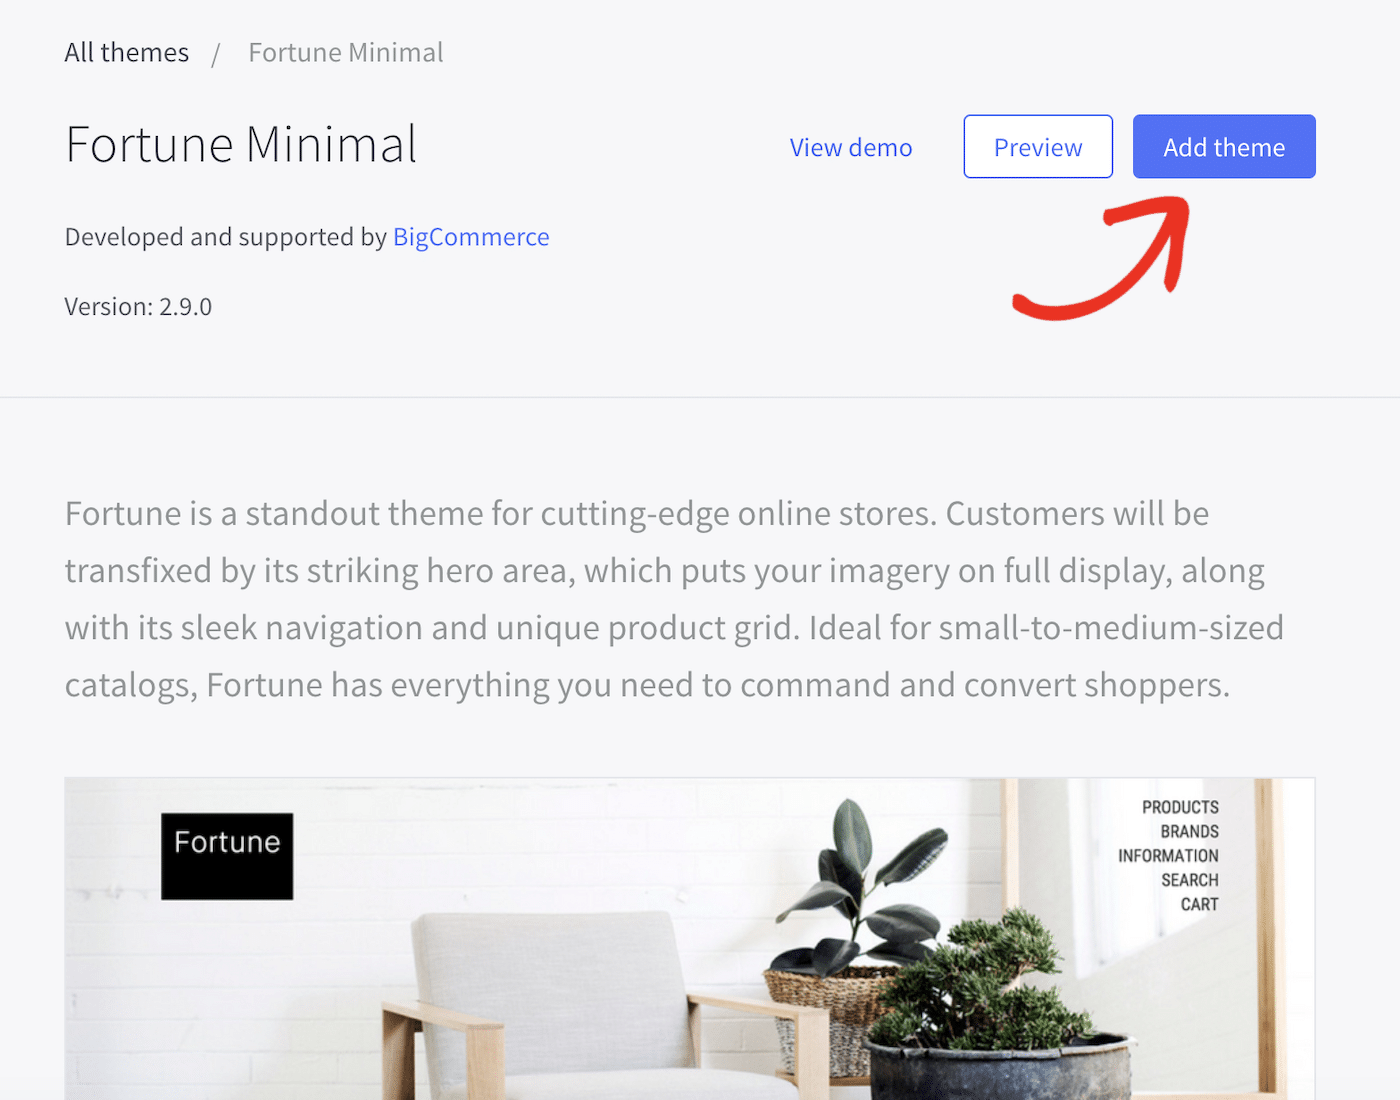
You’ll be asked to reconfirm you want to apply the theme before it’s changed. You can then click the View Store link in your dashboard menu to head over to the front end of your site and see how it looks.
Adding Your Logo
To add your brand logo to your store, navigate to Storefront » Logo and select Upload a custom image to use as your logo.
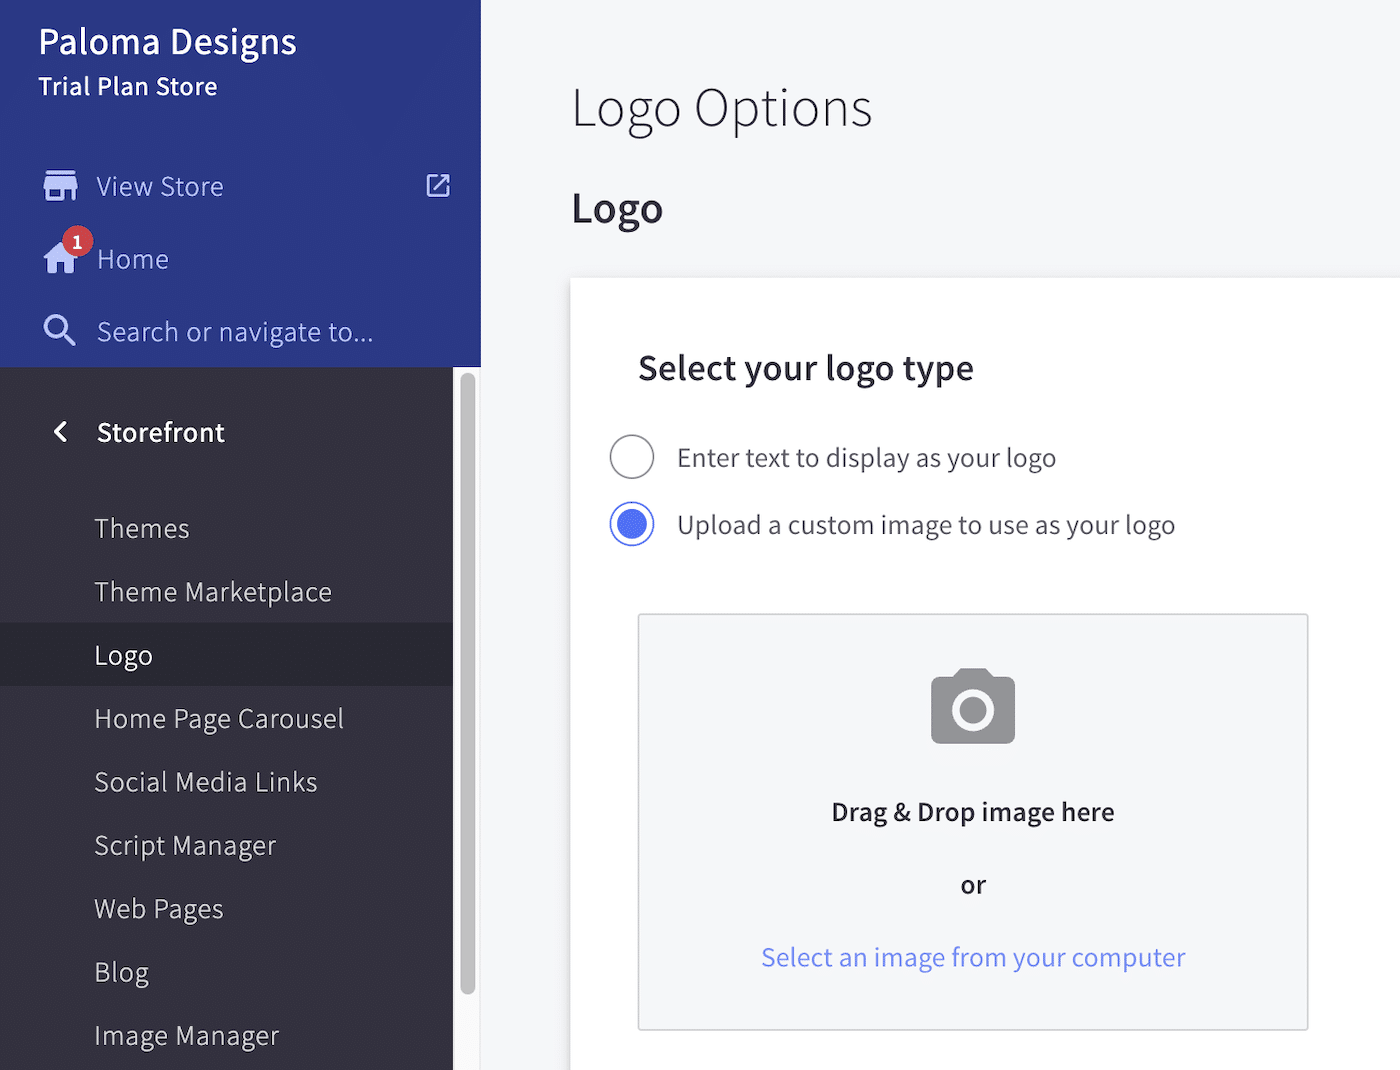
You can then upload the image file from your computer.
Customize Your Theme
You can customize your theme with your brand colors and fonts. Navigate to Storefront » Themes and click the Customize button to go to the visual page builder.
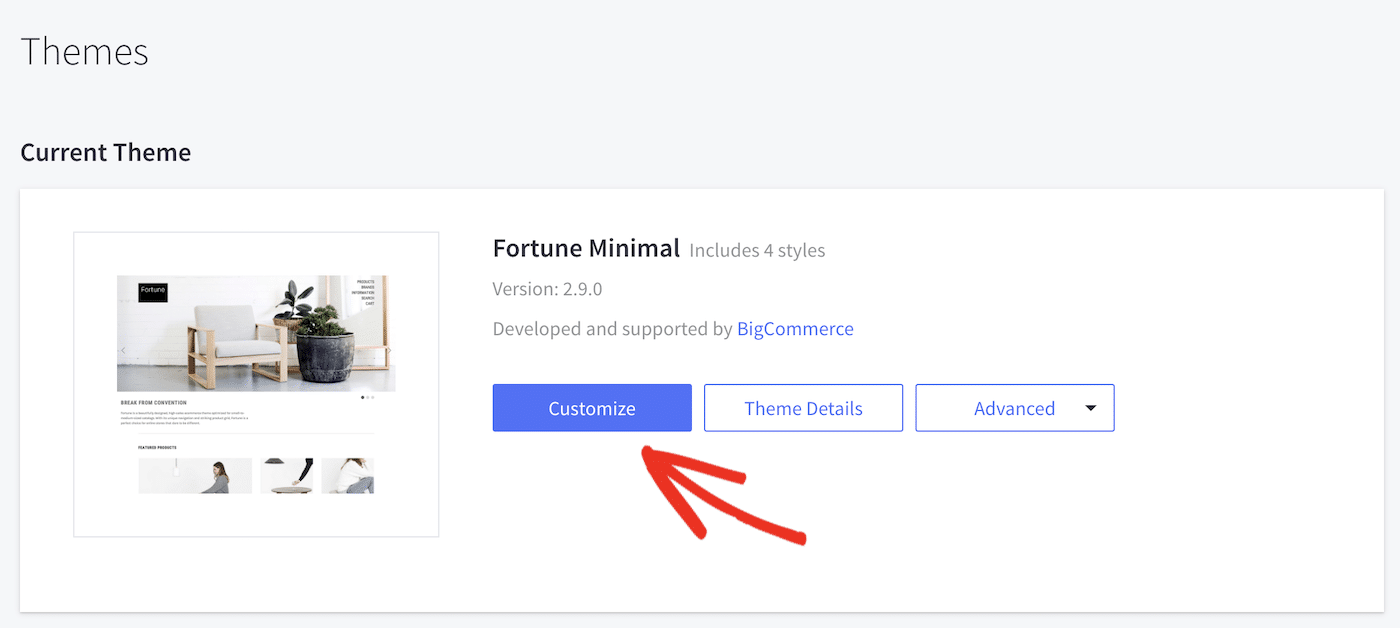
Once you’re in the visual builder, you can adjust the layout of your store’s pages by dragging and dropping the sections.
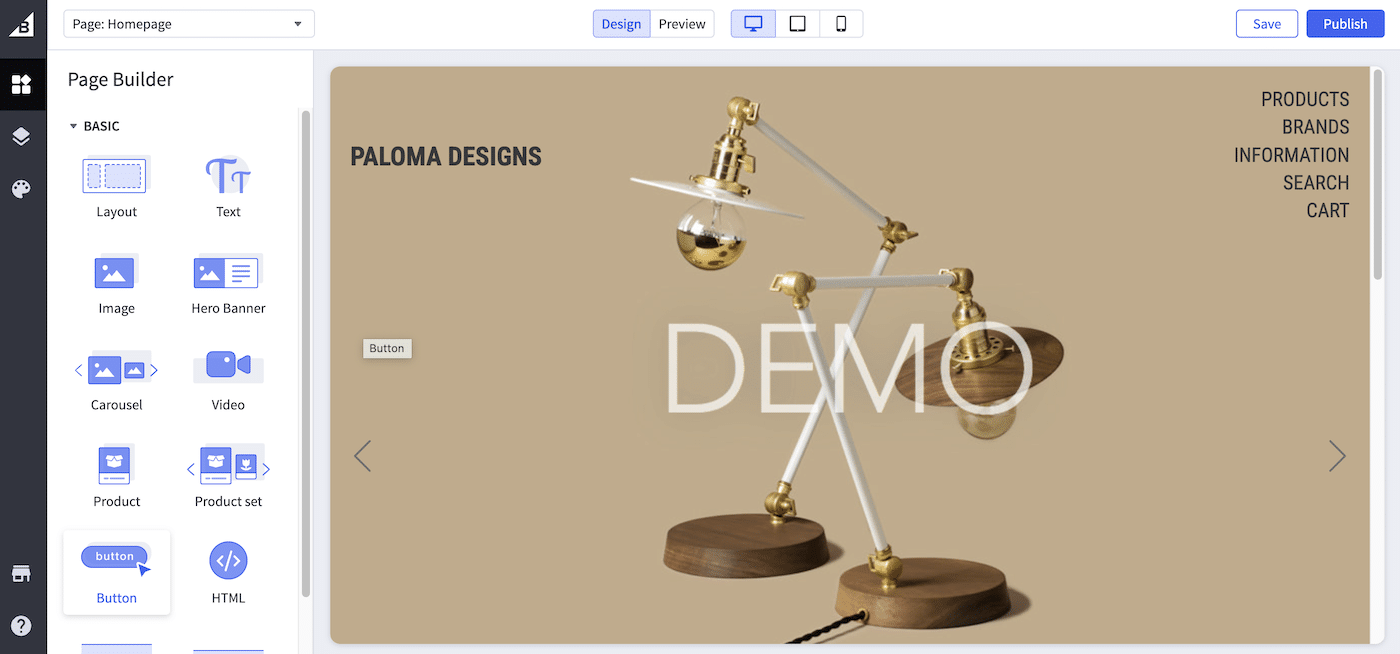
You can also adjust the colors and the general style settings of your store by clicking the Theme Styles icon in the sidebar.
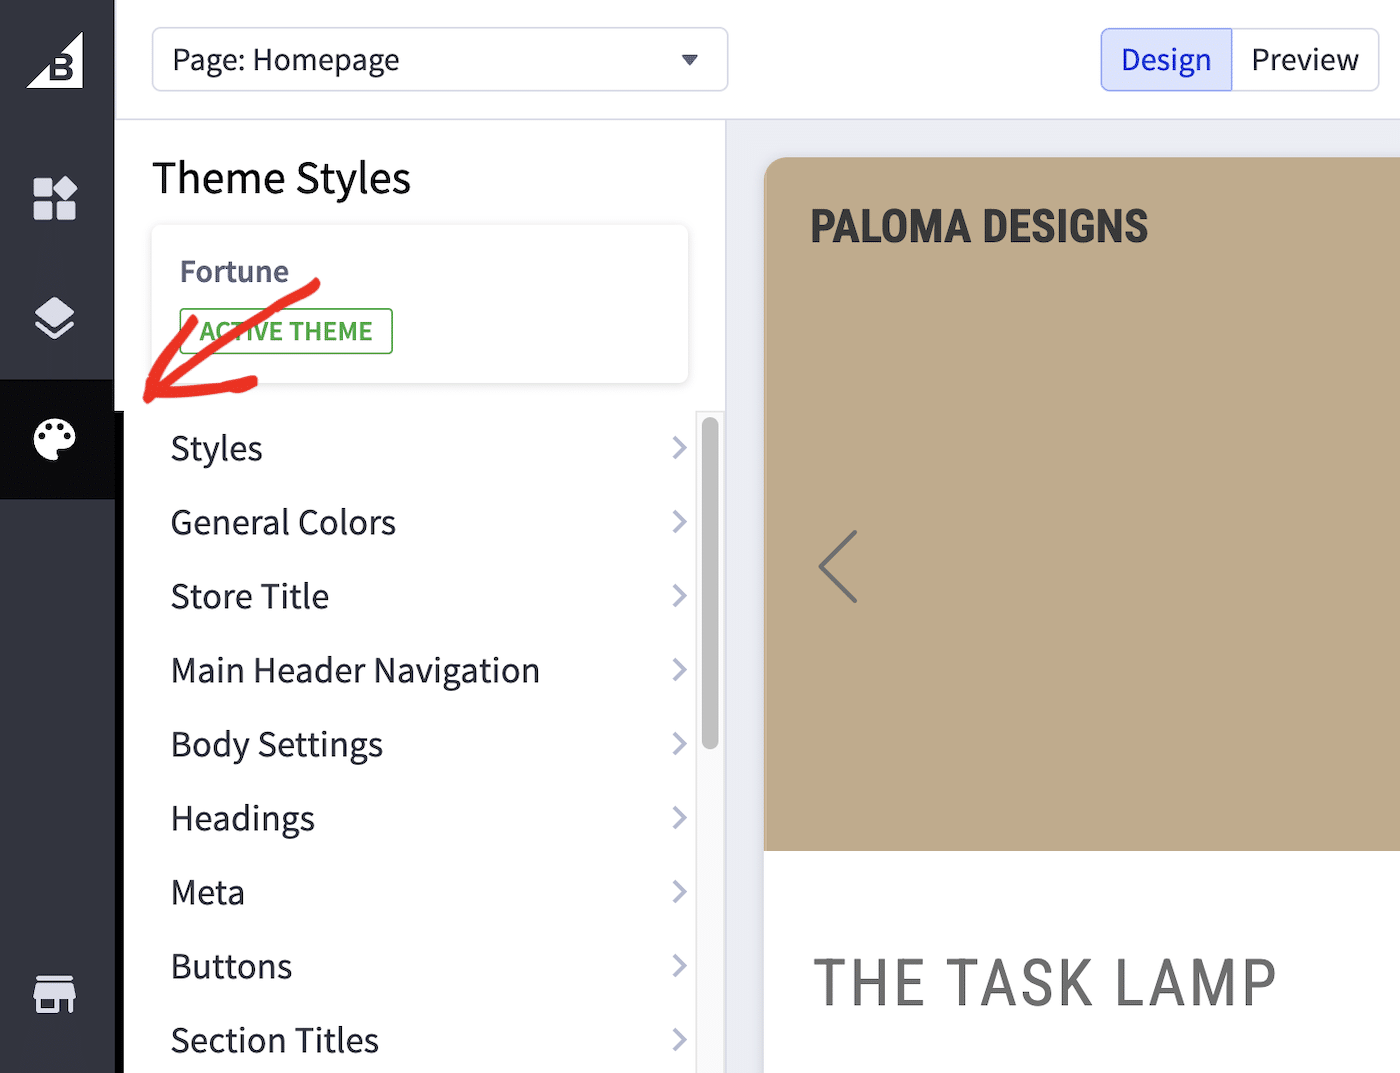
Here you can adjust the overall color palette for your BigCommerce store as well as changing the color of individual elements.
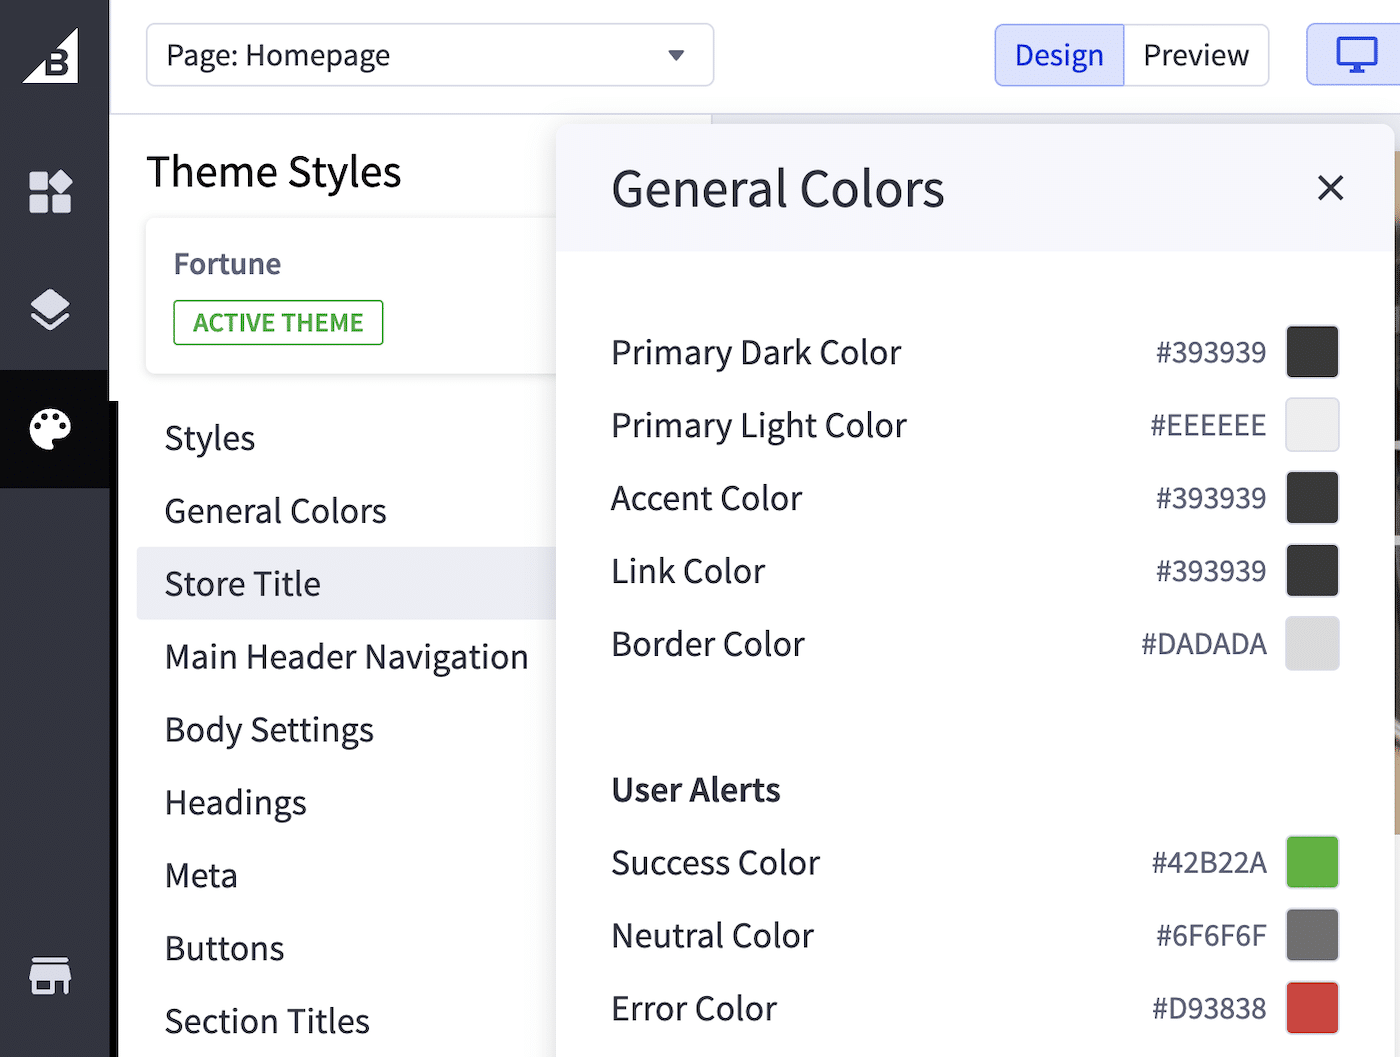
On this screen, you can also adjust styling settings such as the number of products shown on the homepage, the text of promotional labels, select which credit card payment icons to display, and more.
Step 4: Adding Products to Your BigCommerce Store
Now your store is set up and looking the way you want, it’s time to add some products.
Navigate to the Products section in the menu. Here you can see a list of all the products in your store. The trial set comes already set up with some sample products so you can see how it looks.
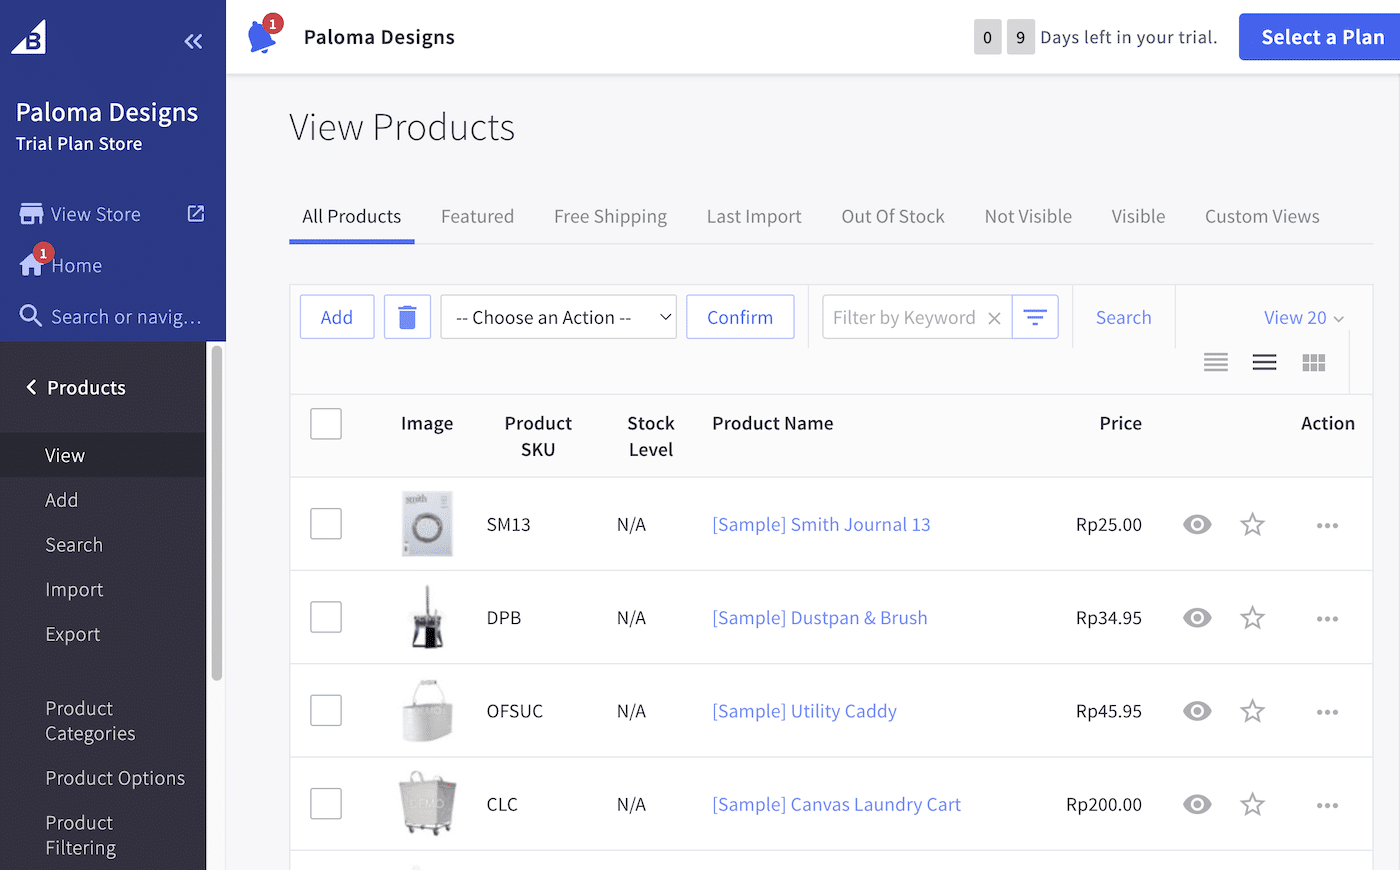
To add a new product, click the Add button. This will open a new page where you can enter details about your product.
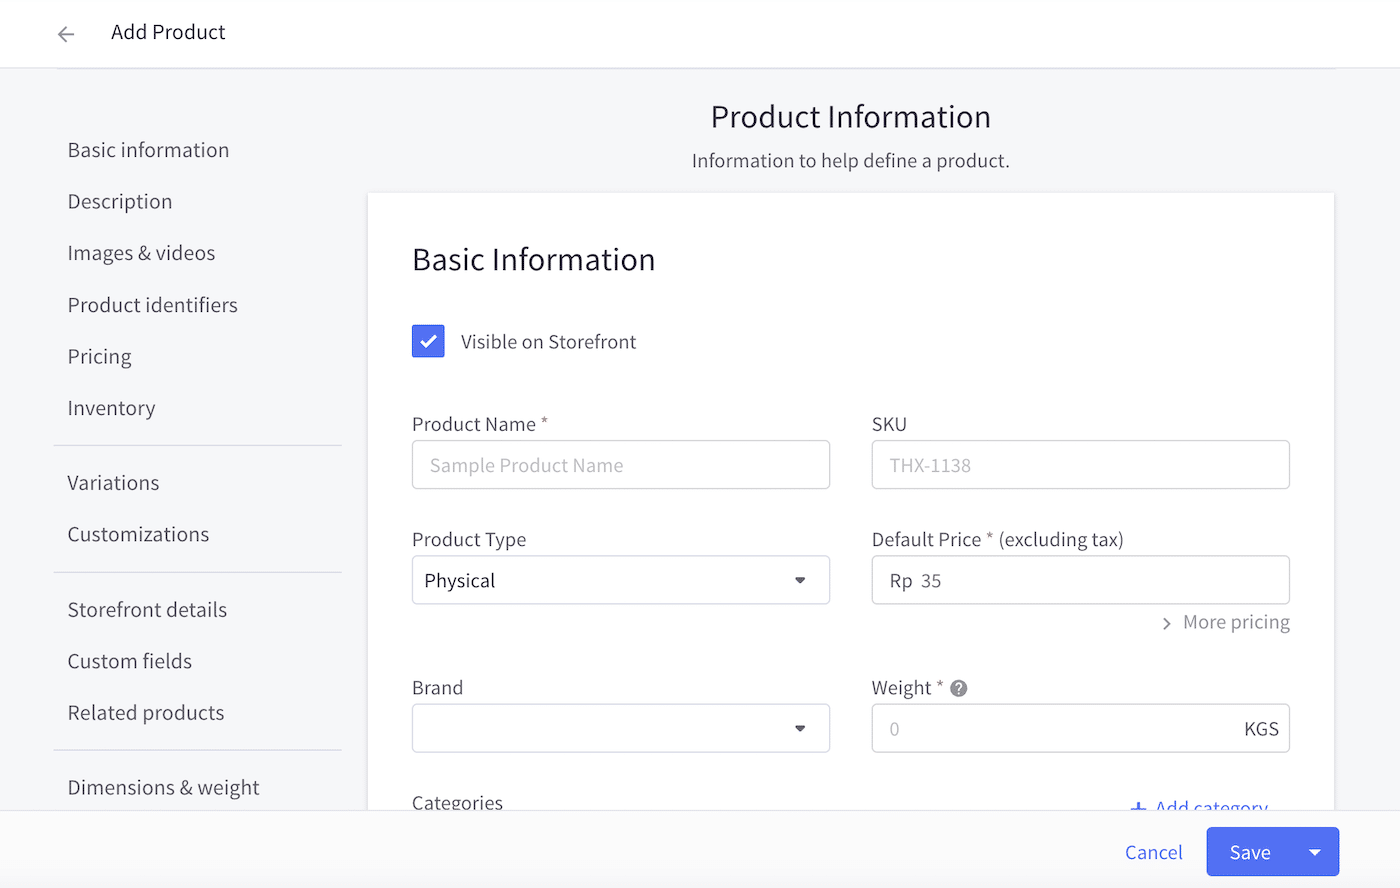
Fill out your product details including the name, price, optional SKU, type (physical or digital), weight (to calculate shipping), choose a category, and write a description. The product description editor also allows you to format the text and add HTML code.
On this screen, you can also upload images and videos, set product variations, and specify options such as shipping and gift wrapping.
There are SEO fields available, which you can use to ensure all relevant keywords are included to make your products easily discoverable in search engines.
Click the Save button to add the product to your store when you’re done. Repeat these steps for each product you wish to add to your store.
Step 5: Setting Up Payment Gateways and Configuring Shipping
In your BigCommerce dashboard, navigate to Settings » Payments.
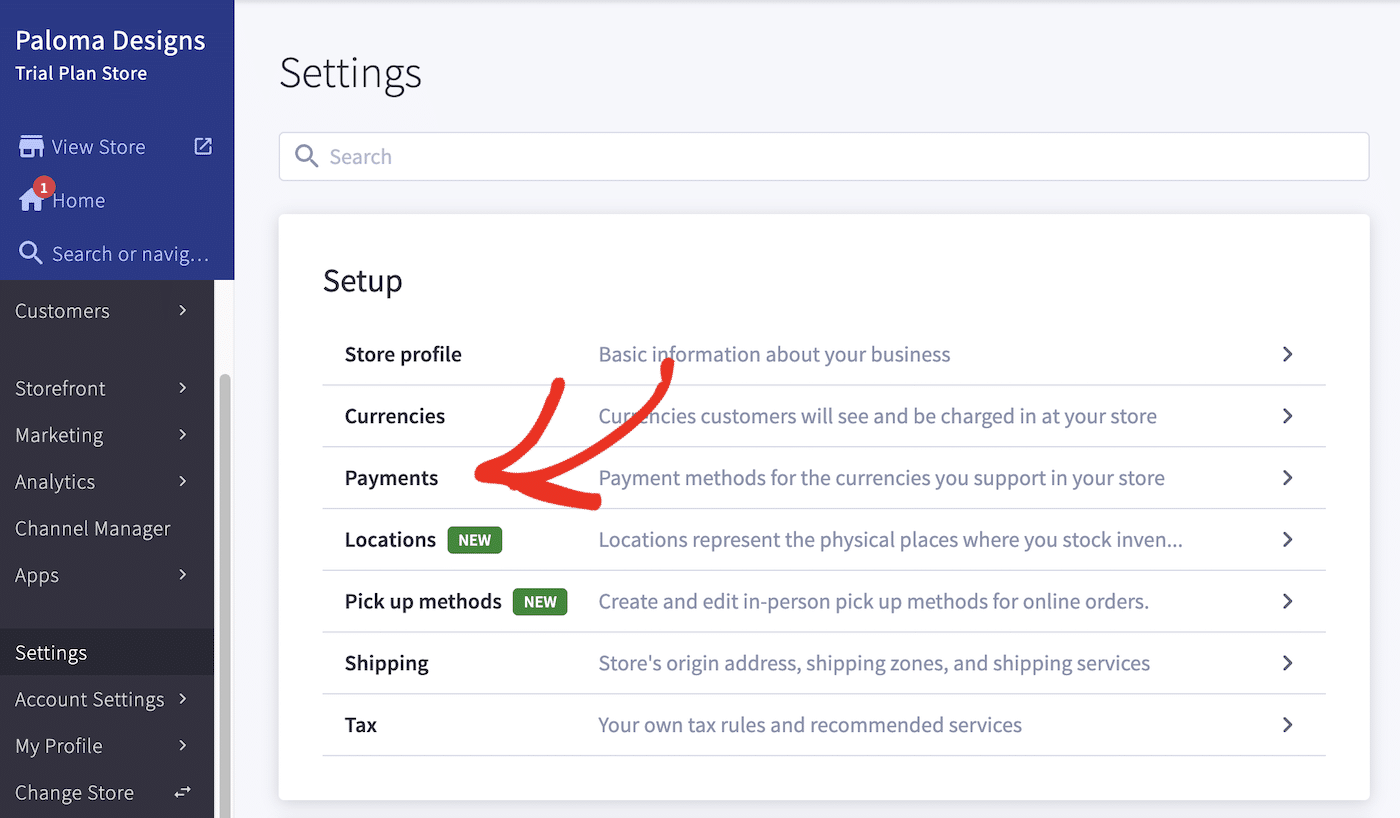
BigCommerce supports a variety of payment gateways like PayPal, Stripe, Square, and others. Choose one or more that best fit your business needs.
When you activate a payment gateway, you’ll be asked to fill in the required details, such as API keys, merchant IDs, etc. These are typically provided by the payment processor.
You can also put each payment gateway into test mode to ensure everything is set up correctly before activating a payment method on your live site.
If you want to accept offline payments like bank transfers or cash on delivery, set these up under Offline Payment methods.
You can change the currency of your store by clicking the Currencies option under Settings. Here you can also select which currencies are shown to visitors from certain countries and enable automatic currency conversion.
Configuring Tax Settings
Navigate to Settings » Tax.
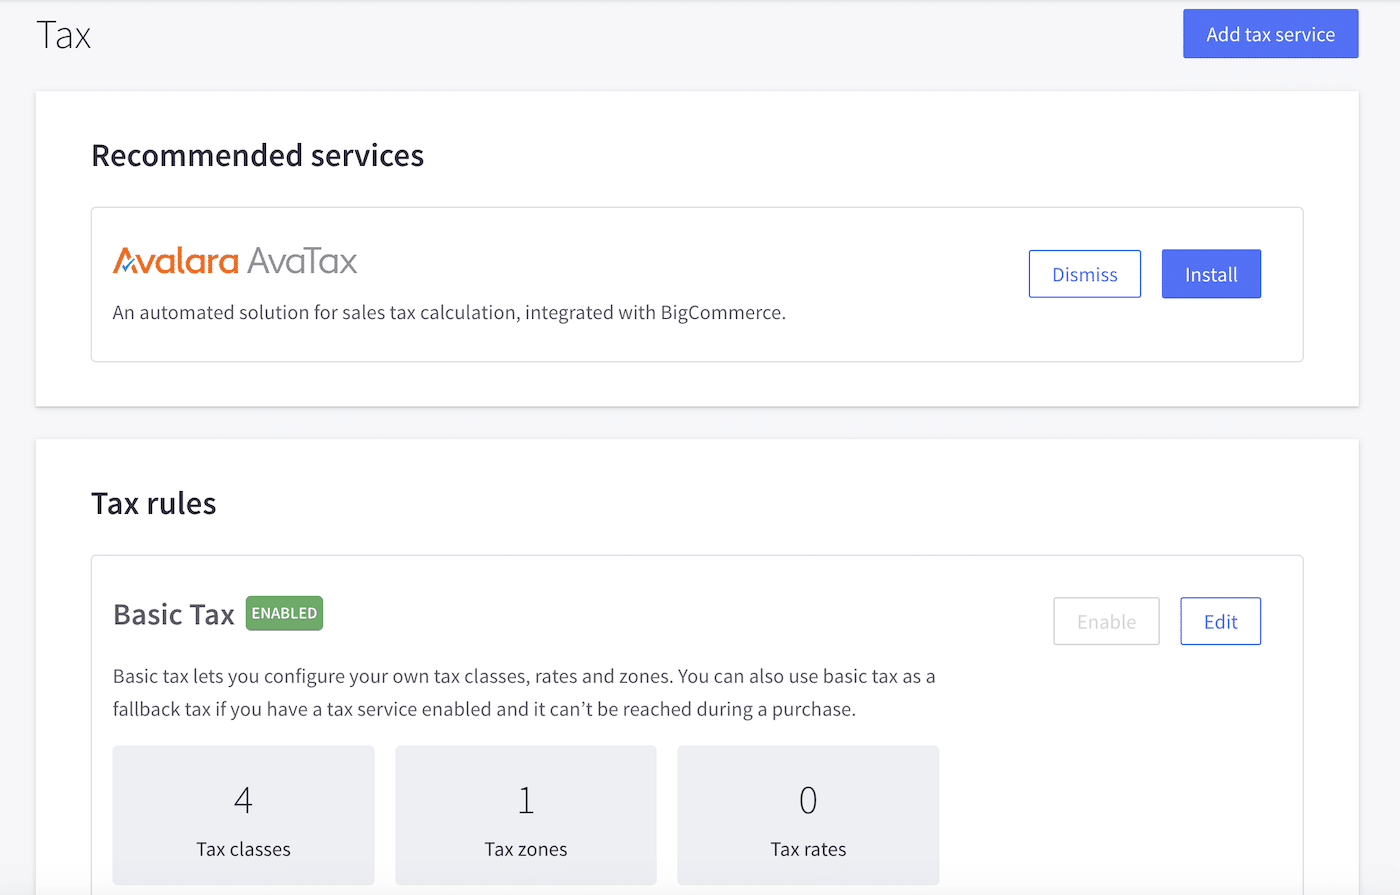
For ease, you can use automated tax calculators like Avalara, which BigCommerce integrates with. These services automatically calculate taxes based on your location and the customer’s location.
Alternatively, you can set up taxes manually by specifying tax rates for different regions. Make sure to research and input accurate tax rates for all regions you sell to.
If required, you can set prices to include tax.
Configuring Shipping
Under Settings » Shipping you’ll find multiple options for calculating shipping. Start by adding the address you’ll be shipping items from
Next, you can set up shipping zones. These are geographical areas where you’ll ship orders. Define zones based on countries, states, or even zip codes.
For each zone, select appropriate shipping methods. Options include flat-rate shipping, free shipping, and carrier-calculated shipping.
BigCommerce also integrates directly with carriers like FedEx, UPS, or USPS for real-time shipping rates via ShipperHQ.If you want to add this functionality to your store, click the button to install ShipperHQ and follow the directions to set it up.
Step 6: Launch Your Store
Before officially launching your store, it’s a good idea to place a couple of test orders to make sure your checkout flow and tax and shipping options are set up correctly.
When you’re confident everything is ready, your site is ready to be published so you can start making some sales!
That’s it! Now you know how to set up a BigCommerce store
Next, would you like to learn how to improve the transactional emails sent from your BigCommerce store? Check out our guide on improving transactional email design for more information.
