
Do you want to build a functional contact form for your React application?
Whether you’re building a portfolio website, business landing page, or complex web application, contact forms are essential for user engagement.
In this comprehensive guide, you’ll learn how to create a contact form in React.js. I’ll also show you how to implement email notification functionality using an email service provider.
- How to Create a Contact Form in React.js
- Step 1: Setting Up Your React Project
- Step 2: Building the Contact Form Component
- Step 3: Handling Form State and Validation
- Step 4: Creating the Backend Server
- Step 5: Connecting the Backend Server to the Contact Form
- Step 6: Testing Your Contact Form
- Troubleshooting Common Errors
- Best Practices and Security
- Frequently Asked Questions
How to Create a Contact Form in React.js
Prerequisites
Before we dive in, make sure you have these requirements set up:
- Node.js installed on your machine (version 20 or higher). Download the latest version here
- Basic knowledge of JavaScript and React.js
- A code editor like Visual Studio Code
- An email service provider. I’ll use SendLayer for this tutorial. You can get started with 200 free emails.
After creating your SendLayer account, make sure to authorize your sending domain. This step is crucial for improving email deliverability and ensuring your messages reach the inbox instead of the spam folder.
Step 1: Setting Up Your React Project
If you already have a React project, you can skip this section. Otherwise, let’s create a new React app using Vite.
To do this, open your terminal and run the following command:
npm create vite@latest contact-form-app -- --template react
Once the installation completes, navigate to the project directory:
cd contact-form-app
Then run the command below to install the project dependencies:
npm install
Now you can start the development server by running the following command:
npm run dev
You should see your React app running at http://localhost:5173. Now we’re ready to build our contact form!
Step 2: Building the Contact Form Component
Let’s create a clean, accessible contact form component. To start, I’ll first create a new file called ContactForm.jsx in the src directory.
Within this file, copy and paste the snippet below:
import { useState } from 'react';
import './ContactForm.css';

function ContactForm() {
  const [formData, setFormData] = useState({
    name: '',
    email: '',
    subject: '',
    message: ''
  });

  const handleChange = (e) => {
    const { name, value } = e.target;
    setFormData(prevState => ({
      ...prevState,
      [name]: value
    }));
  };

  const handleSubmit = (e) => {
    e.preventDefault();
    // We'll implement this later
    console.log('Form submitted:', formData);

     // Reset the form
    setFormData({
      name: '',
      email: '',
      subject: '',
      message: ''
    });
  };

  return (
    <div className="contact-form-container">
      <h2>Contact Us</h2>
      <form onSubmit={handleSubmit} className="contact-form">
        <div className="form-group">
          <label htmlFor="name">Name *</label>
          <input
            type="text"
            id="name"
            name="name"
            value={formData.name}
            onChange={handleChange}
            required
            placeholder="Your full name"
          />
        </div>

        <div className="form-group">
          <label htmlFor="email">Email *</label>
          <input
            type="email"
            id="email"
            name="email"
            value={formData.email}
            onChange={handleChange}
            required
            placeholder="[email protected]"
          />
        </div>

        <div className="form-group">
          <label htmlFor="subject">Subject *</label>
          <input
            type="text"
            id="subject"
            name="subject"
            value={formData.subject}
            onChange={handleChange}
            required
            placeholder="What's this about?"
          />
        </div>

        <div className="form-group">
          <label htmlFor="message">Message *</label>
          <textarea
            id="message"
            name="message"
            value={formData.message}
            onChange={handleChange}
            required
            rows="6"
            placeholder="Tell us more about your inquiry..."
          />
        </div>

        <button type="submit" className="submit-btn">
          Send Message
        </button>
      </form>
    </div>
  );
}

export default ContactForm;
Now, let’s add some basic styling. Create a ContactForm.css file:
.contact-form-container {
    max-width: 800px;
    margin: 2rem auto;
    padding: 2rem 3rem;
    background: #f9f9f9;
    border-radius: 8px;
    box-shadow: 0 2px 10px rgba(0, 0, 0, 0.1);
  }

  .contact-form {
    display: flex;
    flex-direction: column;
    gap: 1rem;
    width: 500px;
  }

  .contact-form h2 {
    text-align: center;
    color: #333;
    margin-bottom: 2rem;
  }


  .form-group {
    margin-bottom: 1.5rem;
  }

  .form-group label {
    display: block;
    width: 100%;
    text-align: left;
    margin-bottom: 0.5rem;
    color: #555;
    font-weight: 500;
  }

  .form-group input,
  .form-group textarea {
    width: 100%;
    padding: 0.75rem 0.3rem;
    border: 1px solid #ddd;
    border-radius: 4px;
    font-size: 1rem;
    transition: border-color 0.3s ease;
  }

  .form-group input:focus,
  .form-group textarea:focus {
    outline: none;
    border-color: #007bff;
    box-shadow: 0 0 0 2px rgba(0, 123, 255, 0.25);
  }

  .submit-btn {
    width: 100%;
    padding: 1rem;
    background: #007bff;
    color: white;
    border: none;
    border-radius: 4px;
    font-size: 1.1rem;
    cursor: pointer;
    transition: background-color 0.3s ease;
  }

  .submit-btn:hover {
    background: #0056b3;
  }

  .submit-btn:disabled {
    background: #6c757d;
    cursor: not-allowed;
  }
After creating the form component, let’s import and use it in the App.jsx to include the contact form:
import ContactForm from './ContactForm';
import './App.css';

function App() {
  return (
    <div className="App">
      <h1>My Website</h1>
      <ContactForm />
    </div>
  );
}

export default App;
Congratulations! You’ve created a contact form for your React application. Let’s run the development server to test our form before adding the email logic.
To run the dev server, open a terminal window and run the command below:
npm run dev
After that, copy the local address and open it in a browser. You should see the contact form component visible on the page.

With the current implementation, the form data will be logged to the console upon submission.

In the next section, I’ll implement email notification feature to alert site owners whenever a user fills the contact form.
Step 3: Handling Form State and Validation
Now let’s add proper form validation and error handling to our component. Update your ContactForm.jsx:
import { useState } from 'react';
import './ContactForm.css';

function ContactForm() {
  const [formData, setFormData] = useState({
    name: '',
    email: '',
    subject: '',
    message: ''
  });

  const [errors, setErrors] = useState({});
  const [isSubmitting, setIsSubmitting] = useState(false);
  const [submitStatus, setSubmitStatus] = useState('');

  const validateEmail = (email) => {
    const emailRegex = /^[^\s@]+@[^\s@]+\.[^\s@]+$/;
    return emailRegex.test(email);
  };

  const validateForm = () => {
    const newErrors = {};

    if (!formData.name.trim()) {
      newErrors.name = 'Name is required';
    } else if (formData.name.trim().length < 2) {
      newErrors.name = 'Name must be at least 2 characters';
    }

    if (!formData.email.trim()) {
      newErrors.email = 'Email is required';
    } else if (!validateEmail(formData.email)) {
      newErrors.email = 'Please enter a valid email address';
    }

    if (!formData.subject.trim()) {
      newErrors.subject = 'Subject is required';
    } else if (formData.subject.trim().length < 5) {
      newErrors.subject = 'Subject must be at least 5 characters';
    }

    if (!formData.message.trim()) {
      newErrors.message = 'Message is required';
    } else if (formData.message.trim().length < 10) {
      newErrors.message = 'Message must be at least 10 characters';
    }

    return newErrors;
  };

  const handleChange = (e) => {
    const { name, value } = e.target;
    setFormData(prevState => ({
      ...prevState,
      [name]: value
    }));

    // Clear errors as user types
    if (errors[name]) {
      setErrors(prevErrors => ({
        ...prevErrors,
        [name]: ''
      }));
    }
  };

  const handleSubmit = async (e) => {
    e.preventDefault();

    const formErrors = validateForm();

    if (Object.keys(formErrors).length > 0) {
      setErrors(formErrors);
      return;
    }

    setIsSubmitting(true);
    setErrors({});
    setSubmitStatus('');

    try {
      // We'll implement the API call here
      console.log('Sending form data:', formData);

      // Simulate API call for now
      await new Promise(resolve => setTimeout(resolve, 2000));

      setSubmitStatus('success');
      setFormData({
        name: '',
        email: '',
        subject: '',
        message: ''
      });
    } catch (error) {
      console.error('Error submitting form:', error);
      setSubmitStatus('error');
    } finally {
      setIsSubmitting(false);
    }
  };

  return (
    <div className="contact-form-container">
      <h2>Contact Us</h2>

      {submitStatus === 'success' && (
        <div className="success-message">
          Thank you! Your message has been sent successfully.
        </div>
      )}

      {submitStatus === 'error' && (
        <div className="error-message">
          Sorry, there was an error sending your message. Please try again.
        </div>
      )}

      <form onSubmit={handleSubmit} className="contact-form">
        <div className="form-group">
          <label htmlFor="name">Name *</label>
          <input
            type="text"
            id="name"
            name="name"
            value={formData.name}
            onChange={handleChange}
            required
            placeholder="Your full name"
            className={errors.name ? 'error' : ''}
          />
          {errors.name && <span className="error-text">{errors.name}</span>}
        </div>

        <div className="form-group">
          <label htmlFor="email">Email *</label>
          <input
            type="email"
            id="email"
            name="email"
            value={formData.email}
            onChange={handleChange}
            required
            placeholder="[email protected]"
            className={errors.email ? 'error' : ''}
          />
          {errors.email && <span className="error-text">{errors.email}</span>}
        </div>

        <div className="form-group">
          <label htmlFor="subject">Subject *</label>
          <input
            type="text"
            id="subject"
            name="subject"
            value={formData.subject}
            onChange={handleChange}
            required
            placeholder="What's this about?"
            className={errors.subject ? 'error' : ''}
          />
          {errors.subject && <span className="error-text">{errors.subject}</span>}
        </div>

        <div className="form-group">
          <label htmlFor="message">Message *</label>
          <textarea
            id="message"
            name="message"
            value={formData.message}
            onChange={handleChange}
            required
            rows="6"
            placeholder="Tell us more about your inquiry..."
            className={errors.message ? 'error' : ''}
          />
          {errors.message && <span className="error-text">{errors.message}</span>}
        </div>

        <button type="submit" className="submit-btn" disabled={isSubmitting}>
          {isSubmitting ? 'Sending...' : 'Send Message'}
        </button>
      </form>
    </div>
  );
}

export default ContactForm;
In the snippet above, I updated the existing ContactForm component to include field validation for the form. This is implemented in the validateForm() function. The validateEmail() function uses regular expressions to validate the email data.
After that, add these styles to your ContactForm.css:
.success-message {
  background: #d4edda;
  color: #155724;
  padding: 1rem;
  border-radius: 4px;
  border: 1px solid #c3e6cb;
  margin-bottom: 1.5rem;
}

.error-message {
  background: #f8d7da;
  color: #721c24;
  padding: 1rem;
  border-radius: 4px;
  border: 1px solid #f5c6cb;
  margin-bottom: 1.5rem;
}

.form-group input.error,
.form-group textarea.error {
  border-color: #dc3545;
  box-shadow: 0 0 0 2px rgba(220, 53, 69, 0.25);
}

.error-text {
  color: #dc3545;
  font-size: 0.875rem;
  margin-top: 0.25rem;
  display: block;
}
Now we’ve added form validation to the contact form. When filling it out, users will see an error when the field isn’t properly filled.

Step 4: Creating the Backend Server
Since React runs in the browser, we need a backend server to handle email sending. You can connect the form to a backend server using SMTP connection or through an email API.
For this tutorial, I’ll use an email API. Let’s create an Express.js server that will process our form submissions.
First, create a new directory for your backend:
mkdir backend && cd backend
Then, initialize a new Node.js project using the command:
npm init -y
After initializing the NPM project, let’s go ahead and install the required dependencies:
npm install express cors dotenv
Next, install the Node.js dev server package:
npm install -D nodemon
Once the installation completes, create a server.js file in your backend directory and add the following snippets:
const express = require('express');
const cors = require('cors');
const dotenv = require('dotenv');

dotenv.config();

const app = express();
const port = process.env.PORT || 3001;

// Middleware
app.use(cors());
app.use(express.json());

// Health check endpoint
app.get('/health', (req, res) => {
  res.json({ status: 'Server is running' });
});

// Contact form endpoint
app.post('/api/contact', async (req, res) => {
  try {
    const { name, email, subject, message } = req.body;

    // Validate required fields
    if (!name || !email || !subject || !message) {
      return res.status(400).json({
        error: 'All fields are required'
      });
    }

    console.log('Received contact form submission:', {
      name,
      email,
      subject,
      message: message.substring(0, 50) + '...'
    });

    // We'll implement email sending here

    res.json({
      success: true,
      message: 'Your message has been sent successfully!'
    });

  } catch (error) {
    console.error('Error processing contact form:', error);
    res.status(500).json({
      error: 'Internal server error'
    });
  }
});

app.listen(port, () => {
  console.log(`Server running on port ${port}`);
});
Next, update your package.json scripts to support development mode:
{
  "scripts": {
    "start": "node server.js",
    "dev": "nodemon server.js"
  }
}
After that, create a .env file for your environment variables:
PORT=3001
NODE_ENV=development

# SendLayer API Configuration
SENDLAYER_API_KEY=your-sendlayer-api-key
[email protected]
Pro Tip: Never commit sensitive credentials like API keys to version control platforms like GitHub. Always use environment variables to secure your details.
To get your API key, log in to your SendLayer account. Once you’re logged in, click the Settings menu and select the API Keys tab.
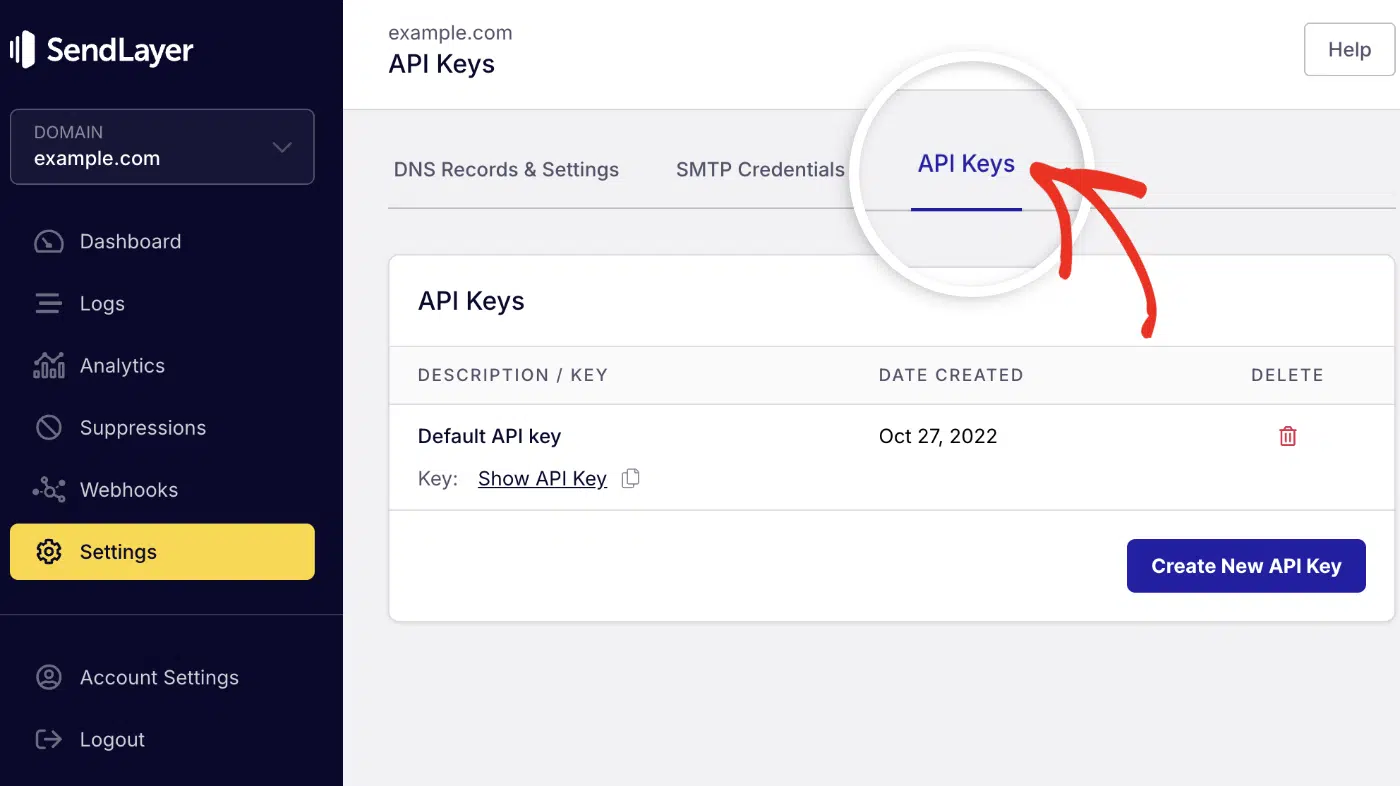
Then click the copy icon next to Default API key to copy it.

Tip: You can create new API keys by clicking the Create New API Key button.
After copying your API key, return to your code editor and create a .env file. Then paste the following snippet to the file.
Send Email with SendLayer API in React
With the backend server ready, let’s proceed to add the email sending functionality to the server. In a previous tutorial, I covered how to send emails in React using SMTP and Nodemailer. However, this section will focus on sending emails through an API.
Using an email API provides additional benefits like improved email deliverability and tracking.
To start, you’ll need to install the sendlayer package:
npm install sendlayer
Once the installation completes, open the server.js file and update it to include email functionality:
const express = require('express');
const cors = require('cors');
const dotenv = require('dotenv');
const { SendLayer } = require('sendlayer');

dotenv.config();

const app = express();
const port = process.env.PORT || 3001;

// Initialize SendLayer
const sendlayer = new SendLayer(process.env.SENDLAYER_API_KEY);

// Middleware
app.use(cors());
app.use(express.json());

app.post('/api/contact', async (req, res) => {
  try {
    const { name, email, subject, message } = req.body;

    // Validate required fields
    if (!name || !email || !subject || !message) {
      return res.status(400).json({
        error: 'All fields are required'
      });
    }

    // Send notification email to yourself
    const notificationResponse = await sendlayer.Emails.send({
      from: {
        email: process.env.FROM_EMAIL,
        name: 'Your Website'
      },
      to: [{
        email: process.env.FROM_EMAIL,
        name: 'Website Owner'
      }],
      subject: `New Contact Form: ${subject}`,
      html: `
        <div style="font-family: Arial, sans-serif; max-width: 600px; margin: 0 auto;">
          <h2 style="color: #333; border-bottom: 2px solid #007bff; padding-bottom: 10px;">
            New Contact Form Submission
          </h2>
          <div style="background: #f9f9f9; padding: 20px; border-radius: 8px; margin: 20px 0;">
            <p><strong>Name:</strong> ${name}</p>
            <p><strong>Email:</strong> <a href="mailto:${email}">${email}</a></p>
            <p><strong>Subject:</strong> ${subject}</p>
          </div>
          <div style="background: white; padding: 20px; border-left: 4px solid #007bff;">
            <h3>Message:</h3>
            <p style="line-height: 1.6;">${message.replace(/\n/g, '<br>')}</p>
          </div>
          <div style="margin-top: 20px; padding: 15px; background: #e9ecef; border-radius: 4px;">
            <p style="margin: 0; font-size: 14px; color: #6c757d;">
              <em>To reply directly, send an email to: ${email}</em>
            </p>
          </div>
        </div>
      `,
      text: `
        New Contact Form Submission

        Name: ${name}
        Email: ${email}
        Subject: ${subject}

        Message:
        ${message}

        Reply to: ${email}
      `,
      replyTo: email,
      tags: ['contact-form'],
    });

    // Send auto-reply to the user
    const autoReplyResponse = await sendlayer.Emails.send({
      from: {
        email: process.env.FROM_EMAIL,
        name: 'Your Website'
      },
      to: [{
        email: email,
        name: name
      }],
      subject: `Thank you for contacting us, ${name}!`,
      html: `
        <div style="font-family: Arial, sans-serif; max-width: 600px; margin: 0 auto;">
          <div style="background: linear-gradient(135deg, #007bff, #0056b3); color: white; padding: 30px; text-align: center; border-radius: 8px 8px 0 0;">
            <h1 style="margin: 0; font-size: 28px;">Thank You!</h1>
            <p style="margin: 10px 0 0 0; font-size: 16px; opacity: 0.9;">
              We've received your message
            </p>
          </div>

          <div style="background: white; padding: 30px; border-radius: 0 0 8px 8px; box-shadow: 0 2px 10px rgba(0,0,0,0.1);">
            <p style="font-size: 16px; color: #333; line-height: 1.6;">
              Hi <strong>${name}</strong>,
            </p>
            <p style="font-size: 16px; color: #333; line-height: 1.6;">
              Thank you for reaching out! We've received your message about "<em>${subject}</em>"
              and will get back to you as soon as possible.
            </p>

            <div style="background: #f8f9fa; padding: 20px; border-radius: 6px; margin: 25px 0; border-left: 4px solid #007bff;">
              <h3 style="margin: 0 0 10px 0; color: #333; font-size: 18px;">Your Message:</h3>
              <p style="margin: 0; font-style: italic; color: #555; line-height: 1.6;">
                "${message.replace(/\n/g, '<br>')}"
              </p>
            </div>

            <p style="font-size: 16px; color: #333; line-height: 1.6;">
              We typically respond within 24 hours during business days. If you have any urgent questions,
              feel free to reply directly to this email.
            </p>

            <div style="margin: 30px 0; padding: 20px; background: #e3f2fd; border-radius: 6px; text-align: center;">
              <p style="margin: 0; color: #1976d2; font-weight: 500;">
                Best regards,<br>
                <strong>Your Website Team</strong>
              </p>
            </div>
          </div>
        </div>
      `,
      text: `
        Hi ${name},

        Thank you for reaching out! We've received your message about "${subject}" and will get back to you as soon as possible.

        Your Message:
        "${message}"

        We typically respond within 24 hours during business days. If you have any urgent questions, feel free to reply directly to this email.

        Best regards,
        Your Website Team
      `,
      tags: ['auto-reply', 'contact-form'],
    });

    console.log('Emails sent successfully:', {
      notification: notificationResponse,
      autoReply: autoReplyResponse,
      user: { name, email }
    });

    res.json({
      success: true,
      message: 'Your message has been sent successfully!'
    });

  } catch (error) {
    console.error('Error sending email with SendLayer:', error);
    res.status(500).json({
      error: 'Failed to send message. Please try again later.'
    });
  }
});

app.get('/health', (req, res) => {
  res.json({ status: 'Server is running' });
});

app.listen(port, () => {
  console.log(`Server running on port ${port}`);
  console.log('SendLayer API configured for email sending');
});
Code breakdown
In the code above, we initialize the SendLayer package with the API key variable stored in the environment variable.
Then, I proceeded to update the /api/contact endpoint to include the email logic. The route requires 4 parameters (name, email, subject, and message). These parameters will be passed from the contact form when we connect the backend server to the form component.
Within the route, I created 2 constants that call the sendlayer.Emails.send() method. The notificationResponse variable handles the notification email sent to the site owner. The autoReplyResponse variable sends an email to the user after submitting their contact request.:
SendLayer’s SDK enables you to send both HTML and plain-text emails. In our implementation, I added both options to ensure the email content is received.
Tip: See our developer documentation to learn more about sending emails with the SendLayer API.
Step 5: Connecting the Backend Server to the Contact Form
Now let’s connect our React frontend to the backend. First, install axios for making HTTP requests.
To do so, open a terminal window and navigate to the React project’s directory. Once there, run the command below:
npm install axios
After that, you’ll need to update your ContactForm.jsx file to make actual API calls. Here’s the updated snippet:
import { useState } from 'react';
import axios from 'axios';
import './ContactForm.css';

const API_BASE_URL = 'http://localhost:3001';

function ContactForm() {
  const [formData, setFormData] = useState({
    name: '',
    email: '',
    subject: '',
    message: ''
  });

  const [errors, setErrors] = useState({});
  const [isSubmitting, setIsSubmitting] = useState(false);
  const [submitStatus, setSubmitStatus] = useState('');

  const validateEmail = (email) => {
    const emailRegex = /^[^\s@]+@[^\s@]+\.[^\s@]+$/;
    return emailRegex.test(email);
  };

  const validateForm = () => {
    const newErrors = {};

    if (!formData.name.trim()) {
      newErrors.name = 'Name is required';
    } else if (formData.name.trim().length < 2) {
      newErrors.name = 'Name must be at least 2 characters';
    }

    if (!formData.email.trim()) {
      newErrors.email = 'Email is required';
    } else if (!validateEmail(formData.email)) {
      newErrors.email = 'Please enter a valid email address';
    }

    if (!formData.subject.trim()) {
      newErrors.subject = 'Subject is required';
    } else if (formData.subject.trim().length < 5) {
      newErrors.subject = 'Subject must be at least 5 characters';
    }

    if (!formData.message.trim()) {
      newErrors.message = 'Message is required';
    } else if (formData.message.trim().length < 10) {
      newErrors.message = 'Message must be at least 10 characters';
    }

    return newErrors;
  };

  const handleChange = (e) => {
    const { name, value } = e.target;
    setFormData(prevState => ({
      ...prevState,
      [name]: value
    }));

    // Clear errors as user types
    if (errors[name]) {
      setErrors(prevErrors => ({
        ...prevErrors,
        [name]: ''
      }));
    }
  };

  const handleSubmit = async (e) => {
    e.preventDefault();

    const formErrors = validateForm();

    if (Object.keys(formErrors).length > 0) {
      setErrors(formErrors);
      return;
    }

    setIsSubmitting(true);
    setErrors({});
    setSubmitStatus('');

    try {
      const response = await axios.post(`${API_BASE_URL}/api/contact`, formData, {
        headers: {
          'Content-Type': 'application/json'
        },
        timeout: 10000 // 10 seconds timeout
      });

      if (response.data.success) {
        setSubmitStatus('success');
        setFormData({
          name: '',
          email: '',
          subject: '',
          message: ''
        });
      }
    } catch (error) {
      console.error('Error submitting form:', error);

      if (error.code === 'ECONNABORTED') {
        setSubmitStatus('timeout');
      } else if (error.response?.status === 400) {
        setSubmitStatus('validation');
      } else {
        setSubmitStatus('error');
      }
    } finally {
      setIsSubmitting(false);
    }
  };

  const getStatusMessage = () => {
    switch (submitStatus) {
      case 'success':
        return {
          type: 'success',
          message: 'Thank you! Your message has been sent successfully. We\'ll get back to you soon!'
        };
      case 'timeout':
        return {
          type: 'error',
          message: 'Request timed out. Please check your connection and try again.'
        };
      case 'validation':
        return {
          type: 'error',
          message: 'Please check all fields and try again.'
        };
      default:
        return {
          type: 'error',
          message: 'Sorry, there was an error sending your message. Please try again later.'
        };
    }
  };

  return (
    <div className="contact-form-container">
      <h2>Contact Us</h2>

      {submitStatus && (
        <div className={`status-message ${getStatusMessage().type}`}>
          {getStatusMessage().message}
        </div>
      )}

      <form onSubmit={handleSubmit} className="contact-form">
        <div className="form-row">
          <div className="form-group">
            <label htmlFor="name">Name *</label>
            <input
              type="text"
              id="name"
              name="name"
              value={formData.name}
              onChange={handleChange}
              required
              placeholder="Your full name"
              className={errors.name ? 'error' : ''}
              disabled={isSubmitting}
            />
            {errors.name && <span className="error-text">{errors.name}</span>}
          </div>

          <div className="form-group">
            <label htmlFor="email">Email *</label>
            <input
              type="email"
              id="email"
              name="email"
              value={formData.email}
              onChange={handleChange}
              required
              placeholder="[email protected]"
              className={errors.email ? 'error' : ''}
              disabled={isSubmitting}
            />
            {errors.email && <span className="error-text">{errors.email}</span>}
          </div>
        </div>

        <div className="form-group">
          <label htmlFor="subject">Subject *</label>
          <input
            type="text"
            id="subject"
            name="subject"
            value={formData.subject}
            onChange={handleChange}
            required
            placeholder="What's this about?"
            className={errors.subject ? 'error' : ''}
            disabled={isSubmitting}
          />
          {errors.subject && <span className="error-text">{errors.subject}</span>}
        </div>

        <div className="form-group">
          <label htmlFor="message">Message *</label>
          <textarea
            id="message"
            name="message"
            value={formData.message}
            onChange={handleChange}
            required
            rows="6"
            placeholder="Tell us more about your inquiry..."
            className={errors.message ? 'error' : ''}
            disabled={isSubmitting}
          />
          {errors.message && <span className="error-text">{errors.message}</span>}
        </div>

        <button type="submit" className="submit-btn" disabled={isSubmitting}>
          {isSubmitting ? (
            <>
              <span className="spinner"></span>
              Sending...
            </>
          ) : (
            'Send Message'
          )}
        </button>
      </form>
    </div>
  );
}

export default ContactForm;
In the snippet above, I updated the contact form component to include API requests to the backend server we set up. The API_BASE_URL variable is the backend Node server address. You’ll need to update this address when you host your backend on a remote server.
The axios library is used to make the post request to the backend server. The endpoint requires 4 parameters, which we pass through the formData variable.
Here are additional styles to include in the ContactForm.css file:
.status-message {
  padding: 1rem;
  border-radius: 4px;
  margin-bottom: 1.5rem;
  font-weight: 500;
}

.status-message.success {
  background: #d4edda;
  color: #155724;
  border: 1px solid #c3e6cb;
}

.status-message.error {
  background: #f8d7da;
  color: #721c24;
  border: 1px solid #f5c6cb;
}

.form-row {
  display: grid;
  grid-template-columns: 1fr 1fr;
  gap: 1rem;
}

@media (max-width: 768px) {
  .form-row {
    grid-template-columns: 1fr;
  }
}

.spinner {
  display: inline-block;
  width: 16px;
  height: 16px;
  border: 2px solid transparent;
  border-top: 2px solid currentColor;
  border-radius: 50%;
  animation: spin 1s linear infinite;
  margin-right: 8px;
}

@keyframes spin {
  0% { transform: rotate(0deg); }
  100% { transform: rotate(360deg); }
}

.submit-btn:disabled {
  background: #6c757d;
  cursor: not-allowed;
  opacity: 0.7;
}
Step 6: Testing Your Contact Form
Now let’s test our contact form implementation:
Start the backend server: In your backend directory, run the following command:
npm run dev
Start the React development server: After starting the backend server, open another terminal window and navigate to your React project directory. Once there, run the command below:
npm run dev
With both servers running, open your browser and go to localhost:5173 to access the React application. Then go ahead and fill out all required fields and submit the form.

You should see a success notification if everything is properly configured.

After that, check the email inbox you specified in the server.js file.

Troubleshooting Common Errors
When implementing a contact form with email notification in React, you’ll likely encounter issues. Below, I’ve highlighted some of the ones I encountered:
net::ERR_CONNECTION_REFUSED
This error indicates that the connection you’re attempting to establish with the backend server was refused. It usually occurs if the backend server is unreachable or inactive. To resolve this issue, ensure the API_BASE_URL is correct and corresponds to the server. Also, check that the backend server is running.
Best Practices and Security
1. Use Environment Variables
Never commit sensitive credentials to your repository. Always use environment variables:
// Good
const apiKey = process.env.SENDLAYER_API_KEY;

// Bad - Never do this
const apiKey = 'your-actual-api-key-here';
2. Sanitize Form Input
Always sanitize user inputs to prevent XSS attacks. Libraries like dompurify include validators to sanitize form inputs. To use this library, you’ll first need to add it as a dependency to your project:
npm install validator dompurify
Here’s how you’ll use the package to sanitize form data:
const validator = require('validator');

// Sanitize inputs
const sanitizedName = validator.escape(name.trim());
const sanitizedSubject = validator.escape(subject.trim());
const sanitizedMessage = validator.escape(message.trim());
3. Implement Rate Limiting
When sending emails through your application, it is important to implement rate limiting to avoid running into errors. Fortunately, SendLayer’s SDK includes rate limiting support out of the box. But you can use libraries like express-rate-limit to add this to your codebase. Here’s how to do it:
npm install express-rate-limit
After installing the package, add it to your email endpoint:
const rateLimit = require('express-rate-limit');

const contactFormLimiter = rateLimit({
  windowMs: 15 * 60 * 1000, // 15 minutes
  max: 5, // limit each IP to 5 requests per windowMs
  message: 'Too many contact form submissions, please try again later.',
  standardHeaders: true,
  legacyHeaders: false,
});

app.use('/api/contact', contactFormLimiter);
Frequently Asked Questions
These are answers to some of the top questions we see about creating contact forms in React.
How do I handle form validation in React.js?
Implement client-side validation using state and conditional rendering to display error messages. Use the useState hook to track validation errors and update them as users interact with form fields. Always validate on both the frontend and backend for security.
Can I create a contact form in React without a backend?
While React runs in the browser and cannot directly send emails, you can use third-party services like EmailJS, Formspree, or Netlify Forms to handle form submissions without building your own backend. However, having your own backend gives you more control and customization options.
How do I send form data to my email in React?
You’ll need a backend service to send emails. React cannot send emails directly due to browser security restrictions. You can use Node.js with Nodemailer for SMTP, or integrate with email APIs like SendLayer for better deliverability and features. Our tutorial on sending emails in JavaScript covers different sending methods.
How can I deploy my React contact form?
You’ll need to deploy the frontend and backend services separately. You can deploy the frontend to services like Vercel, Netlify, or GitHub Pages.
The backend server can be deployed to platforms like Heroku, Railway, or DigitalOcean. Make sure to update your API URLs and configure environment variables for production.
That’s it! You’ve successfully built a complete contact form system with React.js and email notifications support.
If your app is built using Next.js, check out our tutorial for details on how to send emails in Next.js.