Are you getting stuck on how to send email in Laravel?
Laravel is an open-source PHP framework that makes it faster and easier to build web applications. It includes built-in modules, route handling, easy database migration, and security features that streamline and speed up the process of developing PHP-based websites and applications.
Because websites and applications often need to send transactional emails, such as account notifications, password reset messages, and support tickets, it’s crucial to ensure email is configured and working before starting development.
In this guide, I’ll take you through the steps to send emails in Laravel with SMTP, including code snippets you can cut and paste to get up and running within minutes.
- How To Send Email in Laravel With SMTP (Quick Steps)
- Laravel Mail vs. PHP Mail() Function
- Laravel Email Basics
- Prerequisites: Installing Laravel
- How To Send Email in Laravel With SMTP
- Frequently Asked Questions
- How can I customize Laravel email content?
- How do I send emails asynchronously in Laravel?
- How do I attach files to an email in Laravel?
- How do I customize the email subject line?
- Can I send emails to multiple recipients in Laravel?
- What is the difference between Mail::send and Mail::queue in Laravel?
- What is a Laravel Mailable?
- How do I send email in Laravel without SMTP?
- Can this email setup work for password reset emails?
- How do I send email in Laravel using Gmail SMTP?
- That’s it! Now you know how to send email in Laravel.
How To Send Email in Laravel With SMTP (Quick Steps)
- Add your SMTP credentials to the
.envfile. - Confirm the SMTP transport in
config/mail.php. - Generate a Mailable class with
php artisan make:mail TestEmail. - Create a Blade email view in
resources/views/emails. - Add a route that calls
Mail::to(...)->send(new TestEmail()). - Visit the route to send your test email.
The full walkthrough below covers each step, and these instructions work on Laravel 9 and later, including Laravel 12 and 13.
Laravel Mail vs. PHP Mail() Function
Sending mail with Laravel’s email API offers several advantages over using the built-in PHP mail() function. Some of the benefits of Laravel mail include:
- Better security, protecting your website or app from malicious attacks.
- Supports email queuing, so you can avoid hitting your email provider’s limits or your messages being flagged as spam.
- Easy configuration with support for multiple mail drivers.
- Robust error handling, enabling you to troubleshoot email issues promptly.
- Email templates are included so you can easily create dynamic transactional emails for various purposes.
- Option to include file attachments in various formats.
- Localization options to send out emails in multiple languages.
Laravel Email Basics
Laravel comes with an email API built on the Symfony Mailer that supports multipart messages, CSS, attachments, and embedded images, along with several other features.
This mailer includes drivers for some popular email providers and an SMTP driver to use custom credentials for the email provider of your choice.
If you’re looking for a suitable transactional email provider for use with Laravel, SendLayer is a great choice, that’s simple to set up and yet highly secure and powerful.
One of the standout features of SendLayer is its domain reputation protection. It automatically creates a subdomain for your email sending activities, which means your main domain remains protected from any potential deliverability issues. This helps to maintain your sender reputation so your emails stay out of the spam folder.
SendLayer also offers a free trial that allows you to send up to 200 emails, and paid plans start from just $5 a month, making it affordable whether you’re simply testing during development or you need to scale up to sending thousands of emails from your application each month.
Whichever email provider you choose, you’ll need the SMTP credentials for your account, including the SMTP server address, username, and password, before you can set up email in Laravel.
Prerequisites: Installing Laravel
If you haven’t already installed Laravel, you’ll need to do this before getting started. Laravel supports Windows, MacOS, and Linux, and the installation steps vary slightly depending on which platform you’re on.
Regardless of your operating system, you’ll need XAMPP or a stack including a web server like Apache, PHP, and MySQL or an alternative database to run Laravel.
You’ll also need Composer, which is a PHP dependency management tool that Laravel needs to install necessary libraries and packages.
You can see detailed installation instructions and various ways to install Laravel in the official documentation.
Once you’ve installed Laravel and created a new project (I called my project “emailtest”, you can navigate to your project directory in your command line interface:
cd emailtest
Once you’re in the project’s directory, start the server with the command:
php artisan serve
You can now access your Laravel project via your web browser by navigating to:
http://127.0.0.1:8000

How To Send Email in Laravel With SMTP
Once your Laravel project is up and running, it’s time to set up your email. This is all managed via the command line, and there are a few simple steps to configure your SMTP settings and send a test email.
Step 1: Set SMTP Settings in .env File
First, you need to configure your SMTP settings in the .env file of your Laravel project. Open the .env file with a command line editor such as nano by running the following command:
nano .env
You can now add or modify the following lines with your SMTP server details:
MAIL_MAILER=smtp
MAIL_HOST=smtp.sendlayer.net
MAIL_PORT=587
MAIL_USERNAME=your_username
MAIL_PASSWORD=your_password
MAIL_ENCRYPTION=tls
[email protected]
MAIL_FROM_NAME="${APP_NAME}"
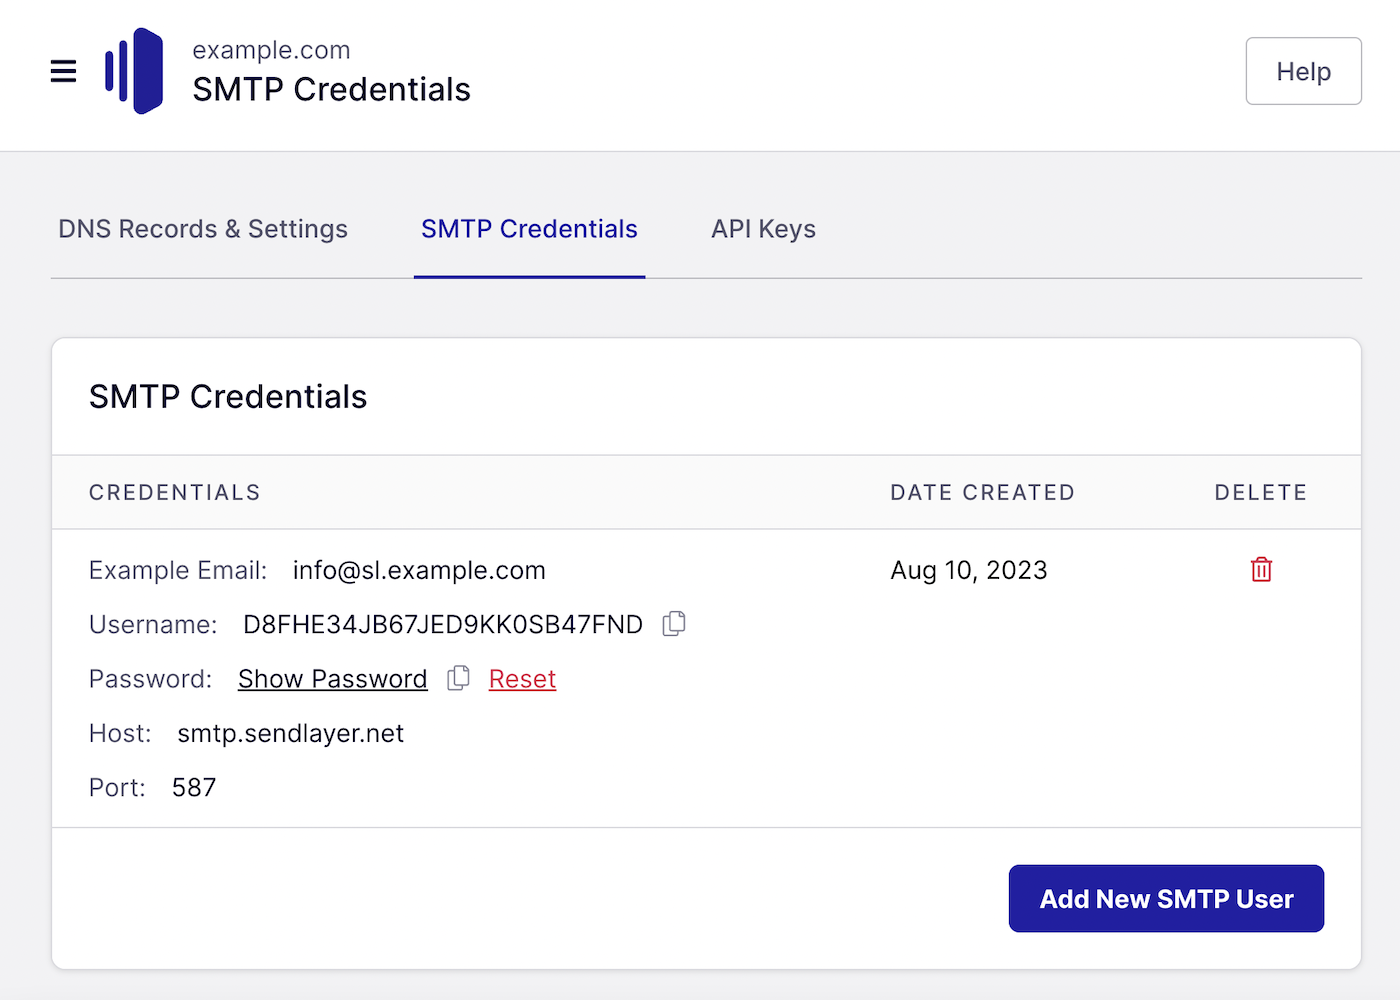
If you’re using SendLayer, you can find your SMTP credentials and copy and paste your username and password from your dashboard.
Once you’re finished editing the file, press CTRL + X to close the .env file and follow the prompts to save the file.
Step 2: Configure Mail Settings in config/mail.php
Laravel uses the settings in the .env file by default, but it’s a good idea to check the config/mail.php file to ensure it uses the correct values.
Open the file by running the command:
nano config/mail.php
Make sure the file includes Laravel mail SMTP config that looks like the following:
'smtp' => [
            'transport' => 'smtp',
           'url' => env('MAIL_URL'),
            'host' => env('MAIL_HOST', '127.0.0.1'),
            'port' => env('MAIL_PORT', 2525),
            'encryption' => env('MAIL_ENCRYPTION', 'tls'),
            'username' => env('MAIL_USERNAME'),
            'password' => env('MAIL_PASSWORD'),
            'timeout' => null,
            'local_domain' => env('MAIL_EHLO_DOMAIN'),
        ],
This references the environment variables set in .env, so you shouldn’t need to make any edits unless you’ve already edited the config file to change the settings at some point.
Step 3: Create a Mailable Class
To send an email, you need to create a Mailable class. Run the following command to create one:
php artisan make:mail TestEmail
On current Laravel versions, this creates a class in app/Mail that uses the envelope(), content(), and attachments() methods. Older tutorials show a single build() method, which still works but is no longer how Laravel generates the class.
Open the newly created file (app/Mail/TestEmail.php) and customize it to your needs. For example:
<?php

namespace App\Mail;

use Illuminate\Bus\Queueable;
use Illuminate\Mail\Mailable;
use Illuminate\Mail\Mailables\Content;
use Illuminate\Mail\Mailables\Envelope;
use Illuminate\Queue\SerializesModels;

class TestEmail extends Mailable
{
    use Queueable, SerializesModels;

    /**
     * Get the message envelope.
     */
    public function envelope(): Envelope
    {
        return new Envelope(
            subject: 'Test Email',
        );
    }

    /**
     * Get the message content definition.
     */
    public function content(): Content
    {
        return new Content(
            view: 'emails.test',
        );
    }

    /**
     * Get the attachments for the message.
     *
     * @return array<int, \Illuminate\Mail\Mailables\Attachment>
     */
    public function attachments(): array
    {
        return [];
    }
}
The envelope() method sets the subject and sender, content() points to your Blade view, and attachments() returns any files. You no longer set these inside a build() method.
Step 4: Create an Email View
Next, create the email view used to generate the email content.
Create a file called test.blade.php in the resources/views/emails directory. This will be your new Blade email template.
You can create and edit the file directly with nano:
nano resources/views/emails/test.blade.php
Once you’ve created the file, you can customize the following code to create your email template:
<!-- resources/views/emails/test.blade.php -->
<!DOCTYPE html>
<html>
 <head>
    <title>Test Email</title>
</head>

<body>
    <h1>Hello!</h1>
    <p>This is a test email from Laravel.</p>
</body>
</html>
Quit nano and remember to save the file.
Step 5: Send a Test Email
To send the test email, create a route in routes/web.php:
use Illuminate\Support\Facades\Mail;
use App\Mail\TestEmail;

Route::get('/send-test-email', function () {
    Mail::to('[email protected]')->send(new TestEmail());
    return 'Test email sent!';
});
Remember to replace [email protected] with the email address you want to receive the test email at.
Step 6: Visit the Route to Send the Email
Open your browser and go to http://127.0.0.1:8000/send-test-email. If everything is configured correctly, you should see the message “Test email sent!” and the email should be delivered to the recipient’s inbox.
Let’s check to make sure we got the email:

Congratulations! You’ve now successfully set up SMTP email and sent an email in Laravel.
Bonus: Check the Email Logs
If you didn’t receive the email, you can check the Laravel email logs to see if you can identify the issue. These logs can be invaluable for troubleshooting problems if your emails aren’t sending or being received as expected.
You’ll find the logs in storage/logs/laravel.log.
Here you can easily see any error messages or just keep track of all the emails your Laravel website or application has sent.
FAQs – Send Email in Laravel
These are answers to some of the top questions developers ask regarding setting up and sending emails in Laravel.
How can I customize Laravel email content?
Pass data to your Blade template through the content() method’s with array, then use it in the view:
public function content(): Content
{
    return new Content(
        view: 'emails.test',
        with: [
            'name' => 'John Doe',
            'message' => 'This is a custom message.',
        ],
    );
}
In your Blade template, you can use the passed data:
<p>Hello, {{ $name }}!</p>
<p>{{ $message }}</p>
How do I send emails asynchronously in Laravel?
To send emails asynchronously in Laravel, you can queue the email using Laravel’s built-in queue system. First, configure your queue driver in the .env file:
QUEUE_CONNECTION=database
Next, create the necessary database table for queues. On Laravel 11 and later, use make:queue-table (older versions use queue:table):
php artisan make:queue-table && php artisan migrate
Then, modify your Mailable class to implement the ShouldQueue interface:
use Illuminate\Contracts\Queue\ShouldQueue;
class TestEmail extends Mailable implements ShouldQueue {
    // Your existing code
}
Finally, use the Mail::queue method to queue the email:
use Illuminate\Support\Facades\Mail;
use App\Mail\TestEmail;

Route::get('/send-test-email', function () {
    Mail::to('[email protected]')->queue(new TestEmail());
    return 'Test email queued!';
});
How do I attach files to an email in Laravel?
Return the file from the attachments() method in your Mailable class:
use Illuminate\Mail\Mailables\Attachment;

public function attachments(): array
{
    return [
        Attachment::fromPath(public_path('files/report.pdf'))
            ->as('report.pdf')
            ->withMime('application/pdf'),
    ];
}
Be sure to replace files/report.pdf with the actual path to the file you want to attach.
How do I customize the email subject line?
Set the subject in the envelope() method of your Mailable class:
public function envelope(): Envelope
{
    return new Envelope(
        subject: 'Custom Subject Line',
    );
}
Can I send emails to multiple recipients in Laravel?
Yes, you can send emails to multiple recipients by passing an array of email addresses to the to method:
use Illuminate\Support\Facades\Mail;
use App\Mail\TestEmail;

Route::get('/send-test-email', function () {
    $recipients = ['[email protected]', '[email protected]'];
    Mail::to($recipients)->send(new TestEmail());
    return 'Test email sent to multiple recipients!';
});
What is the difference between Mail::send and Mail::queue in Laravel?
Mail::send sends the email immediately, while Mail::queue places it in the queue for later delivery. Using Mail::queue is beneficial for sending emails asynchronously, improving the responsiveness of your application.
What is a Laravel Mailable?
A Laravel Mailable is a class that represents an email message. It defines the recipients, subject, view, and attachments through the envelope(), content(), and attachments() methods. Mailables allow you to organize:
- recipients
- subject lines
- Blade templates
- attachments
- email content
To create one, run:
php artisan make:mail WelcomeEmail
Then send it with:
Mail::to($user)->send(new WelcomeEmail());
Using Mailables is considered a best practice because it keeps email logic organized and reusable across your application.
How do I send email in Laravel without SMTP?
You don’t need SMTP to send emails in Laravel.
Many developers use email APIs instead because they’re easier to scale and generally offer better deliverability.
Popular options include:
- SendLayer
- Mailgun
- Amazon SES
- Postmark
- Resend
Instead of opening an SMTP connection, Laravel sends HTTPS requests directly to the email provider’s API.
Can this email setup work for password reset emails?
Yes. Once you’ve configured SMTP in your Laravel application, it works for all user actions, such as welcome emails and password resets. For more details, see our tutorial on implementing password reset in Laravel.
How do I send email in Laravel using Gmail SMTP?
Laravel supports Gmail SMTP out of the box. To use Gmail, update your mail settings:
MAIL_MAILER=smtp
MAIL_HOST=smtp.gmail.com
MAIL_PORT=587
[email protected]
MAIL_PASSWORD=your_app_password
MAIL_ENCRYPTION=tls
Google requires App Passwords for most SMTP integrations, so you’ll need to enable two-factor authentication and generate an App Password before sending emails.
Once configured, Laravel can send emails through Gmail using the same Mailables and Mail facade shown throughout this guide.
That’s it! Now you know how to send email in Laravel.
Next, would you like to make it easy for users to unsubscribe from your Laravel emails? Check out our guide to the list-unsubscribe header for more information.
