
I still remember the first time my team asked me to build an HTML email template. Three hours later, I was drowning in nested tables and wondering why my CSS wasn’t working. If you’ve ever built HTML email templates, you know exactly what I’m talking about.
What if you could build React email templates the same way you build modern web applications?
In this guide, I’ll show you how to build professional email templates in React.js with live code examples. You’ll also learn how to integrate with SendLayer to send emails in production.
By the end of this tutorial, you’ll have a working email template built with React.Email, integrated with SendLayer, and ready to send to your users. Let’s dive in.
React.Email vs Traditional Email Development
Traditional HTML email development requires you to use table layouts, inline all your styles, and test extensively across email clients.
With React.Email, you write modern React components and the library handles the conversion to email-compatible HTML automatically.
Here’s a quick comparison:
Traditional HTML Email:
<table width="100%" cellpadding="0" cellspacing="0">
  <tr>
    <td style="padding: 20px; background-color: #007bff;">
      <a href="https://example.com" style="color: #ffffff; text-decoration: none;">
        Click Here
      </a>
    </td>
  </tr>
</table>
React.Email:
<Button
  href="https://example.com"
  style={{ backgroundColor: '#007bff', padding: '20px' }}
>
  Click Here
</Button>
The React.Email version is cleaner, easier to maintain, and much more intuitive for developers familiar with React.
How to Design Email Templates in React.js
Prerequisites
Before we dive in, make sure you have:
- Node.js installed (version 18.x or higher recommended). Download it here
- Basic knowledge of React and JSX
- A code editor (I recommend Visual Studio Code)
- A SendLayer account for sending emails
SendLayer is an email API service that makes sending transactional emails reliable and secure. One feature I particularly like is the domain reputation protection. SendLayer creates a subdomain specifically for email activities, which keeps your main domain’s reputation safe.
You can start with a free trial that lets you send up to 200 emails for free.
How to Set Up React.Email in Your Project
There are two ways to set up React.Email: automatic setup for new projects or manual setup for existing projects.
Method 1: Automatic Setup (Recommended for New Projects)
The fastest way to get started is using the create-email command. Open your terminal and run:
npx create-email@latest
This command will:
- Create a new directory with React.Email pre-configured
- Set up a basic folder structure
- Include sample email templates
After the installation completes, navigate to the project directory:
cd your-project-name
Then run the command below to install all dependencies:
npm install
Method 2: Manual Setup (For Existing Projects)
If you’re adding React Email to your existing React.js project, you’ll need to install the packages manually.
To do so, run the command below:
npm install react-email @react-email/components -E
npm install @react-email/preview-server -D -E
Adding the -E flag ensures you install the exact version specified, preventing automatic minor/patch updates that could cause compatibility issues.
Configure the Preview Server
After installing the packages, open the project in your code editor. You’ll need to update your project’s package.json file to include the following scripts:
{
  "scripts": {
    "dev": "email dev",
    "build": "email build",
    "start": "email start"
  }
}
Here’s what each script does:
npm run dev– Start the preview server with hot reloadnpm run build– Build email templates for productionnpm run start– Serve built templates
Project Structure
React.Email uses a simple folder structure. Typically, you’ll want to store all email templates in the email/ directory. Start by creating an emails directory in your project root.
Here’s an overview of how the npx installation option organizes the generated templates:
your-project/
├── emails/
│   ├── welcome.tsx
│   ├── password-reset.tsx
│   └── components/
│       ├── header.tsx
│       └── footer.tsx
├── package.json
└── README.md
This organization keeps your email templates separate from your main application code and makes them easy to manage.
How to Build Your First Email Template
Let’s build a simple welcome email using the React Email template builder.
Within the emails folder, create a new file called welcome.tsx. After that, add the following snippets to the file:
import {
  Html,
  Head,
  Body,
  Container,
  Section,
  Text,
  Button,
  Img,
  Hr,
  Tailwind,
  Preview
} from '@react-email/components';

interface WelcomeEmailProps {
  userName: string;
  verificationUrl: string;
}

export const WelcomeEmail = ({
  userName,
  verificationUrl
}: WelcomeEmailProps) => {
  return (
    <Html>
      <Head />
      <Tailwind>
        <Body className="mx-auto my-auto bg-gray-50 px-2 font-sans">
          <Preview>Welcome to SendLayer - Verify your email</Preview>
          <Container className="mx-auto my-[40px] max-w-[600px] rounded-lg border border-solid border-gray-200 overflow-hidden">
            <Section className="bg-[#09092b] py-10 text-center">
              <Img
                src="/static/logo.svg"
                alt="Brand Logo"
                width="250"
                className="mx-auto my-0"
              />
            </Section>

            <Section className="bg-white px-8 py-10">
              <Text className="text-[28px] font-bold text-[#09092b] leading-tight m-0 mb-5">
                Welcome, {userName}!
              </Text>

              <Text className="text-[16px] text-[#53536b] leading-[24px] m-0 mb-6">
                Thanks for signing up. We're excited to have you on board.
                To get started, please verify your email address by clicking
                the button below.
              </Text>

              <Section className="text-center">
                <Button
                    href={verificationUrl}
                    className="bg-[#211ea6] rounded-md px-8 py-3 text-center text-[16px] font-semibold text-white no-underline"
                >
                    Verify Email Address
                </Button>
              </Section>
            </Section>

            <Hr className="mx-8 my-0 w-auto border border-solid border-[#ffd62e]" />

            <Section className="bg-white px-8 py-6">
              <Text className="text-[13px] text-[#53536b] leading-[20px] text-center m-0">
                If you didn't sign up for this account, you can safely ignore this email.
              </Text>
            </Section>
          </Container>
        </Body>
      </Tailwind>
    </Html>
  );
};

export default WelcomeEmail;
Code breakdown
This TypeScript code creates a reusable welcome email template using React Email components with Tailwind CSS for styling.
First, we import components from React email/components (@react-email/components), including the Tailwind wrapper for utility class styling and Preview for setting the email preview text that appears in inbox listings.
The WelcomeEmailProps interface defines TypeScript types for the component’s props: userName for personalization and verificationUrl for the email verification link.
The Tailwind component wraps the email body, allowing us to use Tailwind utility classes instead of inline styles. The Preview component sets the preview text that appears in email clients before opening the message.
Preview Your Email
To see your email template in action, start the development server:
npm run dev
Open your browser and navigate to http://localhost:3000. You’ll see a live preview of your email template.

Any changes you make to the code will automatically update in the browser thanks to hot module replacement.
The preview server shows how your email will look on different screen sizes, making it easy to test responsive designs.
To add multiple templates, place the template files in the emails folder. After adding them, they’ll appear on the sidebar when previewing the email templates.
Styling Email Templates
React.Email supports multiple styling approaches. Let’s explore the most common methods.
Using Inline Styles
Inline styles are the most reliable way to style emails since most email clients strip <style> tags. React.Email makes this easy with React’s style prop:
<Text style={{
  fontSize: '16px',
  lineHeight: '24px',
  color: '#333',
  marginBottom: '16px'
}}>
  Your content here
</Text>
Styling With Tailwind CSS
React.Email also supports Tailwind CSS through a special <Tailwind> component that automatically converts Tailwind classes to inline styles:
import { Tailwind, Button } from '@react-email/components';

export const Email = () => {
  return (
    <Tailwind
      config={{
        theme: {
          extend: {
            colors: {
              brand: '#007bff',
            },
          },
        },
      }}
    >
      <Button
        href="https://example.com"
        className="bg-brand text-white px-6 py-3 rounded"
      >
        Click Here
      </Button>
    </Tailwind>
  );
};
Pro Tip: While Tailwind classes are convenient during development, remember that React.Email converts them to inline styles for email compatibility. Not all Tailwind utilities work in emails. We recommend sticking to basic properties like colors, padding, margins, and text styles.
How to Send Emails in React Using HTML Templates
Once you’ve designed your email template, you’ll need to convert it to HTML and send it through an email service provider.
Using the Render Utility
React.Email provides a render() function that converts your React components to HTML. After importing the email template, you’ll need to add it as a parameter to the render() function. Here’s an example:
import { render } from '@react-email/render';
import { WelcomeEmail } from './emails/welcome';

const emailHtml = await render(
  <WelcomeEmail
    userName="John Doe"
    verificationUrl="https://example.com/verify?token=abc123"
  />
);
Integrate Email API
Now let’s send the email using SendLayer’s Node.js SDK. First, install the SDK:
npm install sendlayer
After installing the package, create a function to send your email. Create a sendWelcomeEmail.ts file within the utils directory and add the following snippets:
import { SendLayer } from 'sendlayer';
import { render } from '@react-email/render';
import { WelcomeEmail } from './emails/welcome';

const sendlayer = new SendLayer(process.env.SENDLAYER_API_KEY);

async function sendWelcomeEmail(userName: string, userEmail: string) {
  // Render the React email template to HTML
  const emailHtml = await render(
    <WelcomeEmail
      userName={userName}
      verificationUrl={`https://example.com/verify?email=${userEmail}`}
    />
  );

  try {
    // Send the email using SendLayer
    const response = await sendlayer.Emails.send({
      from: {
        email: '[email protected]',
        name: 'Your Company'
      },
      to: {
        email: userEmail,
        name: userName
      },
      subject: 'Welcome to Our Platform!',
      html: emailHtml
    });

    console.log('Email sent successfully! Message ID:', response);
  } catch (error) {
    console.error('Failed to send email:', error);
  }
}

// Usage
sendWelcomeEmail('John Doe', '[email protected]');
Code Breakdown
This TypeScript code demonstrates how to send the React Email template we created using SendLayer’s API.
First, we import the SendLayer client, the render function from React Email to convert components to HTML, and our custom WelcomeEmail template. To initialize the SendLayer package, you’ll need an API key stored as an environment variable.
The sendWelcomeEmail function takes a username and email address as parameters. It uses the render function to convert the React component into HTML. It passes the user’s name and a dynamically generated verification URL as props.
Inside the try-catch block, we call sendlayer.Emails.send() with the email configuration object containing the sender details, recipient information, subject line, and the rendered React email template HTML content.
How to Retrieve Your SendLayer API Key
To get your API key, log in to your SendLayer account. Once you’re logged in, click the Settings menu and select the API Keys tab.
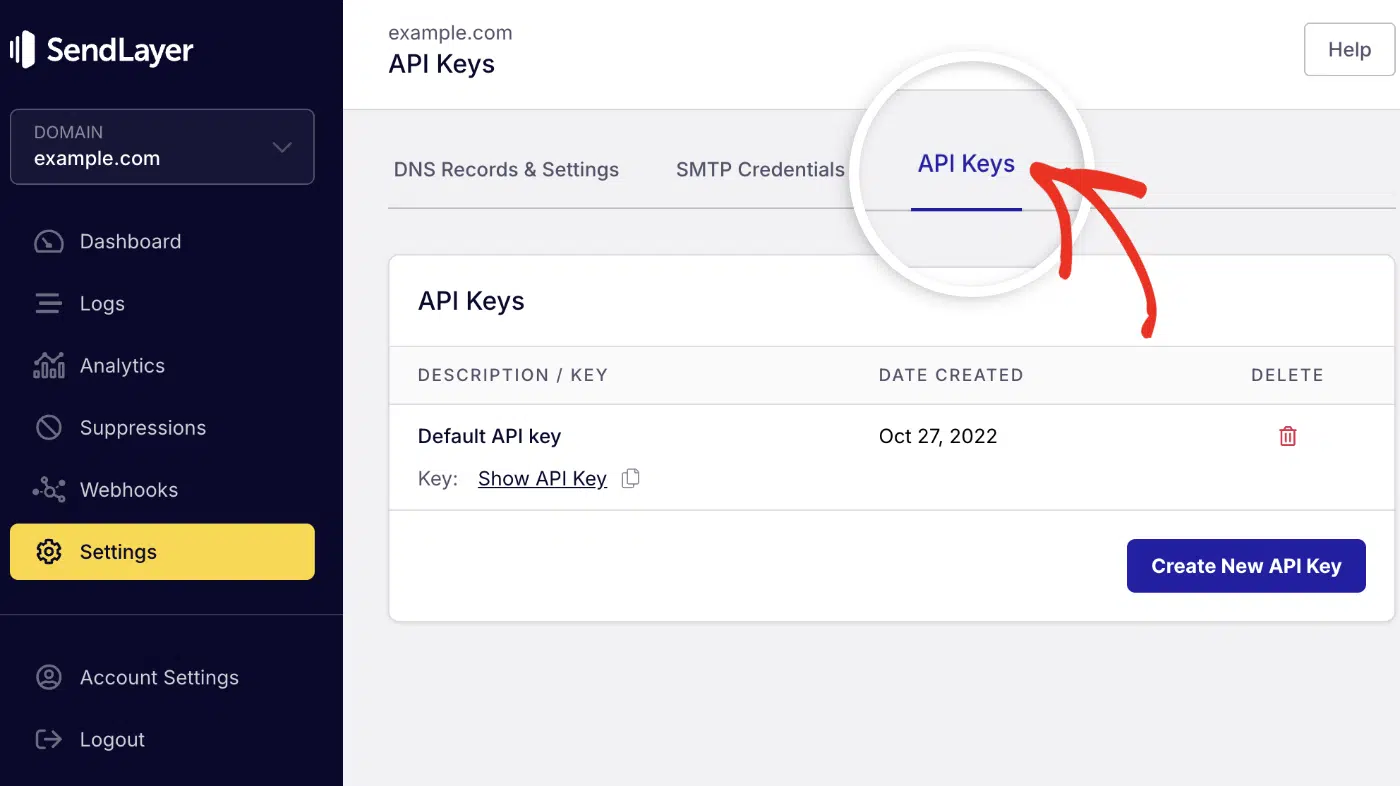
Then click the copy icon next to Default API key to copy it.

After copying your API key, return to your code editor and create a .env.local file. Then paste the following snippet into the file.
SENDLAYER_API_KEY=your-api-key
For more details on using SendLayer’s Node.js SDK, check out our comprehensive Node.js guide.
Send a Test Email
In a real-world scenario, this component would ideally be connected to the registration page on your site. Then the function will trigger on successful registration via the handleSubmit event handler.
However, for the tutorial, I’ll keep things simple and show you how to test your email templates. To send a test email, open your terminal and run the command below:
npx tsx utils/sendWelcomeEmail.ts
You should get a success notification and the message ID logged in the console. Go ahead and check the recipient’s inbox for the email message.

Congratulations! You’ve built a responsive email template and successfully sent a test email to a Gmail recipient.
Best Practices
Here are some best practices I’ve learned from building email templates in React:
Design Principles
- Keep it simple: Focus on one primary call-to-action per email
- Use clear hierarchy: Make important information stand out with headings and spacing
- Mobile-first approach: Most people read emails on mobile devices.
- Brand consistency: Use your brand colors, fonts, and logo
Technical Best Practices
Organize your code: Create reusable components for headers, footers, and buttons:
// emails/components/EmailHeader.tsx
export const EmailHeader = ({ logoUrl }: { logoUrl: string }) => {
  return (
    <Section style={{ padding: '20px 0', textAlign: 'center' }}>
      <Img src={logoUrl} alt="Company Logo" width={150} />
    </Section>
  );
};
Use environment variables: Never hardcode sensitive information like API keys on your codebase. This exposes your keys on version control platforms like GitHub. I recommend using environment variables to store sensitive credentials:
# .env.local
SENDLAYER_API_KEY=your_api_key_here
[email protected]
Pro Tip: Make sure to include the env file in your .gitignore file so you don’t accidentally push it.
FAQs –– React Email Template
These are answers to some of the top questions we see about creating email templates in React.
Does React.Email work with all email clients?
React.Email components are tested across major email clients, including Gmail, Outlook, Apple Mail, and Yahoo. However, email clients vary in their CSS support. Always test your emails in multiple clients before sending to large audiences.
How do I add attachments to emails?
The render() function only creates HTML. To add attachments, use your email provider’s attachment features. Here’s an example with SendLayer:
await sendlayer.Emails.send({
  from: { email: '[email protected]', name: 'Your Company' },
  to: { email: '[email protected]', name: 'John Doe' },
  subject: 'Your Invoice',
  html: emailHtml,
  attachments: [{
    path: 'path/to/invoice.pdf',
    type: 'application/pdf'
  }]
});
Can I use custom React hooks in email templates?
No. React.Email templates are rendered to static HTML, so React hooks like useState, useEffect, or custom hooks won’t work. Email templates should only use props to receive dynamic data.
That’s it! Now you know how to design email templates in React using React.Email.
Next, would you like to learn how to build a responsive contact form in React? Be sure to check our detailed guide on creating a contact form with email notifications in React.js.