
One feature that’s often neglected by developers when building a new system is email functionality. If you need to send email in PHP, you’ve come to the right place.
Whether you’re building a contact form, implementing user registration confirmations, or setting up automated notifications, email notifications are crucial for modern web applications.
In this PHP tutorial, I’ll walk you through how to send emails effectively and securely using SMTP and through an email API.
How to Send Emails Using PHP
Prerequisites
Before we dive in, make sure you have:
- PHP 7.4 or higher installed on your web server or local machine
- Composer package manager installed (Download from getcomposer.org)
- Basic knowledge of PHP programming and functions
- A reliable email service provider with SMTP credentials
- A text editor or IDE for writing your PHP script
- An email service provider (I’ll use SendLayer, but the steps are similar regardless of the email provider you choose)
For this tutorial, I’ll use SendLayer as our email service provider, but the steps are similar regardless of which provider you choose.
If you’d like to follow along with SendLayer, you can get started with a free account that lets you send up to 200 emails monthly.
After creating your free account, you’ll need to authorize your sending domain. This step is essential for improving email deliverability and verifying your account.
How to Send Email in PHP via SMTP
PHP has a built-in mail() function that can send basic emails. However, it does have limitations. There are third-party libraries, such as Symfony Mailer and PHPMailer, that extend the functionality of the default PHP mail function. For this tutorial, I’ll use PHPMailer to implement the email function.
Pro Tip: Never use the built-in PHP mail function for production applications, as it lacks authentication, proper error handling, and advanced features.
Install the PHPMailer Package
PHPMailer is the most popular PHP library for sending emails. It addresses all the limitations of the built-in mail() function and provides a robust, feature-rich solution.
To install the PHP mailer, run the command below:
composer require phpmailer/phpmailer
Note: If Composer isn’t installed, visit getcomposer.org for installation instructions specific to your operating system.
Once the installation completes, create a new .php file that’ll handle email functionality. Then add the following import statement:
<?php
// If using Composer
require_once 'vendor/autoload.php';

use PHPMailer\PHPMailer\PHPMailer;
use PHPMailer\PHPMailer\Exception;
?>
We’re using the require_once line to load the PHPMailer. This line is important if you installed it using Composer.
Configure Your SMTP Server
After adding the import statement, we’ll initialize the mailer using the command below
// Initialize the PHPMailer
$mail = new PHPMailer(true);

// SMTP server configuration
$mail->isSMTP();
$mail->Host = 'smtp.sendlayer.net';
$mail->SMTPAuth = true;
$mail->Username = 'your_sendlayer_username';
$mail->Password = 'your_sendlayer_password';
$mail->SMTPSecure = PHPMailer::ENCRYPTION_STARTTLS;
$mail->Port = 587;
The snippet above is used to configure the SMTP server. We first initialize the mailer using the $mail = new PHPMailer(true); line. Then, use the $mail object to set the credentials as shown above.
Tip: I’m using SendLayer’s SMTP credentials for this tutorial. But you can use any email provider you want.
To access your SMTP credentials in SendLayer, you’ll need to log in to your SendLayer account and select the Settings sidebar menu. Then select the SMTP Credentials tab.
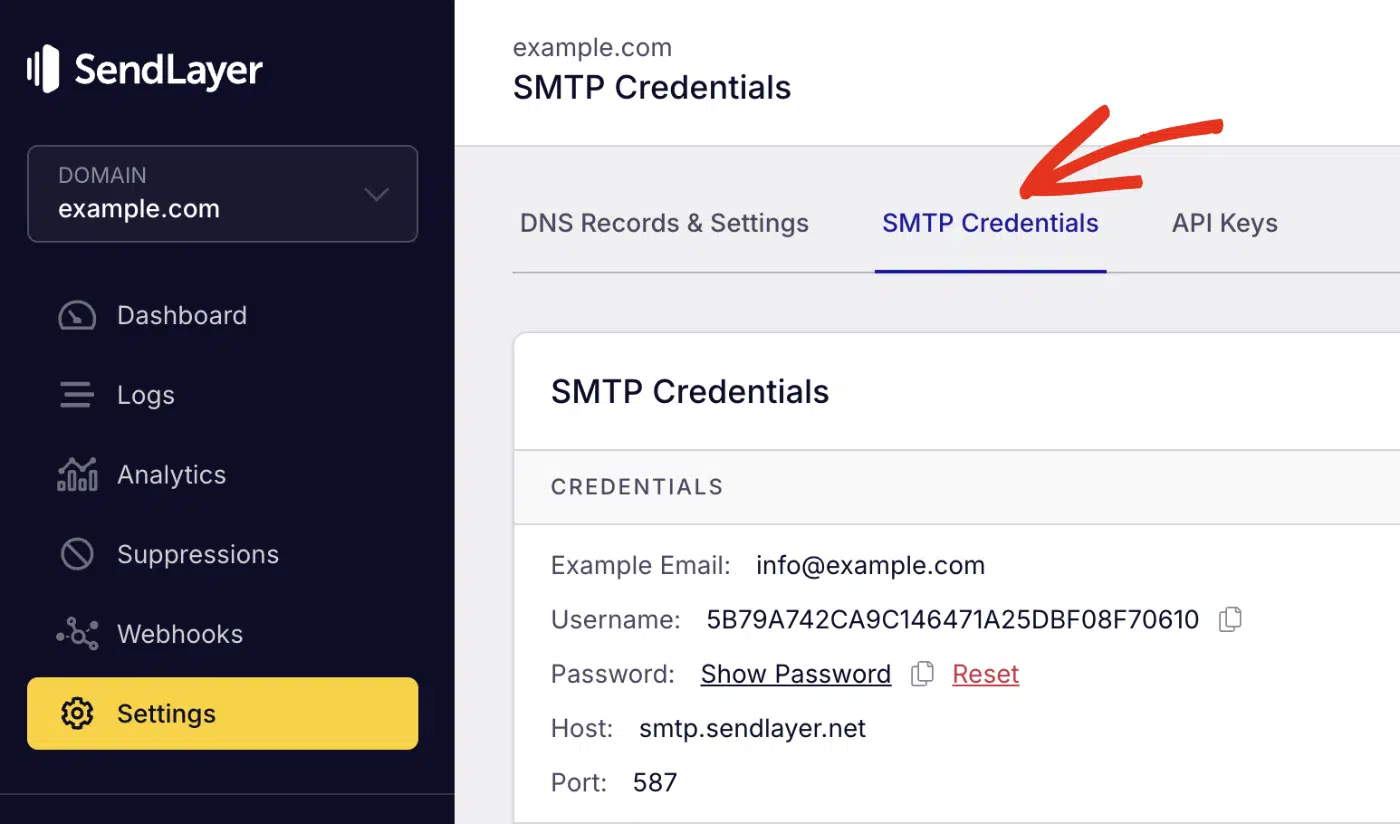
Once there, you’ll see the SMTP credentials required to use SendLayer’s SMTP server. The Host and Port number are the same for all users. However, the Username and Password details are unique to your SendLayer account.
You’ll need to replace the username and password value in the snippet above with your SMTP credentials.
Sending Plain Text Emails
After configuring the SMTP server, you’re ready to send your first email. To do so, add the following snippet to your email service file.
<?php
require_once 'vendor/autoload.php';

use PHPMailer\PHPMailer\PHPMailer;
use PHPMailer\PHPMailer\Exception;

$mail = new PHPMailer(true);

// SMTP Server configuration
$mail->isSMTP();
$mail->Host = 'smtp.sendlayer.net';
$mail->SMTPAuth = true;
$mail->Username = 'your_sendlayer_username';
$mail->Password = 'your_sendlayer_password';
$mail->SMTPSecure = PHPMailer::ENCRYPTION_STARTTLS;
$mail->Port = 587;

// Basic Usage
try {
    // Recipients
    $mail->setFrom('[email protected]', 'Your Name');
    $mail->addAddress('[email protected]', 'Recipient Name');

    // Content
    $mail->isHTML(false); // Set email format to plain text
    $mail->Subject = 'Plain Text Email Subject';
    $mail->Body = 'This is a plain text email sent using PHPMailer and SendLayer SMTP Server.';

    // PHP send email SMTP method
    $mail->send();
    echo 'Email sent successfully!';
} catch (Exception $e) {
    echo "Email could not be sent. Mailer Error: {$mail->ErrorInfo}";
}
?>
Code breakdown
In the code above, we set the sender and recipient email addresses using the $mail-> setFrom() and $mail->addAddress() lines of code.
Note: If you’re using SendLayer to send your emails, the sender email needs to be at the domain you’ve authorized in SendLayer. For instance, if you authorized example.com, your sender email domain should be @example.com.
The $mail->isHTML() line specifies the type of email you want to send. Setting it to false means your email content should be plain text.
The $mail->send() method calls the actual function that handles email sending.
We wrap the entire logic in a try...catch block to implement error handling. This is good practice as it ensures errors preventing emails from sending are logged to the console.
Sending HTML Emails in PHP
PHPMailer also supports sending HTML emails. To send an HTML email, you’ll simply need to set isHTML() to true. Then update the $mail->Body variable with your HTML email content. Here’s an updated version of the snippet:
<?php
require_once 'vendor/autoload.php';

use PHPMailer\PHPMailer\PHPMailer;
use PHPMailer\PHPMailer\Exception;

$mail = new PHPMailer(true);

// SMTP Server configuration
$mail->isSMTP();
$mail->Host = 'smtp.sendlayer.net';
$mail->SMTPAuth = true;
$mail->Username = 'your_sendlayer_username';
$mail->Password = 'your_sendlayer_password';
$mail->SMTPSecure = PHPMailer::ENCRYPTION_STARTTLS;
$mail->Port = 587;

try {
    // Recipients
    $mail->setFrom('[email protected]', 'Your Company');
    $mail->addAddress('[email protected]', 'John Doe');

    // Content
    $mail->isHTML(true);
    $mail->Subject = 'Welcome to Our Platform!';
    $mail->Body = '
    <html>
    <head>
        <style>
            .container { font-family: Arial, sans-serif; }
            .header { background-color: #f4f4f4; padding: 20px; }
            .content { padding: 20px; }
            .button {
                background-color: #007cba;
                color: white;
                padding: 10px 20px;
                text-decoration: none;
                border-radius: 5px;
            }
        </style>
    </head>
    <body>
        <div class="container">
            <div class="header">
                <h2>Welcome to Our Platform!</h2>
            </div>
            <div class="content">
                <p>Hi Pattie,</p>
                <p>Thank you for signing up. We\'re excited to have you on board!</p>
                <p><a href="https://example.com/activate" class="button">Activate Account</a></p>
                <p>Best regards,<br>The Team</p>
            </div>
        </div>
    </body>
    </html>';

    // Alternative plain text body
    $mail->AltBody = 'Thank you for signing up! Visit https://example.com/activate to activate your account.';

    $mail->send();
    echo 'HTML email sent successfully!';
} catch (Exception $e) {
    echo "Email could not be sent. Mailer Error: {$mail->ErrorInfo}";
}
?>
You can optionally add the $mail->AltBody variable if you’d like to have a plain text version of your email. This is helpful as it ensures your emails are visible even on email clients that do not support HTML messages.
Send Emails to Multiple Recipients with PHP
You can also send emails to multiple recipients in your PHP application using PHPMailer. To do so, duplicate the $mail->addAddress() method. Then update the name and email addresses with the recipient’s details. Here’s an updated version of the snippet.
    // Sender
    $mail->setFrom('[email protected]', 'Newsletter Team');

    // Multiple recipients
    $mail->addAddress('[email protected]', 'John Doe');
    $mail->addAddress('[email protected]', 'Jane Smith');
    $mail->addCC('[email protected]', 'Manager');
    $mail->addBCC('[email protected]', 'Admin');

    // Content
    $mail->isHTML(true);
    $mail->Subject = 'Weekly Newsletter';
    $mail->Body = '<h2>This Week\'s Updates</h2><p>Here are the latest news and updates...</p>';

    $mail->send();
    echo 'Newsletter sent to multiple recipients!';
You can also add CC and BCC email addresses using the $mail-> addCC() and $mail-> addBCC() methods, respectively.
PHP Send Email with Attachment
The PHPMailer library, similar to the Symfony Mailer, also includes support for email attachments. To add attachments to your email message, call the addAttachment() method. Within the parentheses, you’ll need to pass the attachment path. You can optionally enter a name for the attachment you wish to attach. Here’s an updated version of the snippet:
 // Recipients
    $mail->setFrom('[email protected]', 'Document Center');
    $mail->addAddress('[email protected]');

    // Attachments
    $mail->addAttachment('/path/to/document.pdf', 'Invoice.pdf');
    $mail->addAttachment('/path/to/image.jpg', 'Photo.jpg');

    // Content
    $mail->isHTML(true);
    $mail->Subject = 'Documents Attached';
    $mail->Body = '<p>Please find the attached documents.</p>';

    // PHP send email example
    $mail->send();
    echo 'Email with attachments sent successfully!';
To add multiple attachments, simply duplicate the addAttachment() method and update the file path and name parameters.
Send a Test Email in PHP
After implementing your email logic, I recommend sending a test email to ensure everything is working properly.
To do so, open a terminal window and run your email script using the command:
php SendEmail.php
Pro Tip: You need to ensure your terminal window is in the same directory as your project. Also, make sure to replace SendEmail.php with your actual email service file name.
After running the command, you should see a success message in the terminal. Go ahead and check the email inbox of the recipient you specified.

How to Send Email in PHP Using API
Sending emails through SMTP works well for smaller projects. However, it is less secure and slower than using an API. Using an API-based service is also much faster, especially when you need to send bulk emails.
Fortunately, platforms like SendLayer provide API endpoints and SDKs you can use to send single and bulk emails programmatically. I’ll show you how to set up a program that uses the SendLayer PHP SDK to send emails.
Send HTML Email in PHP Using SendLayer API
To get started, you’ll need to install the SendLayer SDK using Composer in your project directory. Run the command below to install the package:
composer require sendlayer/sendlayer-php
Once the installation completes, create a new email service file and import the necessary dependencies:
<?php

require_once 'vendor/autoload.php';

use SendLayer\SendLayer;
use SendLayer\Exceptions\SendLayerException;
Next, you’ll need to initialize the SendLayer package using your API key.
<?php

require_once 'vendor/autoload.php';

use SendLayer\SendLayer;
use SendLayer\Exceptions\SendLayerException;

// Initialize the SendLayer package
$sendlayer = new SendLayer('your-api-key');
To get your API key, log in to your SendLayer account. Once you’re logged in, click the Settings menu and select the API Keys tab.
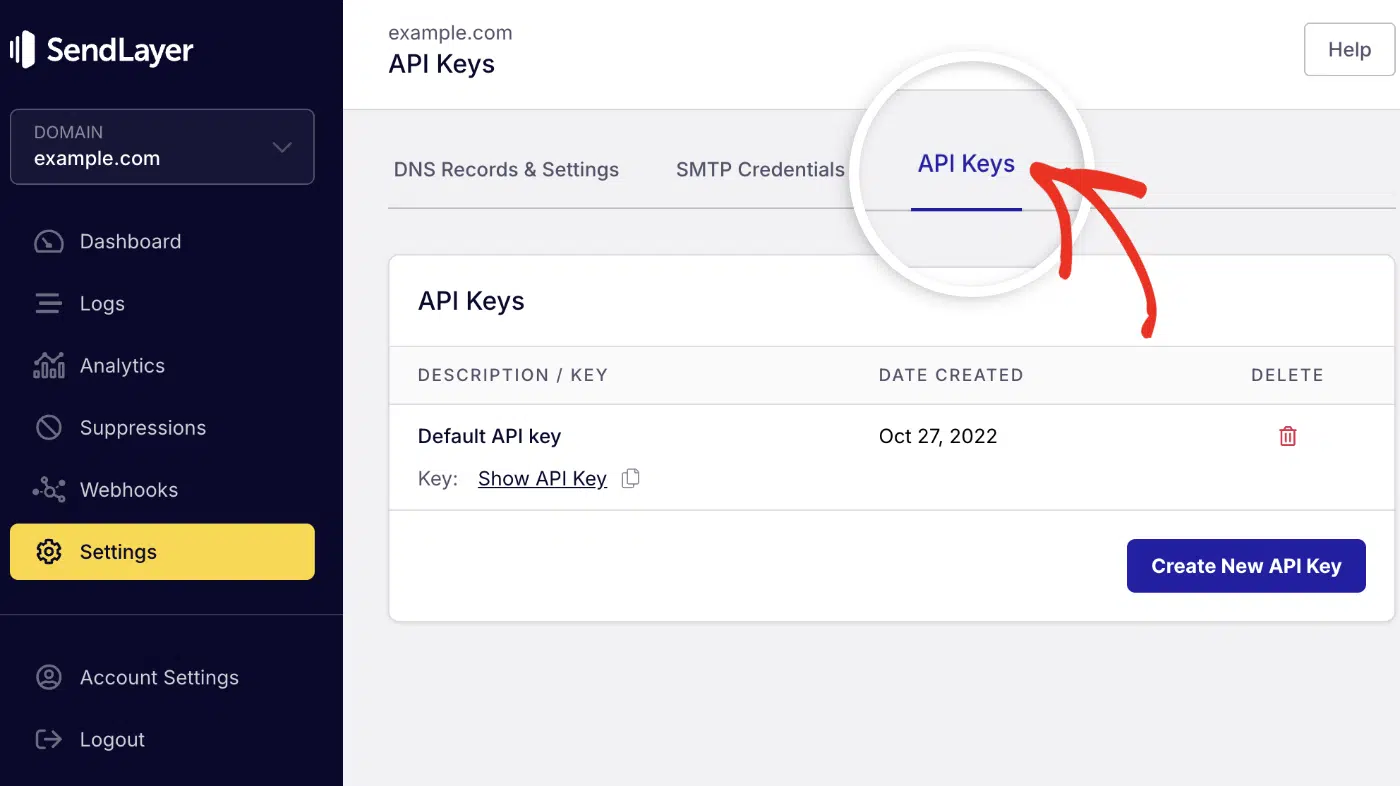
Then click the copy icon next to Default API key to copy it.

Once you’ve gotten it, go ahead and replace the your-api-key with your actual SendLayer API key.
Now, to send an email, call the sendlayer->Emails->send() method and pass the email data as parameters to the method. Here’s the updated snippet:
<?php

require_once 'vendor/autoload.php';

use SendLayer\SendLayer;
use SendLayer\Exceptions\SendLayerException;

// Initialize the SendLayer package
$sendlayer = new SendLayer('your-api-key');

// Call the send email method
try {
    $response = $sendlayer->Emails->send([
        'from' => '[email protected]',
        'to' => '[email protected]',
        'subject' => 'Test Email from PHP SDK',
        'text' => 'This is a test email sent using the SendLayer PHP SDK'
    ]);
    echo "Email sent successfully! " . json_encode($response, JSON_PRETTY_PRINT) . "\n";

} catch (SendLayerException $e) {
    echo "Error: " . $e->getMessage() . "\n";
}
The send() method requires 4 parameters to work:
from: Sender email addressto: recipient’s email address(es)subject: The email subjecttextorhtml: The email message. This can either be plain text or HTML content.
Pro Tip: The from email address needs to match the sending domain you authorized in your SendLayer account.
Send Email in PHP to Multiple Email Addresses
The SendLayer SDK also supports sending emails to multiple recipients, including CC and BCC email addresses. To do so, simply update the to parameter to a comma-separated string list.
    $response = $sendlayer->Emails->send([
        'from' => '[email protected]',
        'to' => ['[email protected]', '[email protected]']
        'subject' => 'Test Email from PHP SDK',
        'html' => '<h1>Hello!</h1><p>This is a test email sent to multiple recipients using SendLayer PHP SDK</p>'
    ]);
    echo "Email sent successfully! " . json_encode($response, JSON_PRETTY_PRINT) . "\n";
If you’d like, you can pass the recipient’s name and email addresses in the payload. Here’s an updated version of the snippet above:
$response = $sendlayer->Emails->send([
        'from' => ['email' => '[email protected]', 'name' => 'Paulie Paloma'],
        'to' => [
                [ 'name' => 'John Doe', 'email' => '[email protected]'],
                [ 'name' => 'Pattie Paloma', 'email' => '[email protected]']
            ],
        'subject' => 'Sending a Test Email Using PHP SDK',
        'html' => '<h1>Hello!</h1><p>This is a test email sent to multiple recipients using SendLayer PHP SDK</p>',
        'cc' => ['[email protected]'],
        'bcc' => ['[email protected]'],
        'replyTo' => '[email protected]',
    ]);
    echo "Email sent successfully! Message ID: " . $response['MessageID'] . "\n";
Send Email with Attachment in PHP
The SendLayer SDK also supports sending emails with attachments. To do so, add the attachments parameter and specify the path and type parameters for the file you wish to attach. Here’s an updated version of the snippet.
   $response = $sendlayer->Emails->send(
        'from' => ['email' => '[email protected]', 'name' => 'Paulie Paloma'],
        'to' => [
                [ 'name' => 'Pattie Paloma', 'email' => '[email protected]']
            ],
        'subject' => 'Sending a Test Email With PHP SDK',
        'html' => '<h1>Hello!</h1><p>This is a test email with attachments using SendLayer PHP SDK</p>',
        'attachments' => [
            [
                'path' => '/path/to/document.pdf',
                'type' => 'application/pdf'
            ],
            [
                'path' => 'https://placehold.co/600x400.png',
                'type' => 'image/png'
            ]
        ]
    );
    echo "PHP Email sent successfully! Message ID: " . $response['MessageID'] . "\n";
You can attach multiple files to your email message. SendLayer’s SDK also supports remote and local files.
The SDK also handles encoding the files before making the API request. So you only need to specify the path and type parameter.
Tip: See Mozilla’s documentation if you’re at all unsure of the type of file you’re attaching.
To learn more about sending emails using SendLayer’s API, be sure to check our developer documentation.
Best Practices for Sending Emails in PHP
Sending emails often involves setting up sensitive credentials and user details. Here are some best practices to optimize your email implementation.
1. Validate and Sanitize Input
To reduce the risk of encountering errors when sending emails, always validate email addresses. You can also sanitize the email content to ensure spam content isn’t getting sent to users. This helps to protect your domain reputation. Here’s an implementation that validates user email:
<?php
function validateEmail($email) {
    return filter_var($email, FILTER_VALIDATE_EMAIL) !== false;
}

function sanitizeInput($data) {
    $data = trim($data);
    $data = stripslashes($data);
    $data = htmlspecialchars($data);
    return $data;
}

// Example usage
$email = $_POST['email'] ?? '';
if (!validateEmail($email)) {
    die('Invalid email address');
}

$name = sanitizeInput($_POST['name'] ?? '');
$message = sanitizeInput($_POST['message'] ?? '');
?>
2. Implement Proper Error Handling
Adding error handling to your email service will help you catch errors that occur when sending emails through your app. You can implement this using PHP’s try...catch syntax. Here’s an example:
<?php
function sendEmail($to, $subject, $body) {
    $mail = new PHPMailer(true);

    try {
        // SMTP configuration
        $mail->isSMTP();
        $mail->Host = 'smtp.sendlayer.net';
        $mail->SMTPAuth = true;
        $mail->Username = 'your_username';
        $mail->Password = 'your_password';
        $mail->SMTPSecure = PHPMailer::ENCRYPTION_STARTTLS;
        $mail->Port = 587;

        // Email settings
        $mail->setFrom('[email protected]', 'Your App');
        $mail->addAddress($to);
        $mail->isHTML(true);
        $mail->Subject = $subject;
        $mail->Body = $body;

        $mail->send();
        return ['success' => true, 'message' => 'Email sent successfully'];
    } catch (Exception $e) {
        error_log("Email Error: " . $e->getMessage());
        return ['success' => false, 'message' => 'Failed to send email'];
    }
}
?>
Whenever your application fails to send an email, you’ll see an error log with details about the specific cause of the issue.
3. Use Environment Variables for Credentials
It is always recommended to never commit sensitive information such as SMTP credentials or API keys to version control systems like GitHub. Instead, use environment variables to store your credentials. That way, they won’t get pushed when you publish your application.
To use environment variables in PHP, you’ll first need to create a .env file and add all your SMTP credentials.
SMTP_HOST=smtp.sendlayer.net
SMTP_USERNAME=your_username
SMTP_PASSWORD=your_password
SMTP_PORT=587
Security Warning: Never commit your .env file to version control. Always use environment variables for sensitive credentials like SMTP passwords and API keys.
After that, you can load and use them in your application.
<?php

// Load environment variables
$dotenv = Dotenv\Dotenv::createImmutable(__DIR__);
$dotenv->load();

// Import and map environment variables
$mail->Host = $_ENV['SMTP_HOST'];
$mail->Username = $_ENV['SMTP_USERNAME'];
$mail->Password = $_ENV['SMTP_PASSWORD'];
$mail->Port = $_ENV['SMTP_PORT'];
?>
You’ll need to install the Dotenv library as a dependency for your project. To do so, run the command below:
composer require vlucas/phpdotenv
5. Set Up Email Authentication
For better deliverability, ensure your domain has proper SPF, DKIM, and DMARC records configured. When using SendLayer, these are typically handled automatically when you verify your domain.
FAQs – Email Sending with PHP
These are answers to some of the top questions we see about sending emails with PHP.
What are the main differences between PHP’s mail() function and PHPMailer?
The mail() function is PHP’s built-in email method, but it has significant limitations. It relies on server configuration, doesn’t support SMTP authentication, and lacks advanced features like attachments and detailed error handling.
PHPMailer, on the other hand, is a comprehensive library that supports SMTP authentication, attachments, HTML messages, multiple recipients, and provides detailed error reporting. For production applications, PHPMailer is the better choice.
How do I add attachments to emails sent from PHP?
With PHPMailer, adding attachments is straightforward. You’ll simply need to specify the file path as a parameter when you call the addAttachment() method.
$mail->addAttachment('/path/to/file.pdf', 'CustomName.pdf');
Can I send emails without SMTP?
While you can use PHP’s built-in mail() function, it’s not recommended for production because:
- No authentication support
- Poor deliverability rates
- Limited error reporting
- No advanced features (HTML, attachments, etc.)
For better results, always use SMTP or email APIs like SendLayer’s REST API.
What’s the difference between STARTTLS and SSL?
The main difference between STARTTLS and SSL is that STARTTLS (Port 587) starts unencrypted, then upgrades to encrypted. While, SSL (Port 465) is encrypted from the beginning. Both are secure, but STARTTLS is more commonly used and supported.
That’s it! Now you know how to send emails in PHP.
We covered both SMTP and API sending methods. If you’re using a framework like Laravel, our guide on sending emails in Laravel will help you get started quickly.