
Looking to send emails from Retool? You can send transactional emails from a Retool admin panel using an SMTP server. Add your SMTP provider as a resource, and then trigger an SMTP query from a button.
Most Ops teams need to send one-off customer emails, refund confirmations, account approvals, and manual order updates. Using a personal Gmail account looks unprofessional and often lands in spam.
A Retool panel solves the workflow. SendLayer solves the deliverability.
In this tutorial, you’ll learn how to set up and send emails in Retool. By the end, you’ll have a working refund confirmation panel in Retool.
- What is a Retool admin panel, and why send transactional emails from it?
- How to get your SendLayer SMTP credentials
- How to add SendLayer as an SMTP resource in Retool
- How to build a refund confirmation panel in Retool
- Why are Retool emails landing in spam, and how do you fix it?
- Should you use Retool Email or SendLayer SMTP?
- Frequently Asked Questions
What is a Retool admin panel, and why send transactional emails from it?
A Retool admin panel is an internal dashboard built in Retool. It gives Ops teams a UI to act on customer data. Sending transactional emails from inside that panel matters for one reason. The trigger lives in the same place that the Ops user is already working.
Transactional emails are responses to a user action. A refund, a status change, a manual approval. They aren’t marketing blasts, even when an Ops user fires them manually.
These are three common Ops-triggered transactional emails:
- Account approval: Ops reviews a sign-up and then sends an approval or rejection notice.
- Refund confirmation: Ops processes a refund and notifies the customer.
- Manual order update: Ops fixes a stuck order and emails the new status.
You can run all three from a single Retool resource that points to SendLayer SMTP.
Prerequisites
You need a Retool account, a verified SendLayer sending domain, and basic familiarity with JavaScript. Here’s the full checklist:
- A Retool workspace (the free plan works for this tutorial).
- A SendLayer account with at least 1 verified sending domain.
- A data source connected in Retool that holds your customer or order records.
What accounts and access do you need?
You need a Retool admin role and an active SendLayer account. The admin role on Retool lets you create resources. The SendLayer account lets you read SMTP credentials. It also lets you add sending domains.
Note: Self-hosted Retool works the same way. SMTP is a first-class resource in both Cloud and Self-Hosted versions.
How to get your SendLayer SMTP credentials
In SendLayer, open Settings » SMTP Credentials and copy the host, port, username, and password. To grab the values:
Sign in to your SendLayer account and go to Settings » SMTP Credentials.
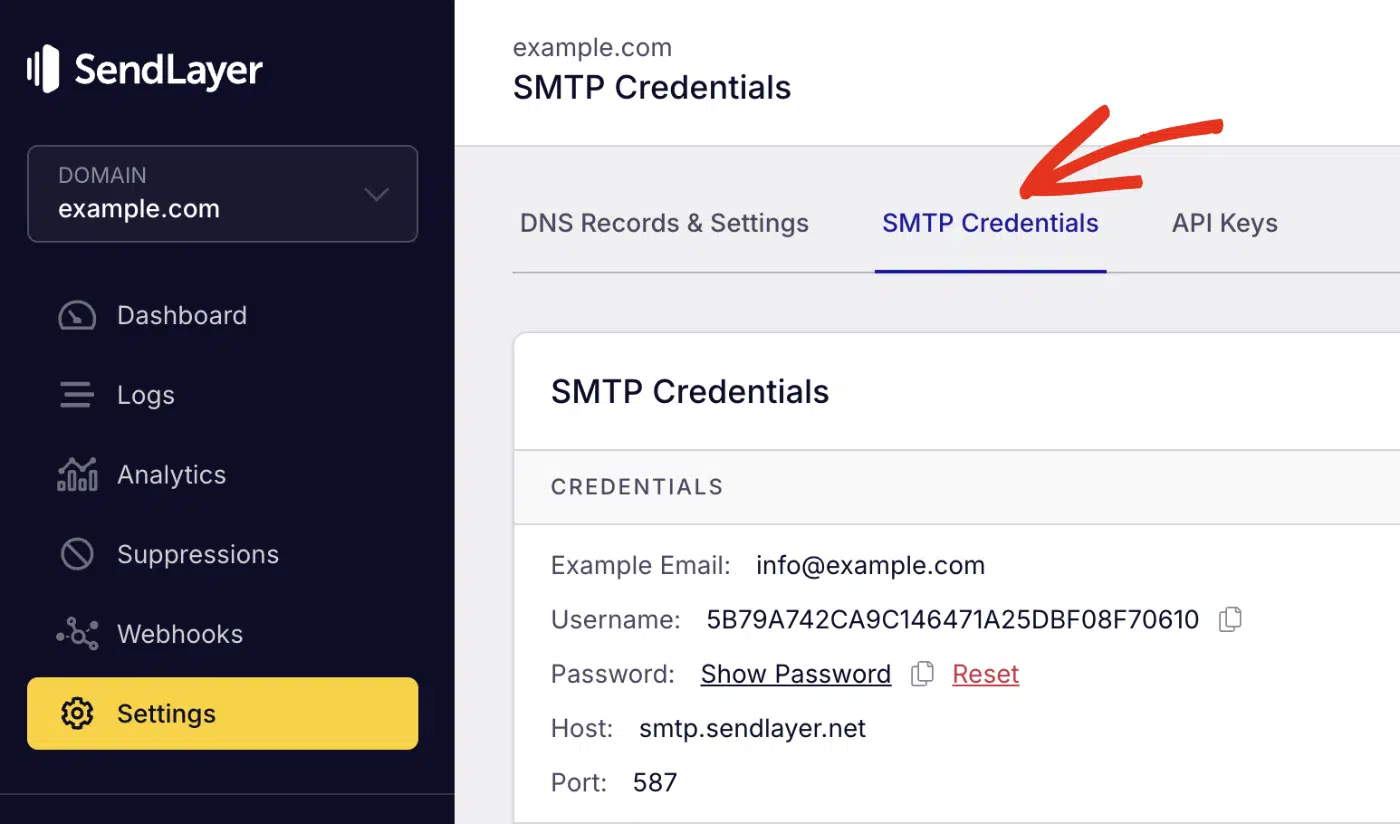
Once here, copy the values for Host, Port, Username, and Password.
Keep this tab open. You’ll paste each value into Retool next.
Here’s what you’ll paste into Retool:
| Field | Value |
|---|---|
| Host | smtp.sendlayer.net |
| Port | 587 (STARTTLS) |
| Username | unique per account |
| Password | unique per account |
Important: Your From-address must use an authorized SendLayer sending domain. Generic Gmail addresses get rejected. For more details, see our guide on authorizing your sending domain.
How to add SendLayer as an SMTP resource in Retool
In Retool, click the Resources tab at the top-right menu bar. Once there, click the Create new button and select Resource from the dropdown menu.

After that, type “SMTP” in the resource search bar and choose the SMTP option.

Then paste the SendLayer credentials into the form.

After adding the SMTP details, click the Create Resource button.

How do you test the SMTP connection in Retool?
To test the SMTP configuration, click Test Connection at the top-right side of the form.

You should see a green success notification if everything is configured properly. If the test fails:
- Double-check the host (
smtp.sendlayer.net, not.com). - Confirm the port is
587, not 25 or 2525. - Re-copy the username and password. No trailing whitespace.
- Try port
465instead if your network blocks 587.
Pro Tip: I keep both 587 and 465 noted in a password manager entry. Some corporate firewalls block 587 outbound. Switching to 465 with SSL fixes it without other config changes.
How to build a refund confirmation panel in Retool
This section serves as a practical send email in Retool example. It covers how to trigger transactional emails directly from your admin panel.
Building a refund confirmation panel in Retool often involves three components. Here’s how the pieces connect:
- Table lists orders pulled from your database resource.
- Form shows the customer email, order ID, and a refund-note textarea.
How to wire a table row to the email form
To connect a table row to the email form, bind each Form input’s Default value to the matching column on the selected table row. Inside the Email input, set the Default value to:
{{ table1.selectedRow.customer_email }}
Inside the Order ID input:
{{ table1.selectedRow.order_id }}
When Ops clicks a row in the table, the Form auto-fills with that customer’s details. The refund-note Textarea remains empty, so ops can type a custom message for each refund.
How to write the SMTP query with dynamic fields
Create a new query against the sendlayer-smtp resource. Reference Form values in the From, To, Subject, and Body fields.
In the bottom-left Code panel, click + » Resource query.

Then choose the SMTP resource you created. In my case, this value is sendlayer-smtp.

Fill in each field as below.
| Field | Value |
|---|---|
| From | "Acme Support" [email protected] |
| To | {{ email1.value }} |
| Subject | `Refund processed for order #${form1.values.order_id.value}` |
| Body | (HTML, see below) |

Pro Tip: Make sure the form and query resource are within the same scope. For example, if your form is scoped to a page in Retool, you should move the query resource to the page section.
After setting the email subject and dynamic recipient, paste this into the Body field:
<p>Hi {{ first_name.value }},</p>

<p>We've processed a refund for order <strong>#{{ order_id.value }}</strong>. The funds should appear in your account within 5 to 10 business days.</p>

<p>Note from our team:</p>
<blockquote>{{ refund_note.value }}</blockquote>

<p>Reply to this email if anything looks off.</p>

<p>Thanks,<br>Acme Support</p>
Note: Retool supports multiple email body formats, including HTML, plain text, and Markdown. Choosing the right Retool email format ensures consistent rendering across inboxes.
How to trigger the email when a user clicks the Send button
Add an event handler to the Submit button that triggers the sendRefundEmail query. Here’s how to configure it:
Select your form’s submit button. In the right panel, click + under Event handlers.

Configure as follows:
- Event:
Click. - Action:
Control query. - Query:
your-query-resource. - Method:
Trigger.
Add a second event handler for the same button. Action: Show notification, with a success message.
Important: Configure success and failure notifications on every query. Without them, users can’t tell whether the email was actually sent. A silent failure looks the same as a success in the UI.
Why are Retool emails landing in spam, and how do you fix it?
Retool emails land in spam when the From domain isn’t authenticated. SendLayer requires you to add 5 DNS records for domain verification and to improve email deliverability.
If any of your domain’s DNS records are missing, your emails might end up in spam.
For a wider look at the DNS records and authentication signals every sending domain should set, see SendLayer’s email security best practices.
Should you use Retool Email or SendLayer SMTP?
Retool recently launched its email integration. However, it might not be the best fit for your project. As a rule of thumb, use Retool Email for low-volume internal alerts. Use a third-party email provider, such as SendLayer SMTP, for any email a customer will see.
Here’s a table comparing both options.
| Feature | Retool Email | SendLayer SMTP |
|---|---|---|
| Custom From-domain | Limited | Yes (authorized domains) |
| Deliverability (customer inboxes) | Best-effort | Optimized (dedicated IPs available) |
| SPF / DKIM / DMARC authentication | Not configurable | Yes |
| Analytics and event tracking | Basic | Detailed |
| Free plan limits | Varies by Retool tier | 200 emails |
| Best for | Internal team alerts | Customer-facing transactional emails |
Other providers, such as SendGrid, also offer SMTP and API-based email delivery, but SendLayer focuses on simpler setup and consistent deliverability for transactional use cases.
Retool Email is fine for internal “the import job finished” alerts. For anything a customer sees, route it through a dedicated provider. Set up proper DNS. That’s the difference between the inbox and the spam folder.
FAQs – Send Email in Retool
Below, we’ve answered some of the top questions developers ask about sending transactional emails from a Retool admin panel.
Can I use SendLayer SMTP with a self-hosted Retool instance?
Yes. The SMTP resource works the same in Retool Cloud and Self-Hosted Retool. Your self-hosted instance needs outbound access to smtp.sendlayer.net on port 587 or 465. If your firewall blocks outbound SMTP, ask your network team to allow that hostname and port.
How do I set the email body programmatically in a Retool SMTP query?
Reference any JavaScript expression inside the Body field using {{ }}. You can build the body string from form inputs, query results, or constants. For complex templates, store the HTML as a JS code module. Then reference it as {{ emailTemplates.refund(form1.values) }}. Keeping templates in modules lets you reuse them across apps.
Can I send emails from a scheduled Retool Workflow using SendLayer SMTP?
Yes. Retool Workflows can use any SMTP resource you’ve already created, including SendLayer. To do this, add an SMTP query block in your Workflow. Point it at the sendlayer-smtp resource.
After that, trigger the Workflow on a cron schedule. It’s the pattern for daily digest emails, weekly reports, and reminder sends.
Does Retool’s SMTP integration support attachments and HTML emails?
Yes to both. For attachments, add a File Button, File Dropzone, or File Input component. Reference it in the SMTP query’s Attachment(s) field. For HTML emails, paste your HTML into the Body field and Retool sends it as text/html. You can also send Markdown or plain text by formatting the Body accordingly.
Can Retool receive email responses?
Retool doesn’t natively support inbound email processing. To receive email in Retool, you’ll need to use a third-party provider that supports inbound parsing and webhooks. Then pass that data into Retool.
Can I use Outlook with Retool to send emails?
Yes, Retool Outlook integration allows you to send emails via Microsoft services. However, for transactional emails with better deliverability and tracking, using an SMTP provider like SendLayer is the better option.
Can I use multiple From addresses from the same SendLayer SMTP resource?
Yes. Set the From field per query rather than per resource. Any From email address on a verified SendLayer domain works. You can send from support@, billing@, notifications@, or any other mailbox on the verified domain. The SMTP resource only holds connection credentials.
That’s it! Now you know how to send transactional emails from a Retool admin panel using SendLayer SMTP.
Ready to send your emails in the fastest and most reliable way? Get started today with the most user-friendly and powerful SMTP email delivery service. SendLayer Business includes 5,000 emails a month with premium support.
