
As a developer working with Express.js, sending emails is a common requirement that you’ll encounter in many applications.
Whether you need to create a professional email template or send bulk email campaigns, Express.js provides powerful features to handle all your email needs.
In this comprehensive guide, I’ll explain everything you need to know about sending emails in Express.js applications.
We’ll explore both SMTP and API-based approaches, complete with working code examples and best practices. Let’s get started!
How to Send Emails in Express.js
Prerequisites
Below are some requirements you’ll need to meet to follow along with this guide:
- Node.js installed on your machine. Download the latest version here
- Code editor. I recommend using Visual Studio Code
- Basic knowledge of JavaScript
- A SendLayer account. You can get started with the trial account that lets you send up to 200 emails for free
After creating your SendLayer account, make sure to authorize your sending domain. This step is essential to improve your site’s email deliverability. With that, you’re all set up and ready to send your first email through an Express.js server.
Setting Up an Express.js Server
Before we proceed, I’ll show you how to set up a basic server in Express.js so beginners can follow along. However, if you already have a running project, proceed to the sending emails section.
To start, create a new directory for your project.
mkdir send-email
Then navigate into this directory using the command:
cd send-email
Within this directory, initialize your project using the command:
npm init -y
This command generates a package.json file with default configurations.
Install Express.js
After that, you’ll need to install the express package to your project using the command:
npm install express dotenv
The express package sets up the server. I also installed the dotenv package. This package allows you to manage sensitive data in a .env file.
After installing express, open the project in your favorite code editor. Then create a server.js file in the root directory of the project.
Within the server.js file, add the following code snippet:
const express = require('express');
const dotenv = require('dotenv');

dotenv.config(); // Load environment variables

const app = express();
const port = process.env.PORT || 3000;

// Middleware to parse JSON data
app.use(express.json());

app.listen(port, () => {
  console.log(`Server running on port ${port}`);
});
In the code above, we use the require syntax to import express and the dotenv libraries. The dotenv.config() statement loads environment variables from a .env file. We use the express.json() syntax to parse incoming JSON requests.
app.listen() starts the server. It accepts 2 parameters: port and a callback function. The port is set to the value specified in the environment variable. If none is set, it defaults to 3000.
To start the dev server, run the command:
node server.js
If everything works well, you’ll see the response on the console:
Server running on port 3000
You can access the server on localhost:3000.
Congrats! You’ve set up a basic Express.js server. Now, let’s proceed to sending emails through the server.
How to Send Emails in Express.js Via SMTP
SMTP (Simple Mail Transfer Protocol) is a standard method for sending emails through mail servers. Using the Nodemailer library, you can send emails through an SMTP server from your Express.js project. Here’s how to do it:
Step 1: Install Nodemailer and Configure .env Variables
To start, run the command below in your terminal to install nodemailer.
npm install nodemailer
After the installation completes, create a .env file and add the settings for your SMTP server. I’m using SendLayer SMTP for this tutorial. But you can use any SMTP server you like.
SMTP_HOST=smtp.sendlayer.net
SMTP_PORT=587
SMTP_USER=your-smtp-username
SMTP_PASS=your-smtp-password
[email protected]
Be sure to replace SMTP_USER and SMTP_PASS with your SMTP user credentials.
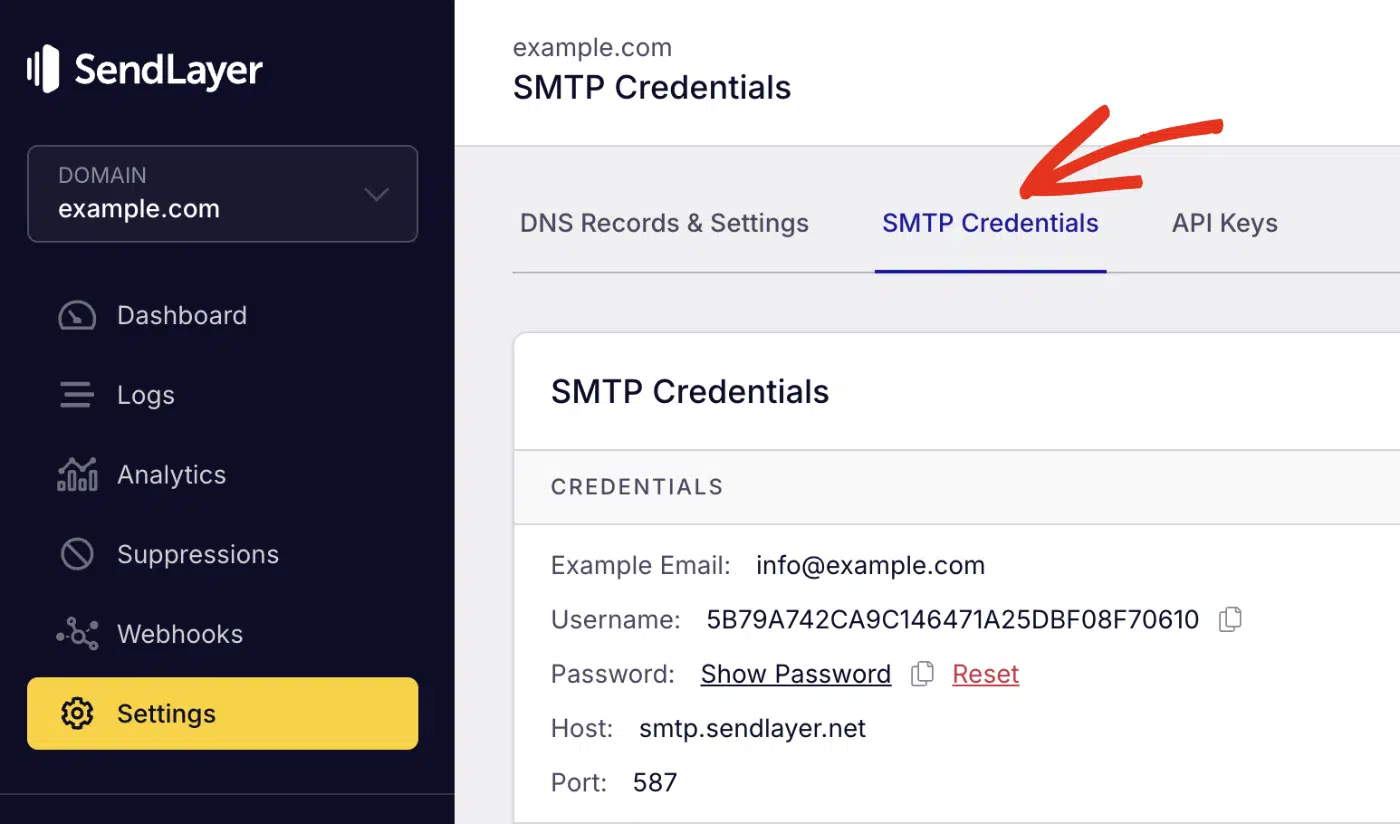
If you’re using SendLayer, you can access your SMTP credentials from your account dashboard by navigating to Settings » SMTP Credentials.
Note: For SendLayer users, the sender email needs to be at the domain you’ve authorized. For instance, if you authorized example.com, your sender email should include @example.com.
Step 2: Create a Route to Send Emails
Now, in the server.js file, add the following code to import the nodemailer module.
const nodemailer = require('nodemailer');
Then we’ll create a new function that sends emails. Within the function, we’ll initialize a transporter to configure the email options. Here’s the snippet to implement this:
const express = require('express');
const dotenv = require('dotenv');
const nodemailer = require('nodemailer');

dotenv.config(); // Load environment variables

const app = express();
const port = process.env.PORT || 3000;

// Middleware to parse JSON data
app.use(express.json());

// Function to send email via SMTP
const sendEmail = async (to, subject, message) => {
  try {
    // Create a transporter (connection to the email server)
    const transporter = nodemailer.createTransport({
      host: process.env.SMTP_HOST,
      port: process.env.SMTP_PORT,
      secure: false, // false for TLS (587), true for SSL (465)
      auth: {
        user: process.env.SMTP_USER,
        pass: process.env.SMTP_PASS,
      },
    });

    // Define the email content
    const mailOptions = {
      from: process.env.FROM_EMAIL,
      to: to,
      subject: subject,
      text: message,
    };

    // Send the email
    const info = await transporter.sendMail(mailOptions);
    console.log('Email sent:', info.messageId);
  } catch (error) {
    console.error('Error sending email:', error);
    throw error; // Propagate error to route handler
  }
};

// POST route to trigger email
app.post('/send-email', async (req, res) => {
  const { to, subject, message } = req.body;

  // Validate required fields.
  if ( !subject || !to || !message) {
    return res.status(400).json({ status: 'error', message: 'Missing required fields' });
  }

  await sendEmail(to, subject, message);
  res.status(200).json({ status: 'success', message: 'Email sent successfully' });
});

// starting up the server
app.listen(port, () => {
  console.log(`Server running on port ${port}`);
});
Code Breakdown
In the code above, we’re creating a function that accepts 3 parameters: to, subject, and message. These parameters correspond to the recipient’s email address(es), email subject line and body of the email.
The nodemailer.createTransport() line of code initializes nodemailer using the SMTP credential stored in the .env file as parameters. Then we use the transporter.sendMail() function to send the email request. This function accepts one parameter, which is the mailOptions variable.
Notice that I set the to, subject, and text options to correspond to the to, subject, and message parameters the function accepts. This means you’ll need to specify these parameters when calling the function. Otherwise, your emails won’t be sent.
I used the try/catch syntax in JavaScript to implement error handling within the function.
Below the function, I created a new post endpoint that’ll trigger the sendEmail() function. Within this API endpoint, I’ve specified that it accepts 3 parameters as the request body. These parameters correspond to the parameters the sendEmail() function requires.
I added a validation to check that all required parameters are specified before sending the request. If one or more of the parameters is missing, the user will encounter a 400 error, and the sendEmail() function won’t be triggered.
Send Email in Express.js with Attachments
If you’d like to send emails with attachments, simply add an attachments object to the mailOptions variable and specify the file you’d like to attach. Here’s an example:
// ...Other code snippets

    // Define the email content
    const mailOptions = {
      from: process.env.FROM_EMAIL,
      to: to,
      subject: subject,
      text: message,
      attachments: [
            {
                filename: 'example.pdf',
                path: './path/to/example.pdf'   // Update with the correct path to your file
            }
      ]
    };
Step 3: Test the SMTP Email
Once you’re done, you can test the API you’ve just created using cURL or an API client like Postman. You can also integrate the email API with a frontend framework such as Next.js or React to send emails.
Here’s how to send a test request. First, start up the dev server using the command:
node server.js
If you’re using Postman, set the request type to POST and enter the post email endpoint, i.e, (localhost:3000/send-email/).
The endpoint requires 3 parameters, if any of the required parameters isn’t specified, you’ll see an error message.

You’ll need to specify the request parameters in the Body tab on Postman. Once done, click the Send button to send your email.

Pro Tip: See Postman’s documentation if you need help with sending requests or adding request parameters.
You should receive a success response.

Go ahead and check the recipient’s email inbox for the test email you just sent.

To send emails to multiple recipients, simply add the recipient’s email address to the “to” object in the request parameter. You’ll need to separate each email address with a comma.
How to Send Emails in Express.js Via API
Sending emails through an email API is more reliable than using an SMTP server. It also provides advanced features, like better email deliverability and scalability for your project.

When handling bulk email campaigns, using an API approach is generally more reliable than SMTP. The email template you create can be easily integrated with the API to maintain consistent branding across all your bulk email sends.
To learn more about the differences between both sending methods, please see our SMTP vs API comparison guide.
Most transactional email service providers like SendLayer include support for sending emails through a secure API. You’ll often require an API key to interact with their email API and send your emails.
To send emails using SendLayer API, you’ll need 3 parameters:
- URL: This is the API endpoint for sending emails. For SendLayer, this endpoint is available at
https://console.sendlayer.com/api/v1/email - Headers: This is where you’ll define the format for the request and also authenticate your connection
- Payload: This contains the actual JSON requests with details for sending an email like the sender and recipient email address.
Pro Tip: To learn more about how SendLayer’s API works, be sure to check our beginner’s guide to using the SendLayer API.
Step 1: Retrieve and Store API Key as Environment Variable
To get your SendLayer API key, log in to your account dashboard. Then, navigate to the Settings » API Keys tab.
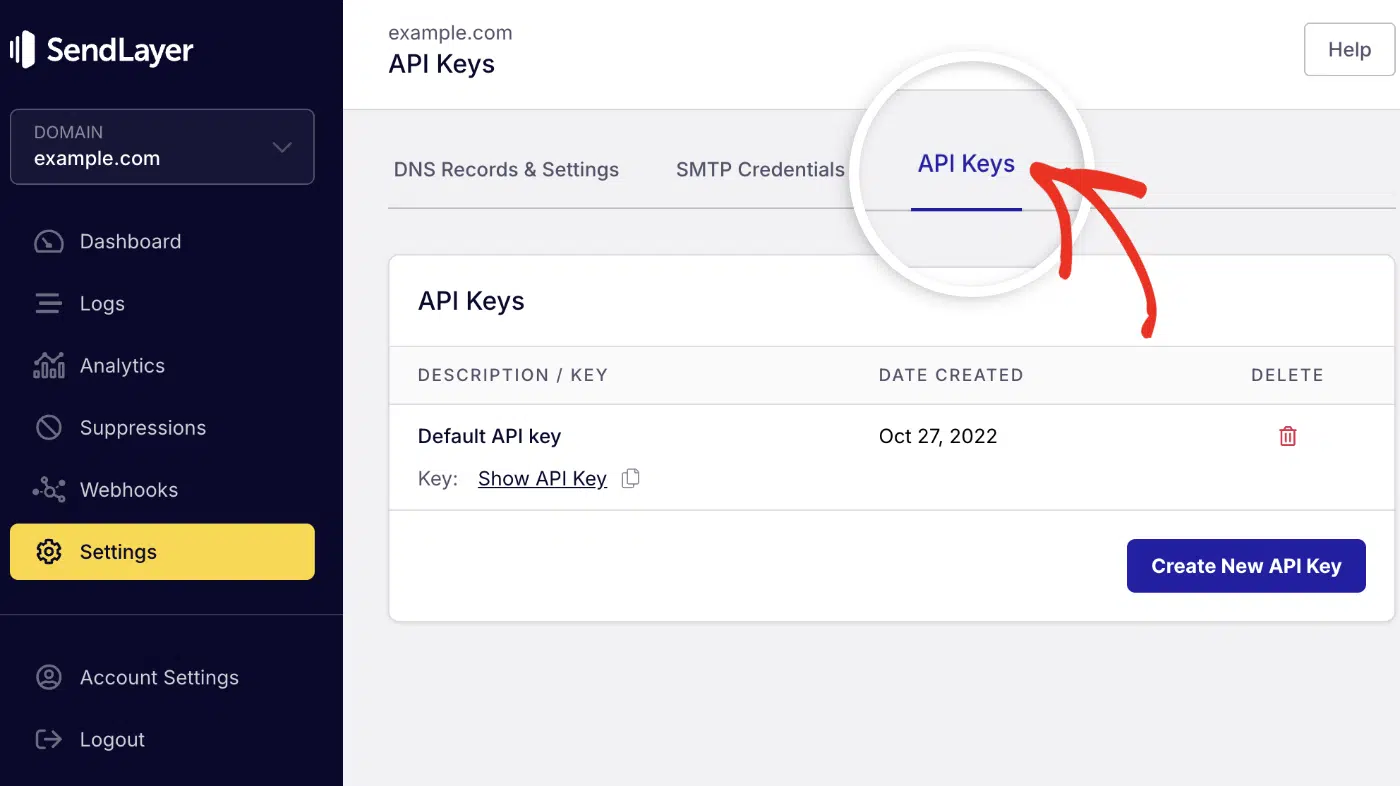
Next, click the copy icon below Default API key to copy it.

After that, add the API key as an environment variable to the .env file.
API_KEY=your-sendlayer-api-key
Step 2: Install the SendLayer SDK
You can send your emails by making API requests to the SendLayer email endpoint. However, I’ll use the SDK approach because it’s easier to implement.
To proceed, you’ll first need to install the SendLayer Node.js SDK in your project:
npm install sendlayer
Once the installation completes, you’re ready to start sending emails in Express.js.
Step 3: Create Email Endpoint
We’ll create an endpoint in server.js to handle email requests. Start by importing the SendLayer package to the server file.
const { SendLayer } = require('sendlayer')
After that, I’ll add a new endpoint to server.js to send an email via the API. Here’s the code snippet for it. I’ll explain what each function does below:
const express = require('express');
const dotenv = require('dotenv');

const { SendLayer } = require('sendlayer');

dotenv.config(); // Load environment variables

const app = express();
const port = process.env.PORT || 3000;

// Middleware to parse JSON data
app.use(express.json());

// POST route to trigger SendLayer API
app.post('/email-api', async (req, res) => {
  const { name, to, subject, message } = req.body;

  const apiKey = process.env.API_KEY;

  const sendlayer = new SendLayer(apiKey);

  const payload = {
    from: {
      name: "Paulie Paloma",
      email:process.env.FROM_EMAIL
    },
    to:[
      {
        name: name,
        email: to
      }
    ],
    subject: subject,
    html: message,
  }

    // Validate required fields.
    if ( !subject || !to || !message) {
      return res.status(400).json({ status: 'error', message: 'Missing required fields' });
    }

  try {
    const response = await sendlayer.Emails.send(payload);

    console.log('Email sent successfully:', response);

    res.status(200).json({ status: 'success', message: 'Email sent successfully'})
  }
  catch (error) {
    if (error.response) {
      // The request was made and the server responded with a status code that falls out of the range of 2xx
      res.status(error.response.status).send({ error: error.response.data });
    } else if (error.request) {
      // The request was made but no response was received
      res.status(500).send({ error: 'No response from email service' });
    } else {
      // Something happened in setting up the request that triggered an Error
      res.status(500).send({ error: 'An error occurred' });
    }
  }
});


app.listen(port, () => {
  console.log(`Server running on port ${port}`);
});
Code Breakdown
In the code above, we’re creating an Express.js application that implements an email sending service using the SendLayer API.
The application sets up a POST endpoint that accepts four parameters in the request body: name, to, subject, and message. These parameters are used to construct and send an email through SendLayer’s API.
The ‘/email-api‘ POST route implements the main email sending functionality. Here’s how it works:
- First, we destructure the required parameters from the request body
- Then, initialize the
SendLayerpackage using my API key - Finally, the payload object is written following SendLayer’s API requirements
The sendlayer.Emails.send(payload); line of code is what makes the actual API call. It accepts a single parameter: the request payload.
The validation check ensures that all required fields (subject, to, and message) are present before proceeding with the API call. If any of these fields are missing, the application returns a 400 status code with an error message.
I also added error handling using a try/catch block with detailed error scenarios. The error handling provides different status codes and messages depending on the type of error encountered:
- 400 for missing required fields
- 500 for server-side errors
Send Emails to Multiple Recipients
SendLayer API allows you to send emails to multiple recipients, including CC and BCC addresses. We covered all these in a previous tutorial. To learn more, see our beginner’s guide to sending emails in JavaScript via API.
Step 4: Send a Test Email
Once you’re done creating your API endpoint, you can proceed to test it on your preferred API client. I’m using Postman for this example.
Make sure to save your server.js file. Then start up the server using the command: node server.js.
Once the server is running, open Postman and select the POST method. After that, enter the endpoint where you implemented the email API, i.e, localhost:3000/email-api/.
Then switch to the Body tab and specify the request parameters. Once done, click Send to make the API call.

You should get a success response if everything is properly configured.

Troubleshooting Common Errors
When sending emails in your Express.js project, either through SMTP or an Email API, you might encounter some issues. Below, I’ve highlighted the most common ones you’ll likely come across.
Error: Invalid SenderAPIKey
This error indicates the API key you’re using to authenticate your connection is invalid. It might occur if you copied the wrong API key or the environment variable isn’t reading your API key value from the .env file.
To fix this error, be sure to double-check that you’ve copied the correct API key. Also, check that the logic for retrieving environment variables is properly implemented.
FAQs – Send Emails in Express.js
These are answers to some of the top questions we see about sending emails from an Express.js application.
How do I send an HTML email in Nodemailer?
To send HTML emails, you’ll simply need to replace text with html in the email data. Then, write your email message using HTML syntax in the html object. Here is an updated version of the mailOptions object used in the Nodemailer section above:
const mailOptions = {
   from: '[email protected]',
   to: '[email protected]',
   subject: 'Test HTML Message from Express.js',
   html: '<p>This is an <b>HTML template email</b> sent from Express.js using Nodemailer
and <a href="https://sendlayer.com">SendLayer SMTP server</a></p>'
};
Can I send emails with attachments in Express.js via API?
Yes! SendLayer’s API supports attaching files to emails you send through its email API. For more details, see our beginner’s guide to sending emails in JavaScript via API.
That’s it! Now you know how to send emails in Express.js through an SMTP server and Email API.
Next, would you like to keep track of emails sent through your application? See our tutorial on checking email delivery status for more information.