
Are you building a web application and need to send emails through your Flask backend API?
Email notifications are among the most crucial aspects of building a web application. Whether it’s for user registration emails, order confirmations, or a simple contact form, email sending functionality is a must-have for any Flask web application.
In this post, I’ll show you how to build an email API to send emails with the Flask framework.
How to Send Emails in Flask
There are 2 popular ways to send emails on web apps. Using an SMTP server or via an Email API. I’ll cover both sending methods in this guide.
Prerequisites
Below are some requirements you’ll need to meet to follow along with this guide:
- Python installed on your machine. I’m using Python version 3.x and recommend using it. Download the latest Python version 3 here
- Knowledge of the Python programming language
- An email service provider. I’m using SendLayer for this tutorial. You can get started with the trial account that lets you send up to 200 emails for free
After creating your SendLayer account, make sure to authorize your domain. This step is essential to improve your site’s email deliverability. With that, you’re all set up and ready to send your first email in Python.
How to Install Flask
Before proceeding, I’ll quickly run-through how to get started with Flask. If you already have a Flask app, you can skip to the sending emails section of this guide.
First, let’s create a virtual environment to hold all our project’s requirements. To do so, run the command below:
python3 -m venv env
Then activate the virtual environment using the command:
source env/bin/activate # On Windows use: env\Scripts\activate
After activating the virtual environment, run the command below to install Flask and dotenv libraries:
pip install Flask python-dotenv
Once the installation completes, create the following files in your project directory.
flask-email/
├── app.py
├── .env
├── templates/
│   └── email.html
After that, open the app.py in your preferred code editor and add the snippet below:
from flask import Flask, jsonify

app = Flask(__name__)

@app.route('/')
def home():
      return jsonify({'message': 'Hello World'})

if __name__ == '__main__':
     app.run(debug=True)
The snippet above is the basic implementation of a Flask server. We initialize the app using the app = Flask(__name__) command. To create a route/endpoint, we use the @app.route() decorator. Within the parentheses, you’ll need to specify the route, e.g., '/api/email'.
After that, proceed to create a function to define the API request functionality, including the request and response format.
Finally, we activate the server using the app.run() command. Setting debug to True means you’ll see server errors as they occur in your Flask app. You’ll need to set debug to False in production to avoid revealing sensitive server details to your app users.
How to Send Email in Flask with SMTP
Python provides a built-in smtplib library for sending emails through an SMTP server. I explained how it works in a separate tutorial. You can check out our sending emails in Python tutorial for more details.
For this Flask tutorial, I’ll use the Flask-Mail library, which offers more features and integrates seamlessly with Flask. To proceed, install the library using the command below:
pip install Flask-Mail
After that, create a .env file within your project’s directory or open the existing one and add the following SMTP configuration.
MAIL_SERVER=smtp.sendlayer.net
MAIL_PORT=587
[email protected]
MAIL_USERNAME=your-smtp-username
MAIL_PASSWORD=your-smtp-password
MAIL_USE_TLS=True
MAIL_USE_SSL=False
Tip: Don’t commit .env files to version control platforms like GitHub to avoid revealing sensitive credentials publicly.
You’ll need to replace the configuration details with your SMTP credentials. I used SendLayer for this tutorial, but you can use Gmail SMTP or any email service provider you like.
Here’s how to retrieve your SMTP credentials if you’re using SendLayer.
Start by logging in to your SendLayer account. Once logged in, select the Settings sidebar menu and navigate to the SMTP Credentials tab.
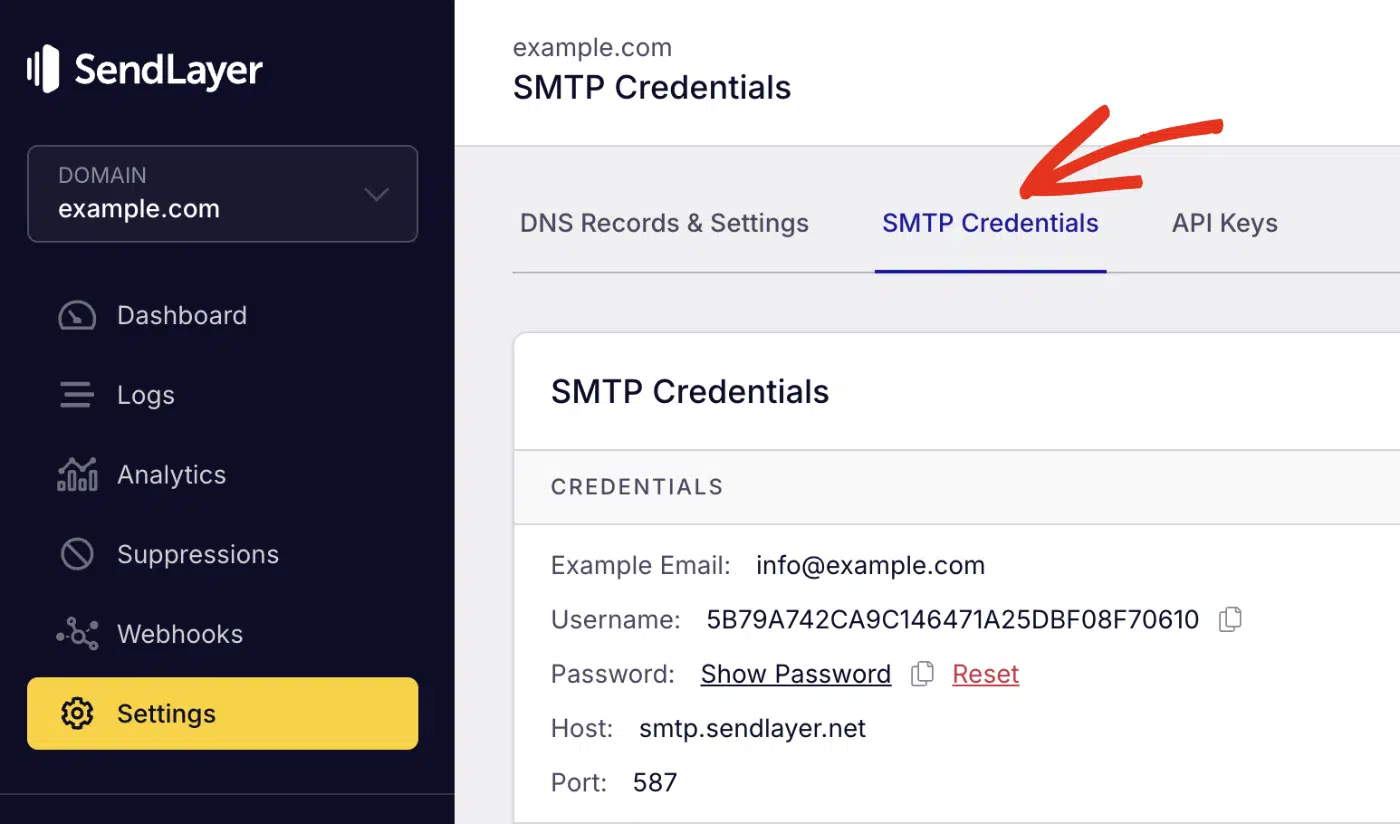
You’ll see the SMTP credentials required to use SendLayer’s SMTP server. The Host and Port number are the same for all users. However, the Username and Password details are unique to your SendLayer account. Go ahead and replace the MAIL_USERNAME and MAIL_PASSWORD values with your SMTP details.
Tip: The MAIL_SENDER is your sender email address. This email needs to be at the domain you’ve verified in SendLayer. If you authorized example.com in your SendLayer account, the sender email should include @example.com.
Send Plain Text Emails
After adding your SMTP credentials, you’re ready to send your first email. To start, open your app.py file and paste the snippet below.
from flask import Flask, request, jsonify
from flask_mail import Mail, Message
from dotenv import load_dotenv
import os

load_dotenv()

# Python flask app initialization
app = Flask(__name__)

# Email config
app.config['MAIL_SERVER'] = os.getenv('MAIL_SERVER')
app.config['MAIL_PORT'] = int(os.getenv('MAIL_PORT'))
app.config['MAIL_SENDER'] = os.getenv('MAIL_SENDER')
app.config['MAIL_USERNAME'] = os.getenv('MAIL_USERNAME')
app.config['MAIL_PASSWORD'] = os.getenv('MAIL_PASSWORD')
app.config['MAIL_USE_TLS'] = os.getenv('MAIL_USE_TLS') == 'True'
app.config['MAIL_USE_SSL'] = os.getenv('MAIL_USE_SSL') == 'True'

mail = Mail(app)

#flask-mail example route
@app.route('/send-email', methods=['POST'])
def send_email():
    data = request.json
    msg = Message(subject=data['subject'],
                  sender=app.config['MAIL_SENDER'],
                  recipients=[data['to']],
                  body=data['message'])
    mail.send(msg)
    return jsonify({"message": "Email sent successfully!"})

if __name__ == '__main__':
    app.run(debug=True) # Set debug=False in production
Code breakdown
In the code above, we first import Flask and request from the flask framework. Then the import Mail and Message modules from flask_mail.
After that, we initialize the Flask app using the command app = Flask(__name__). We use the app.config[] to set the SMTP credentials. These details are retrieved from the .env file we created using the dotenv library.
Next, we initialize the mail client using the mail = Mail(app) command. After that, I created a new post route to handle sending emails.
Within the send_email() function, we create an email object using the Message module. Then, pass the email parameters as arguments in the Message method. For this example, I’ve set the parameters to be passed as request parameters when running the server.
We then call the mail.send() method and pass the msg object as its parameter.
Send HTML Emails using Flask
Flask Mail allows sending HTML email by specifying the html parameter within the Message module. Here’s an example:
# Other Flask code snippet...

@app.route('/send-html-email', methods=['POST'])
def send_html_email():
    data = request.json
    msg = Message(subject="This is a test HTML Email",
                  sender=app.config['MAIL_SENDER'],
                  recipients=['[email protected]'],
                  html="<html><body><p>This is a test email sent with the <a href=\\\"https://sendlayer.com\\\">SendLayer</a> SMTP server!</p></body></html>")
    mail.send(msg)
    return "Email sent successfully!"
Send Email to Multiple Recipients
To send emails to multiple recipients, simply enter each recipient’s email address into the recipients list.
# Other Flask code snippet...

msg = Message(subject="This is a test HTML Email",
             sender=app.config['MAIL_SENDER'],
             recipients=['[email protected]', '[email protected]', '[email protected]'],
             body="This is a test email sent with Flask using SendLayer SMTP server")
Send Email with Attachments
You can also attach files to your emails. This is handy if you’d like to send invoices or event tickets through your Flask application to users.
To include attachments, you’ll need to use the open_resource() function to process the file. Then use the msg.attach() method to add the file to your email message.
with app.open_resource("path/to/file.pdf") as fp:
    msg.attach("file.pdf", "application/pdf", fp.read())
Note: The app.open_resource() method works if the attachment files are in a folder managed by Flask (e.g., static).
If the file is in a different directory, then you’ll need to use Python’s open() method to access the file before attaching it to your email. Here’s an example:
with open("path/to/file.pdf", "rb") as fp:
    msg.attach("file.pdf", "application/pdf", fp.read())
Tip: Make sure to choose the right MIME type for your attachment file.
Send a Test Email
Since the API endpoint we just created accepts request parameters, you can test it by sending a cURL command, or using Postman. You can also test it by making API requests through frontend libraries like React or Next.js.
I’ll make a cURL request for this example. To get started, start the Flask development server using the command:
python app.py
This will start a local development server running on port 5000. With the server running, open a terminal window and send the command below:
Be sure to update the "to", "subject", and "message" parameters to match your email data. Once done, send the cURL request. You should get a success notification.
When you open the email inbox of the recipient you specified, you should receive an email message if everything is configured properly.

Send Email in Flask Without App Context
Sometimes you may need to send emails in Flask without app context, such as from background tasks or scheduled jobs. Here’s how to handle this scenario:
from flask import Flask
from flask_mail import Mail, Message

def send_email_outside_context(app, subject, recipient, body):
    with app.app_context():
        mail = Mail(app)
        msg = Message(subject=subject,
                      sender=app.config['MAIL_SENDER'],
                      recipients=[recipient],
                      body=body)
        mail.send(msg)
This approach is particularly useful when working with task queues or cron jobs in your Python Flask application.
How to Send Email in Flask with Email API
Sending emails through SMTP works well for smaller projects. However, it is less secure and slower when compared to using an API-based email provider.
Also, if you want to send emails in Flask for free, many API providers offer generous free tiers that exceed what’s available through traditional SMTP services.
Platforms like SendLayer provide API endpoints and SDKs you can use to send single and bulk emails programmatically. I’ll show you how to set up a program that uses the SendLayer email API to send emails.
To use SendLayer’s email API, you’ll need to copy your API key from the SendLayer account dashboard. Here’s how to retrieve it:
First, log in to your SendLayer account and navigate to the Settings » API Keys page.
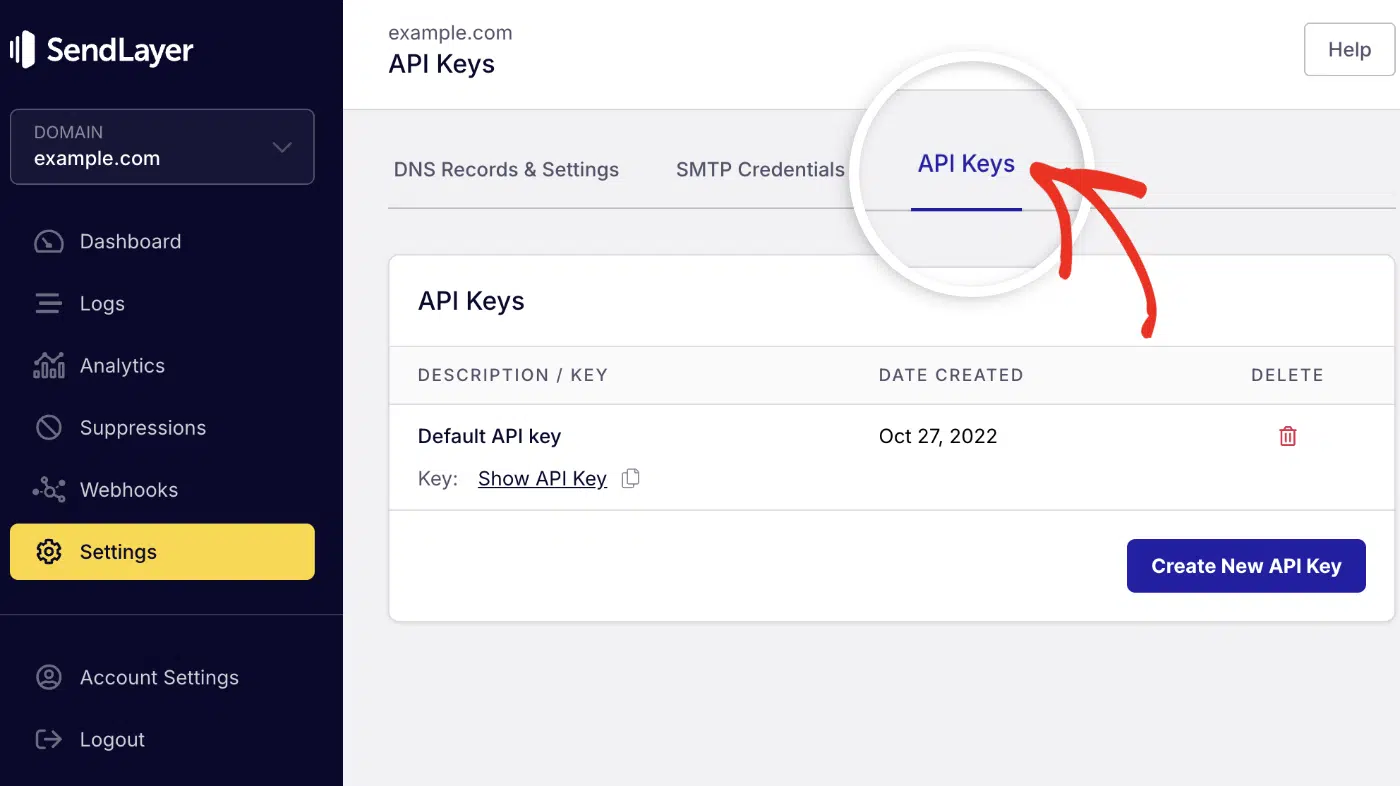
Once here, click the copy icon next to Default API key to copy its value.

Next, open the .env file in your Flask project and paste it using the format below.
SENDLAYER_API_KEY=your-sendlayer-api-key
Send HTML Email with SendLayer API
To get started, open your terminal window and run the command below to install the SendLayer SDK.
pip install sendlayer
After installing the SDK, open your app.py file and import and initialize the SendLayer module.
from flask import Flask, request
from dotenv import load_dotenv
import os

#sendlayer SDK import
from sendlayer import SendLayer

load_dotenv()

#Initialize the SendLayer module with your API key
sendlayer = SendLayer(os.getenv('SENDLAYER_API_KEY'))
After that, create a new API endpoint to handle sending emails on your Flask app. Here’s the complete snippet.
from flask import Flask, request
from sendlayer import SendLayer
from dotenv import load_dotenv
import os

load_dotenv()

#Initialize the SendLayer module with your API key
sendlayer = SendLayer(os.getenv('SENDLAYER_API_KEY'))

app = Flask(__name__)

@app.route('/api/send-email', methods=["POST"])
def send_api_email():

    params = {
        "sender": "[email protected]",
        "to": "[email protected]",
        "subject": "Test Email via SendLayer API",
        "html": "<html><body><p>This is a test email sent with the <a href=\\\"https://sendlayer.com\\\">SendLayer</a> SMTP server!</p></body></html>"
    }
    message = sendlayer.Emails.send(**params)

    return f'Email sent sucessfully: {message}'

if __name__ == '__main__':
    app.run(debug=True)
Code Breakdown
In the code above, we initialize the SendLayer module using the API key value we stored in the .env file.
Then created a new route /api/send-email to handle sending emails through the API. Within the send_api_email() function, we specify the email parameters in the params variable. Then call the sendlayer.Emails.send() method and pass the params variable as the argument.
Send Email to Multiple Recipients
SendLayer API allows you to send emails to multiple recipients, including CC and BCC email addresses. To send to multiple recipients, simply add each recipient’s email to the to parameter. Here’s an example:
    params = {
        "sender": "[email protected]",
        "to": ["[email protected]", "[email protected]", "[email protected]"],
        "subject": "Test Email via SendLayer API",
        "text": "This is a test email sent via SendLayer API"
        "cc": ["[email protected]", "[email protected]"]
    }
Note: SendLayer API limits the number of recipient emails that can be added per API request. See our developer documentation to learn about these limits.
Send Email with Attachments
You can also include attachment files to emails sent through SendLayer’s API. To send emails with attachments, add the attachments list to the params variable. Within the attachments list, specify the path and type fields. Here is an updated version of the email params field.
    params = {
        "sender": "[email protected]",
        "to": "[email protected]",
        "subject": "Test Email via SendLayer API",
        "html": "<html><body><p>This is a test email sent with the <a href=\\\"https://sendlayer.com\\\">SendLayer</a> SMTP server!</p></body></html>",
        "attachments": [
            {
                "path": "path/to/file.pdf",
                "type": "application/pdf"
            }
        ]
    }
Tip: You can attach multiple files by adding a new JSON object with the path and type parameter within the attachments list. Keep in mind that the size limit per email is 10MB.
Tips for Better Email Handling
When integrating email functionality into your Flask web application, it’s crucial to follow specific tips to ensure optimal performance. Here are a few useful tips:
1. Validate Emails
Your email implementation should include sender and recipient email validation. This helps to prevent errors and optimize API usage. If you’re using SendLayer SDK, we’ve added built-in support for email address validation. This means your app won’t send an API request if any of the email addresses in the payload are invalid.
2. Use HTML Templates
Most often, you’ll likely want to send HTML emails. Flask supports HTML templates out of the box. And you can use them using Flask’s render_template() syntax. To use HTML templates, first create a file in the following directory templates/email/welcome.html. Here is an example template:
<!DOCTYPE html>
<html>
<head>
    <style>
        body { font-family: Arial, sans-serif; }
        .container { max-width: 600px; margin: 0 auto; padding: 20px; }
        .header { background-color: #4CAF50; color: white; padding: 20px; text-align: center; }
        .content { padding: 20px; background-color: #f4f4f4; }
    </style>
</head>
<body>
    <div class="container">
        <div class="header">
            <h1>Welcome, {{ name }}!</h1>
        </div>
        <div class="content">
            <p>Thank you for signing up. We're excited to have you on board.</p>
            <p>Your username is: <strong>{{ username }}</strong></p>
            <p>Click <a href="{{ confirmation_link }}">here</a> to confirm your account.</p>
        </div>
    </div>
</body>
</html>
Then, in your app.py file, create a dynamic email function that accepts a template name as a parameter:
def send_email(subject, recipient, template, **kwargs):
    """Send an email using a template."""
    msg = Message(
        subject=subject,
        recipients=[recipient]
    )

    # Render HTML version
    msg.html = render_template(f'email/{template}.html', **kwargs)

    mail.send(msg)
You can now call the function in your API route and specify the template name:
@app.route('/register', methods=['POST'])
def register():
    # Your registration logic here
    name = request.form.get('name')
    email = request.form.get('email')
    username = request.form.get('username')

    # Send welcome email
    send_email(
        subject='Welcome to Our App!',
        recipient=email,
        template='welcome',
        name=name,
        username=username,
        confirmation_link='https://example.com/confirm/12345'
    )

    return 'Registration successful! Check your email.'
3. Apply Rate Limits
Most email service providers include rate limits in their API. To avoid hitting the limit for your account, I recommend implementing a custom rate limit in your email API that’s lower than the limit your email provider allows. That way, you avoid getting blocked by the email provider.
4. Implement Error Handling
Adding error handling to your email API is essential to catch errors in your implementation. Here’s how to add error handling using Python’s try except syntax:
@app.route('/send-email', methods=['POST'])
def send_email():
    try:
        data = request.json
        msg = Message(subject=data['subject'],
                      sender=app.config['MAIL_SENDER'],
                      recipients=[data['to']],
                      body=data['message'])
        mail.send(msg)
        return {"message": "Email sent successfully!"}, 200
    except Exception as e:
        return {"error": str(e)}, 500
FAQs – Send Emails in Flask
These are answers to some of the top questions we see about sending emails in Flask.
Can I use Flask-Mail with Gmail?
Yes, Flask-Mail Gmail integration is straightforward. You’ll need to use Gmail’s SMTP settings (smtp.gmail.com, port 587) and generate an app-specific password from your Google account.
How do I send emails with attachments?
If you’re using the Flask-Mail library, simply add the .attach() method to your message object. However, you’ll first need to access and read the attachment file before attaching it. See the sending emails with attachment section for more details.
Why am I getting “SMTPAuthenticationError” when trying to send emails?
This error is SMTP-related and indicates invalid SMTP credentials. To troubleshoot this error, double-check that your SMTP username and password are correct. If your SMTP provider requires an app-specific password, like Gmail SMTP, make sure you’re using an app password and not your Gmail account password.
Why are my HTML emails showing as plain text?
It might occur if you’re using msg.body instead of msg.html to add your HTML content. Also, some email clients do not support HTML emails, leading to your emails converting to plain text in the user’s inbox.
What’s the difference between Flask-Mail and Flask-Mailman?
Both are excellent libraries for email sending in Flask web applications. Flask Mail is simpler and well-established, while Flask Mailman offers additional features like better async support and more flexible configuration options.
That’s it! Now you know how to send emails in Flask using SMTP and Email API.
Next, would you like to learn about the difference between different sending methods? Check out our tutorial on SMTP vs API for more information.