


Are you looking to send email in Python?
As a software engineer with experience building Python software and web applications, I often notice that some devs struggle to add an email-sending feature to their applications.
Python’s email capabilities are built directly into the standard library, making email integration straightforward. It supports simple text messages, sending multiple emails to recipients, and creating complex HTML emails with attachments.
In this comprehensive tutorial, I’ll walk you through proven, production-ready methods for sending emails in Python using both SMTP protocols and modern API solutions like SendLayer.
How to Send Email in Python
In this section, I’ll show you the 2 ways to send emails in Python.
Prerequisites
Below are some requirements you’ll need to meet to follow along with this guide:
- Python installed on your machine. I’m using Python version 3.x, and I recommend using it as well. Download the latest Python version 3 here
- Knowledge of the Python programming language
- Code editor. I use Visual Studio Code. But you can use any editor you want, including AI editors like Cursor.
- An SMTP provider. I’ll use SendLayer for this tutorial. But the steps are the same for most email providers.
After creating your SendLayer account, make sure to authorize your domain. This step is essential to improve your site’s email deliverability. With that, you’re all set up and ready to send your first email in Python.
SMTP vs. Email API: Which Should You Use?
Python gives you two routes. smtplib is built in, so it’s the fastest way to get a message out. An email API takes more setup but hands you delivery logs and tracking. Here’s how they compare.
| smtplib (SMTP) | Email API | |
|---|---|---|
| Install | Nothing. smtplib ships with Python | An SDK, or plain HTTP requests |
| Credentials | SMTP host, port, username, password | One API key |
| Connection | Several round trips per message | A single HTTPS request |
| Deliverability tooling | None. You build your own | Logs, webhooks, bounce and open tracking |
| Attachments | Yes, via the email package | Yes |
| Best for | Scripts, internal tools, low volume | Production apps and customer-facing mail |
This guide covers both. Start with SMTP below, or jump to the email API section if you already know you need delivery tracking.
How to Send an Email With SMTP in Python
Python’s smtplib email module lets you send emails through an SMTP server. In this guide, I’ll use SendLayer’s SMTP server.
However, the steps are similar for the Gmail SMTP server or any other SMTP server you intend to use.
To get started with SendLayer, you’ll need your SMTP account login credentials.
For this, log in to your SendLayer account and select the Settings sidebar menu. Then select the SMTP Credentials tab.
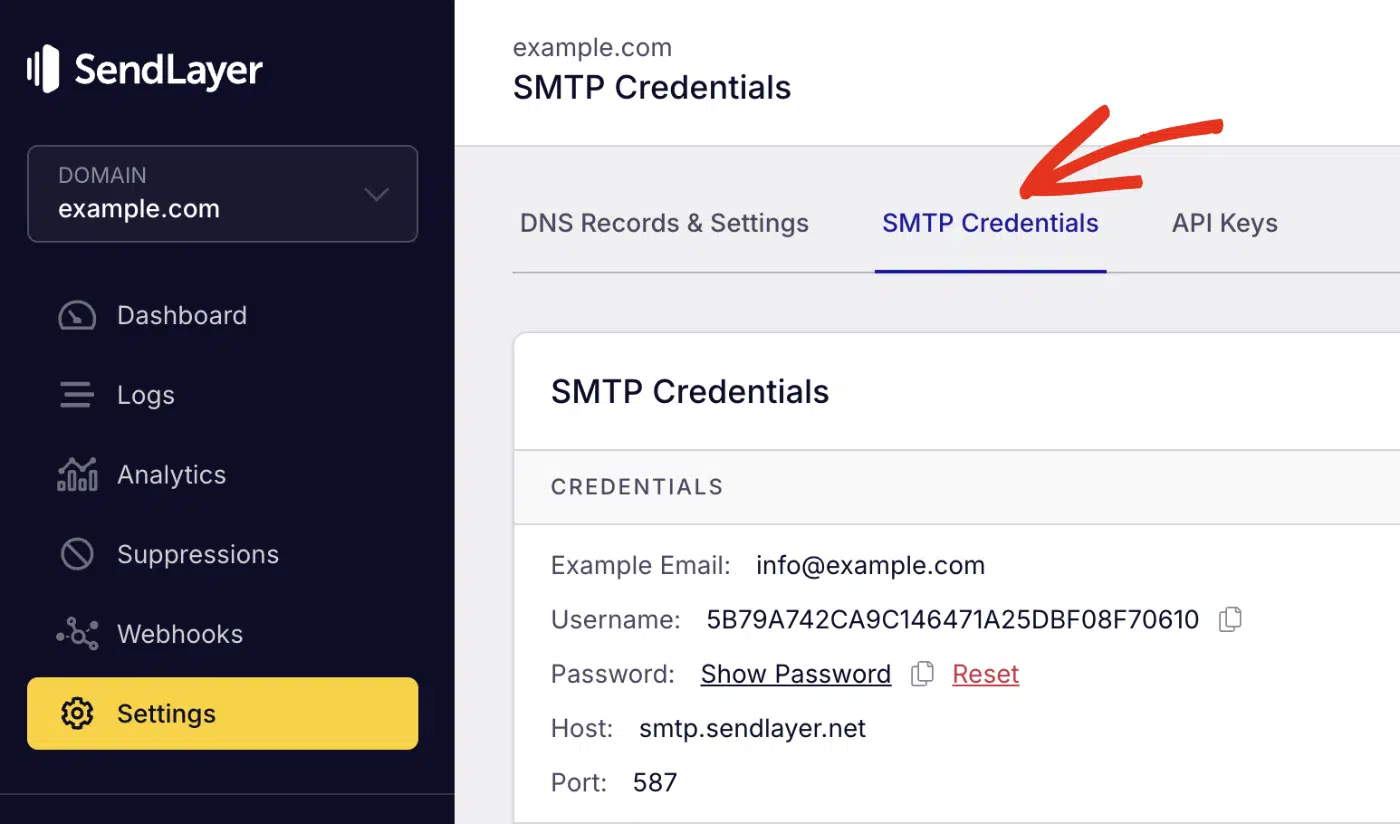
You’ll find the SMTP credentials you need to use SendLayer’s SMTP server. The Host and Port number are the same for all users. However, the Username and Password details are unique to your SendLayer account.
You can leave this browser tab open to easily access the SMTP server details.
Send a Plain Text Email
After you’ve gotten the SMTP credentials, you’re ready to start sending emails in your Python app. To do so, create a new Python file (email_utils.py) or open an existing file in your project.
Once you’ve created the file, go ahead and open it in your code editor. First, import the smtplib library.
import smtplib
After that, create an SMTP instance using the library we just imported.
server = smtplib.SMTP('smtp.sendlayer.net', 587)
The server variable defines the connection between your SMTP server and the Python script. The 2 arguments we specified in the SMTP() method correspond to your email provider’s SMTP Host and Port number. In my example, this value points to SendLayer’s SMTP server.
After initializing the connection, we’ll need to secure it through TLS (Transport Layer Security). This protocol encrypts the connection between your script and SendLayer’s SMTP server.
server.starttls()
Next, we’ll authenticate the connection using the SMTP login details. Recall that I asked you to keep the browser tab with your SendLayer SMTP details open. You’ll need the username and password now.
server.login('username', 'password')
Ensure you replace username and password in the snippet above with your actual SMTP login credentials.
Pro Tip: If you send email in Python using Gmail, you’ll need to generate an app password before you can send an email in Python with Gmail SMTP.
Sending the Email
The final step is to send the email by calling the sendmail() method. This function accepts 3 arguments: the sender’s email, the recipient’s email, and the email message.
server.sendmail('[email protected]', '[email protected]', "This is a test email sent from Python")
Note: If you’re using SendLayer to send your emails, the sender email needs to be at the domain you’ve authorized in SendLayer. For instance, if you authorized example.com, your sender email domain should be @example.com.
Python Send Email Example
Putting it all together:
import smtplib

server = smtplib.SMTP("smtp.sendlayer.net", 587)
server.starttls()
server.login("username", "password")

server.sendmail("[email protected]", "[email protected]", "This is a test email sent from Python")

print("Email sent successfully")
I added a print statement to the code that’ll notify us when we run it whether the email was sent successfully.
To test the code, open a terminal window and run the command below:
python3 email_utils.py
email_utils.py should correspond to the filename you added the script to. After running the script, you should receive an email in the recipient’s inbox.

Send an HTML Email
The implementation above works great if you only intend to send plain-text emails. However, modern emails include HTML elements such as bolded text, images, buttons, and links.
To send such emails, you’ll need to use HTML syntax within the email message. Fortunately, Python’s email library lets you format emails with HTML.
Here’s a basic implementation:
import smtplib
from email.mime.text import MIMEText
from email.mime.multipart import MIMEMultipart

# SMTP Server details
port = 587
smtp_server = "smtp.sendlayer.net"
username = "paulie"  # Your username generated by SendLayer
password = "sendlayer_smtp_password"  # Your password generated by SendLayer

sender_email = "[email protected]"
receiver_email = "[email protected]"

# Email content
subject = "HTML Email Example"
html_message = """\
<html>
  <body>
    <p>Hi,<br>
    This is a <b>test</b> email sent from <a href="https://www.python.org">Python</a> using <a href="https://sendlayer.com">SendLayer's</a> SMTP server</p>
  </body>
</html>
"""

# Create a multipart message and set headers
message = MIMEMultipart()
message["From"] = sender_email
message["To"] = receiver_email
message["Subject"] = subject

# Attach the HTML part
message.attach(MIMEText(html_message, "html"))

# Send the email
with smtplib.SMTP(smtp_server, port) as server:
    server.starttls()
    server.login(username, password)
    server.sendmail(sender_email, receiver_email, message.as_string())

print('Email sent successfully')
In the snippet above, we’re importing the MIMEText and MIMEMultipart classes from the email library. The MIMEMultipart class allows us to specify the different components of an email like the subject, sender address, recipient address, etc.
We use the MIMEText method to specify the email message format. It accepts 2 arguments: message and format.
The message is the actual HTML message you intend to send, corresponding to the html_message variable in the code above. We specified the format as “html”. You can use “plain” if you’d like to send a plain-text message.
When you run the snippet above, it should send the email message with the email subject and HTML content properly formatted.

Send Email to Multiple Recipients in Python
Python’s email library supports sending emails to multiple recipients by default. Once you provide the recipient email addresses as a list, the sendmail() method automatically detects each address and sends the email to all recipients.
The only drawback is that this approach sends emails in bulk. This means the process completes when the script has looped through the list of recipients. It might also take a while if you have a large list of recipients.
Pro Tip: For better email deliverability, I suggest sending emails to multiple recipients through an API service. Here’s how to use SendLayer’s API.
Adding the Snippet
Here’s the snippet for this implementation.
import smtplib
from email.mime.text import MIMEText
from email.mime.multipart import MIMEMultipart

# SMTP Server details
port = 587
smtp_server = "smtp.sendlayer.net"
username = "paulie"  # Your username generated by SendLayer
password = "sendlayer_smtp_password"  # Your password generated by SendLayer

sender_email = "[email protected]"
# Recipient email addresses list
receiver_emails = ["[email protected]", "[email protected]", "[email protected]"]

# Email content
subject = "Email Example to Multiple Recipients"
html_message = """\
<html>
  <body>
    <p>Hi,<br>
    This is a <b>test</b> email sent from <a href="https://www.python.org">Python</a> using <a href="https://sendlayer.com">SendLayer's</a> SMTP server</p>
  </body>
</html>
"""

# Create a multipart message and set headers
message = MIMEMultipart()
message["From"] = sender_email
message["Subject"] = subject
# Join the list of receiver emails into a string separated by commas
message["To"] = ", ".join(receiver_emails)

# Attach the HTML part
message.attach(MIMEText(html_message, "html"))

# Send the email
with smtplib.SMTP(smtp_server, port) as server:
    server.starttls()
    server.login(username, password)
    server.sendmail(sender_email, receiver_emails, message.as_string())

print('Email sent successfully')
In the code above, I created a list of each recipient’s email and stored it in the receiver_emails variable.
Next, I combined the list into a single string and separated each email address with a comma. This step ensures the Email Recipient header includes all recipients.
The sendmail() function loops through the list and sends an email to each recipient.
Sending Emails With Attachments
You can also add attachments to your emails before sending them. For this, we’ll need the MIMEBase class and the encoders function from the email library. I’ve added the import statement below to your code.
from email.mime.base import MIMEBase
from email import encoders
Adding the Snippet
Here is the complete code snippet for handling attachments in email messages.
import smtplib
from email.mime.text import MIMEText
from email.mime.multipart import MIMEMultipart
from email.mime.base import MIMEBase
from email import encoders

# SMTP Server details
port = 587
smtp_server = "smtp.sendlayer.net"
username = "paulie"  # Your username generated by SendLayer
password = "sendlayer_smtp_password"  # Your password generated by SendLayer

sender_email = "[email protected]"
receiver_email = "[email protected]"

# Email content
subject = "Email Example with Attachment"
html_message = """\
<html>
  <body>
    <p>Hi,<br>
    This is a <b>test</b> email sent from <a href="https://www.python.org">Python</a> using <a href="https://sendlayer.com">SendLayer's</a> SMTP server <br>
The email also includes an attachment</p>
  </body>
</html>
"""

# Create a multipart message and set headers
message = MIMEMultipart()
message["From"] = sender_email
message["Subject"] = subject
# Join the list of receiver emails into a string separated by commas
message["To"] = ", ".join(receiver_emails)

# Attach the HTML part
message.attach(MIMEText(html_message, "html"))

# Specify the file path for the attachment
filename = "./path/to/attachment/file.pdf"  # Change this to the correct path

# Open the file in binary mode
with open(filename, "rb") as attachment:
    part = MIMEBase("application", "octet-stream")
    part.set_payload(attachment.read())

# Encode file in ASCII characters to send by email
encoders.encode_base64(part)

# Add header as key/value pair to attachment part
part.add_header("Content-Disposition", f"attachment; filename= {filename}")

# Add attachment to message
message.attach(part)

# Send the email
with smtplib.SMTP(smtp_server, port) as server:
    server.starttls()
    server.login(username, password)
    server.sendmail(sender_email, receiver_email, message.as_string())

print('Email sent successfully')
Code Explanation
In the snippet above, we use the MIMEBase class to specify the attachment type. Setting it to application/octet-stream means it’s a generic file and works for all file formats. Email clients will read it as an attachment file.
Attachment files need to be encoded in Base64 to ensure they are properly transmitted. The line encoders.encode_base64(part) handles that.
Next, we’re including the attachment file in the email header so email clients know to treat it as an attachment using the part.add_header() function.
Finally, we add the attachment to the message so it’s included in the mail using the message.attach(part) function.
When you test the implementation, you should see the file attached to the email message.

Send Emails in Python Using Email API
Sending emails through SMTP works well for smaller projects. However, it is less secure and slower than using an API-based email provider.
An API-based service is also significantly faster, especially when you plan to send bulk emails. Our SMTP vs. API guide will help you understand the difference between these two sending methods.
Fortunately, transactional email services like SendLayer offer API endpoints and SDKs to send single and bulk emails programmatically. I’ll show you how to set up a program that uses the SendLayer email API to send emails.
In this tutorial, I’ll use SendLayer’s SDK to handle email functionality in my sample project. One reason I prefer the SDK is its built-in error-handling support. It also makes it easy to include attachments to emails.
Note: To learn more about how SendLayer’s API works, be sure to check our beginner’s guide to using the SendLayer API.
Getting Started With SendLayer API
To get started, open your terminal and run the command below to install the sendlayer library.
pip install sendlayer python-dotenv
After installing the library, create a new Python file (you can use any name), just make sure to use the .py file extension. For this tutorial, I’ve named mine sl_api_email.py.
Pro Tip: I added python-dotenv to the installation command. This library helps you secure sensitive credentials by loading them externally as environment variables.
Now, open the file you just created and add the following import statement.
from sendlayer import SendLayer
from dotenv import load_dotenv

load_dotenv()
Adding the load_dotenv() command lets the Python interpreter load environment variables from a .env file. This file will contain my SendLayer API key. I recommend using this approach to avoid committing API keys to version control platforms like GitHub.
Retrieving SendLayer API Key
To get your API key, log in to your SendLayer account. Once you’re logged in, click the Settings menu and select the API Keys tab.
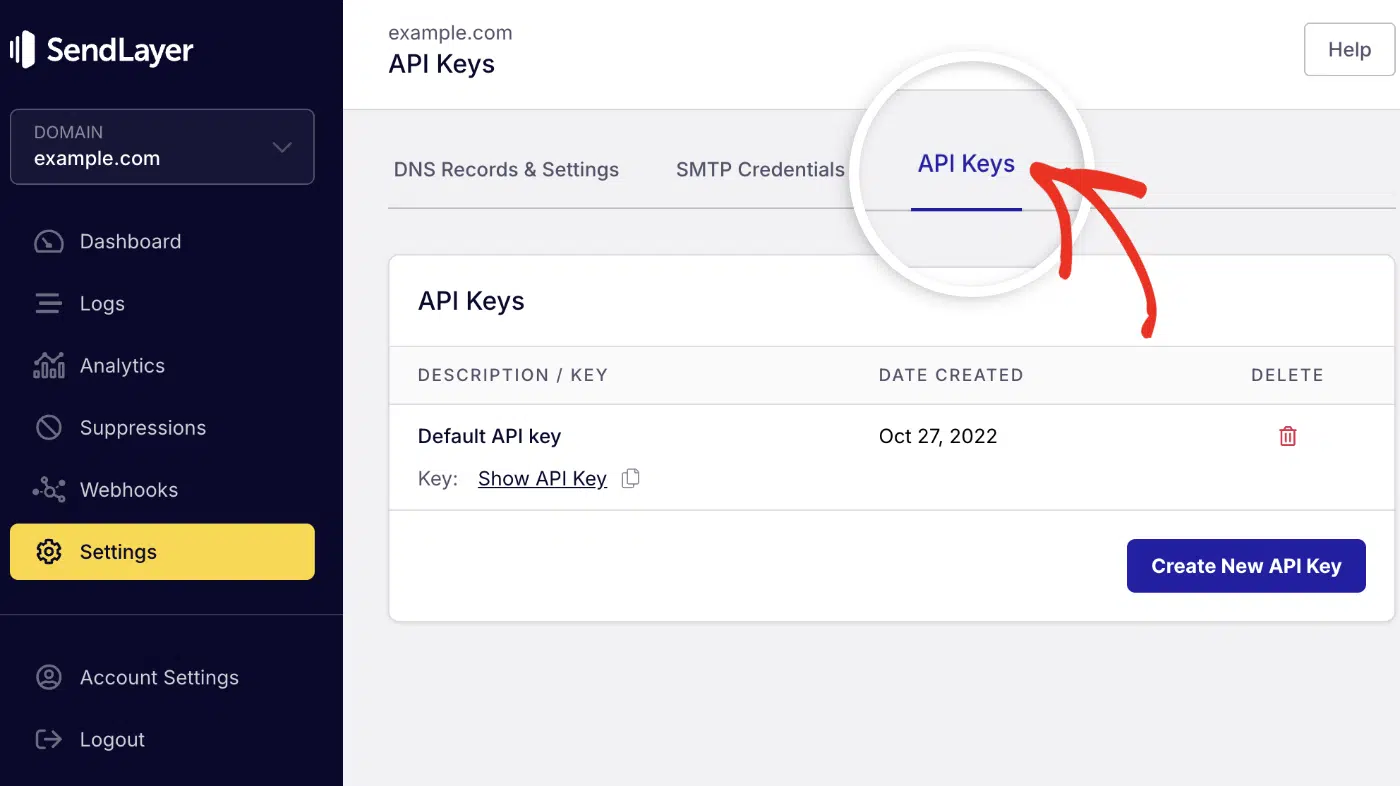
Then click the copy icon next to Default API key to copy it.

After copying your API key, return to your code editor and create a .env file. Then paste the following snippet into the file.
SENDLAYER_API_KEY=your-api-key
Be sure to replace your-api-key with the API key gotten from your SendLayer account dashboard.
Send Plain Text Emails
Now that we’ve installed the necessary libraries and configured our API keys, let’s proceed to implement the email functionality using the SDK.
For this, copy and paste the code snippet below. I’ll explain what each line does afterward.
import os
from dotenv import load_dotenv

from sendlayer import (
    SendLayer,
    SendLayerError
)

load_dotenv()

def sl_send_email():
    # Initialize the email client with your API key
    api_key = os.getenv("SENDLAYER_API_KEY")

    sendlayer = SendLayer(api_key)

    try:
        # Send a simple email
        response = sendlayer.Emails.send(
            sender="[email protected]",
            to="[email protected]",
            subject="Send Email with Python Example",
            text="This is a test email sent using the SendLayer Python SDK",
        )
        print(f"Email sent successfully! Message ID: {response['MessageID']}")

    except SendLayerError as e:
        print(f"Error: {e}")


# Call the function
sl_send_email()
In the snippet above, we define a function, sl_send_email(), that contains the email logic. Within the function, we first load the API key from the environment variable.
Then we initialize the SendLayer package with the API key. After that, we call the sendlayer.Emails.send() method and pass the required parameters.
To send an email, you’ll need the following parameters:
sender: The from email addressto: The recipient email address or list of recipientssubject: The email subject linetextorhtml: The plain or HTML content of the email message.
Make sure to update the sender and to fields with your sender email address and the address you want to send emails to.
Note: The From email domain needs to match the domain you authorized in your SendLayer account. For instance, if you authorized example.com in SendLayer, the from email needs to use @example.com extension.
After that, I added a print statement to return the email’s message ID. As an extra optimization step, I wrapped my entire implementation in a try...catch block. Then use the built-in SendLayerError module to catch exceptions that might prevent emails from sending.
Send a Test Email
I recommend sending a few test emails to make sure everything works properly. To run this code, open a terminal window and run the command below.
python3 sl_api_email.py
You should see a message similar to the one below logged in the terminal.
Email sent successfully! Message ID: "451c0388-cdd4-4a0e-b554-06a381880b14"
When you open the email inbox of the recipient, you’ll see the email message we just sent out.

Congratulations! You’ve just sent your first email through an API-based email provider.
Send an HTML Email in Python via API
The SDK allows you to send both plain and HTML emails. To send HTML emails, simply add the html parameter to your Emails.send() method.
This can be helpful if you’d like to use HTML email templates for activities such as password resets or welcome emails. Here’s an example:
import os
from dotenv import load_dotenv

from sendlayer import (
    SendLayer,
    SendLayerError
)

load_dotenv()

def sl_send_email():
    # Initialize the email client with your API key
    api_key = os.getenv("SENDLAYER_API_KEY")

    sendlayer = SendLayer(api_key)

    try:
        params = {
            "sender": "[email protected]",
            "to": ["[email protected]"],
            "subject": "Python Send Email via API",
            "text": "This is a test email sent using the SendLayer Python SDK",
            "html": "<h1>Hello!</h1><p>This is a test email sent using the SendLayer Python SDK</p>"
        }

        # Send HTML email
        response = sendlayer.Emails.send(**params)

        print(f"Email sent successfully! Message ID: {response['MessageID']}")

    except SendLayerError as e:
        print(f"Error: {e}")

sl_send_email()
Pro Tip: Some email clients do not support HTML emails. I recommend adding both HTML and plain-text version of your email message.
Send Email in Python to Multiple Recipients
With SendLayer’s API, you can send emails to multiple recipients from your Python file. To do so, just add more addresses to the to parameter. Let’s update the params variable:
# Other code snippets...

params = {
            "sender": "[email protected]",
            "to": ["[email protected]", '[email protected]'],
            "subject": "Test Email",
            "text": "This is a test email sent using the SendLayer Python SDK",
            "html": "<h1>Hello!</h1><p>This is a test email sent using the SendLayer Python SDK</p>"
        }

response = sendlayer.Emails.send(**params)
SendLayer also lets you add other recipients using the Cc and Bcc features that email servers support.
To use this, simply add the "cc" and "bcc" fields to the params variable. Within each field, add the recipients’ email address object. This can be a list of email addresses or an object with name and email fields. Here is an example snippet:
# Other code snippets...

params = {
            "sender": {"name": "Paulie Paloma", "email": "[email protected]"},
            "to": [
                {"name": "Pattie Paloma", "email": "[email protected]"},
                {"name": "John Doe", "email": "[email protected]"},
                   ],
            "subject": "Test Email",
            "html": "<h1>Hello!</h1><p>This is a test email sent using the SendLayer Python SDK</p>",
            "cc": [{"name": "Carbon Copy", "email": "[email protected]"}],
            "bcc": ["[email protected]"]
        }

response = sendlayer.Emails.send(**params)
Note: There is a limit to the number of emails you can add to the "to", "cc", and "bcc" fields when sending emails through SendLayer’s API. Please see our guide to learn more about these limits.
Python Send Email with Attachment via API
The SDK supports adding attachments to email messages. Traditionally, you’d need to encode the attachment before attaching it to your email.
However, the SDK handles the encoding in the background. So you’ll only need to specify the attachment path and type parameters.
To include an attachment, update the params variable to include the "attachments" parameter as seen in the snippet below.
# Other code snippets

# Email data
    params = {
            "sender": {"name": "Paulie Paloma", "email": "[email protected]"},
            "to": [
                {"name": "Pattie Paloma", "email": "[email protected]"},
                   ],
            "subject": "Test Email",
            "html": "<h1>Hello!</h1><p>This is a test email sent using the SendLayer Python SDK</p>",
            "attachments": [
                {
                    "path": "path/to/document.pdf",
                    "type": "application/pdf"
                }
            ]
        }

response = sendlayer.Emails.send(**params)
Make sure to update the path to match the location of the file you’d like to attach. Also, ensure you’ve specified the correct MIME type in the type field.
Tip: See Mozilla’s documentation to learn about common MIME types.
Including Multiple Attachment Files
You can also add multiple files to your email message. The SDK supports both local and remote file attachments. To add multiple files, create a new key-value pair within the "attachments" list.
# Other code snippets

# Email data
params = {
            "sender": {"name": "Paulie Paloma", "email": "[email protected]"},
            "to": [
                {"name": "Pattie Paloma", "email": "[email protected]"},
                   ],
            "subject": "Test Email",
            "html": "<h1>Hello!</h1><p>This is a test email sent using the SendLayer Python SDK</p>",
            "attachments": [
                {
                    "path": "path/to/file.pdf",
                    "type": "application/pdf"
                },
                {
                    "path": "https://example.com/picture.jpg",
                    "type": "image/jpg"
                }
            ]
        }

response = sendlayer.Emails.send(**params)
When you run the script, include both attachments in the email message.

Best Practices For Sending Emails Using Python
If you’re building an enterprise application, keep these security considerations in mind. Below, I’ll share some tips to optimize your Python application.
1. Secure Sensitive Credentials
Keep details like API keys, SMTP usernames, and passwords private and don’t share them publicly. If your codebase is public, attackers can easily access sensitive details.
Here’s how to use environment variables to store server details in Python:
First, create a .env file in your project’s root directory. Inside this file, you’ll need to store the server details as variables:
# .env file
SENDLAYER_API_KEY=your_api_key
[email protected]
SENDER_NAME=Sender Name
API_URL=https://console.sendlayer.com/api/v1/email
Next, install the dotenv library for Python. To do so, run the command below in your terminal window:
pip install python-dotenv
Once you’ve installed the library, you’re ready to load the .env file into your main project file. Here’s how to do it:
import os
from dotenv import load_dotenv
In the code above, we’re importing the built-in os module and the dotenv library we just installed. After that, update the send email function to read the values from the environment variables we created.
def send_sendlayer_email():
    # Get values from environment variables
    api_key = os.getenv('EMAIL_API_KEY')
    sender_email = os.getenv('SENDER_EMAIL')
    sender_name = os.getenv('SENDER_NAME')
    api_url = os.getenv('API_URL')
The rest of the code should remain unchanged.
2. Implement Error Handling
One drawback of our current implementation is that we can’t determine the exact cause when an email isn’t sent to the recipient(s).
To address such issues, we need to implement an error-handling mechanism to determine why emails fail to deliver.
I recommend using Python’s try...catch syntax to handle errors as they occur. See the API email sending section to see a working example of this implementation.
Here is an example of an error you might encounter:
Failed to send email. Status code: 401
{"Errors":[{"Code":13,"Message":"Invalid SenderAPIKey"}]}
The error above indicates that your email failed because the API key is invalid. If you encounter this error, make sure to replace the API key placeholder with your actual SendLayer API key.
FAQs –– Using Python to Send Emails
These are answers to some of the top questions we see on how to send emails using Python.
How to run a Python script?
To run a Python file, you’ll need to open up a terminal window and then navigate to the root directory of the project. Once there, specify the version of Python you’re running, give a space, and then mention the script name you want to run.
For instance, if your file name is send_email.py, enter the command python3 send_email.py in your terminal window to run the script.
How do I send an email using Python without using SMTP?
The easiest way to send email in Python without using SMTP is to use an email API provider such as SendLayer.
Instead of opening an SMTP connection and managing credentials, your application sends an HTTPS request to the provider’s API endpoint. This approach is typically more secure, easier to scale, and better suited for production applications.
Most modern email providers offer Python SDKs that simplify the implementation process and include features such as error handling, analytics, attachments, and email tracking.
Can I use AI to send emails?
Yes! You can use AI to send emails by connecting an email service provider to your AI tool using the Model Context Protocol (MCP). SendLayer provides an MCP server that connects to AI tools like Claude Code, Cursor, Gemini, and more. Allowing you to send emails using natural language.
What Python libraries can I use to send emails?
You can use the smtplib Python library, which comes pre-installed by default. However, it has limited features and only works with SMTP. Other libraries like SendLayer SDK offer advanced functionality like email validation, error handling, attachment file handling, etc.
Can Python send automated emails?
Yes! Python can send automated emails very effectively. Python is one of the most popular languages for email automation due to its built-in smtplib library and extensive third-party packages.
Can Python send email without login?
In most cases, no. Most email providers require authentication before allowing applications to send messages. Depending on the provider, this authentication may use:
- SMTP username and password
- Gmail App Passwords
- OAuth authentication
- API keys
Open email relays that allow email to be sent without authentication are extremely rare and generally not recommended, as they are vulnerable to abuse and spam.
For security reasons, you should always authenticate your application before sending email.
How do I send email with Python Outlook?
To send email through Outlook or Microsoft 365, use Outlook’s SMTP server with TLS encryption.
smtp_server = "smtp.office365.com"
port = 587
After authenticating with your Outlook or Microsoft 365 account credentials, you can use Python’s smtplib package to send emails.
Outlook is commonly used in business environments because it integrates with Microsoft 365 services and enterprise email systems.
How do I send email with Python Gmail?
You can send email with Python and Gmail using Gmail’s SMTP server. First, enable two-factor authentication on your Google account and generate an App Password.
Then configure your SMTP connection using Gmail’s server settings:
smtp_server = "smtp.gmail.com"
port = 587
After authenticating with your Gmail address and App Password, you can send emails using Python’s built-in smtplib library.
Keep in mind that Google no longer supports less secure app access, so an App Password is required for most SMTP integrations.
Can I track email opens and clicks when sending emails via Python?
Yes! Most email providers include event tracking when sending emails. In SendLayer, you can enable this option from your account dashboard. Once you’re logged in to your account, navigate to the Settings page.

Under the Tracking section, go ahead and toggle the event tracking you’d like to enable on your account.

You can also use Webhooks to track other email-related events like bounces or complaint. See our developer documentation for more details.
That’s it! Now you know how to send email using Python via SMTP and through an API provider like SendLayer.
If you’re using a specific Python framework, check out our guides for details on sending emails in Django, Flask, and FastAPI.
