
Do you need to add email functionality to your Ruby application?
Whether you’re building user authentication, notification systems, or contact forms, sending emails is a fundamental feature that every developer needs to master.
In this comprehensive Ruby email tutorial, I’ll show you 2 ways to send email in Ruby app.
How to Send Email with Ruby
There are different ways to send emails using Ruby. If you’re using Ruby on Rails, you can integrate quickly with the ActionMailer gem. This guide will focus on sending methods for vanilla Ruby applications.
Prerequisites
Before diving into the email implementations, make sure you have:
- Ruby installed (version 3.1 or higher recommended)
- Basic Ruby programming knowledge
- A text editor or IDE of your choice
- An email service provider
You can use any email service provider you want. However, for this tutorial, I’ll use SendLayer’s SMTP credentials when implementing the email function.
SendLayer is one of the leading email service providers that lets you send emails easily and integrates with any application.
One of the standout features I like is the domain reputation protection. SendLayer automatically creates a subdomain to handle email sending activities. This thereby protects your main domain from any deliverability issues.
SendLayer offers a free account that allows users to send up to 200 emails per month. The pricing plan is also flexible, starting at $5 monthly.
How to Send Emails in Ruby Using the Mail Gem
The Ruby Mail gem is a customizable library that gives you control over your email implementation. It is perfect for Ruby applications outside of Rails. Here’s how to get started with the Mail gem.
Installation and Setup
To start, you’ll need to install the Mail gem as a dependency to your project. To install it, open a terminal window and run the command below:
gem install mail
Tip: Prefix the command with sudo if you encounter permission issues when installing the Mail Ruby gem.
Once the installation completes, you should see a success notification in your terminal window.

Basic Email Configuration
Before you can send an email, you’ll need to configure your SMTP server. Here’s how to configure the Mail gem with SendLayer SMTP. Start by creating an email_service.rb file in your project’s directory.
touch email_service.rb
Then open the file with a code editor. Once open, copy and paste the code below to the email service file:
require 'mail'

Mail.defaults do
  delivery_method :smtp, {
    address: 'smtp.sendlayer.net',
    port: 587,
    user_name: 'your_sendlayer_username',
    password: 'your_sendlayer_password',
    authentication: 'plain',
    enable_starttls_auto: true
  }
end
You’ll need to retrieve your SMTP credentials from the email provider you chose. In SendLayer, you’ll be able to access these details from your account area.
Once logged in, navigate to the Settings sidebar menu. Then select the SMTP Credentials tab.
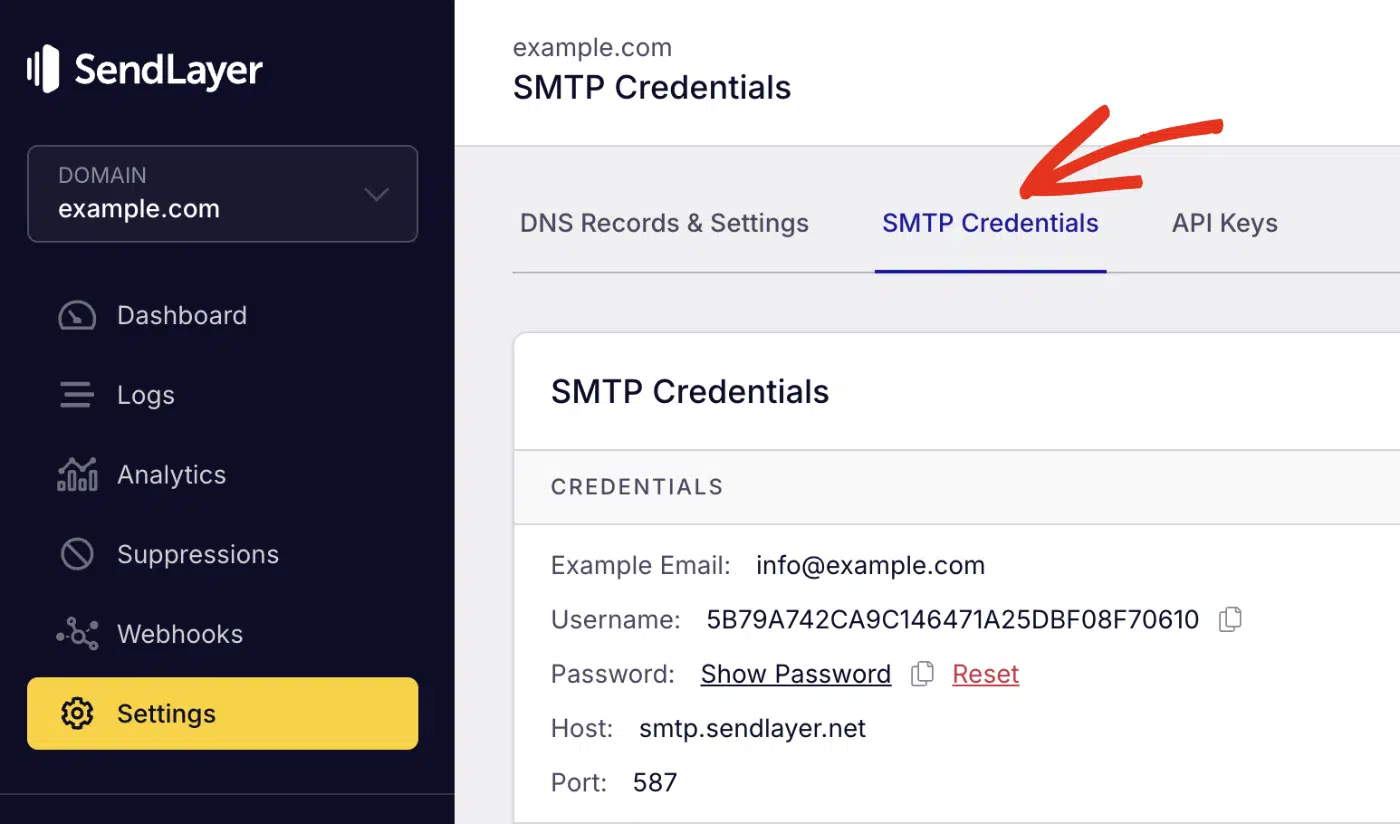
You’ll see the SMTP credentials required to use SendLayer’s SMTP server. The Host and Port number are the same for all users. However, the Username and Password details are unique to your SendLayer account.
Go ahead and replace user_name and password in the snippet above with your actual credentials.
Pro Tip: Never commit sensitive credentials to version control platforms. Always use environment variables.
After updating your SMTP credentials, you’re ready to start sending emails.
Sending Plain Text Emails
Here’s a basic implementation for sending text emails:
require 'mail'

class EmailService
  def self.configure_smtp
    Mail.defaults do
      delivery_method :smtp, {
        address: 'smtp.sendlayer.net',
        port: 587,
        user_name: ENV['SENDLAYER_USERNAME'],
        password: ENV['SENDLAYER_PASSWORD'],
        authentication: 'plain',
        enable_starttls_auto: true
      }
    end
  end

  def self.send_welcome_email(user_email, user_name)
    welcome_message = generate_welcome_message(user_name)

    mail = Mail.new do
      from     '[email protected]'
      to       user_email
      subject  'Welcome to Our Platform!'
      body     welcome_message
    end

    mail.deliver!
    puts "Welcome email sent to #{user_email}"
  rescue Mail::SMTPError => e
    puts "Failed to send email: #{e.message}"
  end

  private

  def self.generate_welcome_message(name)
    <<~MESSAGE
      Hello #{name},

      Welcome to our platform! We're excited to have you join our community.

      You can log in to your account at: https://yourdomain.com/login

      If you have any questions, please don't hesitate to contact our support team.

      Best regards,
      The Team
    MESSAGE
  end
end
Code breakdown
The configure_smtp method sets up the mail delivery configuration using Mail.defaults. We specify the SMTP details, including the address (smtp.sendlayer.net), port (587 for TLS), authentication credentials from environment variables, and enable STARTTLS for secure transmission.
The send_welcome_email method creates a new Mail object using a block syntax. We set the sender address with from, recipient with to, email subject, and generate the email body by calling a private helper method.
The mail.deliver! method actually sends the email through the configured SMTP server. The exclamation mark indicates this method will raise an exception if delivery fails.
Error handling is implemented using a rescue block that catches Mail::SMTPError exceptions. When an SMTP error occurs during delivery, it prints a failure message instead of crashing the application.
The private generate_welcome_message method uses Ruby’s heredoc syntax (<<~MESSAGE) to create a multi-line string template. The ~ removes leading whitespace, making the code more readable while preserving the email formatting.
Send a Test Email
The next step after implementing the email function is to call the class. Let’s create a main.rb file that’ll send the message. After that, copy and paste the code below into the file:
# importing the email service
require_relative 'email_service'

# configure SMTP settings
EmailService.configure_smtp

# send welcome email
EmailService.send_welcome_email('[email protected]', 'Pattie Paloma')
In the snippet above, we first import the email service file. Then call the configure_smtp() method to initialize the SMTP connection. Finally, we call the send_welcome_email() method to send the email. This method accepts 2 parameters: the recipient’s email address and name.
To run the script, open a terminal window and run the command:
ruby main.rb
You should see a welcome email delivered to the specified email address with personalized content.

Sending an HTML Email
The Mail gem also supports HTML content with embedded CSS. This is ideal for brands looking to send newsletter content to users. To send HTML emails, you’ll need to use the html_part property when defining the mail object. Within the property, you’ll need to pass the content_type and body attributes.
Here’s the code to implement this logic. You can add this as an additional class within the email_service.rb file
require 'mail'

class HtmlEmailService
    def self.configure_smtp
        Mail.defaults do
          delivery_method :smtp, {
            address: 'smtp.sendlayer.net',
            port: 587,
            user_name: ENV['SENDLAYER_USERNAME'],
            password: ENV['SENDLAYER_PASSWORD'],
            authentication: 'plain',
            enable_starttls_auto: true
          }
        end
    end

    def self.send_newsletter(recipient_email, newsletter_data)

      newsletter_message = generate_html_content(newsletter_data)
      text_message = generate_text_content(newsletter_data)

      mail = Mail.new do
        from     '[email protected]'
        to       recipient_email
        subject  'Monthly Newsletter - Ruby Tips & Tricks'

        html_part do
          content_type 'text/html; charset=UTF-8'
          body newsletter_message
        end

        text_part do
          body text_message
        end
      end

      mail.deliver!
    end

    private

    def self.generate_html_content(data)
      <<~HTML
        <!DOCTYPE html>
        <html>
          <head>
            <style>
              body { font-family: Arial, sans-serif; margin: 0; padding: 20px; }
              .header { background: #2c3e50; color: white; padding: 20px; text-align: center; }
              .content { padding: 20px; background: #f9f9f9; }
              .article { margin-bottom: 20px; padding: 15px; background: white; border-radius: 5px; }
              .footer { text-align: center; padding: 20px; font-size: 12px; color: #666; }
            </style>
          </head>
          <body>
            <div class="header">
              <h1>#{data[:title]}</h1>
            </div>
            <div class="content">
              #{data[:articles].map { |article| format_article(article) }.join}
            </div>
            <div class="footer">
              <p>© 2024 Your Company. All rights reserved.</p>
            </div>
          </body>
        </html>
      HTML
    end

    def self.format_article(article)
      <<~ARTICLE
        <div class="article">
          <h2>#{article[:title]}</h2>
          <p>#{article[:summary]}</p>
          <a href="#{article[:url]}">Read More</a>
        </div>
      ARTICLE
    end

    def self.generate_text_content(data)
      content = "#{data[:title]}\n\n"
      data[:articles].each do |article|
        content += "#{article[:title]}\n#{article[:summary]}\nRead more: #{article[:url]}\n\n"
      end
      content += "© 2024 Your Company. All rights reserved."
      content
    end
  end
Code Breakdown
The Mail object uses multipart structure with separate html_part and text_part blocks. The HTML part explicitly sets the content type to 'text/html; charset=UTF-8' to ensure proper rendering, while the text part uses the default plain text format. This approach ensures email clients can display either version based on their capabilities.
The generate_html_content method uses Ruby’s heredoc syntax to create a complete HTML email template. It includes inline CSS styling for better email client compatibility and uses string interpolation (#{data[:title]}) to insert dynamic content from the newsletter data hash.
The helper method format_article generates individual article HTML blocks using the same heredoc approach. It takes an article hash and formats it with title, summary, and read-more link within styled div containers.
The generate_text_content method creates a plain text fallback version by iterating through the articles array using each and building a simple text format. This ensures users with text-only email clients can still read the newsletter content.
While Rails mailer includes built-in mailer views for template management, in vanilla Ruby, we handle HTML templates directly.
Send a Test HTML email in Ruby
Here’s how you’ll use the HTMLEmailService class we created. In your main.rb file, copy and paste the code snippet below:
# importing the email service
require_relative 'email_service'

# configure SMTP settings
HtmlEmailService.configure_smtp

# create newsletter data
newsletter_data = {
    title: "This Month in SendLayer",
    articles: [
      {
        title: "New Ruby SDK Launched",
        summary: "Discover the latest improvements in SendLayer API",
        url: "https://example.com/features"
      }
    ]
  }

# send HTML email
HtmlEmailService.send_newsletter('[email protected]', newsletter_data)
When you test this implementation, email clients will automatically select the HTML or text version based on user preferences and client capabilities. Providing the best possible experience for all recipients.

Send Bulk Emails in Ruby
By default, the Mail gem doesn’t include support for sending emails to multiple recipients. However, you can implement support to send emails in batches using Ruby loops. Here’s how to handle bulk emails efficiently:
class BulkEmailService
    MAX_BATCH_SIZE = 50
    DELAY_BETWEEN_BATCHES = 1 # seconds

    def self.configure_smtp
        Mail.defaults do
          delivery_method :smtp, {
            address: 'smtp.sendlayer.net',
            port: 587,
            user_name: ENV['SENDLAYER_USERNAME'],
            password: ENV['SENDLAYER_PASSWORD'],
            authentication: 'plain',
            enable_starttls_auto: true
          }
        end
      end

    def self.send_bulk_emails(recipients, subject, message)
      recipients.each_slice(MAX_BATCH_SIZE) do |batch|
        batch.each do |recipient|
          send_single_email(recipient[:email], subject, message, recipient[:name])
          sleep(0.1) # Small delay to prevent overwhelming server
        end

        puts "Processed batch of #{batch.size} emails"
        sleep(DELAY_BETWEEN_BATCHES)
      end
    end

    private

    def self.send_single_email(email, subject, message, name = nil)
      personalized_message = name ? message.gsub('{{name}}', name) : message

      mail = Mail.new do
        from     '[email protected]'
        to       email
        subject  subject
        body     personalized_message
      end

      mail.deliver!
      puts "Email sent to #{email}"
    rescue StandardError => e
      puts "Failed to send email to #{email}: #{e.message}"
    end
  end
Code Breakdown
In the code above, we first define two important constants: MAX_BATCH_SIZE = 50 sets the maximum number of emails to process in each batch, and DELAY_BETWEEN_BATCHES = 1 specifies a one-second pause between batches. These help prevent overwhelming the server and avoid rate limiting or blacklisting.
The send_bulk_emails method uses Ruby’s each_slice method to divide the recipients array into smaller batches of the specified size.
Within each batch, we iterate through recipients and call send_single_email for each one. The sleep(0.1) adds a 100-millisecond delay between individual emails.
After processing each batch, the method prints a status message and pauses for the specified DELAY_BETWEEN_BATCHES duration.
The private send_single_email method handles personalization by using gsub('{{name}}', name) to replace placeholder text with the recipient’s actual name. If no name is provided, it uses the original message unchanged.
Send a Test Email
After setting up the email service, you can import and use it in another file. Let’s continue using the main.rb file. Here’s an example snippet showing how to use the bulk email class.
# importing the email service
require_relative 'email_service'

# configure SMTP settings
BulkEmailService.configure_smtp

  recipients = [
    { email: '[email protected]', name: 'Alice' },
    { email: '[email protected]', name: 'Bob' },
    # ... more recipients
  ]

  message = <<~MESSAGE
    Hello {{name}},

    We have an important update to share with you...
  MESSAGE

  BulkEmailService.send_bulk_emails(recipients, 'Important Update', message)
Send Email with Attachments
The Mail gem includes support for attaching files to emails. To send an email with an attachment, you’ll need to include the add_file property when specifying the email parameters. Here’s an example:
require 'mail'

def send_email_with_attachment(recipient, attachment_path)
  mail = Mail.new do
    from     '[email protected]'
    to       recipient
    subject  'Document Attached'
    body     'Please find the attached document.'

    add_file attachment_path
  end

  mail.deliver!
end
The value of the add_file property should be the path to the file you wish to attach. The Mail gem handles encoding and also tries to guess the file type.
To send multiple attachments, use Ruby’s foreach syntax to map each attachment file to the add_file property. Here is an example:
# For multiple attachments
def send_email_with_multiple_attachments(recipient, attachment_paths)
  mail = Mail.new do
    from     '[email protected]'
    to       recipient
    subject  'Multiple Documents Attached'
    body     'Please find the attached documents.'

    attachment_paths.each { |path| add_file path }
  end

  mail.deliver!
end
That’s it! You’ve now learned how to send emails in Ruby using SMTP.
How to Send Emails in Ruby Using Email API
Sending emails through SMTP works well for smaller projects. However, it is less secure and slower when compared to using an email API.
Fortunately, platforms like SendLayer also include an API for sending emails and tracking events such as open and bounce rates. I’ll show you how to set up a program that uses the SendLayer API to send emails.
Send Emails With SendLayer API
To send an email using SendLayer API, you’ll need 3 parameters:
- Base URL: This is the API endpoint for sending emails. For SendLayer, this endpoint is available at
https://console.sendlayer.com/api/v1/email - Headers: This is where you’ll define the format for the request and also authenticate your connection
- Payload: This contains the JSON object with details for sending an email, like the sender and recipient email addresses
Ruby provides a default net/http library for making HTTP requests. I’ll use this gem to make the HTTP request to SendLayer’s email endpoint. Here’s the snippet to send emails with the SendLayer API.
require 'uri'
require 'net/http'

url = URI("https://console.sendlayer.com/api/v1/email")

http = Net::HTTP.new(url.host, url.port)
http.use_ssl = true

request = Net::HTTP::Post.new(url)
request["Authorization"] = 'Bearer <token>'
request["Content-Type"] = 'application/json'
request.body = {
  "From": {
    "name": "Paulie Paloma",
    "email": "[email protected]"
  },
  "To": [
    {
      "name": "Pattie Paloma",
      "email": "[email protected]"
    }
  ],
  "Subject": "Test email with Ruby and SendLayer API",
  "ContentType": "HTML",
  "HTMLContent": "<html><body><p>This is a test email sent with the <a href="https://sendlayer.com">SendLayer</a> API and Ruby!</p></body></html>",
}.to_json

response = http.request(request)
puts response.read_body
Code Breakdown
In the snippet above, we first create a URI object from the SendLayer API endpoint and initialize an HTTP connection. We call http.use_ssl = true to enable SSL/TLS encryption for secure communication with the API server.
Next, we create a POST request object and set the required headers. The Authorization header uses Bearer token authentication with 'Bearer <token>', and we set the Content-Type to 'application/json' since we’re sending JSON data.
Note: Remember to replace <token> with your actual SendLayer API token and update the email addresses to valid ones for testing.
The request body contains a Ruby hash with the email data structure that SendLayer expects. This hash is then converted to JSON format using .to_json before being assigned to request.body. This ensures the data is properly serialized for the API request.
Finally, we execute the request using http.request(request) and print the API response with response.read_body. The response will typically contain information about the delivery status or any error messages from the SendLayer service.
Retrieving SendLayer API Key
To get your API key, log in to your SendLayer account. Once you’re logged in, click the Settings menu and select the API Keys tab.
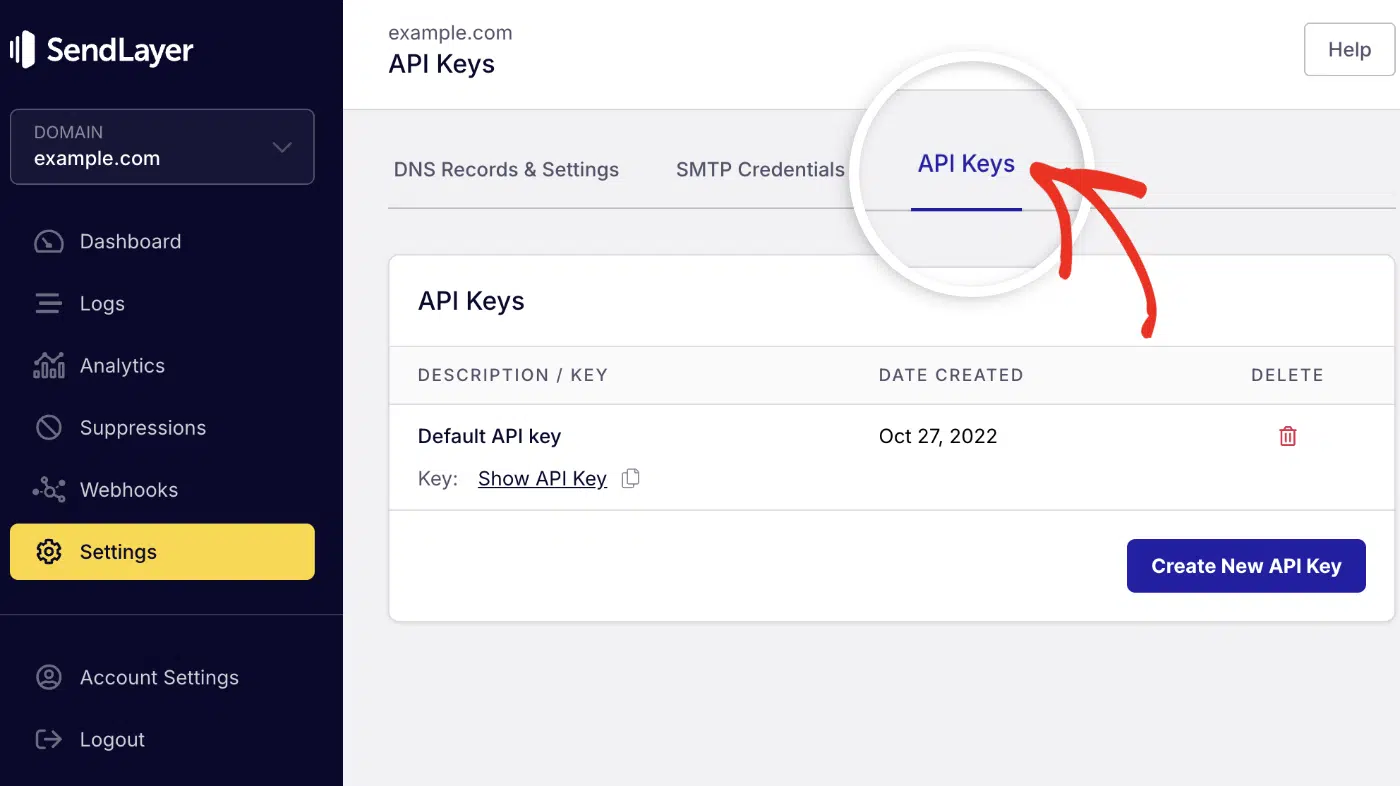
Then click the copy icon next to Default API key to copy it.

Sending Email to Multiple Recipients
SendLayer’s API allows you to send emails to multiple recipients, including CC and BCC email addresses. To send an email to multiple recipients in Ruby, update the To array in the email body with the additional recipient(s) you want to add. Here’s an example:
# other code snippets...

request.body = {
  "From": {
    "name": "Paulie Paloma",
    "email": "[email protected]"
  },
  "To": [
    {
      "name": "Pattie Paloma",
      "email": "[email protected]"
    },
   {
      "name": "John Doe",
      "email": "[email protected]"
    }
  ],
  "CC": [
    {
      "name": "Pattie Paloma CC",
      "email": "[email protected]"
    }
  ],
  "BCC": [
    {
      "name": "Pattie Paloma BCC",
      "email": "[email protected]"
    }
  ],
  "ReplyTo": [
    {
      "name": "Pattie Paloma ReplyTo",
      "email": "[email protected]"
    }
  ],
  "Subject": "This is the email to multiple recipients",
  "ContentType": "HTML",
  "HTMLContent": "<html><body><p>This is a test email sent with the <a href="https://sendlayer.com">SendLayer</a> API and Ruby!</p></body></html>",
}.to_json

# ... other code
SendLayer API also lets you attach files to your email messages. See our developer guide for more details on sending emails through an email API.
FAQs – Send Emails With Ruby
What’s the difference between Action Mailer and the Mail gem in Ruby?
Action Mailer is a built-in email framework providing seamless integration with Ruby on Rails applications. It includes templating, testing helpers, and background job integration. The Mail gem, on the other hand, is a standalone library that works in any Ruby application. It offers more low-level control over email creation and delivery.
How do I handle bounced emails and delivery failures?
The best way to handle delivery failures is by implementing proper error handling with try-catch blocks. You can also use webhook endpoints provided by your SMTP service to handle bounce notifications. Services like SendLayer provide detailed delivery reports and bounce handling.
How do I configure SMTP settings for production?
Proper mailer configuration is crucial for production environments. Always use environment variables for SMTP Ruby credentials and ensure your SMTP class implementation includes proper error handling and connection pooling.
What are the security best practices for email delivery in Ruby?
Below, we’ve highlighted some of the best practices for handling email in Ruby applications:
- Always use environment variables for credentials
- Enable TLS/SSL connections
- Validate email addresses before sending
- Implement rate limiting
- Use reputable SMTP providers with proper authentication.
- Never expose API keys or passwords in your source code
That’s it! Now you know how to send emails in Ruby.
Next, would you like to learn about the difference between different sending methods? Check out our tutorial on SMTP vs API for more information.