
As a frontend developer, you’ll often require the ability to send emails from your web app built using tools like React.
Whether you’re building a contact form or implementing a full email system, handling email functionality in React can significantly enhance user and developer experience.
In this post, you’ll learn how to send emails with React using Nodemailer backend.
How to Send Emails with React
Prerequisites
Below are some requirements you’ll need to meet to follow along with this guide:
- Node.js installed on your machine. Download the latest version here
- Code editor. I recommend using Visual Studio Code
- Basic knowledge of JavaScript and React
- A SendLayer account. You can get started with the trial account that lets you send up to 200 emails for free
After creating your SendLayer account, make sure to authorize your sending domain. This step is essential to improve your site’s email deliverability. With that, you’re all set up and ready to build and send emails from your React app.
Pro Tip: While this guide focuses on a basic React email implementation, you can also adapt it for React and TypeScript projects. The core concepts remain the same, with the added benefit of type safety.
How to Setup a React Project
If you already have an existing React project, please proceed to the section covering how to send emails in React.
To create a new React project, open a terminal window and run the command below:
npm create vite@latest react-email-app -- --template react
This command uses the Vite library to bootstrap a new React app in the react-email-app directory. Be sure to replace the folder name with the one you’d like to use.
Then navigate into the project directory:
cd react-email-app
Once here, go ahead and install dependencies for the project using the command:
npm install
Once the installation is completed, you can start the dev server:
npm run dev
You should see the dev server running. Go ahead and open the localhost address on your browser.

Now you’re ready to start sending emails from your React app.
Build an Email Backend to Send Emails in React
Because React is a frontend library, some APIs prevent making requests directly from the frontend. This is a security feature that helps to protect the API server from cyber-attacks.
I’ll show you how to build a basic backend using Express.js to handle email sending and how to connect it to your React app.
Step 1: Build an Express.js Backend
In a previous tutorial, we covered the steps to set up a basic server. You can review the tutorial if you need help setting up a server in Express.js.
After setting up your Express server, proceed to install Nodemailer. Nodemailer is a Node.js library that lets you send emails through an SMTP server.
npm install nodemailer cors
I also added the CORS library to the installation command. This library will allow us to make API requests from the browser to the localhost Express server.
After the installation completes, create a .env file and add the settings for your SMTP server. I’m using SendLayer SMTP for this tutorial. But you can use any SMTP server you like.
SMTP_HOST=smtp.sendlayer.net
SMTP_PORT=587
SMTP_USER=your-smtp-username
SMTP_PASS=your-smtp-password
[email protected]
Be sure to replace SMTP_USER and SMTP_PASS with your SMTP user credentials.
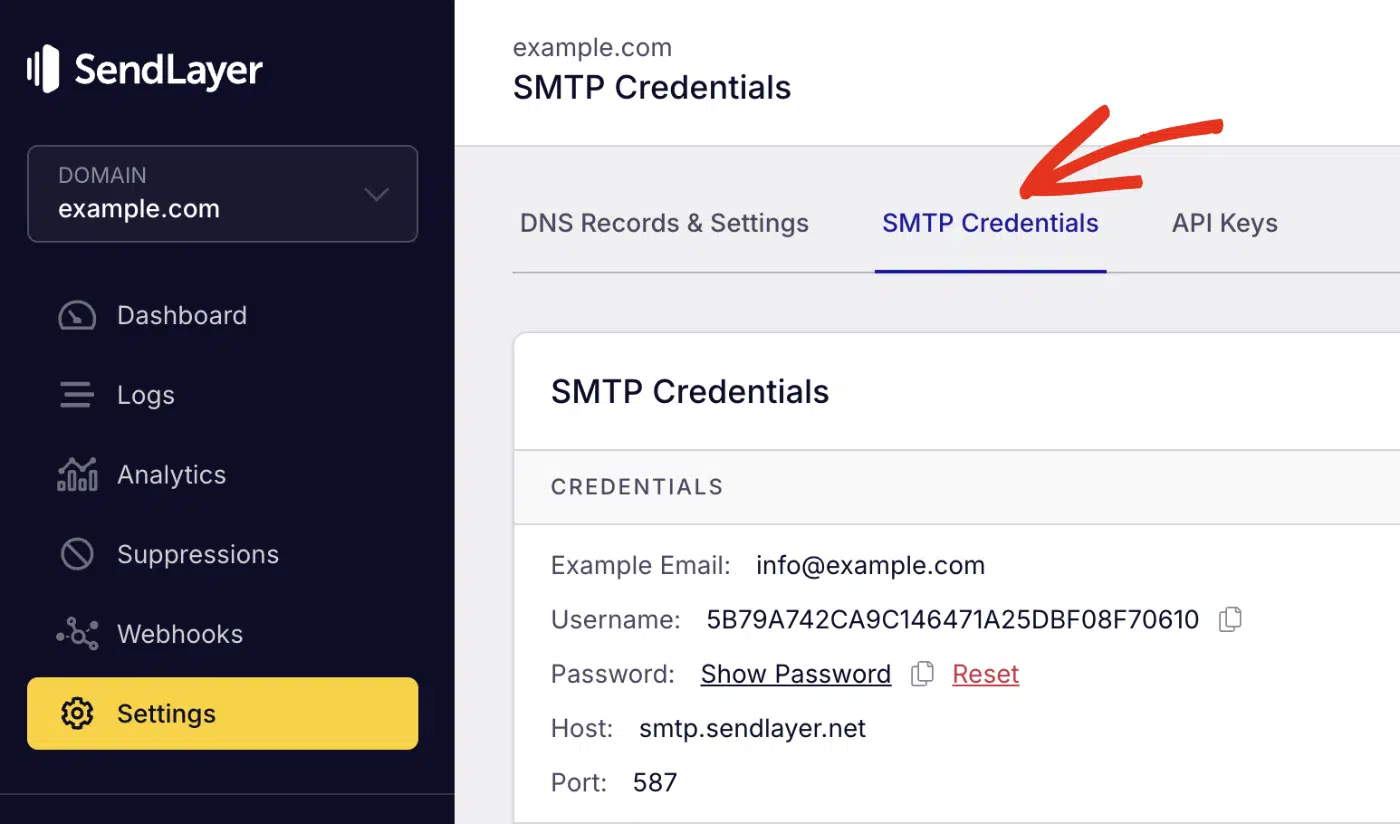
If you’re using SendLayer, you can access your SMTP credentials from your account dashboard by navigating to Settings » SMTP Credentials.
Note: For SendLayer users, the sender email needs to be at the domain you’ve authorized. For instance, if you authorized example.com, your sender email should include @example.com.
Express.js Email API Server Code
Now, in your Express server.js file, add the following code to import the nodemailer and cors libraries.
const nodemailer = require('nodemailer');
const cors = require('cors');
Then we’ll create a new route to handle POST requests to the API. Within the endpoint, we’ll initialize a transporter to configure the email options. Here’s the snippet to implement this:
const nodemailer = require('nodemailer');
const cors = require('cors');
const dotenv = require('dotenv');
const express = require('express');

dotenv.config(); // Load environment variables

const app = express();
const port = process.env.PORT || 3000;

// Allowing React frontend to make API requests
app.use(cors());

// Middleware to parse JSON data
app.use(express.json());

// POST route to trigger email
app.post('/api/send-email', async (req, res) => {
    const { to, subject, message } = req.body;

    // Create a transporter (connection to the email server)
    const transporter = nodemailer.createTransport({
      host: process.env.SMTP_HOST,
      port: process.env.SMTP_PORT,
      secure: false, // false for TLS (587), true for SSL (465)
      auth: {
        user: process.env.SMTP_USER,
        pass: process.env.SMTP_PASS,
      },
    });

    // Define the email content
    const mailOptions = {
      from: process.env.FROM_EMAIL,
      to: to,
      subject: subject,
      text: message,
    };

  // Validate required fields.
  if ( !subject || !to || !message) {
    return res.status(400).json({ status: 'error', message: 'Missing required fields' });
  }

       // Send the email
    try {
        const info = await transporter.sendMail(mailOptions);
        res.status(200).json({ status: 'success', message: 'Email sent successfully' });
        console.log('Email sent:', info.messageId);
    } catch (error) {
        if (error.response) {
            // The request was made and the server responded with a status code that falls out of the range of 2xx
            res.status(error.response.status).send({ error: error.response.data });
        } else if (error.request) {
            // The request was made but no response was received
            res.status(500).send({ error: 'No response from email service' });
        } else {
            // Something happened in setting up the request that triggered an Error
            res.status(500).send({ error: 'An error occurred' });
        }
    }
});

// starting up the server
app.listen(port, () => {
  console.log(`Server running on port ${port}`);
});
Code Breakdown
In the post route, we set the request body to accept 3 parameters: to, subject, and message. These parameters correspond to the recipient’s email address(es), email subject line, and email message. When using the API in our React app, we can specify these parameters as the request body for the API call.
The nodemailer.createTransport() line of code initializes nodemailer using the SMTP credential stored in the .env file as parameters. Then we use the transporter.sendMail() function to send the email request. This function accepts one parameter, which is the mailOptions variable.
This basic server creates an API endpoint that uses Nodemailer to send emails. When you make a request to the /api/send-email/ endpoint and specify the request body, it’ll send a request to the server. Which will trigger the Nodemailer transporter and call the sendMail function.
Pro Tip: I used Nodemailer as the email backend in my example. However, you can also use an Email API if you’d like. Our guide covers the steps to send emails through SendLayer API in Express.js.
Step 2: Start the Server
In a production environment, you’ll typically host the backend in a server like AWS. Then make your API call from the deployed URL. However, I’ll use the local development server to initialize the Express server for this tutorial. To do so, run the command below:
node server.js
You should see a response that the server is running on the port number you specified. So we can make API requests to localhost:3000/api/send-email from a frontend library like React to send emails.
Tip: For more details on building an email backend, see our guide to learn how to send emails in Express.js.
Step 3: Connect Email Backend to React App
Now that we have a server running, let’s proceed to use the email API we just created in Express.js. For this, open the App.jsx file or create a new React function-based component.
We’ll use the Axios library to send requests to the email API. Install it if you haven’t already.
npm install axios
After that import the library to your React component.
import axios from 'axios';
Here is the full snippet for the React component.
import { useState } from 'react'
import axios from 'axios';

function App() {
  const [isSending, setIsSending] = useState(false)
  const [error, setError] = useState(null)

  const handleSubmit = async (e) => {
    e.preventDefault()

    setIsSending(true)
    setError(null)


    const url = 'http://localhost:3000/api/send-email'
    const payload = {
      to: '[email protected]',
      subject: 'Test Email from Sendlayer With React',
      message: '<p>This is a test email sent from an Express server via a React app with SendLayer SMTP.</p>'
    }

    try {

      const response = await axios({
        method: 'POST',
        url: url,
        headers: {
          'Content-Type': 'application/json',
        },
        data: payload,
      });

      if (response.status === 200) {
        alert('Email sent successfully!');
      }

    } catch (error) {
      alert(`Error sending email: ${error.message}`);
    }
   setIsSending(false);
  }

  return (
    <>
      <h1>Sending Email With Sendlayer</h1>
      <div className="card">
        <button
          onClick={handleSubmit}
          disabled={isSending}
        >
          {isSending ? 'Sending...' : 'Click to Send Email'}
        </button>
        {error && <p className="error">{error}</p>}
        <p>
          Clicking the button above will send an email through Sendlayer's API to the email address you have configured in the emailData object.
        </p>
      </div>
    </>
  )
}

export default App;
Code Breakdown
The code above is a simple React component that includes a button with an onClick event handler. This event handler triggers a function handleSubmit that contains the logic for sending the email.
Within the function, we use the axios library to make a POST request to the local email API endpoint we created with Express.js.
Recall that in the backend, we specify to, subject, and message as the request body. These parameters would be the payload for the email. Make sure to replace them with your actual email data.
If you’d like to accept other parameters like HTML messages, attachments, etc, you’ll need to add them as part of the request body in your backend. Then map each one to the emailOptions variable in the Nodemailer setup.
Tip: Nodemailer allows you to send emails to multiple recipients, include attachments, etc. To learn more, see our tutorial on how to send emails in JavaScript using Nodemailer.
We use JavaScript’s try catch syntax to implement error handling when sending the email. This means users will receive an alert about the email status upon clicking the send button.
Step 4: Send a Test Email
To send a test email, you’ll need to make sure your backend Express.js server is running. Otherwise, the React app won’t be able to establish a connection to the email server.
With the backend running, start up your React app using the command:
npm run dev
Open your browser and go to the localhost server for your React app. Once there, select the Click to Send Email button.

You’ll receive an alert when the email is sent successfully. Go ahead and check the recipient’s inbox for the email message.

Congratulations! You’ve successfully sent an email from your React application. Email functionality in React has several use cases, including contact forms and password reset flows.
Troubleshooting Common Errors
When testing the code, I encountered some errors. I’ve highlighted some of them to help you prevent such errors.
Error: ERR_NETWORK
This typically occurs if you attempt to send API requests directly from a frontend library like React. It indicates that the API is blocking requests from your localhost server. To fix the error, you can create a basic backend server with Express.js and then send your emails from the API endpoint you implement locally.
FAQs – Send Emails Using React
Below, we’ve answered some of the top questions about sending emails in React.
How do I send emails in React without a backend?
To send emails in React without a backend, you’ll need to use an SDK provided by your email service provider. Alternatively, you can use a third-party provider like EmailJS to connect your email server with React.
How do I prevent my email API keys from being exposed in the frontend?
When sending emails in React with or without a backend, it is recommended to use environment variables to store sensitive details like API keys, SMTP usernames, and passwords.
That’s it! Now you know how to send emails with React using Nodemailer.
Next, are you looking for ideas on how to onboard new users to your React app via email? Our best onboarding email examples guide contains templates to help you get started.