
If you’re building a Django application with user authentication, you’ll need a way for users to reset their passwords when they forget them.
Fortunately, Django comes with a built-in password reset system that handles the heavy lifting for you.
In this tutorial, I’ll show you how to implement a complete password reset workflow in your Django application.
By the end of this guide, you’ll have a fully functional password reset system that sends secure emails to users and allows them to reset their passwords safely.
Understanding Django’s Built-in Password Reset System
Django’s django.contrib.auth module provides everything you need for password reset functionality. The system uses four main class-based views that handle the entire workflow:
- PasswordResetView: Displays the form where users enter their email address.
- PasswordResetDoneView: Confirms that the reset email has been sent.
- PasswordResetConfirmView: Validates the reset link and displays the new password form.
- PasswordResetCompleteView: Confirms successful password change.
Here’s how the workflow works from a user’s perspective:

The beauty of this system is that Django handles token generation, validation, and security for you. The tokens are time-sensitive (valid for 3 days by default) and can only be used once.
Note: Django doesn’t reveal whether an email exists in the system when a reset is requested. This security feature prevents potential attackers from discovering valid email addresses.
How to Implement Password Reset in Django
Prerequisites
Before we dive in, make sure you have:
- Django installed on your machine. I recommend using v5.x or higher.
- Basic knowledge of Django’s URL routing and templates.
- A working Django project (if you need to create one, check Django’s official documentation).
- An email service for sending emails. I’ll use SendLayer for this tutorial.
SendLayer offers reliable email delivery for your Django applications. If you’re looking to test your emails, SendLayer offers a generous free plan that lets you send up to 200 emails.
They also offer an affordable pricing plan that scales depending on your business needs.
Step 1: Configure Email Backend for Password Reset
Before getting started, you’ll need to configure Django to send emails. There are two main approaches: a console backend for development and SMTP for production.
Development Setup: Console Email Backend
For local development, the console backend prints emails to your terminal rather than sending them. This is perfect for testing.
To use the console backend, open your settings.py file, and add the following snippet to it:
# settings.py

EMAIL_BACKEND = 'django.core.mail.backends.console.EmailBackend'
With this configuration, when you trigger a password change, the email content (including the reset link) will appear in your terminal.
Production Setup: SMTP Configuration
For production, you’ll need an actual email service. I’ll show you how to configure SendLayer’s SMTP server, but the process is similar for other providers.
First, add your SMTP settings to settings.py:
# settings.py

EMAIL_BACKEND = 'django.core.mail.backends.smtp.EmailBackend'
EMAIL_HOST = 'smtp.sendlayer.net'
EMAIL_PORT = 587
EMAIL_USE_TLS = True
EMAIL_HOST_USER = 'your-smtp-username'
EMAIL_HOST_PASSWORD = 'your-smtp-password'
DEFAULT_FROM_EMAIL = '[email protected]'
Pro Tip: Do not store sensitive information such as usernames and passwords in your codebase. Use environment variables instead.
Here’s how to secure sensitive credentials on your project:
Start by creating a .env file in your project’s root directory. Then add your SMTP credentials.
// .env file
EMAIL_HOST_USER = 'your-sendlayer-username'
EMAIL_HOST_PASSWORD = 'your-sendlayer-password'
Important: Add .env to your .gitignore file to prevent committing sensitive credentials to version control.
After that, you’ll need to install a third-party library using the command below:
pip install python-decouple
Next, return to your settings.py file and import the config module from decouple.
from decouple import config
The config method lets you access the SMTP username and password you specified in the .env file. Here’s the updated email configuration settings:
# settings.py

EMAIL_BACKEND = 'django.core.mail.backends.smtp.EmailBackend'
EMAIL_HOST = 'smtp.sendlayer.net'
EMAIL_PORT = 587
EMAIL_USE_TLS = True
EMAIL_HOST_USER = config('EMAIL_HOST_USER')
EMAIL_HOST_PASSWORD = config('EMAIL_HOST_PASSWORD')
DEFAULT_FROM_EMAIL = '[email protected]'
Getting Your SendLayer SMTP Credentials
Here’s how to retrieve your SMTP server details on SendLayer. Start by logging into your account area. Once there, navigate to Settings » SMTP Credentials tab.
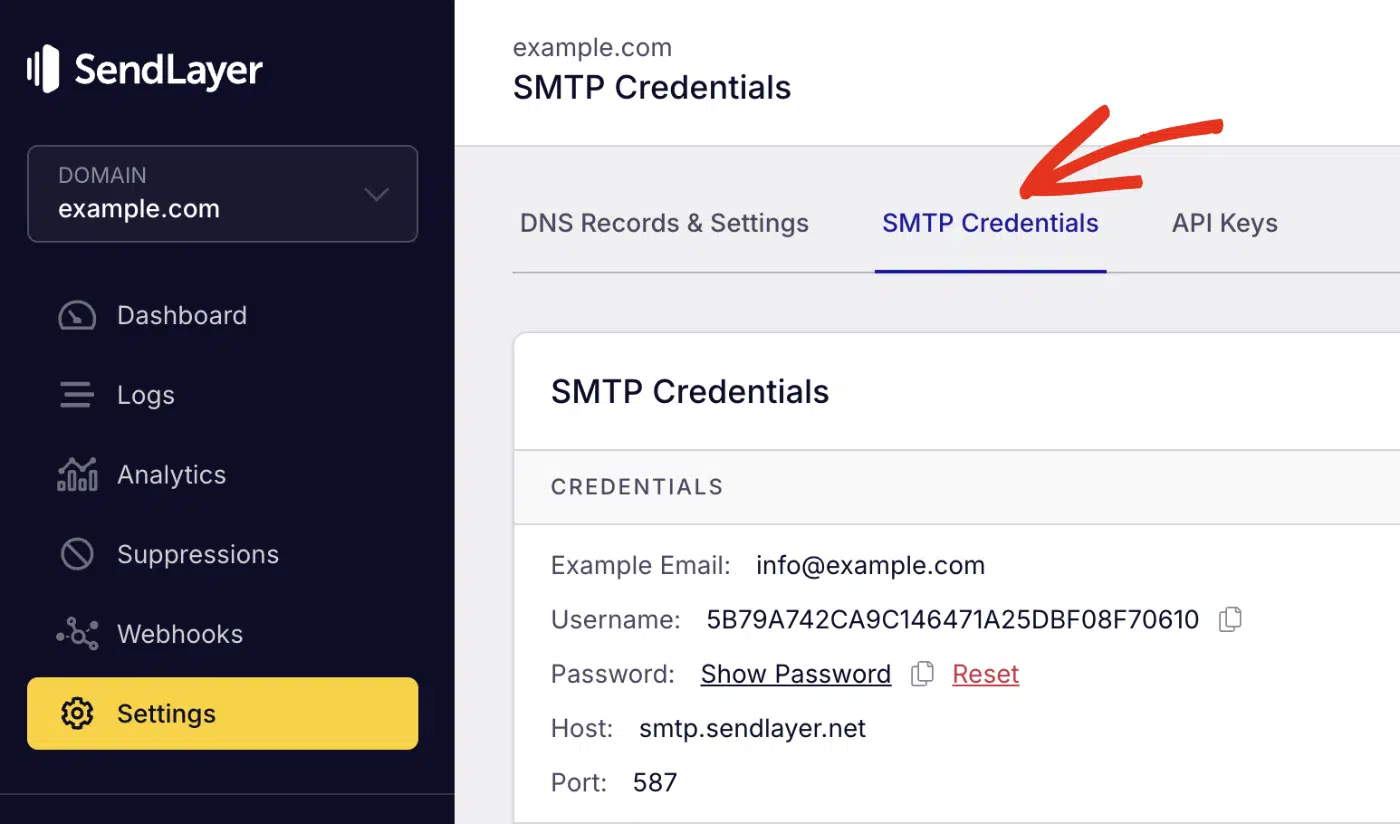
You’ll find your SMTP credentials. The SMTP host and port number are the same for all users.
Go ahead and copy the username and password. Then return to the .env file and update the dummy details with your actual credentials.
Step 2: Set Up Django Password Reset URLs
Now, let’s configure the URL patterns for our password change flow. Django’s built-in views make this straightforward.
In your urls.py, add the following patterns:
# urls.py
from django.contrib.auth import views as auth_views
from django.urls import path

urlpatterns = [
    path('password-reset/',
         auth_views.PasswordResetView.as_view(
             template_name='registration/password_reset_form.html'
         ),
         name='password_reset'),

    path('password-reset/done/',
         auth_views.PasswordResetDoneView.as_view(
             template_name='registration/password_reset_done.html'
         ),
         name='password_reset_done'),

    path('reset/<uidb64>/<token>/',
         auth_views.PasswordResetConfirmView.as_view(
             template_name='registration/password_reset_confirm.html'
         ),
         name='password_reset_confirm'),

    path('reset/done/',
         auth_views.PasswordResetCompleteView.as_view(
             template_name='registration/password_reset_complete.html'
         ),
         name='password_reset_complete'),
]
Code breakdown
In the code above, we first import the authentication views from django.contrib.auth. Then we define the URL patterns for each password reset view.
The line auth_views.PasswordResetView.as_view() contains the logic for the password reset form and email notification. It accepts template_name as a parameter. This is where you specify the path to your password change form.
Each reset URL pattern follows the same format. First, you define the path, then specify the specific view, and map the template to handle it.
Understanding the URL Parameters
The reset confirmation URL includes two parameters:
- uidb64: The user’s ID encoded in base64 format
- token: A secure, time-sensitive token that validates the reset request
These parameters ensure that only the intended user can reset their password, and only within the valid timeframe.
Step 3: Create Custom Templates
For a Django custom password reset experience that matches your application’s branding, you’ll need to create custom templates.
Based on the URL pattern we defined above, Django will look for the password change templates in a registration folder within your templates directory. Let’s create all the necessary templates.
First, make sure your TEMPLATES setting in settings.py includes your templates directory:
# settings.py

TEMPLATES = [
    {
        'BACKEND': 'django.template.backends.django.DjangoTemplates',
        'DIRS': [BASE_DIR / 'templates'],
        'APP_DIRS': True,
        'OPTIONS': {
            'context_processors': [
                'django.template.context_processors.debug',
                'django.template.context_processors.request',
                'django.contrib.auth.context_processors.auth',
                'django.contrib.messages.context_processors.messages',
            ],
        },
    },
]
Now create the following directory structure:
project/
├── templates/
│   └── registration/
│       ├── password_reset_form.html
│       ├── password_reset_email.html
│       ├── password_reset_subject.txt
│       ├── password_reset_done.html
│       ├── password_reset_confirm.html
│       └── password_reset_complete.html
Template 1: Password Reset Request Form
File: templates/registration/password_reset_form.html
Note: This section assumes you already have a base.html template.
{% extends 'base.html' %}

{% block content %}
<div class="container">
    <h2>Forgot Your Password?</h2>
    <p>Enter your email address below, and we'll send you a link to reset your password.</p>

    <form method="post">
        {% csrf_token %}

        {% if form.errors %}
        <div class="alert alert-danger">
            {% for field in form %}
                {% for error in field.errors %}
                    <p>{{ error }}</p>
                {% endfor %}
            {% endfor %}
        </div>
        {% endif %}

        <div class="form-group">
            <label for="{{ form.email.id_for_label }}">Email Address</label>
            {{ form.email }}
        </div>

        <button type="submit" class="btn btn-primary">Send Reset Link</button>
    </form>

    <p class="mt-3">
        <a href="{% url 'login' %}">Back to Login</a>
    </p>
</div>
{% endblock %}
This template displays the initial password reset request form. It includes {% csrf_token %} for security and loops through any form errors to display validation messages. The form renders Django’s email field and submits via POST to trigger the reset link email.
Template 2: Email Content
This is the actual email content that’s sent to users when they request a password reset. You can customize the content to match your brand.
File: templates/registration/password_reset_email.html
{% autoescape off %}
Hello,

You recently requested to reset your password for your account. Click the link below to reset it:

{{ protocol }}://{{ domain }}{% url 'password_reset_confirm' uidb64=uid token=token %}

If you didn't request a password reset, you can safely ignore this email. Your password won't be changed unless you click the link above and create a new one.

This link will expire in 3 days.

Thanks,
The {{ site_name }} Team
{% endautoescape %}
This template generates the password reset email body. The {% autoescape off %} tag prevents HTML encoding since this is a plain-text email. Django automatically provides variables like {{ protocol }}, {{ domain }}, {{ uid }}, and {{ token }} to construct the secure reset URL.
Template 3: Email Subject
File: templates/registration/password_reset_subject.txt
Password Reset Request
This is a simple one-line file that sets the email subject. Django uses this template to determine what appears in the reset email’s subject line.
Template 4: Confirmation Page
File: templates/registration/password_reset_done.html
{% extends 'base.html' %}

{% block content %}
<div class="container">
    <h2>Password Reset Email Sent</h2>
    <p>
        We've sent you instructions for resetting your password to the email address you submitted.
    </p>
    <p>
        You should receive the email shortly. If you don't see it, please check your spam folder.
    </p>
    <p>
        If you don't receive an email, make sure you've entered the address you registered with.
    </p>
    <p class="mt-3">
        <a href="{% url 'login' %}">Return to Login</a>
    </p>
</div>
{% endblock %}
This template displays after a user submits the reset request form. It confirms that the email was sent and provides helpful tips about checking spam folders. For security, it shows the same message whether the email exists or not.
Template 5: New Password Form
File: templates/registration/password_reset_confirm.html
{% extends 'base.html' %}

{% block content %}
<div class="container">
    {% if validlink %}
        <h2>Enter Your New Password</h2>
        <form method="post">
            {% csrf_token %}

            {% if form.errors %}
            <div class="alert alert-danger">
                {% for field in form %}
                    {% for error in field.errors %}
                        <p>{{ error }}</p>
                    {% endfor %}
                {% endfor %}
            </div>
            {% endif %}

            <div class="form-group">
                <label for="{{ form.new_password1.id_for_label }}">New Password</label>
                {{ form.new_password1 }}
            </div>

            <div class="form-group">
                <label for="{{ form.new_password2.id_for_label }}">Confirm Password</label>
                {{ form.new_password2 }}
            </div>

            <button type="submit" class="btn btn-primary">Reset Password</button>
        </form>
    {% else %}
        <h2>Invalid Reset Link</h2>
        <p>
            The password reset link was invalid, possibly because it has already been used or has expired.
        </p>
        <p>
            Please request a new password reset.
        </p>
        <p class="mt-3">
            <a href="{% url 'password_reset' %}">Request New Reset Link</a>
        </p>
    {% endif %}
</div>
{% endblock %}
This template displays when users click the reset link in their email. The {% if validlink %} check verifies the token is still valid and hasn’t been used. If valid, it shows the new password form; otherwise, it displays an error message with a link to request a new reset.
Template 6: Success Message
File: templates/registration/password_reset_complete.html
{% extends 'base.html' %}

{% block content %}
<div class="container">
    <h2>Password Reset Complete</h2>
    <p>
        Your password has been successfully reset. You can now log in with your new password.
    </p>
    <p class="mt-3">
        <a href="{% url 'login' %}" class="btn btn-primary">Log In</a>
    </p>
</div>
{% endblock %}
This template displays after a successful password reset. It confirms the password was changed and provides a direct link to the login page so users can sign in with their new credentials.
Step 4: Test Your Password Reset Implementation
Now that everything is set up, let’s test the complete flow.
Testing Locally with Console Backend
Here’s how to test your password reset implementation if you’re using the console backend. Start by running your Django development server:
python manage.py runserver
After that, open your browser and navigate to http://localhost:8000/password-reset/
Then enter a valid email address from your database and submit the Django forgot password form.

After submitting the form, check your terminal. You should see the email content printed there.

Go ahead and copy the reset link from the terminal output and paste it into your browser. You’ll be redirected to the new password form if the token is valid.

After completing the password reset, you’ll be directed to the success page. From here, you’ll be able to log back in to your account using the new password.

Testing with Real SMTP
Once you’ve verified the flow works locally, switch to your SMTP backend in settings.py. If you were using the console backend for testing, you’ll need to update the EMAIL_BACKEND to use an SMTP server.
After updating the settings, navigate to the password reset route and request a password reset for a real email address.
You’ll see a generic password request email sent notification.

Go ahead and check your inbox for the password change email.

If you don’t find it in your main inbox, check the spam folder.
Pro Tip: Using an API-based email provider like SendLayer improves your email’s deliverability and protects your domain’s reputation. This ensures transactional emails get delivered to the user’s inbox.
You can then use the reset link in the email to update your password.
Congratulations! You now have a fully functional password reset system in your Django app with email notification.
Troubleshoot Common Issues
These are answers to some of the issues I encountered and how to resolve them.
Email Not Sending
The Django password reset email not sending issue often occurs due to missing settings or invalid SMTP credentials.
If you’re not receiving reset emails:
- Review your SMTP settings and verify that your SMTP username, password, host, and port are correct.
- Check your spam folder. Sometimes reset emails end up in spam, especially during development.
- Verify your firewall settings. Make sure port 587 (or your SMTP port) isn’t blocked.
- If you’re testing locally, try setting
EMAIL_USE_TLStoFalseto allow sending emails from non-HTTPS domains.
Pro Tip: Make sure to update the EMAIL_USE_TLS settings when moving to production.
Template Not Found Error
This error indicates Django was unable to find the password reset template at the location you set when configuring the URL pattern.
If you see TemplateDoesNotExist: registration/password_reset_form.html:
- Verify your
TEMPLATESsetting includes the templates directory:
# settings.py
'DIRS': [BASE_DIR / 'templates'],
- Check your directory structure. The templates must be in
templates/registration/.
- Verify your app order in
INSTALLED_APPS. Your app should come beforedjango.contrib.adminso Django finds your templates first.
Invalid or Expired Token
If users see “The password reset link was invalid”, it often indicates:
- The link has been used. Reset tokens are single-use only.
- The link expired. By default, tokens expire after 3 days. You can customize this in your
settings.pyfile:
# settings.py
PASSWORD_RESET_TIMEOUT = 86400  # 24 hours in seconds
- URL configuration issue. Make sure your URL patterns match the structure in the email template.
Django Password Reset Security Best Practices
Django’s password reset system is secure by default, but here are some additional best practices:
Enforce Strong Passwords
Configure password validators in your settings.py:
AUTH_PASSWORD_VALIDATORS = [
    {
        'NAME': 'django.contrib.auth.password_validation.UserAttributeSimilarityValidator',
    },
    {
        'NAME': 'django.contrib.auth.password_validation.MinimumLengthValidator',
        'OPTIONS': {'min_length': 8,}
    },
    {
        'NAME': 'django.contrib.auth.password_validation.CommonPasswordValidator',
    },
    {
        'NAME': 'django.contrib.auth.password_validation.NumericPasswordValidator',
    },
]
Use HTTPS in Production
Always use HTTPS for password reset links in production:
# settings.py (production)
SECURE_SSL_REDIRECT = True
SESSION_COOKIE_SECURE = True
CSRF_COOKIE_SECURE = True
Monitor Reset Attempts
Consider logging password reset attempts to detect suspicious activity:
import logging

logger = logging.getLogger(__name__)

# In your custom view
logger.info(f"Password reset requested for email: {email}")
FAQs – Django Password Reset
These are answers to some of the top questions we see about implementing password change in Django.
Can I implement password reset with Django Rest Framework?
While this tutorial covers Django’s template-based password reset, you can implement password reset Django Rest Framework functionality using DRF’s APIViews. You’ll need to create API endpoints that trigger the same password reset flow, but return JSON responses instead of rendering templates.
Alternatively, consider using the dj-rest-auth package, which provides ready-made password reset endpoints for REST APIs. The token generation and validation logic remains the same.
Does this work with custom user models?
Yes, Django’s built-in password reset system works with custom user models as long as they inherit from AbstractBaseUser and include an email field. The password reset views automatically detect your custom user model through the AUTH_USER_MODEL setting. No additional configuration is needed—the Django password reset token generator will work with any properly configured user model.
Should I use Django allauth for password reset?
This depends on your use case. If you need additional features, such as social authentication, Django-allauth is an excellent choice and handles password resets automatically.
However, if you only need basic password reset functionality, Django’s built-in system is simpler and requires no additional dependencies.
That’s it! Now you know how to implement password reset in a Django application.
Next, would you like to ensure that your password reset emails comply with industry standards? Check out our tutorial on best practices for password reset emails.