
One of the most essential features any web application needs is a secure password reset system. If you’re looking to implement password reset in Laravel, you’ve come to the right place.
Whether you’re building a new application or adding authentication to an existing project, nobody wants frustrated users locked out of their accounts. Laravel makes it easy to implement this functionality with its built-in password reset features.
In this guide, I’ll walk you through implementing password reset in Laravel. We’ll cover the built-in system and how to create custom implementations for APIs and advanced use cases.
Let’s jump right in!
- Understanding Laravel’s Built-In Password Reset System
- How to Implement Password Reset in Laravel
- How to Set Up Password Reset Using Laravel Breeze
- How to Implement Password Reset API for Modern Applications
- How to Customize Token Expiration Time
- Troubleshooting Common Password Reset Issues
- Best Practices for Production
- Frequently Asked Questions
Understanding Laravel’s Built-In Password Reset System
Before diving into implementation, let’s understand how Laravel’s password reset works under the hood.
How Laravel Password Reset Works
Laravel provides a complete password reset system out of the box. Here’s how the flow works:
- User clicks “Forgot Password” and enters their email address.
- Laravel generates a unique token and stores it in the
password_reset_tokenstable. - An email with a password reset link (containing the token) is sent to the user.
- User clicks the link and is directed to a password reset form.
- Upon submitting the new password, Laravel validates the token.
- If valid, Laravel will update the user’s password and delete the token.

The beauty of this system is that tokens are hashed for security and automatically expire after a set time (60 minutes by default).
Key Components
Laravel’s password reset functionality relies on several key components:
- PasswordBroker: Manages token creation and validation.
- Password Facade: Provides convenient methods for resetting passwords.
- ResetPassword Notification: Sends the password reset email.
- password_reset_tokens Table: Stores reset tokens.
Now that we understand how it works, let’s implement it.
How to Implement Password Reset in Laravel
Prerequisites
Before we get started, make sure you have:
- Laravel 11.x or 12.x installed on your machine.
- Basic understanding of Laravel routing and controllers.
- A mail server or SMTP server configured. I’ll show you how to use SendLayer’s SMTP.
- Database connection set up.
- A code editor like VS Code.
You can check your Laravel version by running:
php artisan --version
If you don’t have Laravel installed yet, you can set up a new project with:
composer create-project laravel/laravel password-reset-demo
Tip: password-reset-demo is the name of the Laravel project. You can use any name you’d like.
Then navigate into the project directory using the command:
cd password-reset-demo
How to Set Up Password Reset Using Laravel Breeze
The quickest way to get password reset working is to use Laravel Breeze, which provides a complete authentication scaffolding.
Step 1: Install Laravel Breeze
Laravel Breeze is a minimal authentication starter kit that includes login, registration, password reset, and email verification. To install it, run:
composer require laravel/breeze --dev
You’ll be prompted to choose a stack. For this tutorial, I’ll use the Blade stack. You can simply run the command below to install with the Blade stack:
php artisan breeze:install blade
Next, install the frontend dependencies using the command below:
npm install && npm run dev
Note: npm run dev starts the Vite frontend development server. Please keep this server running to use the password reset forms.
Once the installation completes, run the command below to migrate your database:
php artisan migrate
This command creates all necessary database tables, including the password_reset_tokens table.
Step 2: Configure Your Email Settings
Password reset relies on email notifications, so you’ll need to configure your mail settings in the .env file.
I recommend using SendLayer for reliable email delivery. Here’s how to configure it:
MAIL_MAILER=smtp
MAIL_HOST=smtp.sendlayer.net
MAIL_PORT=587
MAIL_USERNAME=your_sendlayer_username
MAIL_PASSWORD=your_sendlayer_password
MAIL_ENCRYPTION=tls
[email protected]
MAIL_FROM_NAME="${APP_NAME}"
Important: Your MAIL_FROM_ADDRESS should use the domain you’ve authorized in SendLayer. For example, if you authorized example.com, use [email protected].
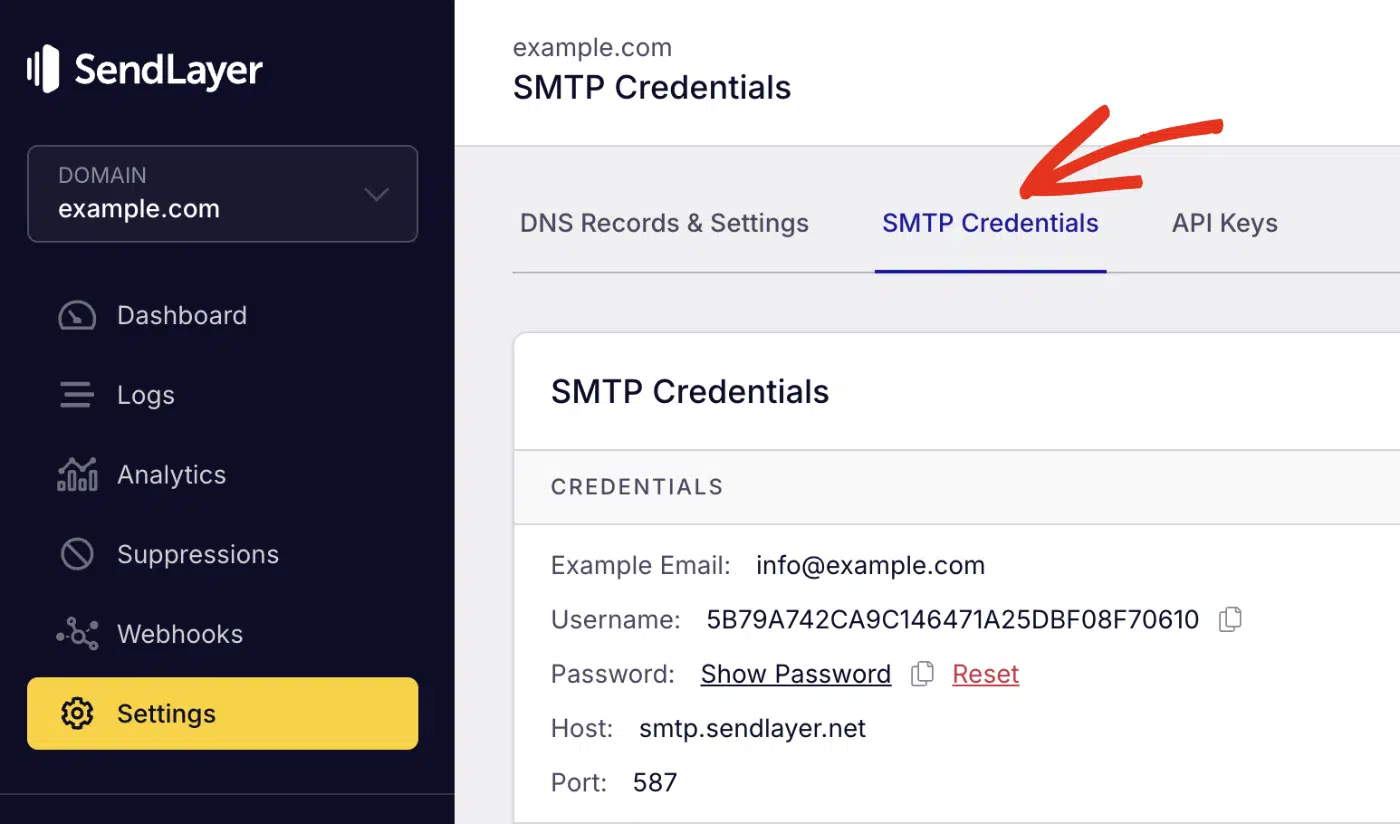
If you’re using SendLayer, you can get your SMTP credentials from your account dashboard under Settings » SMTP Credentials.
Pro Tip: If you need more help, please see our tutorial on setting up email in Laravel.
Step 3: Verify the Password Reset Database Table
Let’s check that the password reset table was created correctly. The migration should look like this:
Schema::create('password_reset_tokens', function (Blueprint $table) {
    $table->string('email')->primary();
    $table->string('token');
    $table->timestamp('created_at')->nullable();
});
You can verify this by running:
php artisan migrate:status
The table stores three things:
- email: The user’s email address
- token: A hashed version of the reset token
- created_at: Timestamp for token expiration
Step 4: Test the Password Reset Flow
With Breeze installed, you already have a working password reset system. Let’s test it:
Start your development server using the command:
php artisan serve
After that, open your browser and navigate to http://localhost:8000/login. Once there, click the Forgot your password? link.

Then, enter a registered user’s email address and click the EMAIL PASSWORD RESET LINK button.

You should receive the message in the user’s inbox. Go ahead and click the Reset Password button to reset your password.

If the token is valid, you’ll be directed back to your Laravel application to enter your new password. The token will be added as a URL parameter in the reset password link.
Go ahead and enter and confirm your new password. Then click the RESET PASSWORD button to update your password.

If everything works, congratulations! You’ve successfully implemented password reset in Laravel.
How to Implement Password Reset API for Modern Applications
If you’re building a mobile app, SPA, or headless CMS, you’ll need an API-based password reset system instead of traditional web forms. Here’s how to do it:
Step 1: Create API Routes
Start by creating a new api.php file in the routes folder. Then, add these routes to your routes/api.php:
<?php

use App\Http\Controllers\Api\PasswordResetController;

// Laravel reset password API routes
Route::post('/forgot-password', [PasswordResetController::class, 'forgotPassword']);
Route::post('/reset-password', [PasswordResetController::class, 'resetPassword']);
This PHP code defines the API routes that connect HTTP endpoints to the password reset controller methods we’ll create in step 3.
First, we import the PasswordResetController class so we can reference its methods in our route definitions.
Then we define two POST routes using Laravel’s Route::post() method. The /forgot-password endpoint maps to the forgotPassword method, which handles sending reset links.
The /reset-password endpoint maps to the resetPassword method, which handles the actual password change.
Step 2: Register API Routes
After defining the API routes, we’ll need to register them so Laravel can process the routes. Laravel 11+ requires explicit API route registration in bootstrap/app.php.
To do so, open the bootstrap/app.php file and add the line below to the return statement. Ideally, it should be placed below the web line.
api: __DIR__.'/../routes/api.php',
If you omit this line, your application will default to the routes defined in web.php.
Step 3: Create the API Controller
Now, we’ll need to create a new controller for API password reset:
php artisan make:controller Api/PasswordResetController
After that, open the Http/Controllers/Api/PasswordResetController file and replace its content with the snippets below:
<?php

namespace App\Http\Controllers\Api;

use App\Http\Controllers\Controller;
use Illuminate\Http\Request;
use Illuminate\Support\Facades\Password;
use Illuminate\Support\Facades\Hash;
use Illuminate\Validation\ValidationException;

class PasswordResetController extends Controller
{
    public function forgotPassword(Request $request)
    {
        $request->validate(['email' => 'required|email']);

        $status = Password::sendResetLink(
            $request->only('email')
        );

        if ($status === Password::RESET_LINK_SENT) {
            return response()->json([
                'message' => 'Password reset link sent to your email.'
            ], 200);
        }

        throw ValidationException::withMessages([
            'email' => [__($status)],
        ]);
    }

    public function resetPassword(Request $request)
    {
        $request->validate([
            'token' => 'required',
            'email' => 'required|email',
            'password' => 'required|min:8|confirmed',
        ]);

        $status = Password::reset(
            $request->only('email', 'password', 'password_confirmation', 'token'),
            function ($user, $password) {
                $user->password = Hash::make($password);
                $user->save();
            }
        );

        if ($status === Password::PASSWORD_RESET) {
            return response()->json([
                'message' => 'Password has been reset successfully.'
            ], 200);
        }

        throw ValidationException::withMessages([
            'email' => [__($status)],
        ]);
    }
}
Code Breakdown
In the code above, we define a Laravel API controller that handles password reset, including sending reset links and processing password changes.
First, we define the namespace and import the necessary Laravel classes. Here’s an overview of the classes we’re using:
Controller: The base class.Request: Handles HTTP data.Password: Used for reset operations.Hash: Handles secure password hashing.ValidationException: For error handling.
The forgotPassword method validates that the request includes a valid email address. Then, uses Password::sendResetLink() to generate a unique token and send a reset email.
If successful, it returns a JSON confirmation; otherwise, it throws a validation exception with the error message.
The resetPassword method validates the token, email, and new password. It then calls Password::reset(), which verifies the token.
After that, it executes a callback that hashes the new password with Hash::make() and saves the user’s details.
Step 4: Password Reset Email Customization
By default, Laravel sends a branded password reset email template. Let’s go ahead and customize it to match your brand.
First, create a custom notification:
php artisan make:notification CustomResetPasswordNotification
Then update the notification class:
<?php

namespace App\Notifications;

use Illuminate\Notifications\Messages\MailMessage;
use Illuminate\Notifications\Notification;

class CustomResetPasswordNotification extends Notification
{
    public $token;

    public function __construct($token)
    {
        $this->token = $token;
    }

    public function via($notifiable)
    {
        return ['mail'];
    }

    public function toMail($notifiable)
    {
        $url = url(route('password.reset', [
            'token' => $this->token,
            'email' => $notifiable->getEmailForPasswordReset(),
        ], false));

        return (new MailMessage)
            ->subject('Reset Your Password')
            ->line('You are receiving this email because we received a password reset request for your account.')
            ->action('Reset Password', $url)
            ->line('This password reset link will expire in 60 minutes.')
            ->line('If you did not request a password reset, no further action is required.');
    }
}
Finally, override the sendPasswordResetNotification method in your User model (app/Models/User.php):
use App\Notifications\CustomResetPasswordNotification;

public function sendPasswordResetNotification($token)
{
    $this->notify(new CustomResetPasswordNotification($token));
}
Your password reset emails will now use your custom template.
Step 5: Test the API
You can test your API endpoints using cURL or an API client like Postman. Here’s how to run a quick test using cURL:
# Send password reset link
curl -X POST http://localhost:8000/api/forgot-password \
  -H "Content-Type: application/json" \
  -d '{"email":"[email protected]"}'
After requesting the password reset link, you should receive an email notification if the user’s email exists.

Since this is an API route, there is no view to update the password. So the reset password button won’t work.
We’ll need to copy the Laravel password reset token. Then use it when making an API call to the reset password endpoint. Here’s an example command:
# Reset password
curl -X POST http://localhost:8000/api/reset-password \
  -H "Content-Type: application/json" \
  -d '{
    "token":"your_token_here",
    "email":"[email protected]",
    "password":"newpassword123",
    "password_confirmation":"newpassword123"
  }'
Replace the "token" value with the actual token you received in the forgot password email. You should receive a successful response after sending the request.
{"message":"Password has been reset successfully."}%
How to Customize Token Expiration Time
By default, password reset tokens expire after 60 minutes. You can change this in your config/auth.php file. Here’s how to update Laravel’s password reset expiration:
'passwords' => [
    'users' => [
        'provider' => 'users',
        'table' => 'password_reset_tokens',
        'expire' => 30, // Change to 30 minutes
        'throttle' => 60,
    ],
],
The throttle option prevents users from requesting multiple reset emails within the specified timeframe (in seconds).
Troubleshooting Common Password Reset Issues
These are troubleshooting tips for Laravel password reset not working issues.
"This password reset token is invalid" Error
This is the most common error you’ll encounter. It can happen for several reasons:
- The token has expired (default is 60 minutes)
- The token has already been used
- The email doesn’t match the token in the database
- There’s a mismatch between the token in the URL and database
To resolve this issue:
- Check your token expiration setting in
config/auth.php - Verify the email address matches exactly (case-sensitive)
- Clear the password reset tokens table for testing:
php artisan tinker
DB::table('password_reset_tokens')->truncate();
- Make sure you’re passing the token correctly in your form
Password Reset Email Not Sending
If users aren’t receiving password reset emails, here’s what to check:
- Test your email configuration:
php artisan tinker
Mail::raw('Test email', function($msg) {
    $msg->to('[email protected]')->subject('Test');
});
- Check your
.envfile for correct SMTP settings. - Review Laravel logs at
storage/logs/laravel.logfor errors. - If using queues, make sure your queue worker is running:
php artisan queue:work
- For production, use a reliable SMTP service like SendLayer to ensure deliverability.
Routes Not Working (404 Error)
If you’re getting 404 errors when accessing password reset routes:
- Clear your route cache:
php artisan route:clear
php artisan cache:clear
- Verify routes are registered:
php artisan route:list | grep password
- Make sure you’ve added the routes to the correct file (
web.phporapi.php)
Best Practices for Production
When deploying a password reset system to production, follow these security best practices:
Use HTTPS
Always use HTTPs in production. Password reset links should never be sent over unsecured connections.
In your .env:
APP_URL=https://yourdomain.com
Queue Email Sending
For better performance, queue password reset emails instead of sending them synchronously:
public function sendPasswordResetNotification($token)
{
    $this->notify((new CustomResetPasswordNotification($token))->delay(now()->addSeconds(5)));
}
Make sure to run your queue worker:
php artisan queue:work
Implement Rate Limiting
Prevent abuse by limiting password reset requests. Laravel includes throttling by default, but you can customize it:
'passwords' => [
    'users' => [
        'provider' => 'users',
        'table' => 'password_reset_tokens',
        'expire' => 60,
        'throttle' => 60, // Only allow 1 request per 60 seconds
    ],
],
Don’t Reveal User Existence
For security reasons, don’t tell attackers whether an email exists in your system. Always return the same message:
public function sendResetLink(Request $request)
{
    $request->validate(['email' => 'required|email']);

    Password::sendResetLink($request->only('email'));

    // Always return success message
    return back()->with('status', 'If this email exists, a password reset link has been sent.');
}
FAQs – Laravel Password Reset
These are answers to some of the most common questions we see about implementing password resets in Laravel.
How do I customize the Laravel reset password email template?
To customize the reset email, you’ll need to create a custom notification class and override the sendPasswordResetNotification method in your User model. See the Customize the Email Template section above for more details.
Can I use Laravel password reset without email?
Yes, you can implement OTP-based reset using SMS or store tokens in your database. Then, you can verify them manually before allowing password changes.
Is Laravel’s password reset secure for production?
Yes, Laravel uses industry-standard security practices including token hashing, expiration, and secure random generation. Just ensure you’re using HTTPS and following best practices.
How do I implement password reset for multiple user types?
Create separate password brokers in config/auth.php for each user type (users, admins, etc.) and use different guards.
That’s It! Now You Know How to Implement Password Reset in Laravel.
Next, would you like to ensure your password reset emails follow industry standards? Check out our tutorial on best practices for password reset emails.