


Want to stop spam in your Django contact forms? Your business website requires a contact form if you hope to collect leads and interact with your customers.
Here’s the problem with most contact forms. The moment your form goes live, bots find it. They scrape your page, detect the <form> tag, and POST junk to your view all day. You get fake leads, phishing links, and an inbox you stop trusting.
In this guide, you’ll learn how to prevent contact form spam in Django without using CAPTCHA.
By the end of this guide, you’ll have a working Django contact form with email notifications. It blocks spam before the email ever sends.
- Why do Django contact forms get so much spam?
- How to prevent contact form spam in Django
- How to build a contact form in Django
- How to send contact form notification email in Django
- How to add spam protection to your form
- Why not just use reCAPTCHA?
- How to test that spam is actually blocked
- Frequently Asked Questions
Why do Django contact forms get so much spam?
Django contact forms get spammed because bots automatically hunt for public forms. Bots often crawl the web, find any page with a form, and submit it thousands of times. Your form doesn’t have to rank or get traffic. It just has to exist.
The damage adds up fast:
- Wasted time: You sort real messages from garbage every day.
- Poisoned data: Fake submissions skew your analytics and CRM.
- Security risk: Many spam messages carry phishing or malware links.
- Deliverability harm: Auto-replies to fake addresses can hurt your sender’s reputation.
Note: Bots don’t read your site. They target the form endpoint directly, so hiding the form behind JavaScript rarely helps.
How to prevent contact form spam in Django
For this tutorial, we’ll build a Django contact form with a layered spam defense and reliable email delivery. The flow is simple: a visitor submits the form, and only clean submissions are sent as email.

Here’s the stack:
- Django forms for the form itself
- A honeypot field as the first, free layer of spam protection
- ActiveLayer for the AI spam check (server-side, no CAPTCHA)
- SendLayer to send the notification email
How to build a contact form in Django
To build a contact form in Django, you’ll need a form class, a view, and a template. Start with the form. We’ll add the honeypot field now so the spam layer is ready later.
Prerequisites
You’ll need a few things ready before you start:
- Python 3.9 or newer, with Django installed
- A Django project with at least one app and a URL you can route
- A free SendLayer account for sending email
- A free ActiveLayer account (it includes 1,000 spam checks a month)
- The
requestslibrary: runpip install requests
Writing the form class
Create a ContactForm in your app’s forms.py. It holds the real fields plus one hidden field that bots love to fill.
# forms.py
from django import forms

class ContactForm(forms.Form):
    name = forms.CharField(max_length=100)
    email = forms.EmailField()
    message = forms.CharField(widget=forms.Textarea)

    # Honeypot: hidden from humans, tempting to bots.
    # Real users leave it blank. Bots fill every field.
    website = forms.CharField(required=False, widget=forms.HiddenInput)

    def clean_website(self):
        # If the honeypot has a value, it's a bot.
        if self.cleaned_data.get("website"):
            raise forms.ValidationError("Spam detected.")
        return self.cleaned_data["website"]
The website field is your honeypot. Humans never see it, so they never fill it. We’ll explain the trick in full in the spam section.
Wiring up the view and template
Add a view in views.py that handles both GET and POST. On a valid POST, it will later send the email.
# views.py
from django.shortcuts import render, redirect
from django.contrib import messages
from .forms import ContactForm


def contact_view(request):
    if request.method == "POST":
        form = ContactForm(request.POST)
        if form.is_valid():
            # We'll add spam checks and email sending here soon.
            messages.success(request, "Thanks! Your message was sent.")
            return redirect("contact")
    else:
        form = ContactForm()

    return render(request, "contact.html", {"form": form})
Now add a simple template at templates/contact.html:
<!-- contact.html -->
<form method="post">
  {% csrf_token %}
  {{ form.as_p }}
  <button type="submit">Send message</button>
</form>
Point a URL at the view in urls.py:
# urls.py
from django.urls import path
from . import views

urlpatterns = [
    path("contact/", views.contact_view, name="contact"),
]
At this point, visit /contact/ in your browser. You should see the form with name, email, and message fields. The honeypot stays hidden.
How to send contact form notification email in Django
With the contact form in place, let’s add email functionality to notify the site admin when users submit a form.
Django’s built-in SMTP backend simplifies the setup process. You’ll only need to add your SMTP credentials when setting it up.
I’ll use SendLayer’s SMTP server details for this guide. But the steps are similar for most email hosting providers.
Connecting SendLayer to Django
First, grab your SMTP details from your SendLayer dashboard. Go to Settings » SMTP Credentials to find your username and password.
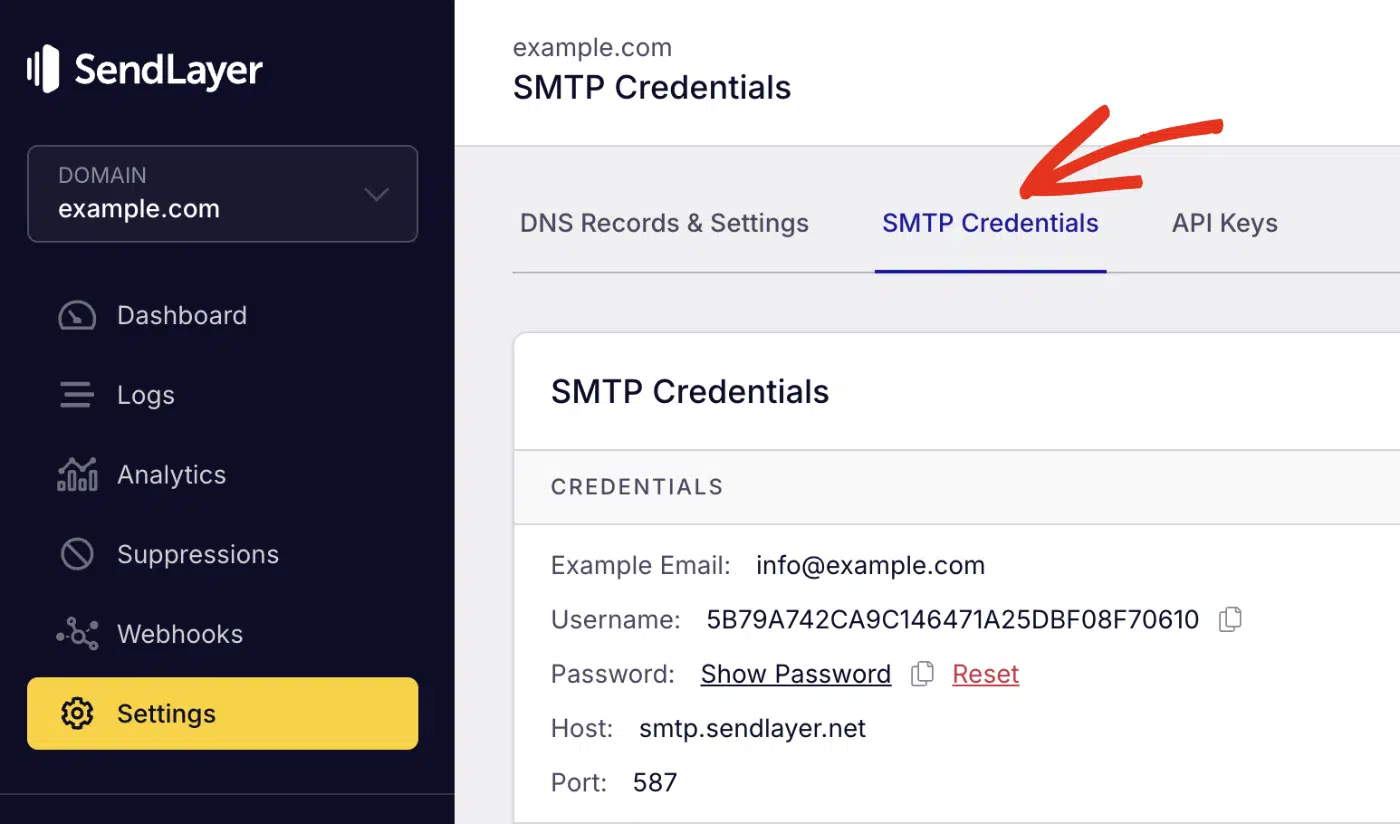
Add these to your Django settings.py. Never hardcode credentials. Read them from environment variables instead.
# settings.py
import os

EMAIL_BACKEND = "django.core.mail.backends.smtp.EmailBackend"
EMAIL_HOST = "smtp.sendlayer.net"
EMAIL_PORT = 587
EMAIL_USE_TLS = True
EMAIL_HOST_USER = os.environ["SENDLAYER_USER"]
EMAIL_HOST_PASSWORD = os.environ["SENDLAYER_PASS"]
DEFAULT_FROM_EMAIL = "[email protected]"
Important: The DEFAULT_FROM_EMAIL address must use a domain you’ve verified in SendLayer. Sending from an unverified domain will fail.
Set your environment variables in your shell or .env file:
export SENDLAYER_USER="your-sendlayer-username"
export SENDLAYER_PASS="your-sendlayer-password"
For a deeper walkthrough of Django email setup, see our full guide on how to send email with Django.
Sending the submission as an email
Update your view to send the form data as an email. We use send_mail from Django’s mail module.
# views.py
from django.core.mail import send_mail
from django.conf import settings


def send_contact_email(data):
    subject = f"New contact form message from {data['name']}"
    body = (
        f"Name: {data['name']}\n"
        f"Email: {data['email']}\n\n"
        f"{data['message']}"
    )
    send_mail(
        subject,
        body,
        settings.DEFAULT_FROM_EMAIL,
        ["[email protected]"],  # where you want to receive messages
        fail_silently=False,
    )
Call this helper inside the valid POST branch of contact_view. Right now, it sends every valid submission. Next, we’ll send only those that pass the spam checks.
How to add spam protection to your form
There are numerous ways to add spam protection in Django. For this guide, we’ll focus on non-CAPTCHA options that don’t require user interactions.
The honeypot stops cheap, high-volume bots. ActiveLayer stops the smart submissions that fill your form like a human would.
Layer 1: the honeypot field
A honeypot is a hidden form field that real users can’t see. The website field from earlier is the honeypot. A browser hides it, so a human leaves it blank. A bot reads the raw HTML, sees a field, and fills it in.
We already added the check in clean_website. When the field has a value, the form fails validation and never reaches the email code.
Pro Tip: Name your honeypot something a bot expects, like website, url, or phone2. Generic names catch more bots than random strings.
The honeypot is free and invisible. But it only stops bots that blindly fill every field. Smarter bots skip hidden fields, so you need a second layer.
Layer 2: screening with ActiveLayer’s AI API
ActiveLayer is an AI spam service that scores a submission server-side in about 60 to 120 milliseconds. You send the message content, the email address, and the visitor’s IP address.
It returns a verdict and a confidence score. If you’re curious how these models decide, see how AI spam filters work. No puzzle, no image grid, nothing for your visitor to solve.
Here’s how to get started with ActiveLayer. First, click the Get started button.

Then sign up using your email address. You’ll need to choose a plan before proceeding. The free plan lets you check 1000 submissions. Choose a plan and proceed to checkout.

After completing the checkout, you’ll be directed to the account dashboard. Here, enter a name for your project and choose the Custom App option.

Then click Create Project to proceed. You should see your API key afterward.

Go ahead and copy the API key. We’ll use it in the next section.
Note: You won’t be able to access the API key after closing this page. Make sure to store it in a secure location in case you need to refer to it.
Integrating ActiveLayer
After retrieving your API key, add it to your environment.
export ACTIVELAYER_API_KEY="your-activelayer-api-key"
Now add a helper that calls the ActiveLayer check endpoint. It sends a POST request with a bearer token.
# spam.py
import os
import requests

def check_spam(content, email, ip):
    response = requests.post(
        "https://api.activelayer.ai/v1/check",
        headers={
            "Authorization": f"Bearer {os.environ['ACTIVELAYER_API_KEY']}",
            "Content-Type": "application/json",
        },
        json={
            "content": content,
            "email": email,
            "ip": ip,
        },
        timeout=5,
    )
    response.raise_for_status()
    return response.json()
The response is JSON. The fields you’ll use most are is_spam (true or false) and confidence (a score from 0.0 to 1.0). You also get signals explaining why a submission was flagged.
Note: Check the ActiveLayer API reference for the full list of request and response fields. We use the core ones here.
Acting on the verdict and confidence score
You act on the verdict by picking a confidence threshold and blocking anything above it. A threshold of 0.8 blocks obvious spam while letting borderline messages through. Raise it to 0.95 to be more cautious about false positives.
First, add a small helper to read the visitor’s IP:
# spam.py
def get_client_ip(request):
    forwarded = request.META.get("HTTP_X_FORWARDED_FOR")
    if forwarded:
        return forwarded.split(",")[0].strip()
    return request.META.get("REMOTE_ADDR", "")
Now tie it all together in the view:
# views.py
from .spam import check_spam, get_client_ip

SPAM_THRESHOLD = 0.8


def contact_view(request):
    if request.method == "POST":
        form = ContactForm(request.POST)
        if form.is_valid():  # honeypot already checked here
            data = form.cleaned_data
            ip = get_client_ip(request)

            try:
                verdict = check_spam(data["message"], data["email"], ip)
                is_spam = verdict.get("is_spam") or \
                    verdict.get("confidence", 0) >= SPAM_THRESHOLD
            except requests.RequestException:
                # API down? Fail open so real users aren't blocked.
                is_spam = False

            if is_spam:
                messages.error(request, "Your message looks like spam.")
                return redirect("contact")

            send_contact_email(data)
            messages.success(request, "Thanks! Your message was sent.")
            return redirect("contact")
    else:
        form = ContactForm()

    return render(request, "contact.html", {"form": form})
Pro Tip: The except block fails open on purpose. If ActiveLayer is unreachable, you send the email anyway so you never lose a real lead. Log the error so you can spot outages.
Your form now runs both layers. The honeypot drops cheap bots at validation. ActiveLayer scores everything that gets past it, and only clean messages become an email.
Why not just use reCAPTCHA?
reCAPTCHA works, but it puts the burden on your visitor and stops less than you’d think. It adds friction to your form, and that friction costs you real submissions. Bots also solve modern CAPTCHAs with cheap services, so it isn’t the wall people assume.
Here’s how the two approaches compare:
| Factor | reCAPTCHA | Honeypot + ActiveLayer |
|---|---|---|
| Visitor effort | Sometimes a puzzle | None, fully invisible |
| Works in all regions | Blocked in some countries | Yes |
| Server-side control | Limited | Full, you set the threshold |
| Explains why it blocked | No | Yes, via signals |
| Beaten by CAPTCHA-solving bots | Yes | Harder, uses behavior and reputation |
reCAPTCHA can still be useful as a third layer on high-value forms. But for most contact forms, an invisible honeypot plus a server-side AI check gives better protection and a smoother experience.
How to test that spam is actually blocked
You test your spam protection by sending both clean and spammy submissions and watching what happens. Do this before you trust the form in production.
- Submit a normal message through the browser. You should see the success message, and the email should land in your inbox.

curl -X POST http://localhost:8000/contact/ \
  -d "name=Bot&[email protected]&message=hi&website=http://spam.com" \
  -d "csrfmiddlewaretoken=YOUR_TOKEN"
The form should fail validation, and no email should be sent.
- Submit spammy content with a normal (empty) honeypot. Use classic spam text with links. ActiveLayer should flag it, and you should see the spam error.
Common problems and fixes
A few issues trip people up on the first run:
- No email arrives. Check that your
DEFAULT_FROM_EMAILdomain is verified in SendLayer. An unverified domain silently fails. KeyErroron an environment variable. You forgot to exportSENDLAYER_USER,SENDLAYER_PASS, orACTIVELAYER_API_KEY. Restart your server after setting them.- Every message is blocked. Your threshold may be too low, or the API key is wrong. Print the
verdictresponse to see theconfidenceandsignals.
Frequently Asked Questions
These are answers to some of the top questions we see about preventing contact form spam in Django.
Does a honeypot field alone stop all contact form spam?
No. A honeypot stops simple bots that fill every field, and that’s a lot of them. But smarter bots skip hidden fields, so a honeypot alone leaves gaps. Pairing it with a server-side check like ActiveLayer covers the bots it misses.
Do I still need reCAPTCHA if I use ActiveLayer?
Usually not. ActiveLayer scores submissions server-side without any visitor interaction. That gives you strong protection without the friction of a CAPTCHA. You can add reCAPTCHA as an extra layer on high-risk forms, but most sites won’t need it.
Will spam protection block real users or delay my emails?
It shouldn’t. The honeypot is invisible to humans, so it never affects real users. ActiveLayer returns a verdict in about 60 to 120 milliseconds, which readers won’t notice. If the API is ever down, the fail-open code sends the email anyway.
How do I stop spam without adding a CAPTCHA in Django?
Combine a honeypot field with a server-side spam API. The honeypot catches basic bots at form validation. A service like ActiveLayer scores the rest by content, reputation, and behavior. Neither one shows your visitor a puzzle.
Can I use this approach with Django REST Framework or a decoupled frontend?
Yes. The spam check runs on the server, so it works the same in a DRF view or API endpoint. Call check_spam in your serializer’s validate method or the view before saving. Send the content, email, and IP the same way. If your frontend is React, here’s how to build a contact form in React too.
That’s it! Now you know how to prevent spam in Django contact forms.
Next, apply the same layered pattern to your other forms, like signups and comments. If you want to compare all the options first, read our guide on how to stop contact form spam.
