
Sending email in Ruby on Rails requires three things: ActionMailer configured per environment, a reliable SMTP provider, and background processing so emails don’t block response time.
Connecting Rails directly to Gmail or a generic SMTP server works fine in development, but is often flagged as spam in production.
After configuring ActionMailer across a dozen Rails apps, I’ve found that a dedicated transactional email provider eliminates the problem entirely.
This tutorial walks you through configuring ActionMailer with SendLayer’s SMTP, writing a mailer class, and delivering email in the background with Active Job.
- Step 1: Generate your mailer class
- Step 2: Create a mailer method and email view
- Step 3: Configure SMTP settings
- Step 4: Send email with Rails
- Step 5: Send emails in the background with deliver_later
- How to test your mailer without sending real emails
- How do you troubleshoot common Rails email errors?
- Frequently Asked Questions
How to send email in Ruby on Rails
Prerequisites
Before you begin, make sure you have:
- Ruby 3.x and Rails 7.x or 8.x installed.
- A Rails app (new or existing).
- An email provider. Preferably, one that includes features like event tracking.
I’ll use SendLayer email provider for this tutorial, but the steps are similar regardless of the provider you use.
If you don’t have a SendLayer account yet, you can sign up for free and send up to 200 emails. One of the standout features I like about SendLayer is the domain reputation feature. Your emails are sent from a subdomain, which protects your actual domain in case of issues.
How does email sending work in Rails?
Rails has a built-in module for email called ActionMailer. Think of it like a controller. It handles emails instead of web responses.
You create a mailer class with methods for each email type. Each method has a matching view template, just like a controller action has a view. When you call the method, Rails renders the template and sends it through your configured SMTP server.

The SMTP server is where your SMTP provider comes in. ActionMailer handles the structure. The SMTP provider, in this case, SendLayer, handles the delivery.
Step 1: Generate your mailer class
To get started, open a terminal window and run this command within your Rails project directory:
bin/rails generate mailer UserMailer
Rails creates 3 files:
create  app/mailers/user_mailer.rb
create  app/views/user_mailer/
create  test/mailers/user_mailer_test.rb
Open app/mailers/user_mailer.rb. It looks like this:
class UserMailer < ApplicationMailer
end
That’s our starting point. We’ll add email methods here in Step 2.
Pro Tip: ApplicationMailer inherits from ActionMailer::Base. You can set a default from: address in app/mailers/application_mailer.rb so every mailer uses the same sender address automatically.
Step 2: Create a mailer method and email view
Replace the contents of app/mailers/user_mailer.rb with the following:
class UserMailer < ApplicationMailer
  def welcome_email
    @user = params[:user]
    mail(to: @user.email, subject: 'Welcome to the app!')
  end
end
Now create the HTML view at app/views/user_mailer/welcome_email.html.erb:
<!DOCTYPE html>
<html>
  <body>
    <h1>Welcome, <%= @user.name %>!</h1>
    <p>Thanks for joining. Your account is ready.</p>
  </body>
</html>
Also create a plain-text fallback at app/views/user_mailer/welcome_email.text.erb:
Welcome, <%= @user.name %>!

Thanks for joining. Your account is ready.
Pro Tip: Always include a plain-text version. Some email clients don’t render HTML. Without .text.erb, those users see a blank email.
At this point, your mailer class and templates are ready. Next, we’ll connect them to the SMTP provider.
Step 3: Configure SMTP settings
Open config/environments/production.rb and add this block. Using a dedicated SMTP provider avoids common email deliverability issues that generic SMTP setups run into.
config.action_mailer.delivery_method = :smtp
config.action_mailer.smtp_settings = {
  address:              'smtp.sendlayer.net',
  port:                 587,
  domain:               ENV['MAIL_DOMAIN'],
  user_name:            ENV['SMTP_USERNAME'],
  password:             ENV['SMTP_PASSWORD'],
  authentication:       :plain,
  enable_starttls_auto: true
}
For development testing, add the same block to config/environments/development.rb.
You’ll need to retrieve your SMTP credentials from the email provider you chose. In SendLayer, you’ll be able to access these details from your account area.
Once logged in, navigate to the Settings sidebar menu. Then select the SMTP Credentials tab.
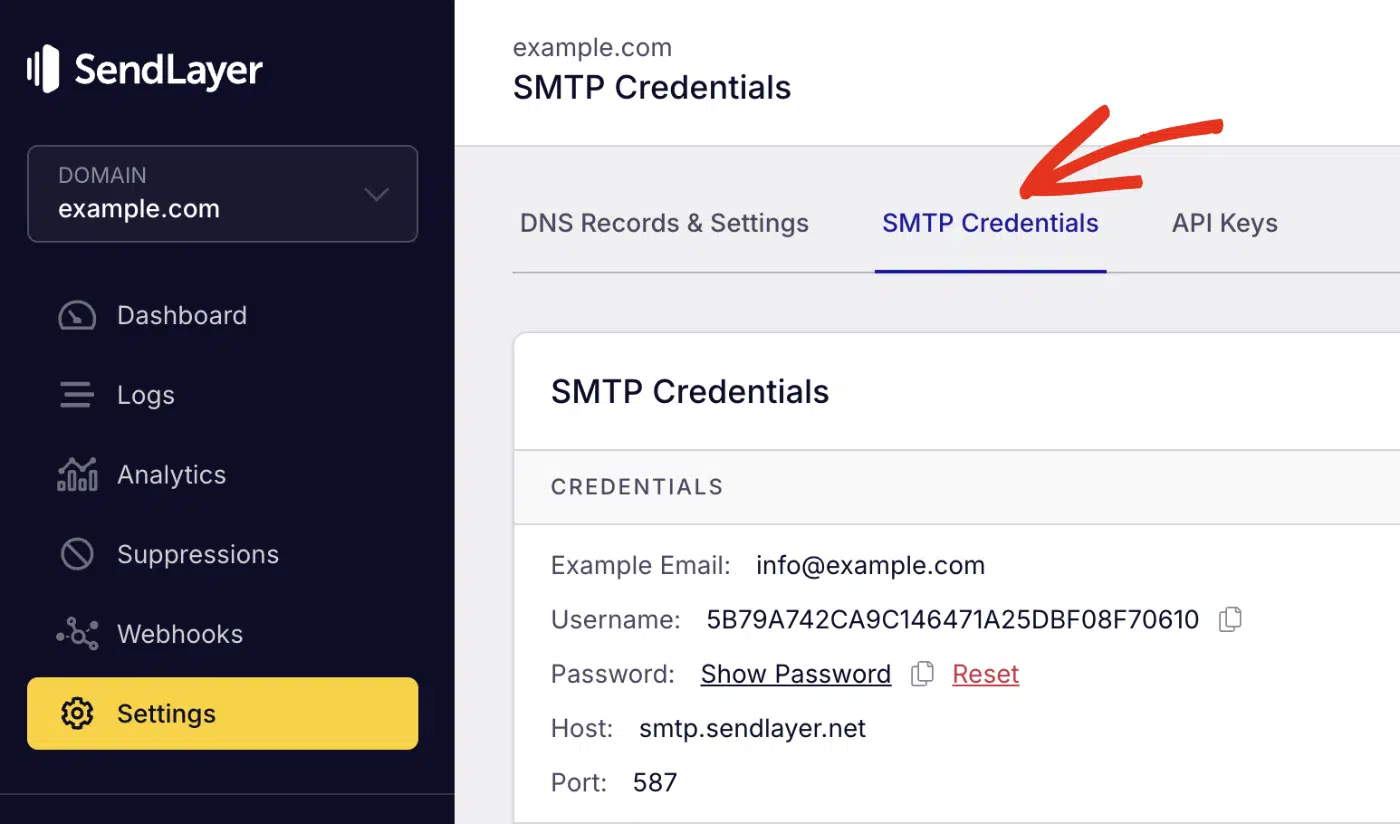
You’ll see the SMTP credentials required to use SendLayer’s SMTP server. The Host and Port number are the same for all users. However, the Username and Password details are unique to your SendLayer account.
Secure credentials with environment variables
Never hardcode your SMTP credentials in a config file. Use environment variables instead. I’ve seen exposed credentials get abused within hours of a leaked .env file.
Add these to your .env file (or set them in your hosting platform’s environment settings):
SMTP_USERNAME=your_sendlayer_smtp_username
SMTP_PASSWORD=your_sendlayer_smtp_password
[email protected]
MAIL_DOMAIN=yourdomain.com
Warning: Never commit .env to version control. Add it to .gitignore. Exposed credentials let anyone send email from your domain.
Step 4: Send email with Rails
With the mailer and SMTP config in place, you can trigger the email from a controller action. Here’s an example in a RegistrationsController:
class RegistrationsController < ApplicationController
  def create
    @user = User.new(user_params)

    if @user.save
      UserMailer.with(user: @user).welcome_email.deliver_now
      redirect_to root_path, notice: 'Account created!'
    else
      render :new
    end
  end
end
deliver_now sends the email immediately, before the response returns to the browser. It works fine for low-traffic apps. Step 5 covers a better approach for production.
To test it now, open the Rails console and trigger the email manually:
rails console
Then type the command below to create a test user.
user = User.create(email: "[email protected]", password: "123456")
Then send the email to the new user we created.
UserMailer.with(user: user).welcome_email.deliver_now
Check your SendLayer dashboard. You should see the email in your sent log within a few seconds.
If you have access to the email inbox, you should also receive the welcome email.

Step 5: Send emails in the background with deliver_later
Sending email synchronously blocks your app. If SendLayer takes 200ms to accept the message, your user waits 200ms longer for their page to load. For high-traffic apps, that adds up fast.
Swap deliver_now for deliver_later:
UserMailer.with(user: @user).welcome_email.deliver_later
deliver_later queues the email using Active Job. Rails processes it in the background after the response is sent.
Rails 8 ships with Solid Queue built in. It runs background jobs using your existing database. No Redis, no Sidekiq, no extra infrastructure.
To use it, set the queue adapter in config/application.rb:
config.active_job.queue_adapter = :solid_queue
That’s all you need for Rails 8. For Rails 7, add Sidekiq or another Active Job backend. See the Rails Active Job guide for options.
Pro Tip: Use deliver_later in production and deliver_now in test and development. It keeps your test suite fast and your development feedback instant.
How to test your mailer without sending real emails
ActionMailer has a built-in preview feature. It renders your email in the browser without sending it.
Create a preview file at test/mailers/previews/user_mailer_preview.rb:
class UserMailerPreview < ActionMailer::Preview
  def welcome_email
    user = User.first
    UserMailer.with(user: user).welcome_email
  end
end
Visit http://localhost:3000/rails/mailers/user_mailer/welcome_email to see your email rendered live. Rails picks up previews from test/mailers/previews by default.

For unit tests, ActionMailer stores sent emails in ActionMailer::Base.deliveries. Check it in your test suite:
assert_equal 1, ActionMailer::Base.deliveries.count
assert_equal ['[email protected]'], ActionMailer::Base.deliveries.last.to
Make sure your test environment uses the test delivery method. Add this to config/environments/test.rb if it isn’t already there:
config.action_mailer.delivery_method = :test
How do you troubleshoot common Rails email errors?
Most Rails email issues fall into 4 categories: authentication, deliverability, queuing, and template errors. Here’s how to fix each one.
Why am I getting Net::SMTPAuthenticationError?
Your SMTP credentials don’t match what the email provider expects. Check that SMTP_USERNAME and SMTP_PASSWORD are set and loading correctly. Run this in the Rails console to confirm:
puts ENV['SMTP_USERNAME']
If you’re on Heroku, Render, or a similar platform, set environment variables in the platform’s dashboard. This is because the .env isn’t read in production by default.
Why are my emails going to spam?
Emails sent through generic SMTP servers often land in spam because they lack proper SPF, DKIM, and DMARC records. SendLayer configures all 3 automatically when you send through smtp.sendlayer.net.
If emails still reach spam after switching to SendLayer, your domain’s DNS records may not be verified yet. In your SendLayer dashboard, go to Settings » Domains to confirm your domain is verified.
Why isn’t deliver_later sending my emails?
deliver_later enqueues a job — but if no queue worker is running, the job sits there permanently. In development, start Solid Queue with:
bin/rails jobs:work
In production, make sure your queue worker runs as a persistent process. You can confirm jobs are enqueued by checking the solid_queue_jobs table (Rails 8) or your Sidekiq dashboard (Rails 7).
Why am I getting ActionView::MissingTemplate?
Rails looks for a template named after the mailer method. If your method is welcome_email, Rails expects app/views/user_mailer/welcome_email.html.erb. A mismatch between the method name and the template filename raises this error. Rename one to match the other.
What are your options for sending email in Rails?
Rails gives you 3 ways to send email. SMTP is the most common. It works with any provider and requires no extra gems. An API approach is faster and more resilient for high-volume sending.
| Option | How it works | Best for |
|---|---|---|
| SMTP | ActionMailer connects to your provider’s SMTP server | Most apps. Simple setup, works with any provider |
| HTTP API | Sends via your provider’s REST API using a gem | High-volume sending or when SMTP port 587 is blocked |
| Letter Opener | Intercepts emails and opens them in your browser | Development only — no real sending |
This tutorial uses SMTP; it’s the fastest way to get started and works with SendLayer out of the box. If you need the API approach, SendLayer’s API docs cover the HTTP endpoint and authentication.
FAQs – Send email in Rails
Below, we’ve answered some of the top questions developers ask about sending emails in Ruby on Rails.
How can I set up a new Ruby on Rails application?
To set up a Rails app, you’ll first need to install Ruby on your machine. This provides access to the Ruby package manager (gem). With the package manager, run the command below to install Rails.
gem install rails
After that, use the command below to start a new project:
rails new my_app && cd my_app
In the command above, my_app is the project name. You can use any name you’d like for your project.
To start the server, run the command below:
bin/rails server
The server should start running on localhost:3000. Open your browser and navigate to this page. You should see a basic landing page.

What is ActionMailer in Ruby on Rails?
ActionMailer is Rails’ built-in email framework. It lets you create mailer classes with methods that generate emails, using ERB templates for the content. You configure it once with an SMTP provider, and it handles all your app’s outgoing email.
What’s the difference between deliver_now and deliver_later?
deliver_now sends the email immediately and blocks the current request until the email is sent. deliver_later queues the email as a background job and returns the response right away. Use deliver_later in production so emails don’t slow down page loads.
How do I test ActionMailer emails without sending real emails?
Use ActionMailer previews to view rendered emails in your browser during development. For automated tests, set config.action_mailer.delivery_method = :test and check ActionMailer::Base.deliveries to verify emails were queued correctly.
Can I use Gmail SMTP with Ruby on Rails?
Yes, but it’s not recommended for production. Gmail SMTP works in development, but Google limits regular accounts to 500 emails per day and flags bulk sending as spam.
To use it, set delivery_method to :smtp, use smtp.gmail.com on port 587, and use a Gmail App Password, not your regular password.
For production, a dedicated transactional email provider like SendLayer gives you higher limits, better deliverability, and SPF/DKIM records out of the box.
That’s it! Now you know how to send emails from your Ruby on Rails application.
You’ve set up ActionMailer, created a welcome email, connected it to SendLayer’s SMTP, and configured background sending with deliver_later. That’s a solid, production-ready email setup for your Rails app.
If you’re working with plain Ruby outside of Rails, check out our guide on sending emails in Ruby for a standalone approach.
