
Do you need to add email functionality to your Ruby application? You’re in the right place.
I’ve spent years building email systems for Ruby apps, from simple scripts to Rails applications sending thousands of transactional emails daily. The method you choose to send email in Ruby makes all the difference in deliverability and reliability.
In this guide, I’ll cover two proven approaches: the Mail gem for standalone apps, and the SendLayer Ruby SDK for scalable delivery. You’ll get working code for plain text emails, HTML emails, and attachments.
Let’s dive in.
- How to Send Email with Ruby
- How to Send Emails in Ruby Using Net::SMTP
- How to Send Emails in Ruby Using the Mail Gem
- How to Send Emails in Ruby on Rails Using ActionMailer
- How to Send Emails in Ruby Using Email API
- Comparing Different Ways to Send Email in Ruby
- Troubleshooting Common Issues
- Frequently Asked Questions
How to Send Email with Ruby
There are different ways to send emails using Ruby. If you’re using Ruby on Rails, you can integrate quickly with the ActionMailer gem. This guide will focus on sending methods for vanilla Ruby applications.
Prerequisites
Before diving into the email implementations, make sure you have:
- Ruby installed (version 3.1 or higher recommended)
- Basic Ruby programming knowledge
- A text editor or IDE of your choice
- An email service provider
You can use any email service provider you want. However, for this tutorial, I’ll use SendLayer’s SMTP credentials when implementing the email function.
SendLayer is one of the leading email service providers that lets you send emails easily and integrates with any application.
One of the standout features I like is the domain reputation protection. SendLayer automatically creates a subdomain to handle email sending activities. This thereby protects your main domain from any deliverability issues.
How to Send Emails in Ruby Using Net::SMTP
Ruby includes the Net::SMTP module in its standard library. That means you can send a basic email without installing any extra gems. It’s the simplest option for quick scripts and standalone tasks.
require 'net/smtp'

message = [
  "From: Your Store <[email protected]>",
  "To: Customer <[email protected]>",
  "Subject: Hello from Ruby",
  "",
  "This email was sent using Ruby's built-in Net::SMTP library."
].join("\r\n")

smtp = Net::SMTP.new('smtp.sendlayer.net', 587)
smtp.enable_starttls
smtp.start('localhost', 'your_smtp_username', 'your_smtp_password', :login) do
  smtp.send_message(message, '[email protected]', '[email protected]')
end
This connects to your SMTP provider over a secure STARTTLS connection on port 587. Swap in your own host and credentials. If you use SendLayer, you’ll find these under Settings » SMTP credentials in your dashboard.
Net::SMTP is great for a quick send. But it doesn’t make it easy to add attachments or HTML content. For that, the Mail gem below is a better fit.
How to Send Emails in Ruby Using the Mail Gem
The Ruby Mail gem is a customizable library that gives you control over your email implementation. It is perfect for Ruby applications outside of Rails. Here’s how to get started with the Mail gem.
Installation and Setup
To start, you’ll need to install the Mail gem as a dependency to your project. To install it, open a terminal window and run the command below:
gem install mail
Tip: Prefix the command with sudo if you encounter permission issues when installing the Mail Ruby gem.
Once the installation completes, you should see a success notification in your terminal window.

Basic Email Configuration
Before you can send an email, you’ll need to configure your SMTP server. Here’s how to configure the Mail gem with SendLayer SMTP. Start by creating an email_service.rb file in your project’s directory.
touch email_service.rb
Then open the file with a code editor. Once open, copy and paste the code below into the email service file:
require 'mail'

Mail.defaults do
  delivery_method :smtp, {
    address: 'smtp.sendlayer.net',
    port: 587,
    user_name: 'your_sendlayer_username',
    password: 'your_sendlayer_password',
    authentication: 'plain',
    enable_starttls_auto: true
  }
end
You’ll need to retrieve your SMTP credentials from the email provider you chose. In SendLayer, you’ll be able to access these details from your account area.
Once logged in, navigate to the Settings sidebar menu. Then select the SMTP Credentials tab.
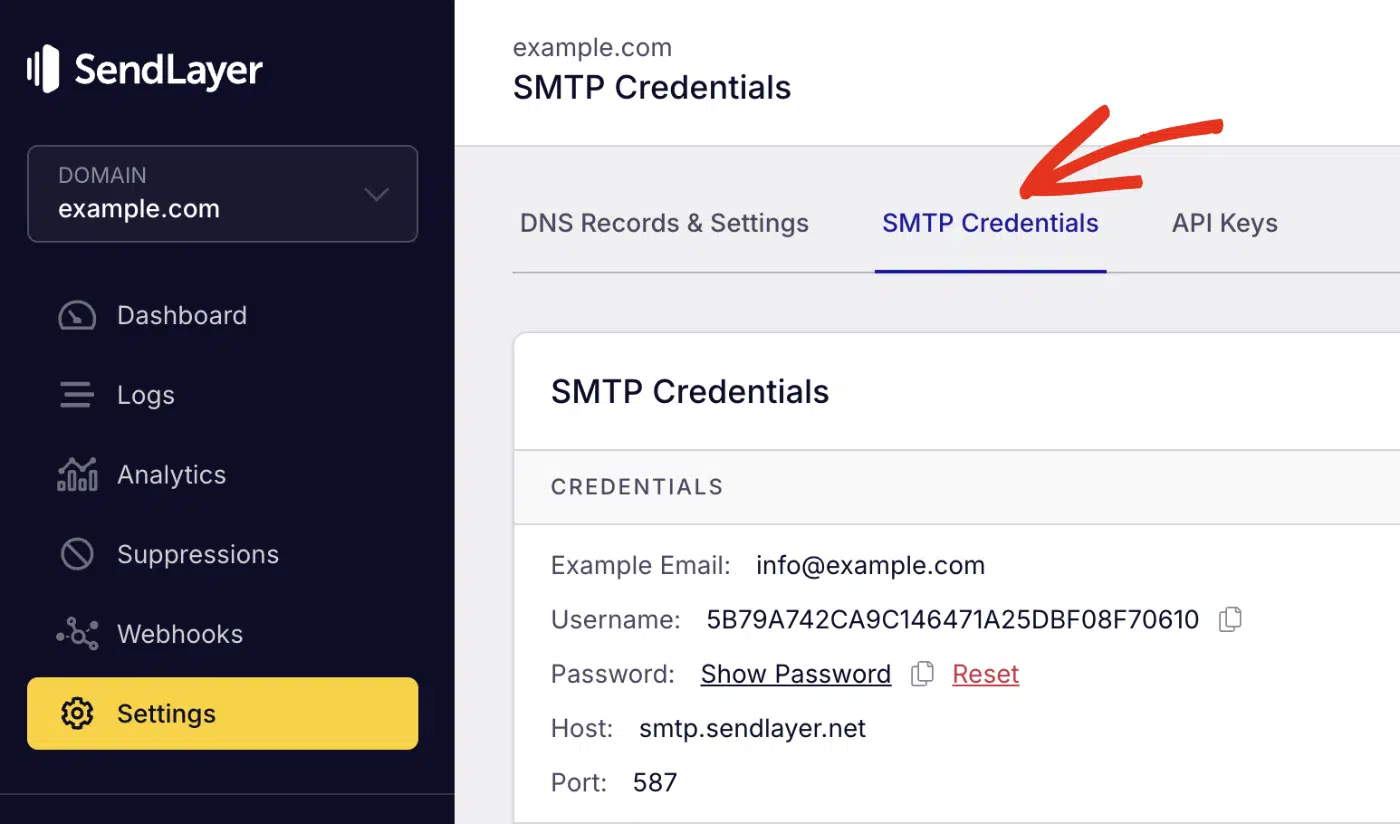
You’ll see the SMTP credentials required to use SendLayer’s SMTP server. The Host and Port number are the same for all users. However, the Username and Password details are unique to your SendLayer account.
Go ahead and replace user_name and password in the snippet above with your actual credentials.
Pro Tip: Never commit sensitive credentials to version control platforms. Always use environment variables.
To use environment variables, first install the dotenv library.
gem install dotenv
Then create a new file called .env and add your SMTP credentials.
SENDLAYER_USERNAME=your-smtp-username
SENDLAYER_PASSWORD=your-smtp-password
After updating your SMTP credentials, you’re ready to start sending emails.
Sending Plain Text Emails
Here’s a basic implementation for sending text emails:
require 'mail'

class EmailService
  def self.configure_smtp
    Mail.defaults do
      delivery_method :smtp, {
        address: 'smtp.sendlayer.net',
        port: 587,
        user_name: ENV['SENDLAYER_USERNAME'],
        password: ENV['SENDLAYER_PASSWORD'],
        authentication: 'plain',
        enable_starttls_auto: true
      }
    end
  end

  def self.send_welcome_email(user_email, user_name)
    welcome_message = generate_welcome_message(user_name)

    mail = Mail.new do
      from     '[email protected]'
      to       user_email
      subject  'Welcome to Our Platform!'
      body     welcome_message
    end

    mail.deliver!
    puts "Welcome email sent to #{user_email}"
  rescue Mail::SMTPError => e
    puts "Failed to send email: #{e.message}"
  end

  private

  def self.generate_welcome_message(name)
    <<~MESSAGE
      Hello #{name},

      Welcome to our platform! We're excited to have you join our community.

      You can log in to your account at: https://yourdomain.com/login

      If you have any questions, please don't hesitate to contact our support team.

      Best regards,
      The Team
    MESSAGE
  end
end
Code breakdown
The configure_smtp method sets up the mail delivery configuration using Mail.defaults. We specify the SMTP details, including the address (smtp.sendlayer.net), port (587 for TLS), authentication credentials from environment variables, and enable STARTTLS for secure transmission.
The send_welcome_email method creates a new Mail object using a block syntax. We set the sender address with from, recipient with to, email subject, and generate the email body by calling a private helper method.
The mail.deliver! method actually sends the email through the configured SMTP server. The exclamation mark indicates this method will raise an exception if delivery fails.
Error handling is implemented using a rescue block that catches Mail::SMTPError exceptions. When an SMTP error occurs during delivery, it prints a failure message instead of crashing the application.
The private generate_welcome_message method uses Ruby’s heredoc syntax (<<~MESSAGE) to create a multi-line string template. The ~ removes leading whitespace, making the code more readable while preserving the email formatting.
Send a Test Email
The next step after implementing the email function is to call the class. Let’s create a main.rb file that’ll send the message. After that, copy and paste the code below into the file:
# importing the email service
require_relative 'email_service'

# configure SMTP settings
EmailService.configure_smtp

# send welcome email
EmailService.send_welcome_email('[email protected]', 'Pattie Paloma')
In the snippet above, we first import the email service file. Then call the configure_smtp() method to initialize the SMTP connection. Finally, we call the send_welcome_email() method to send the email. This method accepts 2 parameters: the recipient’s email address and name.
To run the script, open a terminal window and run the command:
ruby main.rb
You should see a welcome email delivered to the specified email address with personalized content.

Send Email with Attachments
The Mail gem includes support for attaching files to emails. To send an email with an attachment, you’ll need to include the add_file property when specifying the email parameters. Here’s an example:
require 'mail'

def send_email_with_attachment(recipient, attachment_path)
  mail = Mail.new do
    from     '[email protected]'
    to       recipient
    subject  'Document Attached'
    body     'Please find the attached document.'

    add_file attachment_path
  end

  mail.deliver!
end
The value of the add_file property should be the path to the file you wish to attach. The Mail gem handles encoding and also tries to guess the file type.
To send multiple attachments, use Ruby’s foreach syntax to map each attachment file to the add_file property. Here is an example:
# For multiple attachments
def send_email_with_multiple_attachments(recipient, attachment_paths)
  mail = Mail.new do
    from     '[email protected]'
    to       recipient
    subject  'Multiple Documents Attached'
    body     'Please find the attached documents.'

    attachment_paths.each { |path| add_file path }
  end

  mail.deliver!
end
That’s it! You’ve now learned how to send emails in Ruby using SMTP.
How to Send Emails in Ruby on Rails Using ActionMailer
If you’re building a Ruby on Rails app, ActionMailer is the built-in way to send email. It’s part of Rails, so there’s nothing extra to install.
First, add your SMTP settings to your environment config.
# config/environments/production.rb
config.action_mailer.delivery_method = :smtp
config.action_mailer.smtp_settings = {
  address:              'smtp.sendlayer.net',
  port:                 587,
  user_name:            ENV['SENDLAYER_SMTP_USER'],
  password:             ENV['SENDLAYER_SMTP_PASSWORD'],
  authentication:       :login,
  enable_starttls_auto: true
}
Next, create a mailer class with an action for the email you want to send.
# app/mailers/user_mailer.rb
class UserMailer < ApplicationMailer
  default from: '[email protected]'

  def welcome_email
    @user = params[:user]
    mail(to: @user.email, subject: 'Welcome to our store')
  end
end
Then send the email from a controller or a background job.
UserMailer.with(user: @user).welcome_email.deliver_now
ActionMailer uses the Mail gem under the hood, so the message API feels familiar. Pair it with SendLayer’s SMTP for reliable delivery in production.
Note: For more information, see our guide on sending emails in Ruby on Rails.
How to Send Emails in Ruby Using Email API
While SMTP works well for smaller projects, using an email API via the SendLayer Ruby gem offers better performance and reliability. It also includes features such as webhook management and event tracking.
Before getting started, you’ll need to install the SendLayer Ruby SDK using RubyGems:
gem install sendlayer
Once the installation completes, create a new .rb file and initialize the SDK with your API key:
require 'sendlayer'

# Initialize the email client with your API key
sendlayer = SendLayer::SendLayer.new('your-api-key')
Retrieving SendLayer API Key
To get your API key, log in to your SendLayer account. Once you’re logged in, click the Settings menu and select the API Keys tab.
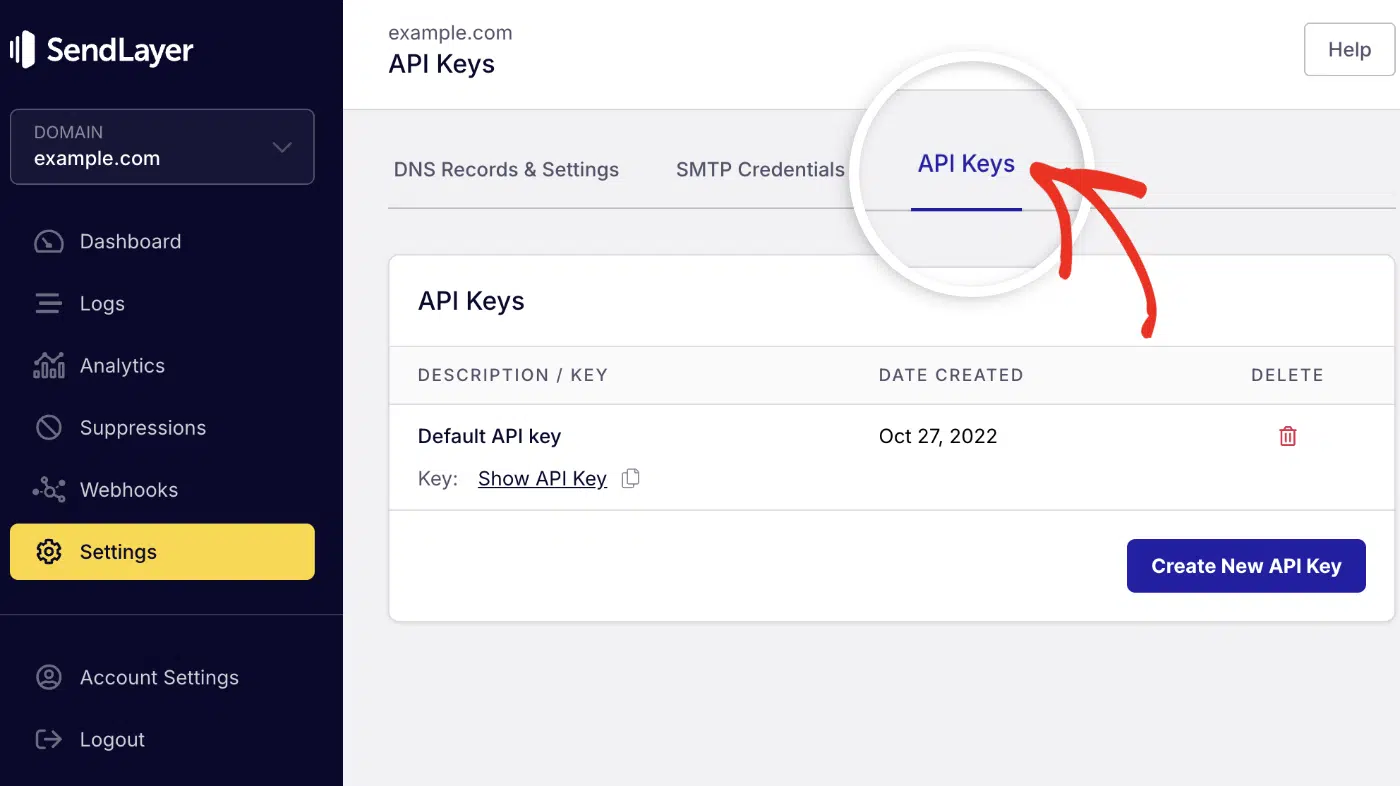
Then click the copy icon next to Default API key to copy it.

Sending an Email in Ruby via API
Here is the complete snippet for sending a plain-text email in Ruby using the SendLayer Ruby gem.
require 'sendlayer'

sendlayer = SendLayer::SendLayer.new('your-api-key')

params = {
  from: '[email protected]',
  to: '[email protected]',
  subject: 'Test Email',
  text: 'This is a test email'
}

response = sendlayer.emails.send(params)

if response['MessageID']
  puts "Email sent successfully! Message ID: #{response['MessageID']}"
else
  puts "Failed to send email"
end
Code breakdown
The SDK requires an active API key to initialize it before you can send an email. Make sure to replace your-api-key with your actual API key.
Pro Tip: Never hardcode sensitive credentials, such as API keys or SMTP username and password, in your code. Use environment variables instead and add the .env file to your project’s .gitignore file before uploading the code to a version control system like GitHub.
After initializing the package, configure the email parameters. The SDK accept multiple parameters. However, the following are required to send the API request:
from: Sender email addressto: A string or list of email recipient(s)subject: The email subject linetextorhtml: Either HTML or plain text email content
To send the email, call the .emails.send() method and pass the parameter.
Sending HTML Emails with the SDK
The SDK also supports HTML emails. To send an HTML email, add the html property to the email params field. This is useful when integrating dynamic, reusable email templates for activities such as password reset and order confirmation emails.
# ...other code snippets

params = {
  from: '[email protected]',
  to: '[email protected]',
  subject: 'Test Email',
  html: "<html><body><p>This is a test email sent with the <a href='https://sendlayer.com'>SendLayer</a> API!</p></body></html>"
}
Note: You can include both text and html parameters to have both plain text and HTML versions of your email.
Sending to Multiple Recipients
To send emails to multiple recipients, update the to property in the params variable to a list of email recipients.
You can either pass the recipients as a comma-separated list of email addresses. Or a list of key-value pairs with the email and name properties for each recipient.
# ...other code snippets

params = {
  from: { email: '[email protected]', name: 'Paulie Paloma' },
  to: [
    { email: '[email protected]', name: 'Recipient 1' },
    { email: '[email protected]', name: 'Recipient 2' }
  ],
  subject: 'Sending Emails to Multiple Recipients',
  html: '<p>This is a <strong>test email</strong>!</p>',
  text: 'This is a test email!',
  cc: [{ email: '[email protected]', name: 'CC Recipient' }],
  bcc: [{ email: '[email protected]', name: 'BCC Recipient' }],
  reply_to: [{ email: '[email protected]', name: 'Reply To' }]
}
The SDK also lets you include CC and BCC email addresses when sending an email.
Note: Rate limit applies to the number of recipients you can add per email request. To learn more, see our rate limit guide.
Send Email with Attachments via API in Ruby
You can send emails with attachments by adding the attachments property to the email params. It requires two fields:
path: Path to the file you intend to attach. It accepts both local and remote files.type: The MIME type of the attachment file
# ...other code snippets

params = {
  from: { email: '[email protected]', name: 'Paulie Paloma' },
  to: [{ email: '[email protected]', name: 'Recipient' }],
  subject: 'Email with Attachment',
  html: '<p>Please find the attached document.</p>',
  attachments: [
    {
      path: 'path/to/file.pdf',
      type: 'application/pdf'
    }
  ]
}
Note: The maximum email size is 10MB (message plus attachments).
Comparing Different Ways to Send Email in Ruby
Now that you know how to implement email functionality, let’s explore the different methods available for sending emails in Ruby applications. Each approach has its strengths and is suited for different use cases:
| Method | Best For | Library/Tool | Difficulty |
|---|---|---|---|
| SMTP | Basic scripts, standalone apps | Net::SMTP (built-in) | Easy |
| Mail Gem | Simple Ruby applications | mail gem | Easy |
| Rails ActionMailer | Ruby on Rails web apps | ActionMailer (built-in Rails) | Medium |
| Email API | Scalable production apps | SendLayer gem | Easy |
Troubleshooting Common Issues
Here are the most common issues developers encounter when sending emails in Ruby and how to fix them:
SMTP Authentication Failed
Net::SMTPAuthenticationError: 535 Authentication failed
This error is often caused by incorrect SMTP credentials or authentication method. You might also encounter it if you’ve set up two-factor authentication (2FA) on your email account.
Solutions:
To resolve the error, verify your SMTP credentials are correct. If you’re using Gmail SMTP, use an app-specific password.
Gmail SMTP Blocked
Gmail may block sign-in attempts from apps it considers less secure.
Solutions:
- Enable “Less secure app access” in Gmail settings (not recommended)
- Use App Passwords instead
- Switch to a professional SMTP service like SendLayer
Invalid Email Address Format
Mail::Field::ParseError: invalid email address
Solution: Always validate email addresses before sending:
def valid_email?(email)
  email.match?(/\A[\w+\-.]+@[a-z\d\-]+(\.[a-z\d\-]+)*\.[a-z]+\z/i)
end

# Use before sending
if valid_email?(user_email)
  send_email(user_email)
else
  puts "Invalid email address"
end
FAQs – Send Emails With Ruby
These are answers to some of the questions developers ask about sending emails in Ruby.
What’s the difference between Action Mailer and the Mail gem in Ruby?
Action Mailer is a built-in email framework that integrates tightly with Ruby on Rails applications. It includes templating, testing helpers, and background job integration. The Mail gem, on the other hand, is a standalone library that works in any Ruby application. It offers more low-level control over email creation and delivery.
How do I handle bounced emails and delivery failures?
The best way to handle delivery failures is by implementing proper error handling with try-catch blocks. You can also use webhook endpoints provided by your SMTP service to handle bounce notifications. Services like SendLayer provide detailed delivery reports and bounce handling.
How do I configure SMTP settings for production?
Proper mailer configuration is crucial for production environments. Always use environment variables for SMTP Ruby credentials and ensure your SMTP class implementation includes proper error handling and connection pooling.
What are the security best practices for email delivery in Ruby?
Below, we’ve highlighted some of the best practices for handling email in Ruby applications:
- Always use environment variables for credentials
- Enable TLS/SSL connections
- Validate email addresses before sending
- Implement rate limiting
- Use reputable SMTP providers with proper authentication.
- Never expose API keys or passwords in your source code. Use environment variables to store and manage sensitive credentials.
What is the difference between send and public_send in Ruby?
While both send and public_send are method invocation methods in Ruby, they serve different purposes:
send– Can invoke any method (public, private, or protected) on an object. This bypasses Ruby’s access control.public_send– Only invokes public methods, respecting Ruby’s access control mechanism.
In the context of email sending, this distinction doesn’t typically apply. The Mail gem uses deliver! or deliver_now methods directly rather than dynamic method invocation.
Can I use the Mail gem in Rails applications?
Yes, ActionMailer is actually built on top of the Mail gem. However, ActionMailer provides Rails-specific conveniences like:
- Integration with Rails views and templates
- Asset pipeline support for email assets
- Built-in testing helpers
- Background job integration
For Rails applications, it’s recommended to use ActionMailer rather than the Mail gem directly.
That’s it! Now you know how to send emails in Ruby.
Next, would you like to learn about the difference between different sending methods? Check out our tutorial on SMTP vs API for more information.
If your project uses the Rails framework, see our step-by-step guide on how to send email in Ruby on Rails using ActionMailer.
