



Supabase is an open-source backend platform for building web and mobile apps. It gives you a PostgreSQL database, authentication, storage, and auto-generated APIs in one place. Many developers pick it as an alternative to Google’s Firebase.
Supabase can send email for you too. Sign-up confirmations, password resets, and magic links all go out by email. These transactional messages matter. If they land in spam or never arrive, users get stuck.
The catch is that Supabase’s built-in email service is meant for testing, not production. It’s slow, capped, and only reaches your own team. To send real email to real users, you’ll want to connect your own SMTP provider.
This guide shows you how to set up custom SMTP in Supabase, step by step. We’ll use SendLayer as the SMTP provider.
- Why Supabase’s Built-In Email Service Isn’t Enough
- How to Get Your SendLayer SMTP Credentials
- How to Configure Custom SMTP in Supabase
- How to Adjust Email Rate Limits
- How to Customize Your Email Templates
- How to Test Your Supabase Email Configuration
- Troubleshooting Common Supabase SMTP Issues
- Frequently Asked Questions
Why Supabase’s Built-In Email Service Isn’t Enough
Every Supabase project ships with a built-in email sender. It’s handy for a quick demo. It’s not built for production, and Supabase says so in its own docs.
Here’s what holds it back:
- No delivery guarantee. There’s no SLA on uptime or inbox placement. Your emails might arrive late, or not at all.
- Auth emails only. It sends transactional auth messages, not marketing or product email.
Custom SMTP fixes all of this. You bring your own provider, lift the recipient limit, and take control of deliverability.
Which Emails Does Supabase Send?
Supabase Auth sends a message for each key account action. Knowing them helps you test your setup and edit the right templates. The main ones are:
- Confirm sign up: verifies a new user’s email address.
- Magic link or OTP: sends a one-time sign-in link or code.
- Reset password: lets a user set a new password.
- Change email address: confirms a user’s new address.
- Invite user: invites someone to create an account.
- Reauthentication: verifies identity before a sensitive action.
All of these are transactional. They need to arrive fast, which is exactly what custom SMTP delivers.
Built-In vs. Custom SMTP
| Built-in service | Custom SMTP (SendLayer) | |
|---|---|---|
| Hourly limit | 2 emails/hour | 30/hour default, adjustable |
| Recipients | Your team only | Anyone |
| Deliverability | No SLA | Monitored IPs, domain authentication |
| Sender address | Fixed | Your own domain |
| Best for | Local testing | Production apps |
What You Need Before You Start
You’ll need two things:
- A Supabase project. Create one free at supabase.com if you don’t have one yet.
- An SMTP provider. Any provider with SMTP credentials works. We recommend a service built for transactional email, like SendLayer.

Supabase works with any SMTP host. Here’s how a few popular options compare:
| Provider | SMTP host | Port | Notes |
|---|---|---|---|
| SendLayer | smtp.sendlayer.net | 587 | 200 free emails, built-in domain authentication |
| Resend | smtp.resend.com | 465 | Developer-focused |
| SendGrid | smtp.sendgrid.net | 587 | Large free-tier history |
| Mailgun | smtp.mailgun.org | 587 | Pay-as-you-go |
| Amazon SES | email-smtp.us-east-1.amazonaws.com | 587 | Low cost at scale |
Note: For a detailed comparison, see our review of the best email API providers.
We’ll use SendLayer for the rest of this guide. It’s designed for developers, with an SMTP relay for quick setup and an API for more control. You also get detailed analytics and built-in domain reputation protection.
How to Get Your SendLayer SMTP Credentials
Before you touch Supabase, grab your SMTP details from SendLayer.
Log in to your SendLayer dashboard. Go to Settings » SMTP Credentials. You’ll see everything you need on this page.
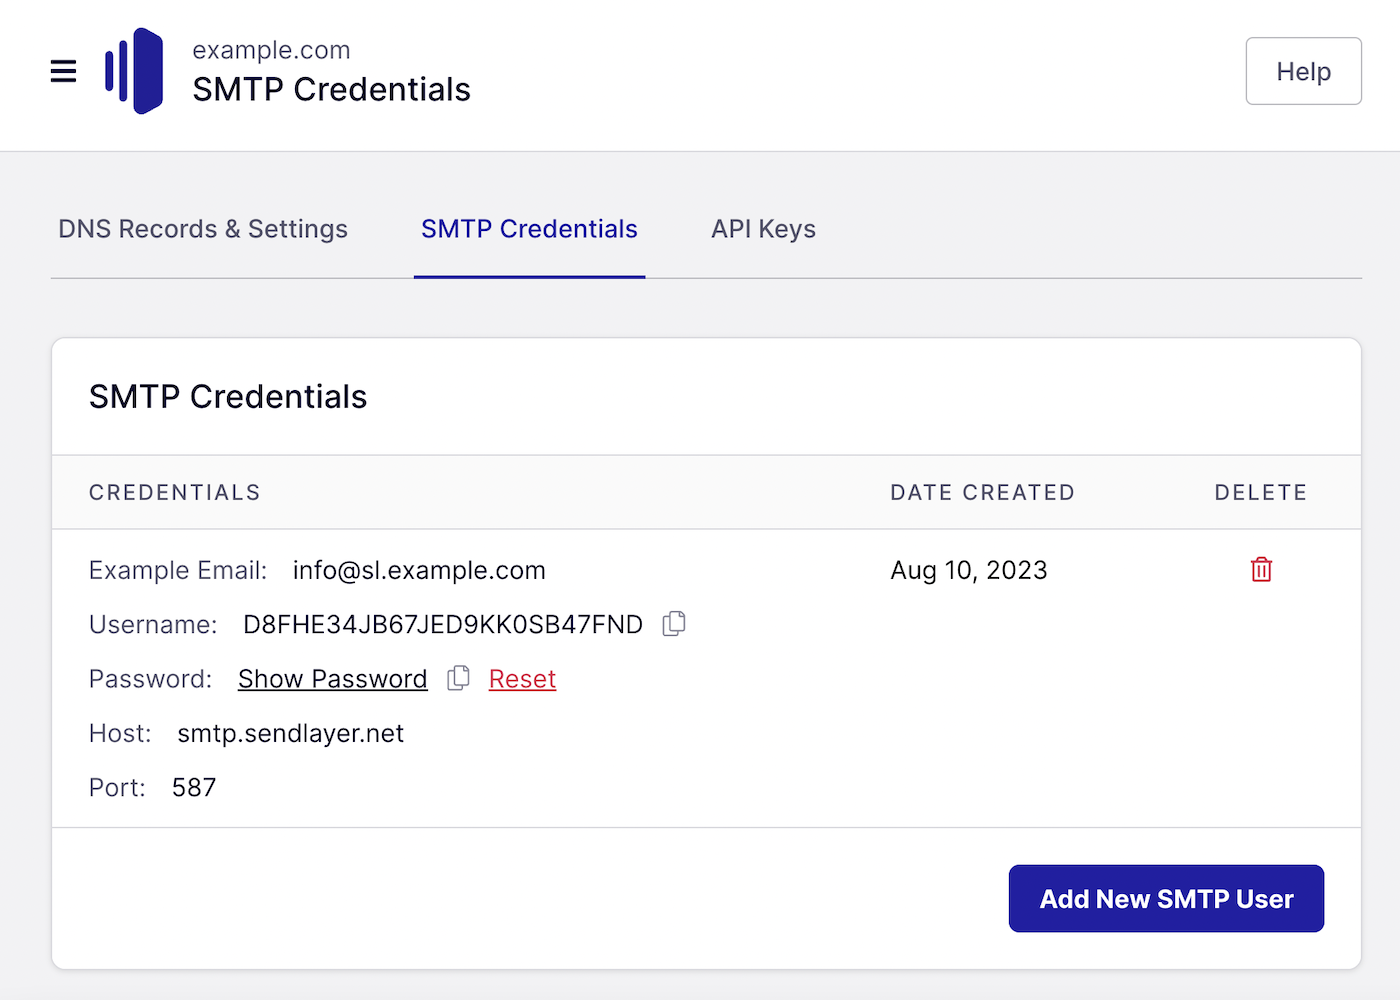
Copy these four values:
- Host:
smtp.sendlayer.net - Port:
587 - Username: shown in your dashboard
- Password: shown in your dashboard
Keep this tab open. You’ll paste these into Supabase in a minute.
Authenticate Your Domain First
Deliverability starts with domain authentication. Without it, mailbox providers may reject your email or flag it as spam.
SendLayer walks you through this when you add a domain. It generates your SPF, DKIM, and DMARC records for you. You add them to your DNS, then SendLayer verifies them.
Each record plays a role:
- SPF tells mailbox providers which servers may send for your domain.
- DKIM signs your emails so they can’t be tampered with in transit.
- DMARC ties SPF and DKIM together and sets a policy for failures.
Make sure your domain shows as verified before you send. The sender address you use in Supabase must match your authenticated domain.
How to Configure Custom SMTP in Supabase
Supabase updated its dashboard, so the SMTP settings moved. Here’s the current path.
Step 1: Open Authentication
From your project dashboard, click Authentication in the left sidebar.

Step 2: Open the Emails settings
In the Authentication menu, find the NOTIFICATIONS section. Then click Emails to access the SMTP settings.

Step 3: Go to SMTP Settings
The Emails page has two tabs: Templates and SMTP Settings. On the Templates tab, you’ll see a prompt to set up custom SMTP. Click Set up SMTP to open the settings.

Step 4: Enter your sender details.
Toggle Enable Custom SMTP on. Then enter your sender email and sender name. These show as the “from” details on every email you send.

Your sender email must match the domain you authenticated with SendLayer.
Step 5: Enter your SMTP credentials
Now fill in the SMTP Provider Settings with the values you copied from SendLayer:
- Host:
smtp.sendlayer.net - Port number:
587 - Username: paste from your SendLayer dashboard
- Password: paste from your SendLayer dashboard

You can also set a minimum interval between emails. Adjust it if your provider enforces a send rate.
Step 6: Save and confirm
Once you’re done adding your SMTP credentials, click Save. You’ll see a message confirming the settings were saved.

That’s it. Supabase now sends every auth email through SendLayer.
How to Adjust Email Rate Limits
Enabling custom SMTP doesn’t remove rate limits. It raises the default to 30 emails per hour. You can change that number to fit your app.
Go to Authentication » Rate Limits. Here you can set the hourly limit for sending emails. You can also adjust limits for SMS, token refreshes, verifications, and sign-ins.

Set the email limit to match what your SendLayer plan supports. That keeps Supabase and your provider in sync.
How to Customize Your Email Templates
Once custom SMTP is on, you can edit the emails Supabase sends. Go to Authentication » Emails and open the Templates tab.

You’ll find a template for each auth email:
- Confirm sign up
- Invite user
- Magic link or OTP
- Change email address
- Reset password
- Reauthentication
Click any template to edit its subject and body. You can view your changes as raw HTML or as a full preview.

Keep the confirmation link variable in place when you edit. Removing it breaks the email.
How to Test Your Supabase Email Configuration
Always test before you rely on your setup. There are two easy ways.
Send a Test Invite
Go to Authentication » Users and click Add user.

Choose Send invitation, enter an email address, and click Invite user.

Supabase sends the invite through SendLayer. Check the inbox to confirm it arrived.
Trigger an Email in Code
You can also fire a real auth email from your app. This magic-link example uses the Supabase JavaScript client:
const { error } = await supabase.auth.signInWithOtp({
  email: '[email protected]',
})
Run it, then check your inbox. A password reset works the same way:
const { error } = await supabase.auth.resetPasswordForEmail('[email protected]')
If the email lands, your SMTP setup works.
Troubleshooting Common Supabase SMTP Issues
Most SMTP problems come down to a few causes. Here’s how to fix them.
Emails aren’t arriving at all. Double-check your host, port, username, and password. One wrong character stops delivery. Confirm custom SMTP is toggled on and saved.
Emails land in spam. This usually means your domain isn’t authenticated. Verify your SPF, DKIM, and DMARC records in SendLayer. Send from your authenticated domain, not a free Gmail or Outlook address.
“Connection refused” or TLS errors. Use port 587 for SendLayer. If your host blocks it, try an alternate port your provider supports.
You hit the rate limit. Raise the email limit at Authentication » Rate Limits. Make sure it doesn’t exceed your SendLayer plan.
Magic links or confirmation links stop working. Some providers rewrite links for click tracking. That breaks Supabase’s single-use links. Turn off link tracking for these emails.
The built-in service still won’t email customers. That’s expected. The built-in sender only reaches your team. Switch to custom SMTP to email real users.
FAQs — Send Email in Supabase
These are answers to some of the top questions developers ask about setting up custom SMTP for email notifications in Supabase.
What is the default email rate limit in Supabase?
The built-in service sends 2 emails per hour, per project. That limit is shared across sign-ups, invites, magic links, and password resets.
Why aren’t my Supabase auth emails being delivered?
The built-in service only delivers to pre-authorized team addresses, and it has no SLA. To reach real users reliably, set up a custom SMTP with a provider like SendLayer.
Should I use port 587 or 465 for Supabase custom SMTP?
Both work. Port 587 uses STARTTLS, and port 465 uses implicit TLS. SendLayer uses port 587. For more information, see our guide explaining the available SMTP ports and when to use them.
Does enabling custom SMTP remove all rate limits?
No. Supabase applies a default limit of 30 emails per hour after you enable custom SMTP. You can adjust it at Authentication » Rate Limits.
Can I use Gmail SMTP with Supabase?
You can, but we don’t recommend it for production. Personal Gmail has strict daily limits and weak deliverability for app email. A transactional provider like SendLayer scales better.
And that’s it! Now you know how to set up Supabase custom SMTP.
Next, want to set up transactional email for another auth platform? Check out our guide to setting up and sending emails in Auth0.
