Are you looking for a Help Scout tutorial to help you set up your account for the first time?
Help Scout is a user-friendly help desk solution, but to get the most out of it and make sure you can provide the highest quality support, it’s important to set up your account properly from the start.
In this Help Scout tutorial, we’ll take you step-by-step through getting started with your Help Scout account, from setting up your mailbox to integrating with your CRM and marketing software, working with the mobile app, and more.
How Does Help Scout Work?
Help Scout works like a shared inbox, providing a help desk solution that’s efficient and flexible. Customers can contact you by email or chat, and your team sends replies from Help Scout. The platform manages and stores all communication in a conversation thread so no messages get lost.
The platform is designed to be a modern and more user-friendly alternative to the traditional customer service ticketing system.
While the backend functionality keeps everything efficient and organized for your support team, categorizing conversations with custom fields like customer type or priority, your users receive messages as normal emails.
There’s no need for customers to log into a support portal or for your support team to assign ticket numbers, and the system lends itself to friendly and natural conversations that improve the customer experience.
Help Scout Tutorial
Help Scout offers a 15-day free trial to all new users. This free trial includes all the features of the full version, and you don’t need to enter credit card details to sign up, so it’s a great way to try out Help Scout if you’re not sure it’s the right help desk software for your team.
1. Sign Up for Help Scout
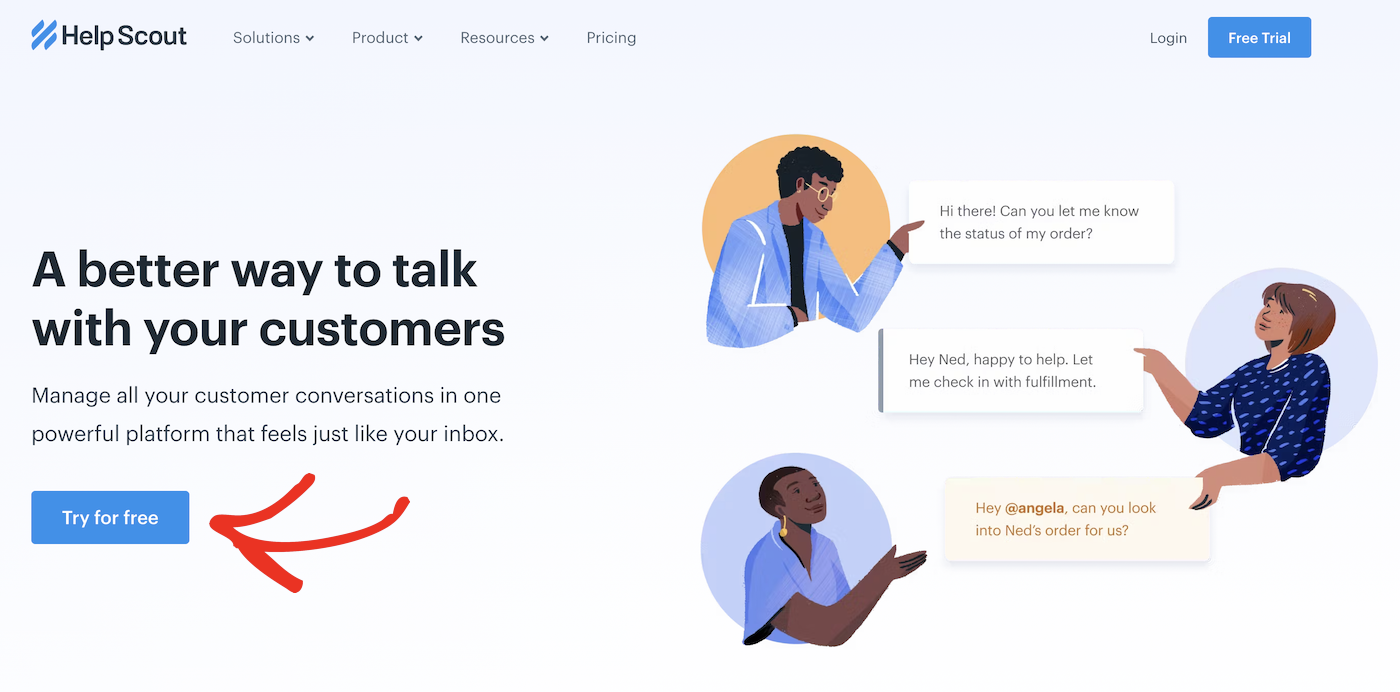
If you don’t already have a Help Scout account, head over to HelpScout.com and click the Try for free button.
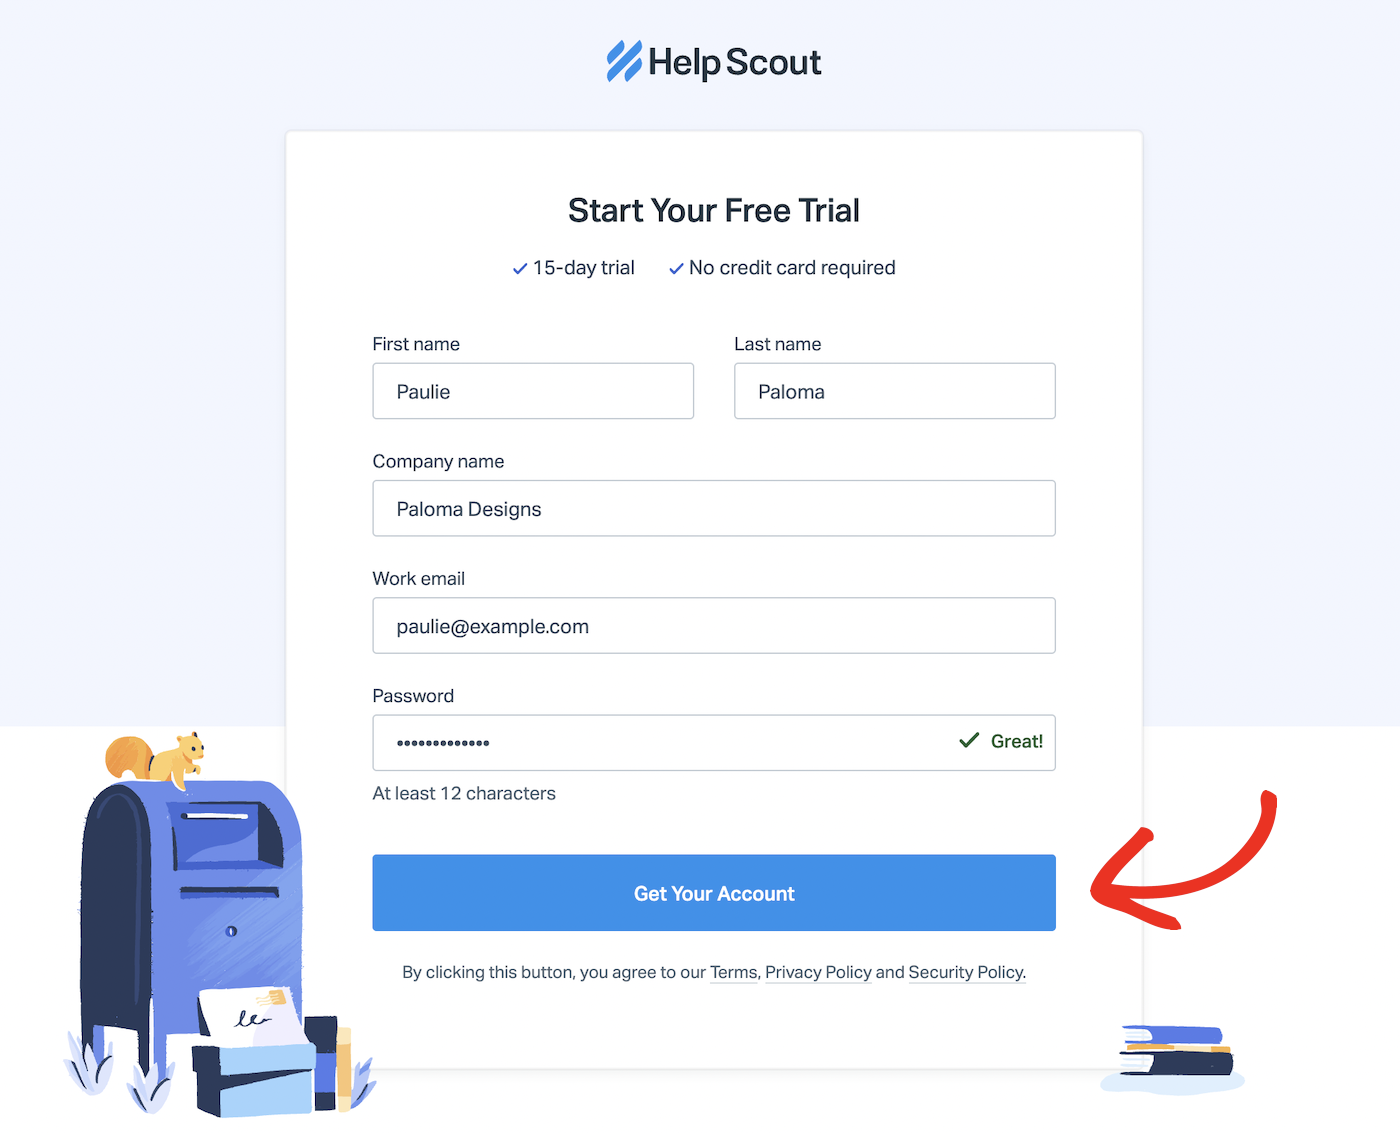
After clicking the free trial button, you’ll see a signup form where you should fill out your name, company name, email, and chosen password. Click the Get Your Account button to create your Help Scout account.
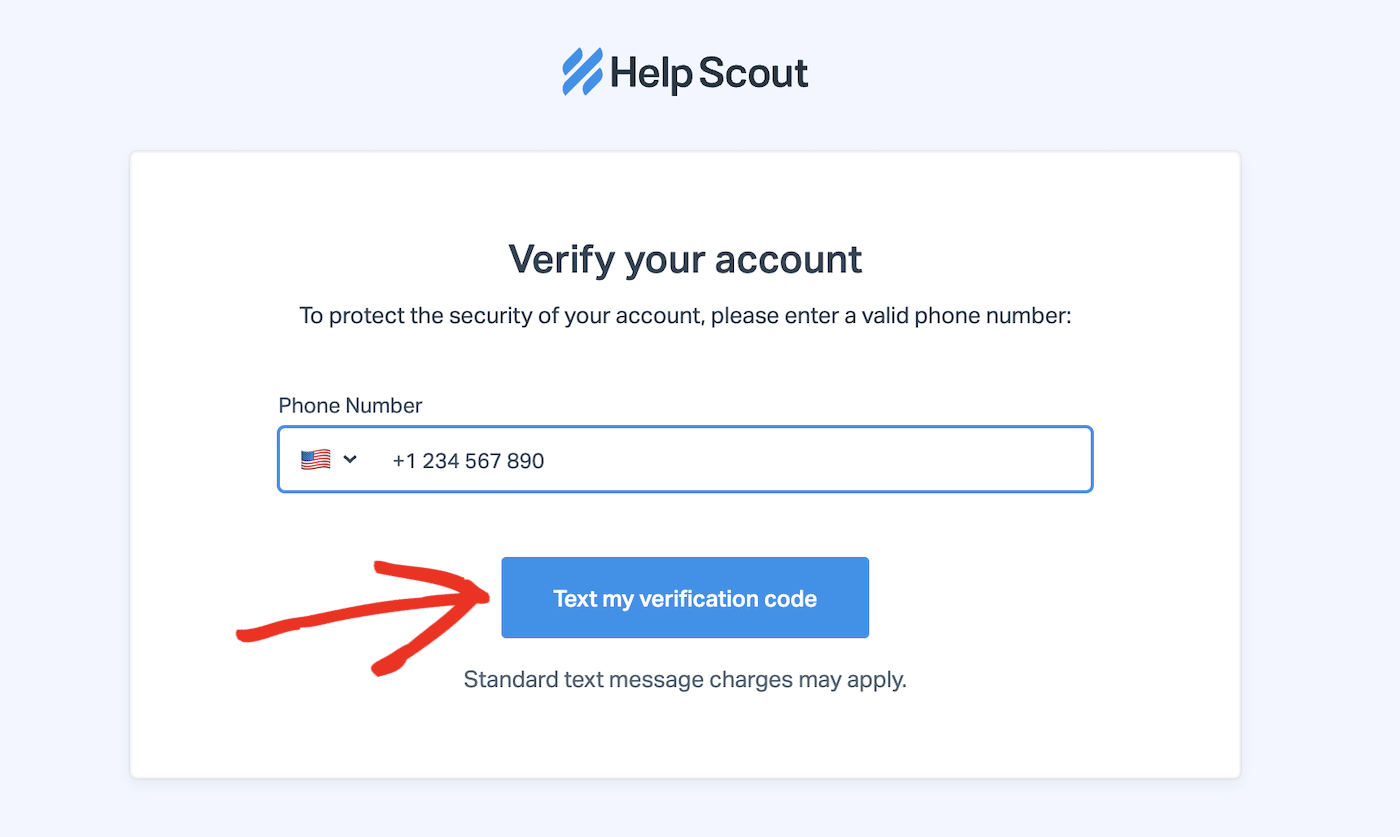
You’ll then need to enter a phone number for Help Scout to send a verification account. Select your country, enter your number, and click Text my verification code.
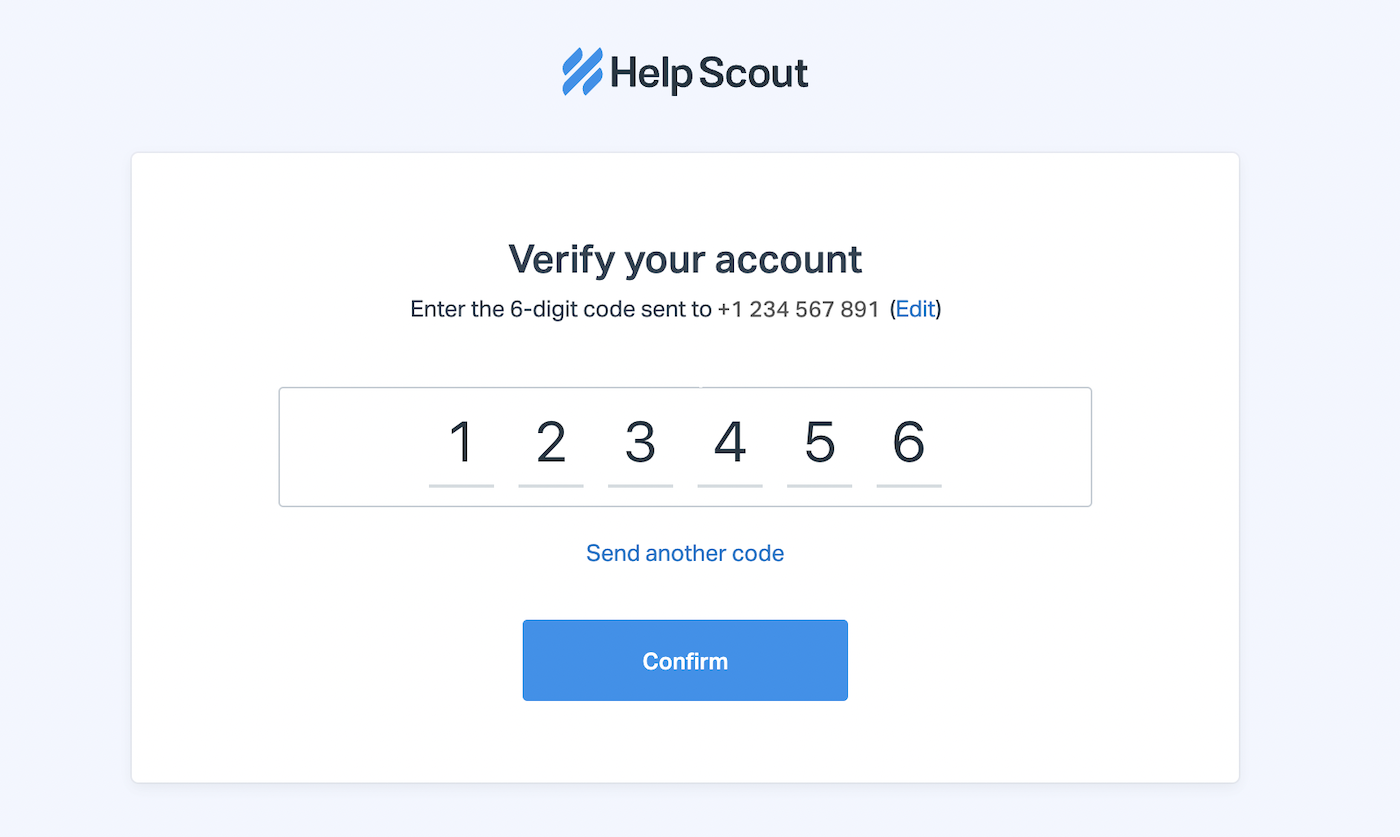
When you receive the SMS verification code, fill it out in the form and click the Confirm button to verify your phone number.
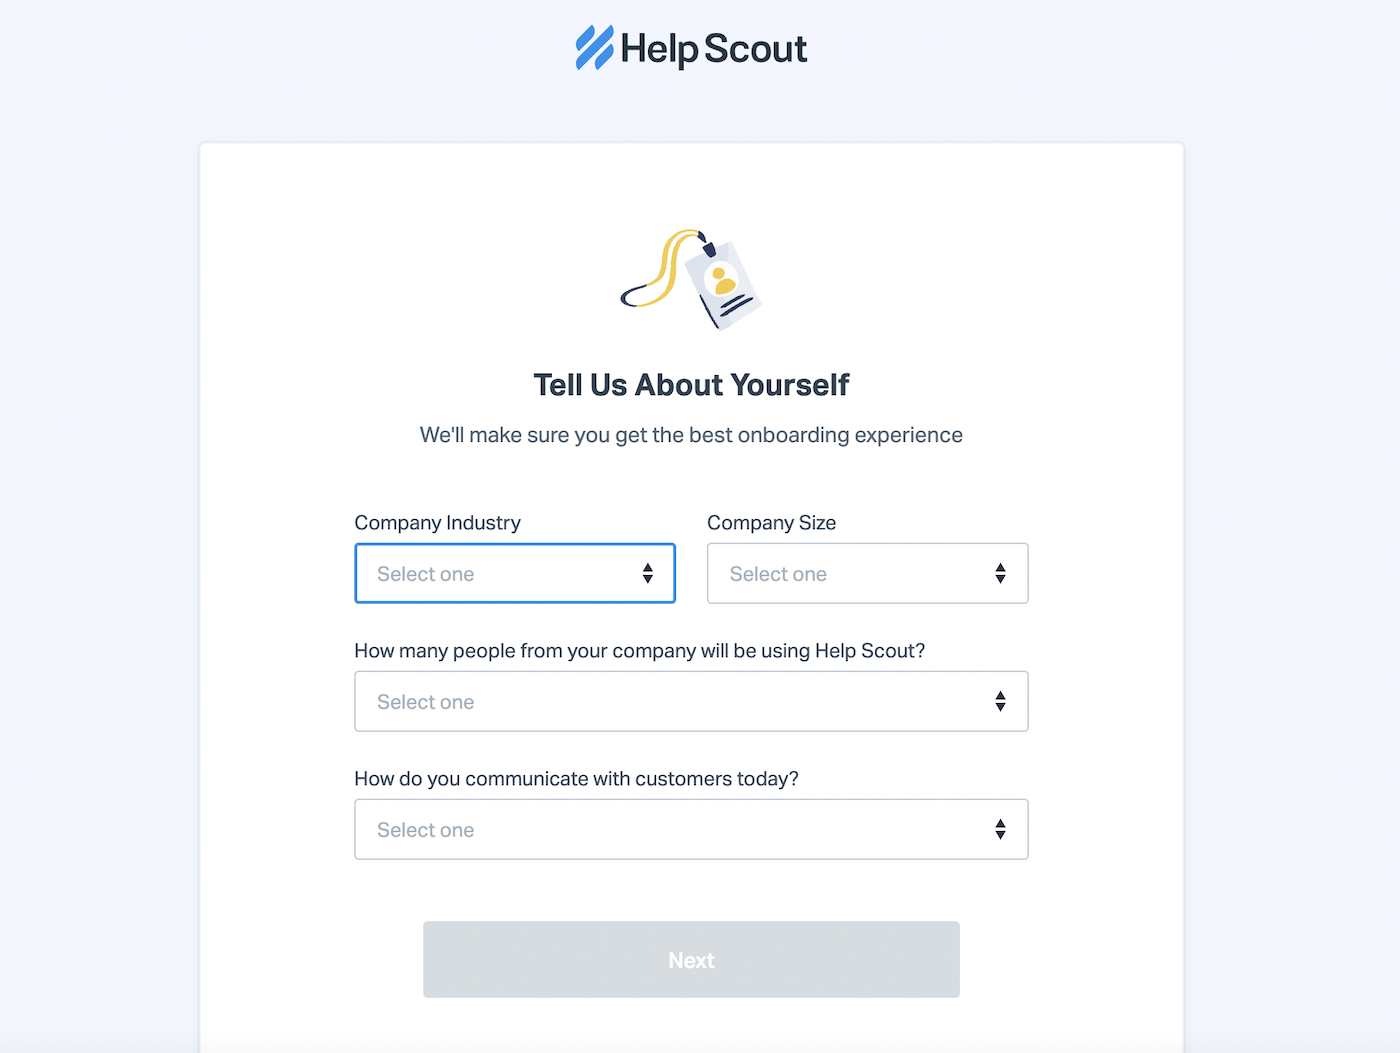
The next step is to fill out some basic information about your company and team. This allows Help Scout to customize the onboarding process to make it more helpful for you.
Click the Next button when you’ve finished filling out the form.
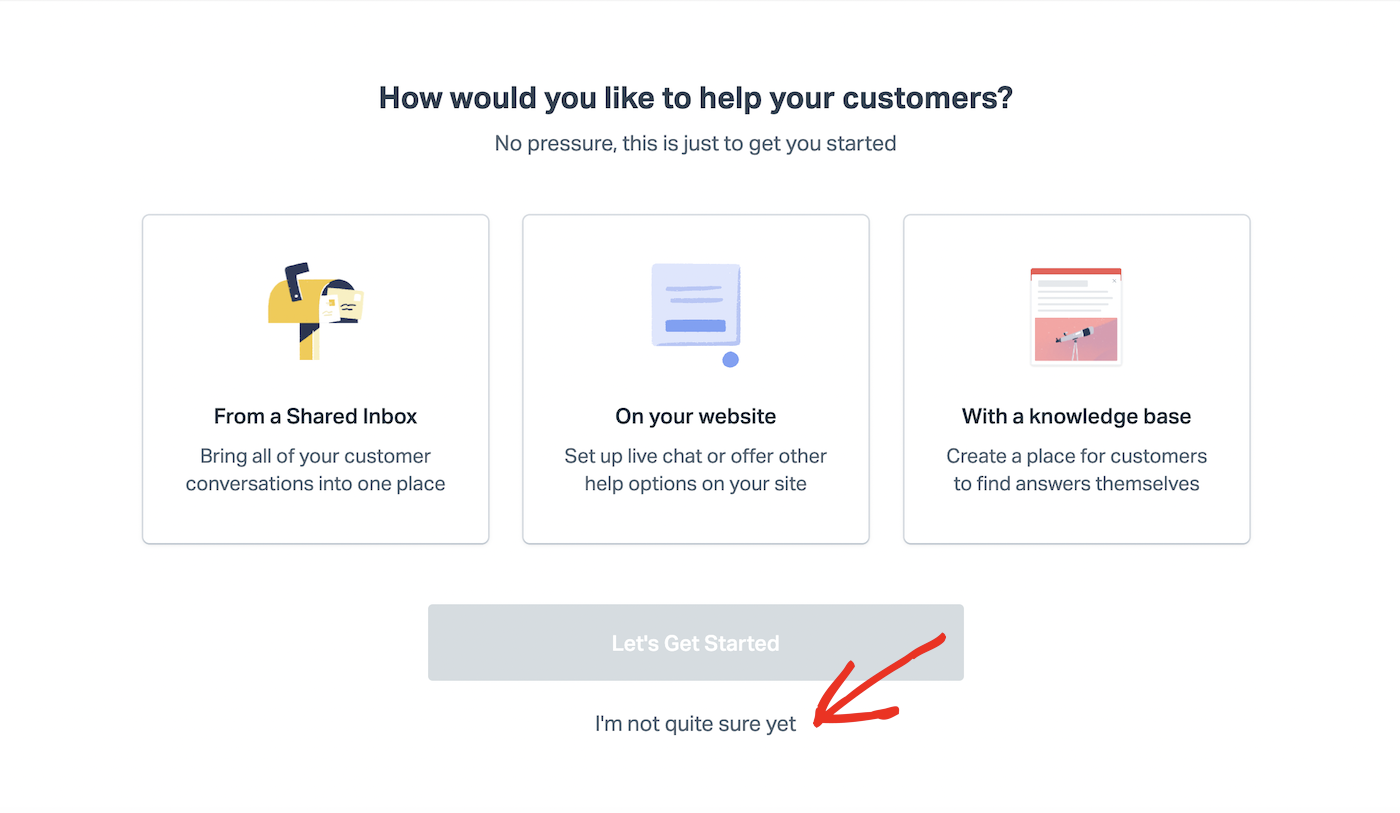
Help Scout will also ask you about the type of help desk you want to set up. This doesn’t limit your account in any way, but for now, we suggest clicking the “I’m not quite sure yet” link.
The next step in the signup process is creating a mailbox. This is where you’ll manage and organize all your customer conversations.
Fill out the Help Scout subdomain you want to use for your mailbox (your company name is the obvious choice), the name you want to call your mailbox, and your support email address. You can link a custom email address (such as [email protected]) to your Help Scout mailbox address later.
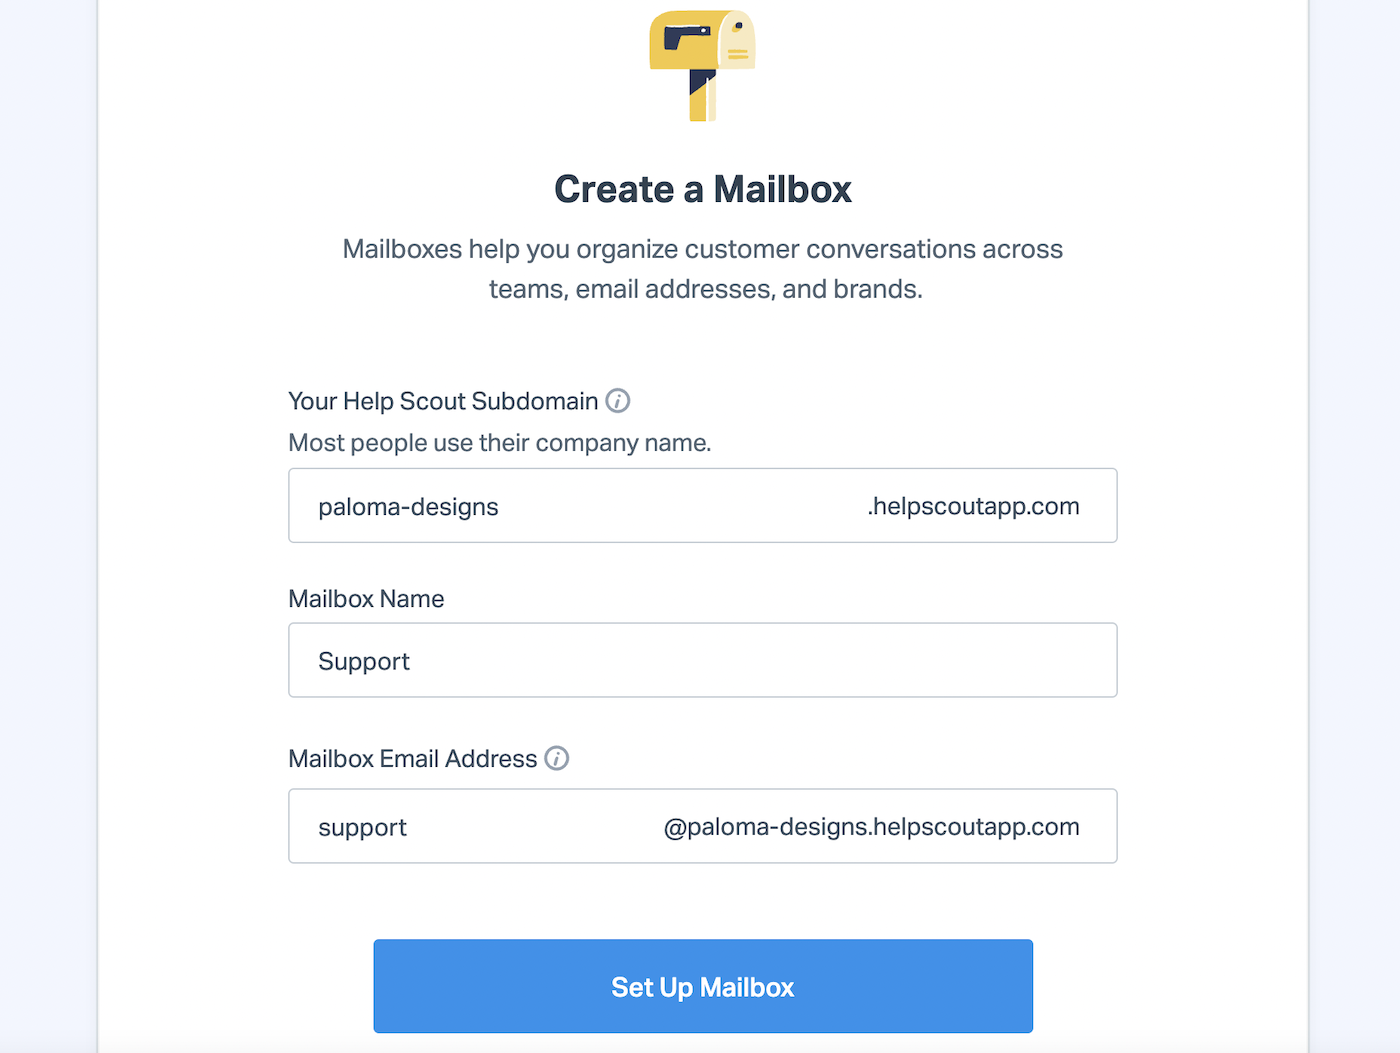
Click the Set Up Mailbox button to create your mailbox.
2. Connect Your Email
After setting up your mailbox, click the Connect Your Email button.
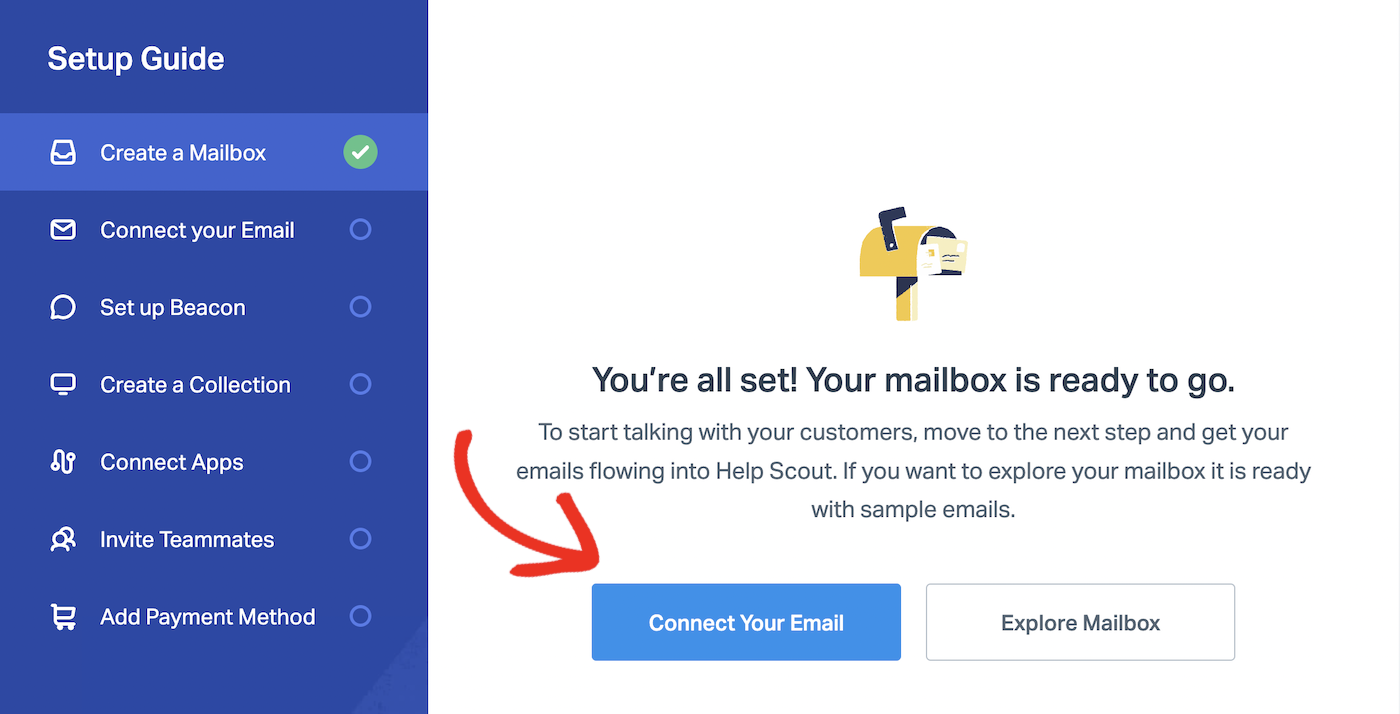
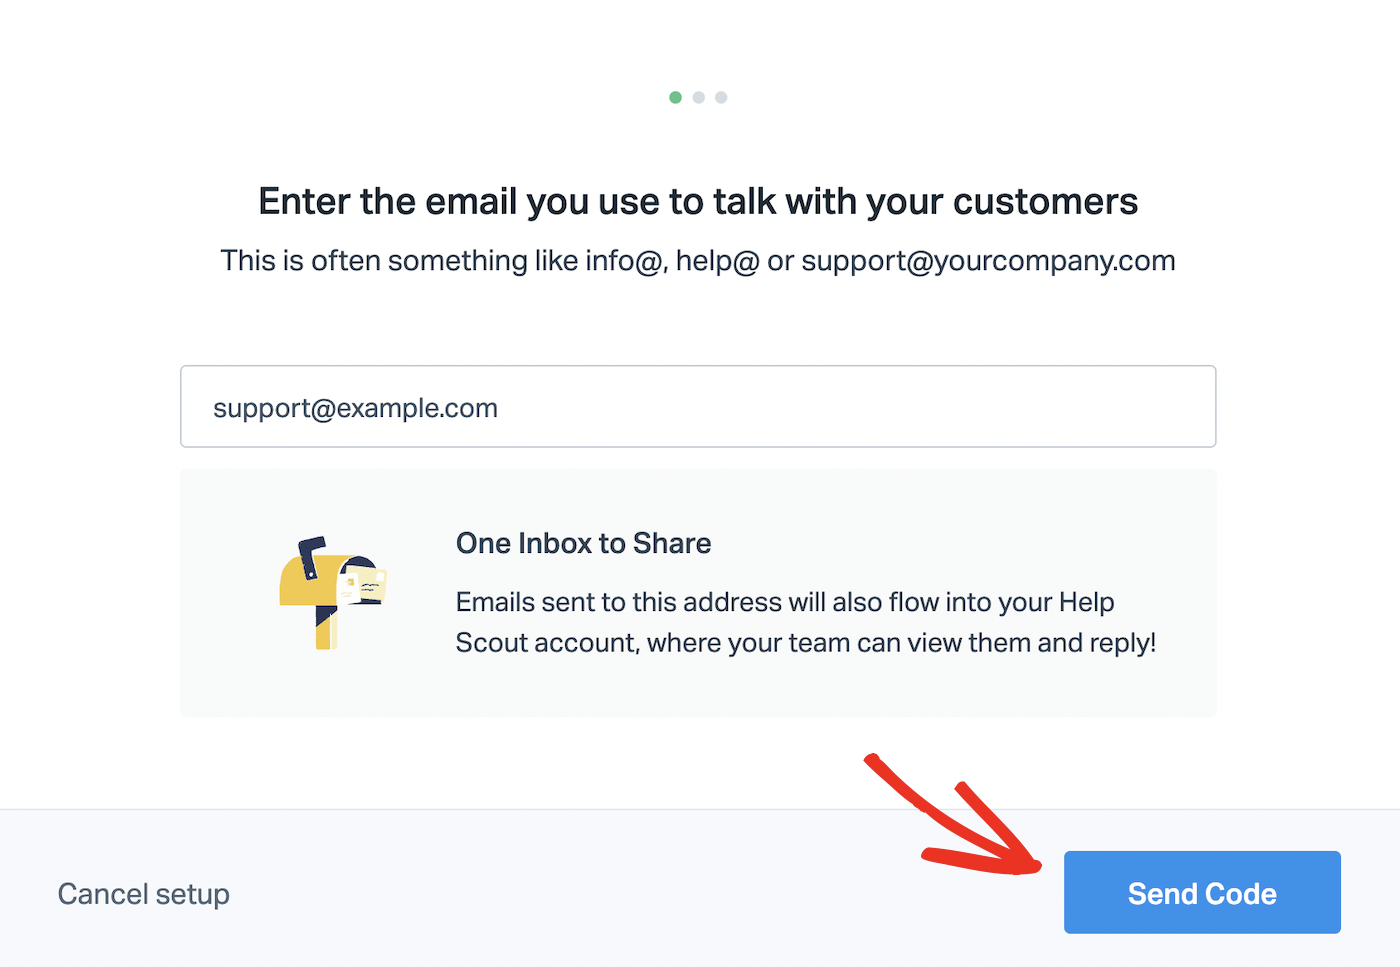
Enter the email you want your customers to contact you on when they need support. This is usually something like “[email protected]” or “[email protected].”
Click the Send Code button and check your email for the confirmation code.
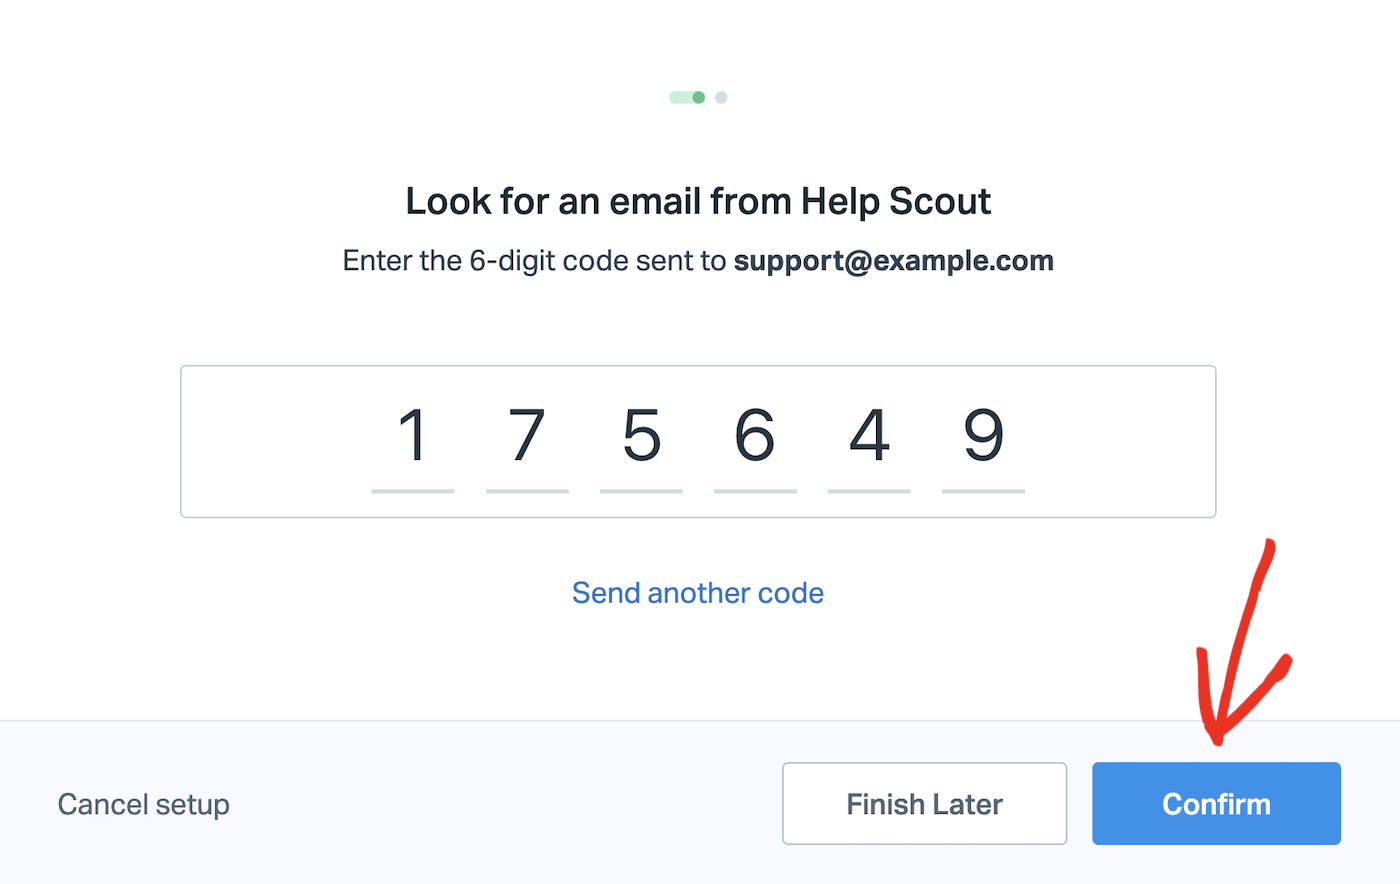
Enter the code that you receive at your support email address and click the Confirm button.
3. Set Up Email Forwarding
The next step is to open a new browser tab and go to your email provider so you can automatically forward emails from your main support email (e.g. [email protected]) to your Help Scout mailbox (e.g. [email protected]).
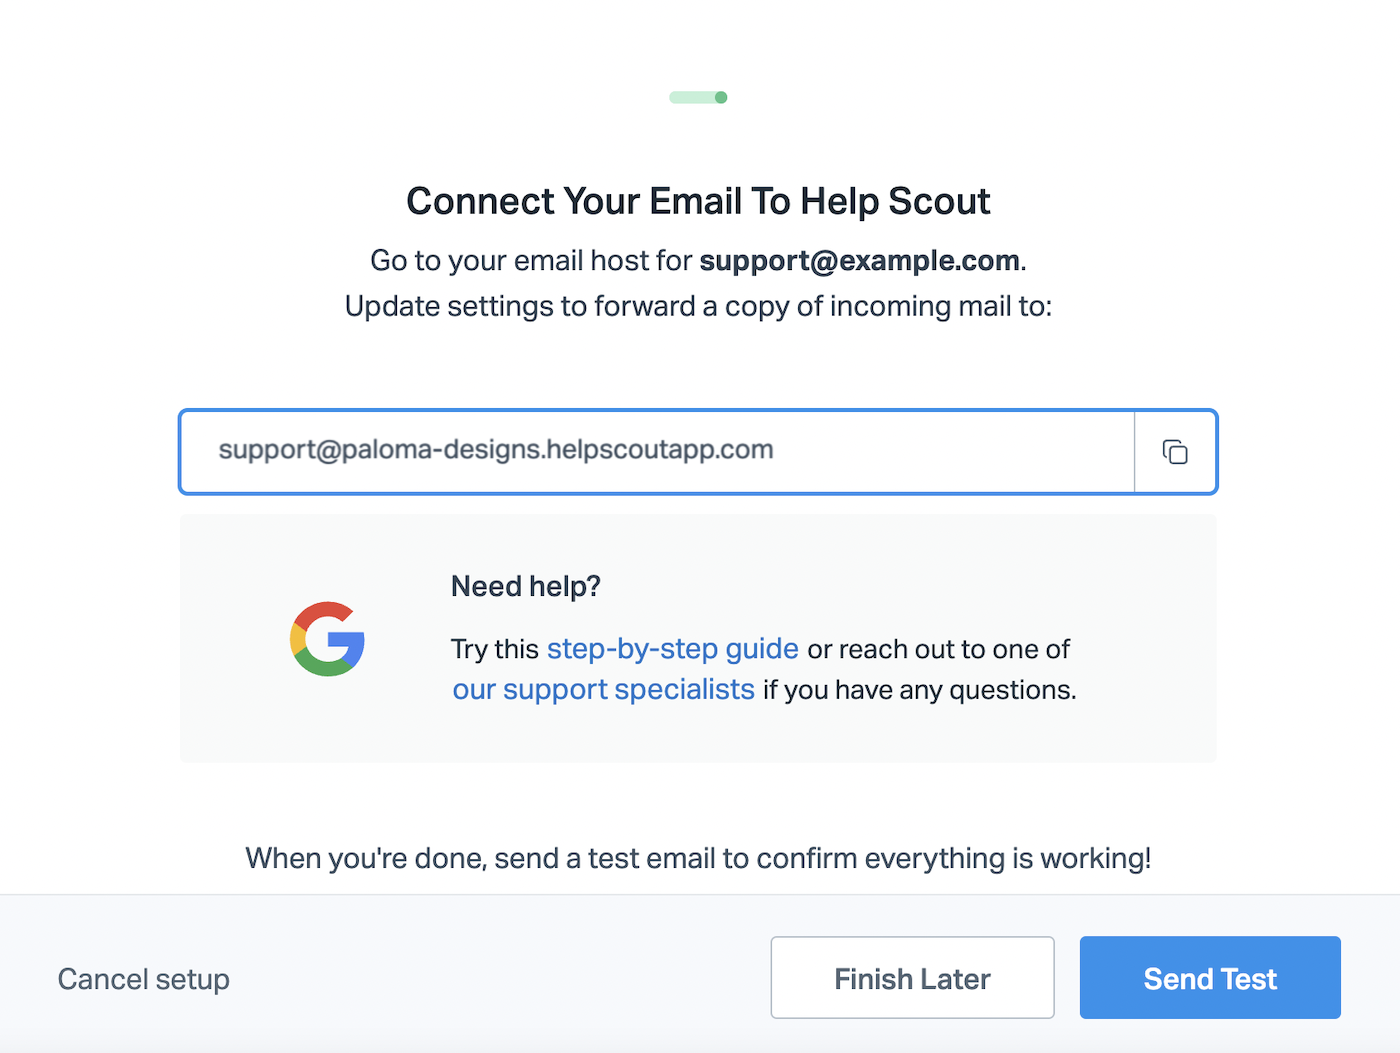
If you’re using Gmail, you can follow the steps below. Follow the detailed steps provided by Help Scout if you want to forward emails from a Google Workspace group or aliases. Or consult your email host for full instructions on how to set up email forwarding on their servers.
Setting Up Email Forwarding in Gmail
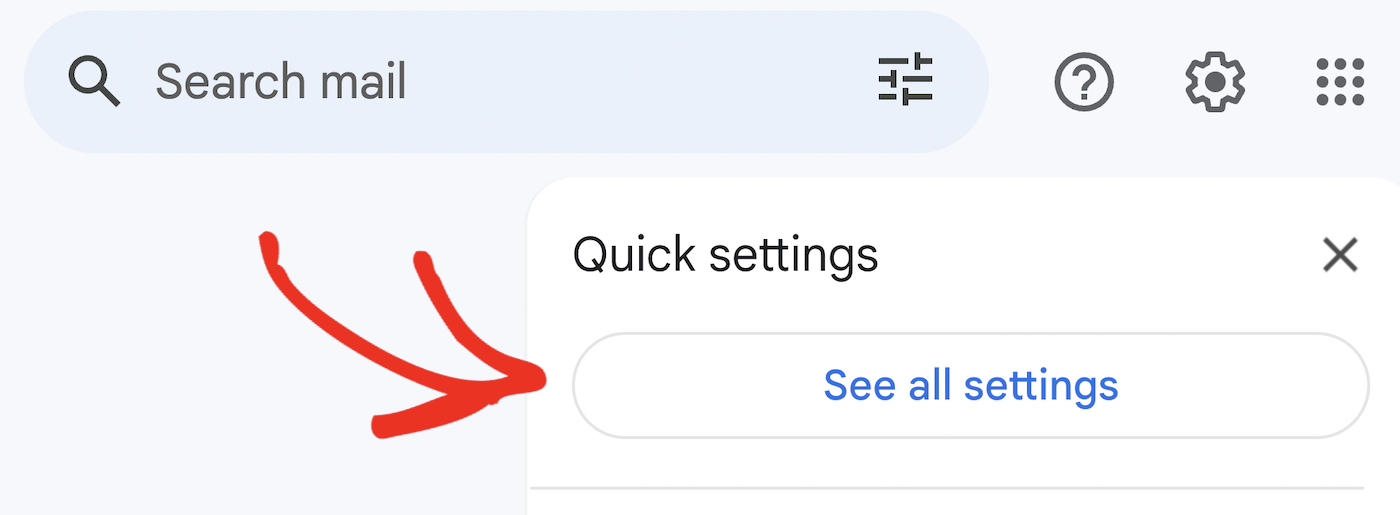
In Gmail, click on the gear icon in the top right corner to open settings. Click the See all settings button.
Click the Forwarding and POP/IMAP tab, and under Forwarding: click the Add a forwarding address button.

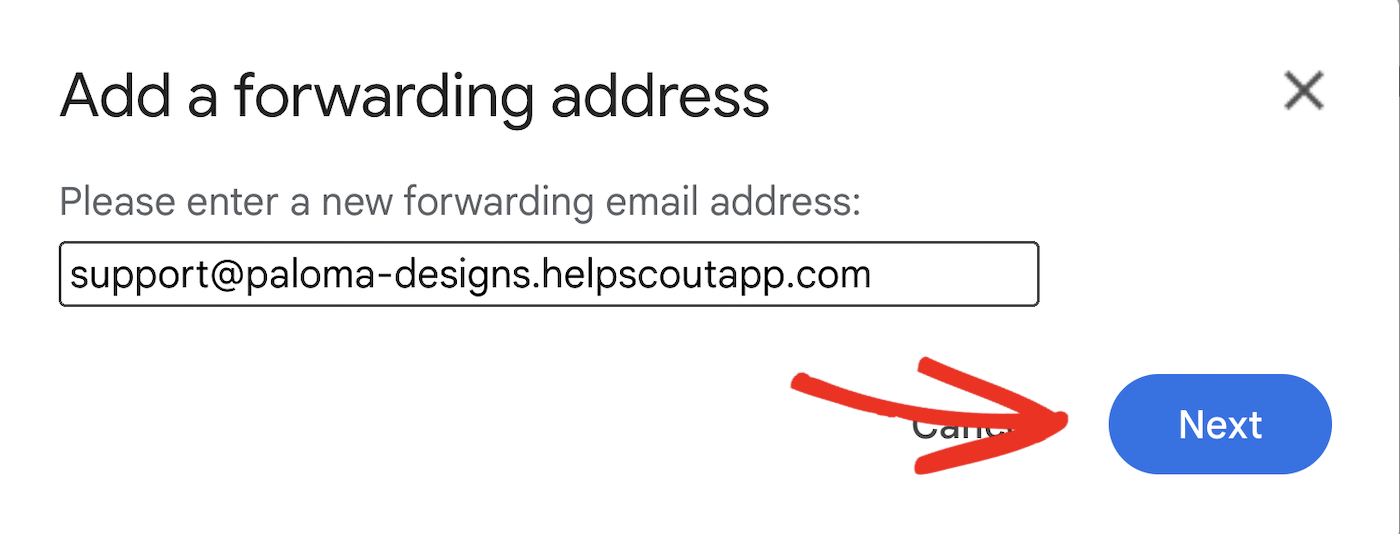
Enter the Help Scout mailbox you just set up (e.g. “[email protected]) and click the Next button.
In the popup window, click the Proceed button to confirm forwarding to your Help Scout mailbox.

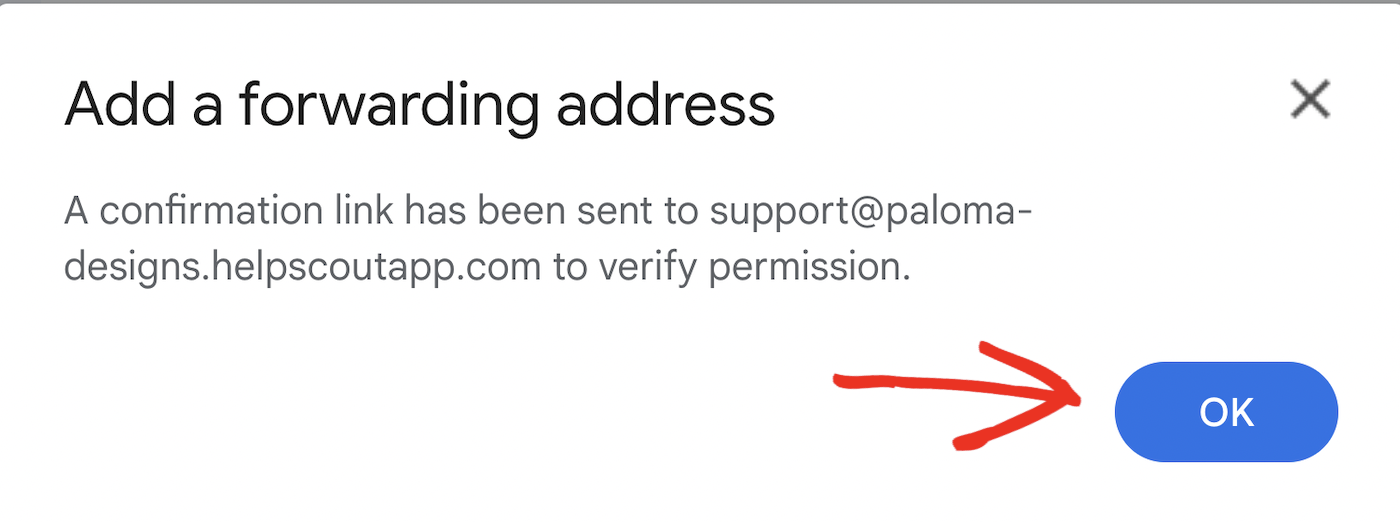
You’ll see a message that a confirmation email has been sent to your Help Scout email. Click OK to close the popup.
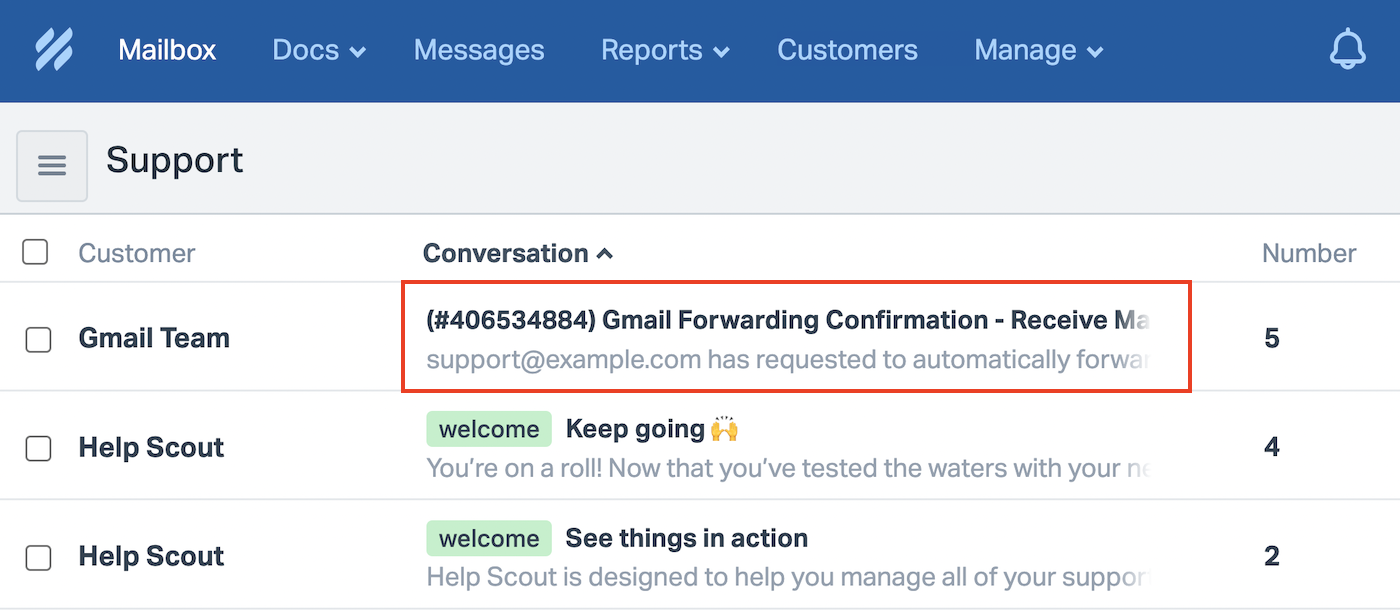
Open your Help Scout dashboard in a new tab and click the Mailbox tab.

You should see the confirmation email from Gmail in your mailbox.
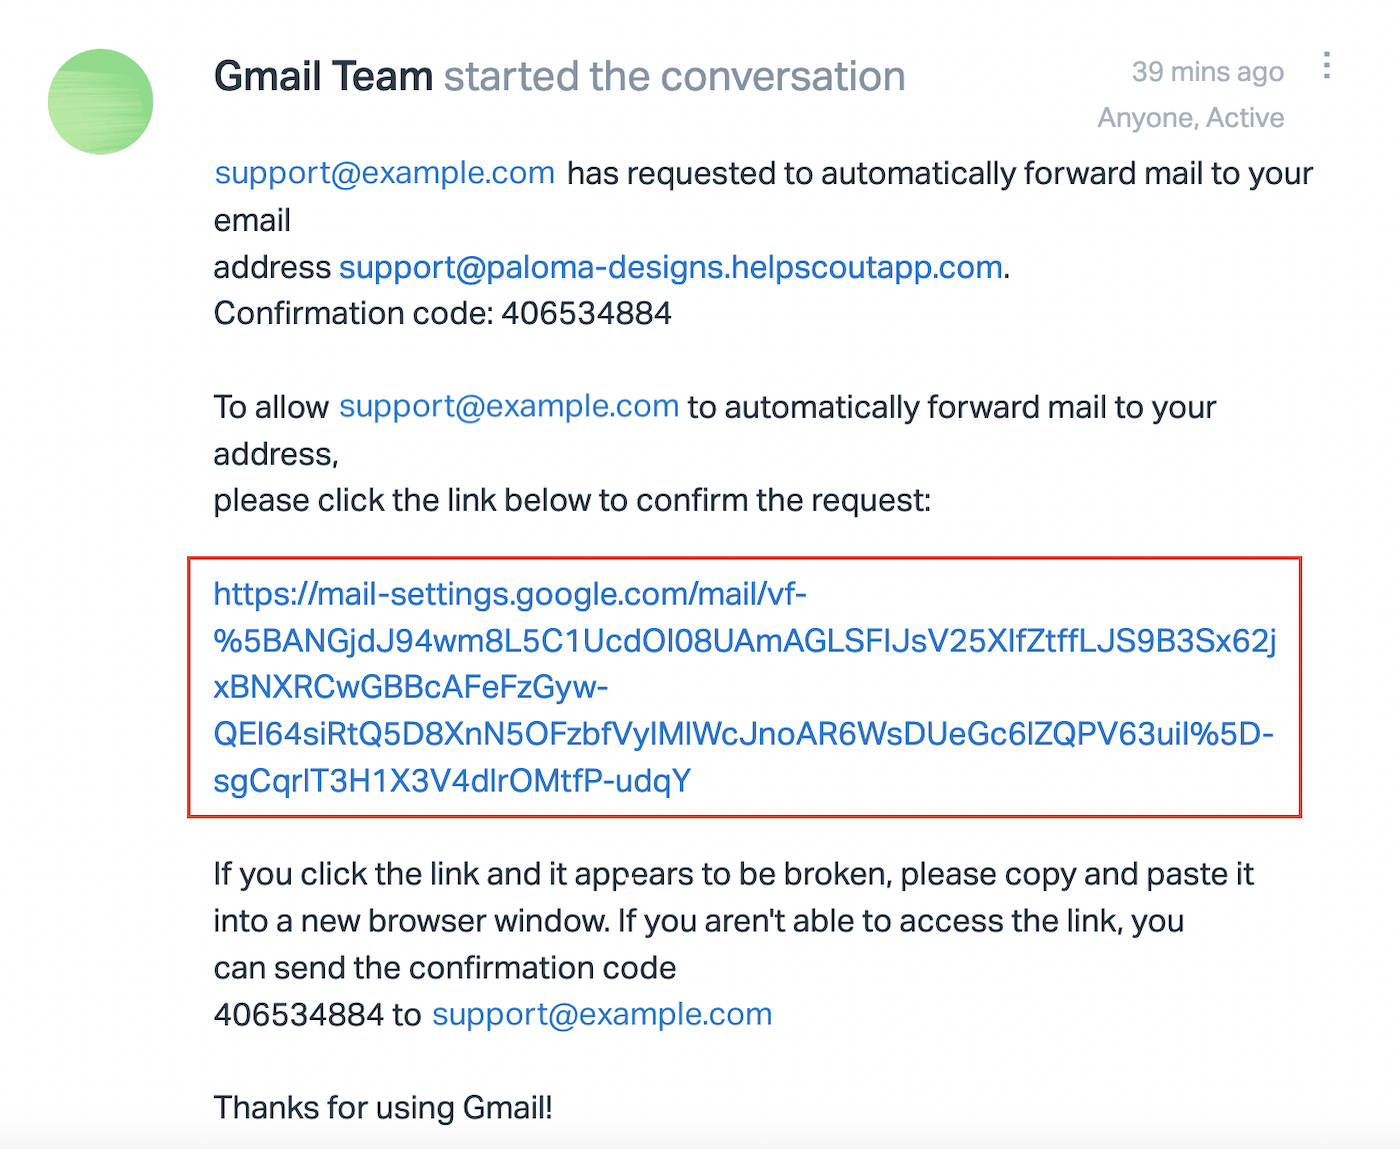
Click the link inside the email to confirm, and you’ll see a message from Gmail stating the forwarding is set up.
You’ll need to click one more Confirm button to complete the setup.
Now go back into your Gmail settings (you’ll need to refresh if you haven’t left the page) and make sure to select the radio button to “Forward a copy of incoming email to…“
You can also choose whether you want Gmail to keep a copy of the forwarded email in the inbox, mark it as read, archive it, or delete it.
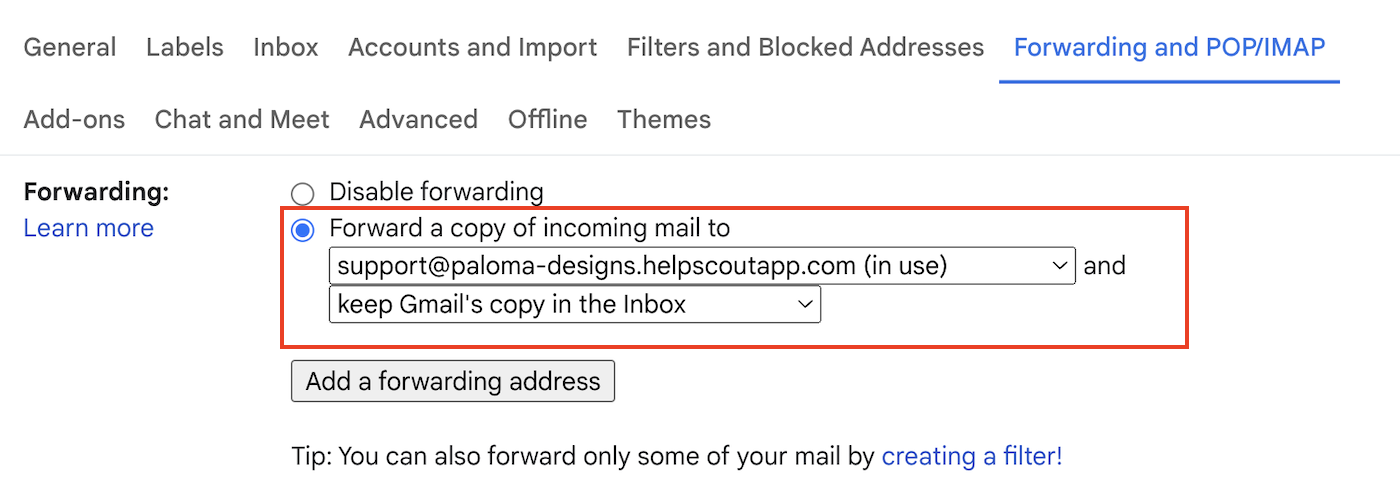
Make sure to scroll down and click the Save changes button at the bottom of the page before leaving settings.
Once you’ve set up email forwarding, you can go back to the Help Scout tab and navigate to Manage » Mailbox.
Click on your mailbox to open the settings, and then click the Send Test button to make sure your email forwarding is set up correctly.
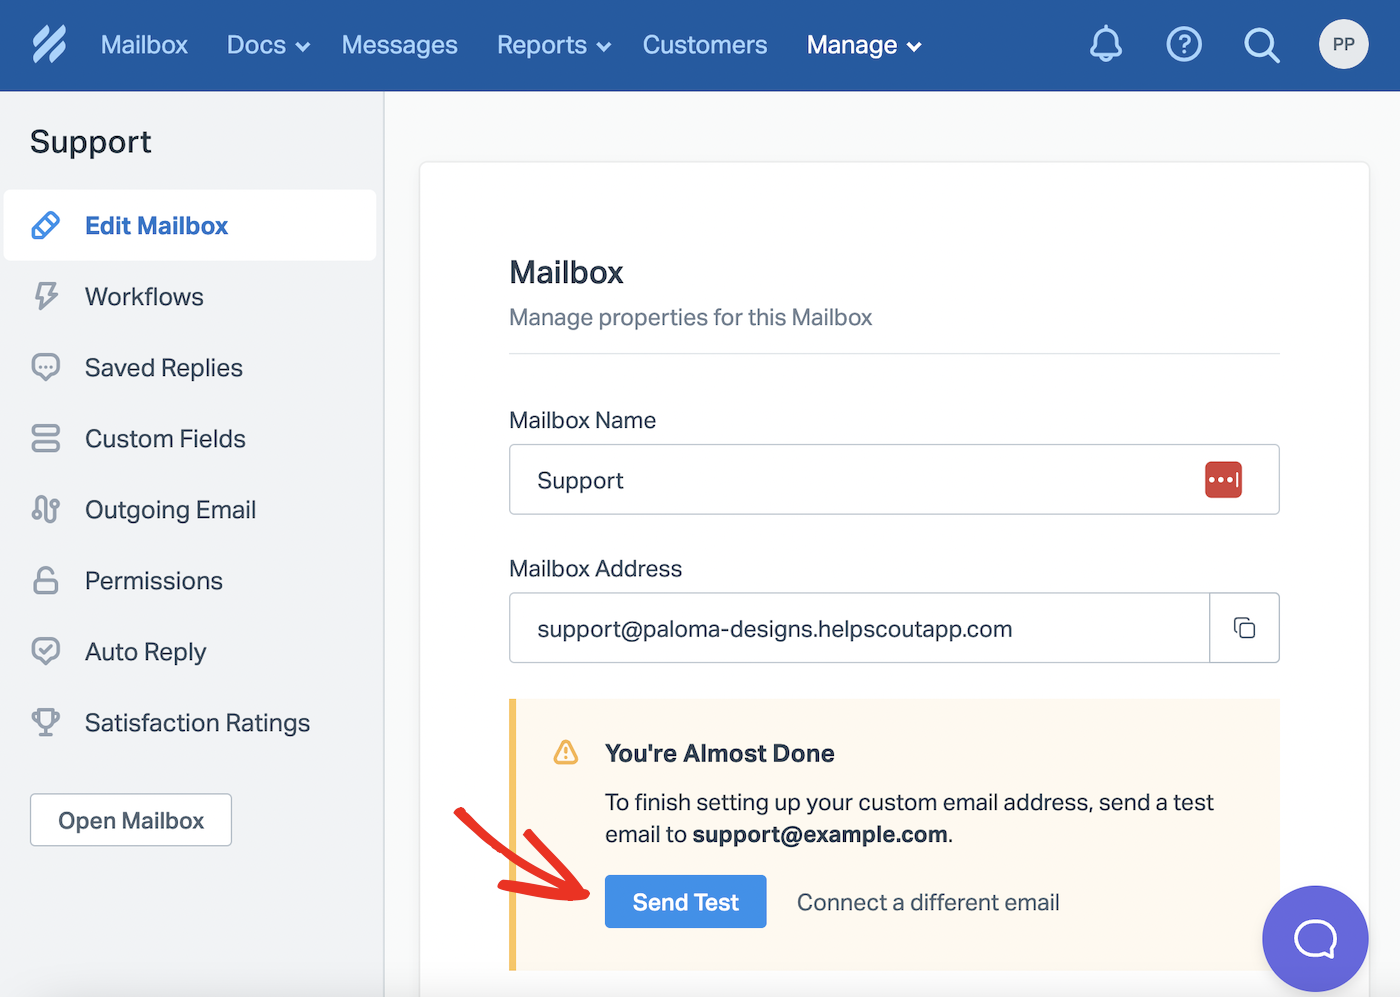
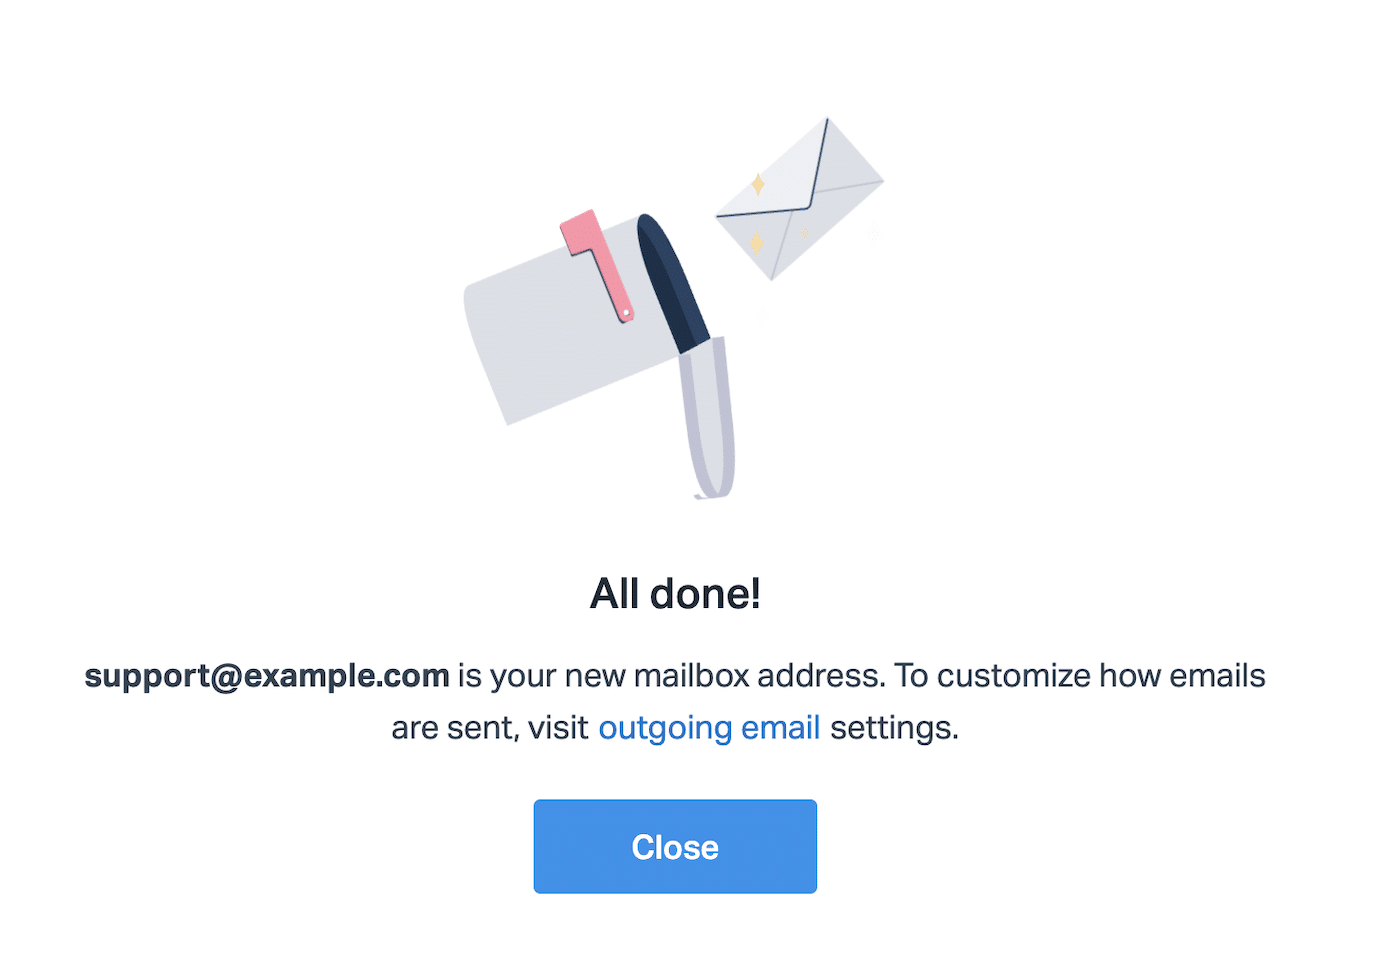
You’ll see a message saying that your test email is sent, and then if all goes well, you should see a confirmation message that your support email has been linked to your mailbox.
If you now go into your Help Scout mailbox, you should see the test email.
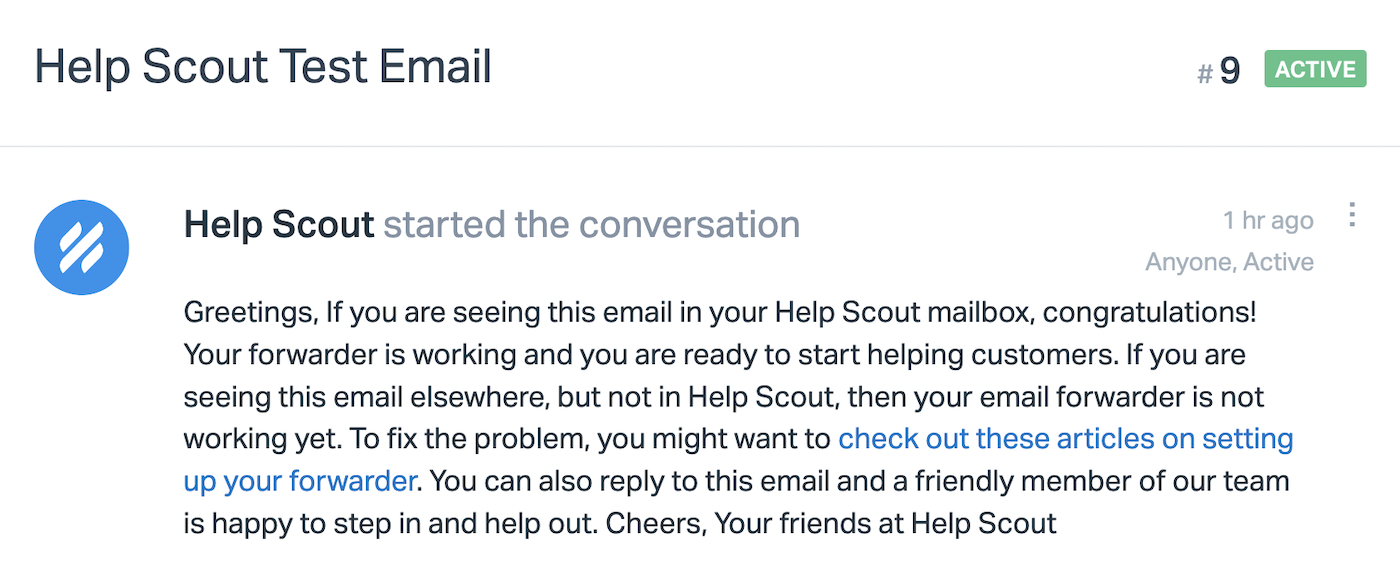
Note: After setting up forwarding in Gmail, you should no longer reply to any messages from your Gmail inbox. You should send all replies and messages within Help Scout to avoid breaking the conversation link.
4. Configure Outgoing Mail Settings
You have two options for setting up outgoing mail in Help Scout: You can either use Help Scout servers or use SMTP to send mail via your own servers.
There are a couple of issues with leaving the default setting of Help Scout to handle your outgoing email:
Firstly, your support emails will show in the user’s inbox as via helpscout.net or on behalf of your domain for authentication purposes.

Secondly, and more importantly, some mail servers may block emails sent from Help Scout in this way. This is because they can look similar to “spoofed” emails, which are emails sent from one domain but made to look like they’re sent from another.
Email spoofing is often used for malicious purposes, so some mail clients and services are set up to block any suspicious emails before they reach the user’s inbox.
Improving Help Scout Email Deliverability
You can adjust your DNS settings to create a Sender Policy Framework (SPF) record to get around this problem. This shows that you’ve given Help Scout permission to send emails from your domain.
Using SPF will improve deliverability and help to prevent your emails from being marked as spam, but it’s not 100% foolproof – some mail servers may still block emails if they’re not being sent directly from your domain.

When you’re running a business, it’s crucial your emails are delivered to the intended recipient. This is even more important when you’re running a help desk.
Users expect to receive replies to their support requests quickly, and it can be incredibly frustrating for them to be kept waiting. If your Help Scout emails are being blocked, marked as spam, or not ending up in the recipient’s inbox for any reason, this could damage your company’s reputation and result in lost business.
The best way to ensure your emails from Help Scout are delivered is to set it up to use custom SMTP.
Using Custom SMTP With SendLayer in Help Scout
You can connect to Google’s SMTP servers with OAuth directly or enter custom SMTP settings for another mail provider in your mailbox settings.
However, for maximum deliverability and control over your email, we recommend using an SMTP email service like SendLayer.
SendLayer ensures the deliverability of emails sent from your website or third-party apps and services by authenticating your domain as a reputable email sender and routing your emails through infrastructure designed for optimal speed and reliability.
If this is all starting to sound a bit complicated, don’t worry! You can think of SendLayer as being an ultra-reliable courier service that delivers your mail for you. And you don’t need to understand the ins and outs of how it works to use it successfully.
Sending your emails via SendLayer means they’re almost guaranteed to hit the recipient’s inbox quickly and without being marked as spam. So you’ll know when you send a reply to a support request, it won’t go missing or be delayed.
Plus, SendLayer collects data and metrics about your email and displays it in a user-friendly, real-time report dashboard so you can see at a glance how many emails you’ve sent, their delivery status, and if they’re being opened or email links are being clicked.
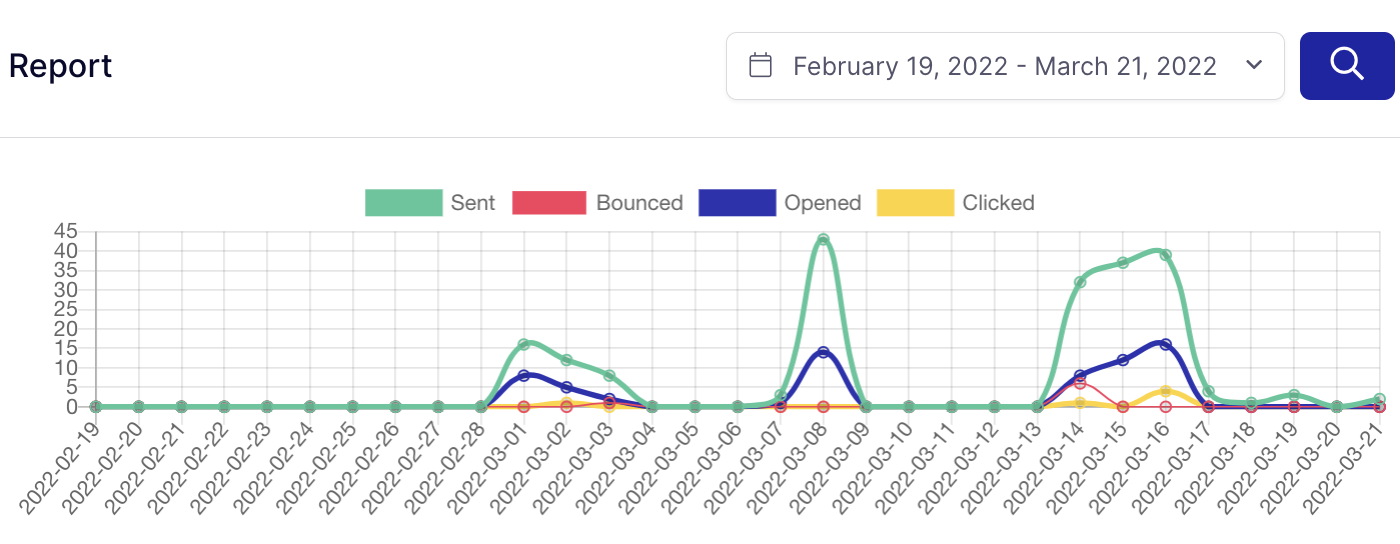
SendLayer is quick and easy to set up, and support is available if you need it. As well as being a useful tool for Help Scout, you can also use it for sending any kind of transactional emails, including account notifications, order confirmations, password resets, and more.
Create a SendLayer Account
To get started with SendLayer, head over to the pricing page, choose your plan, and click the Get Started button.
If you want to try out SendLayer before signing up for a paid plan, click the link for the free trial at the bottom of the pricing table.
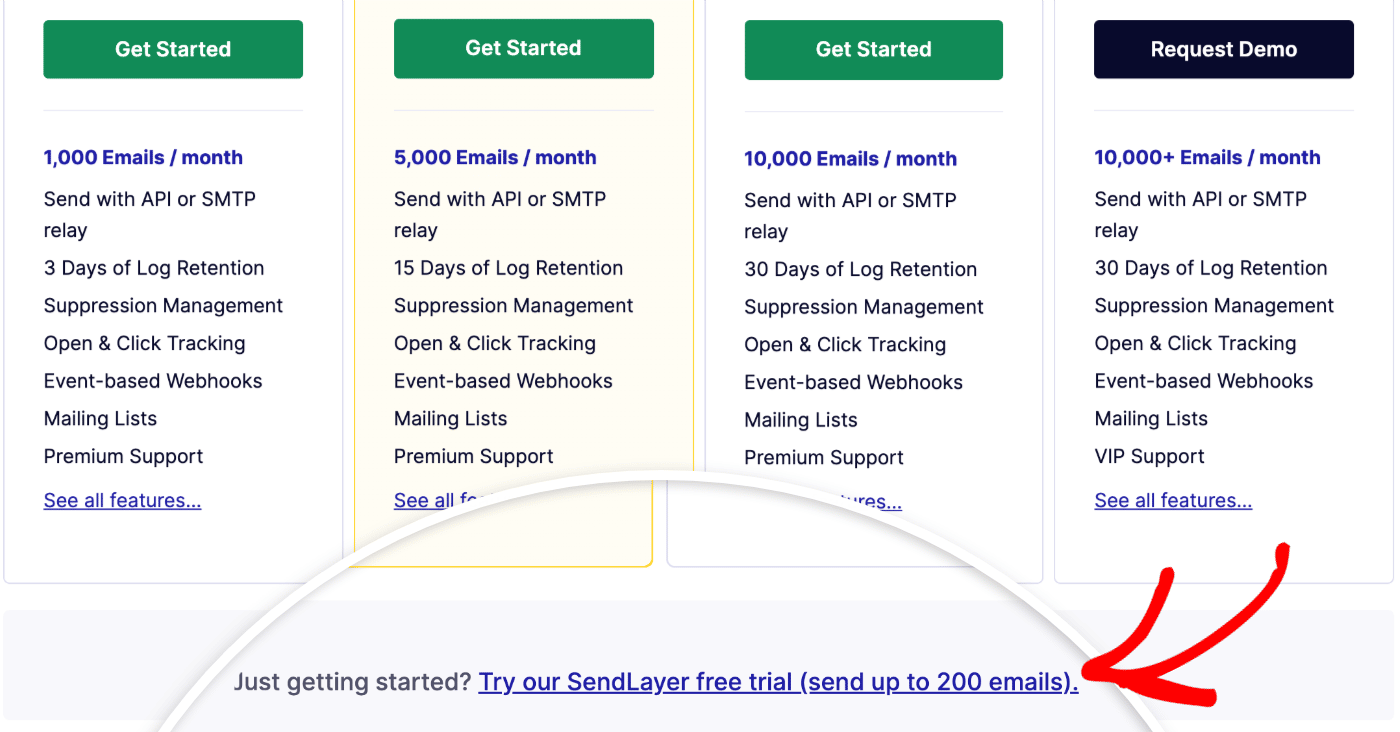
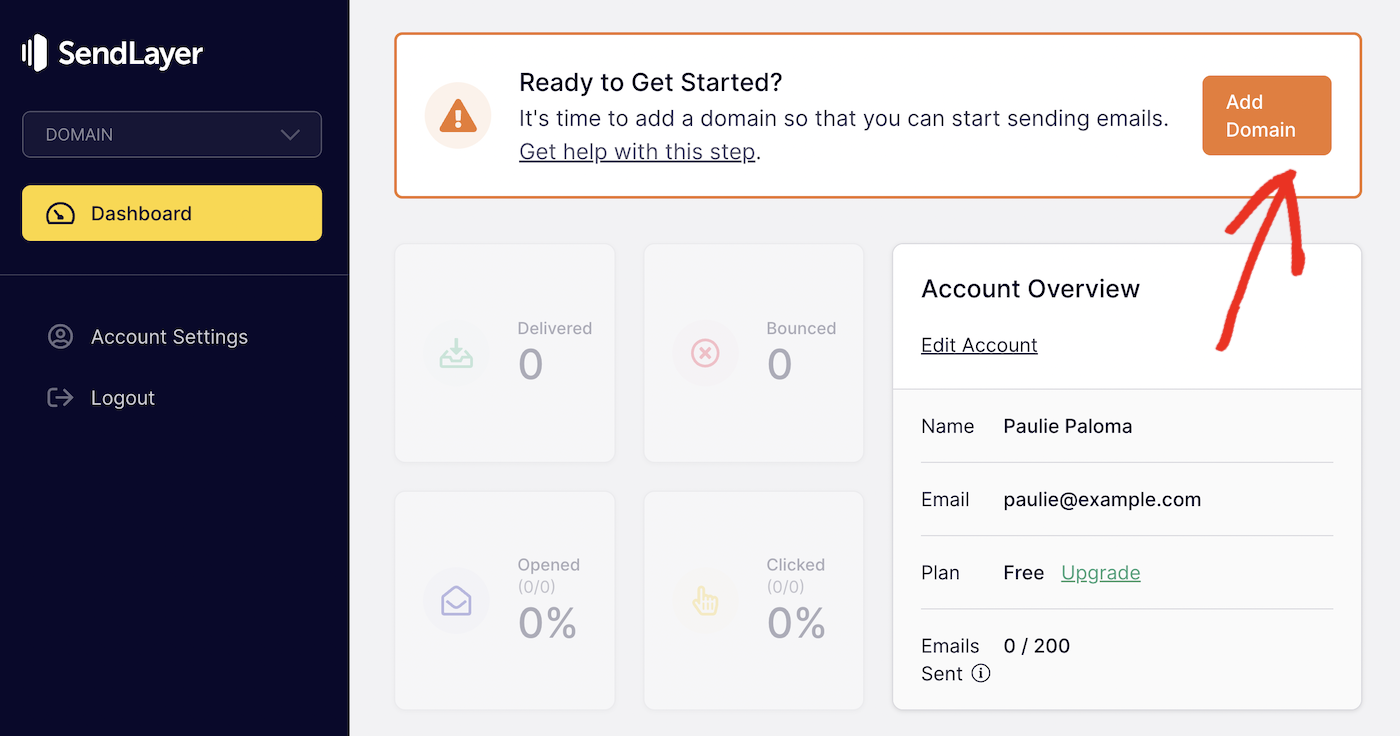
Once you’ve created your account, log into your SendLayer dashboard.
Adding and Authorizing Your Domain
The first step of setting up your SendLayer account is to add the domain you’ll be sending support emails from. Click the Add Domain button in the top right to get started.
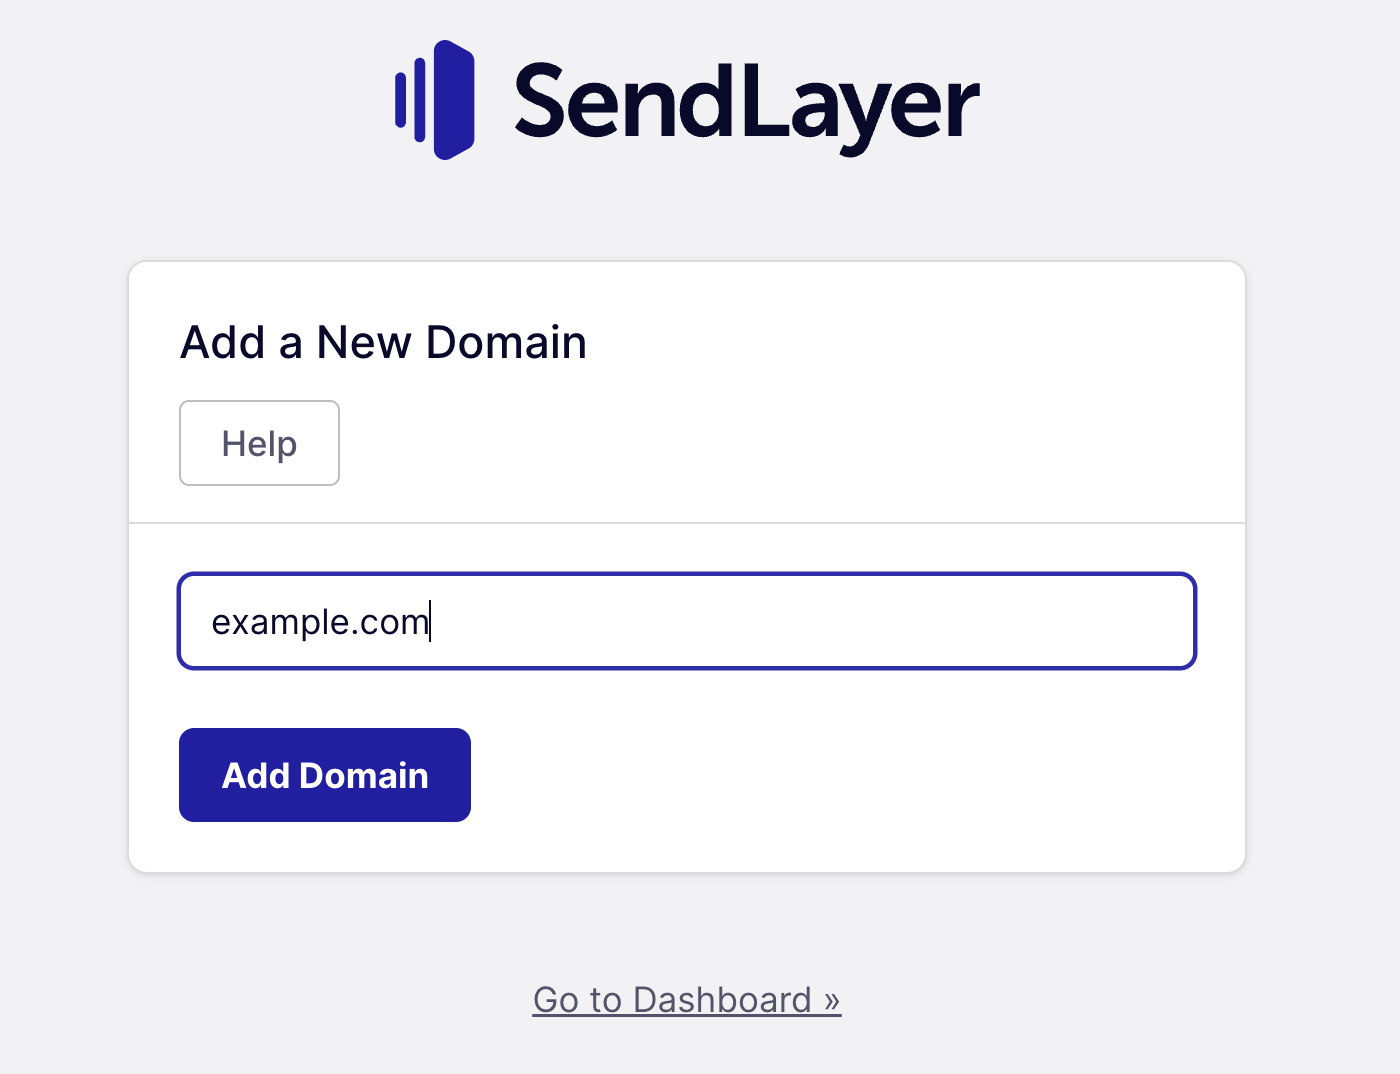
Type in your domain and click the Add Domain button.
SendLayer will generate 5 new DNS records for you. You’ll need to add these DNS records to your domain DNS settings in your web hosting account. You can follow our domain setup guide for more help with this.
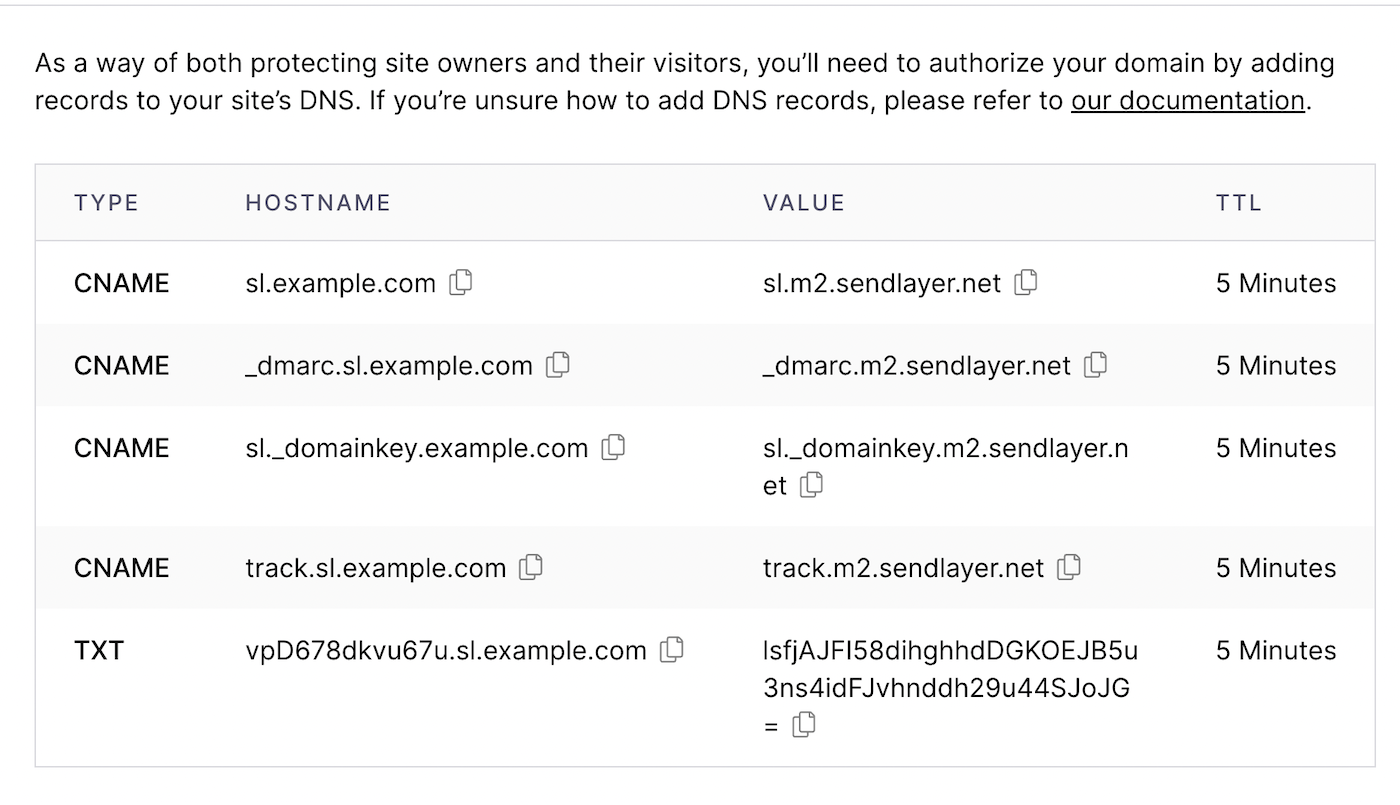
Once you’ve added all 5 DNS records to your domain, go back to SendLayer, tick the box, I have added these DNS records and am ready to proceed, and click the Verify DNS Records button.

Before you can use your SendLayer SMTP settings, make sure your domain has been authorized. You can do this by clicking on Settings in the sidebar menu of your SendLayer dashboard and scrolling down to the DNS Records & Settings section.
If SendLayer has been able to verify your domain’s DNS records, you should see a green checkmark in the Status column.
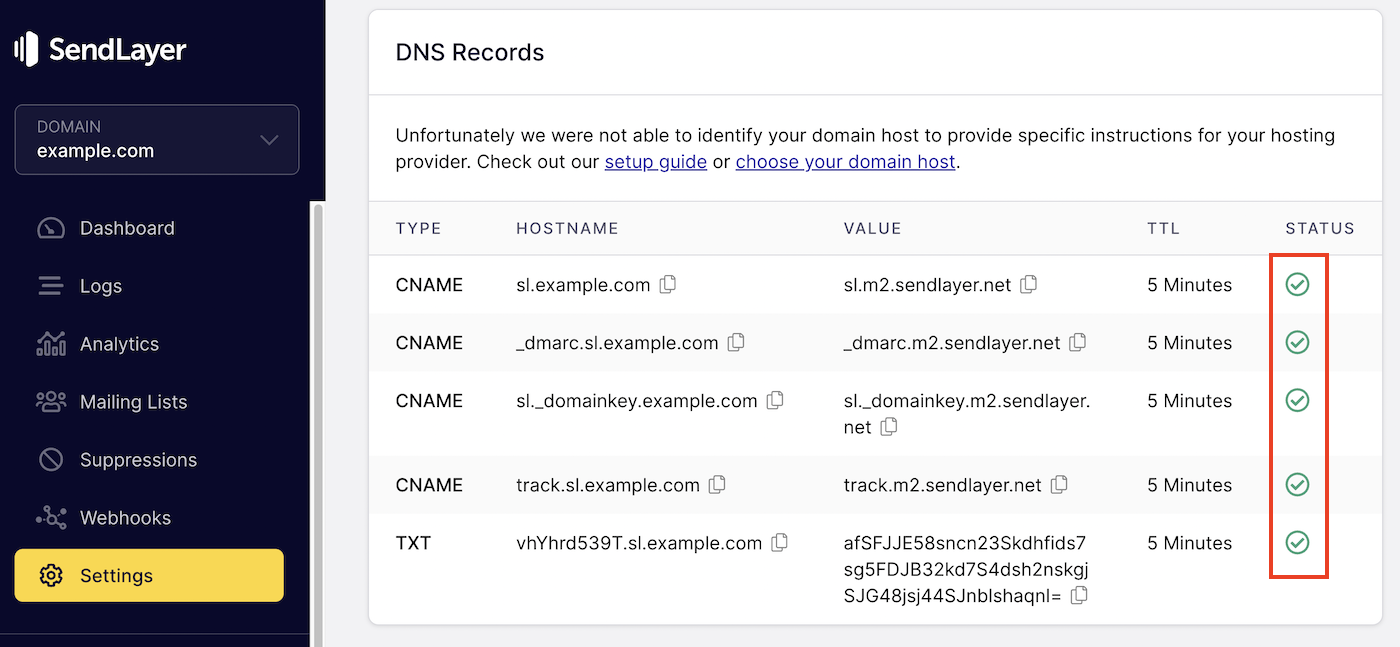
Note: changes to your domain DNS settings can take time to propagate across the internet. You may need to wait up to 48 hours until SendLayer can verify your DNS settings.
Connecting to the SendLayer SMTP Server
Once all your DNS records have been verified and SendLayer has authorized your domain, you can go ahead and copy the SMTP credentials for your Help Scout account.
All the information you need is on the Settings page, under SMTP credentials.
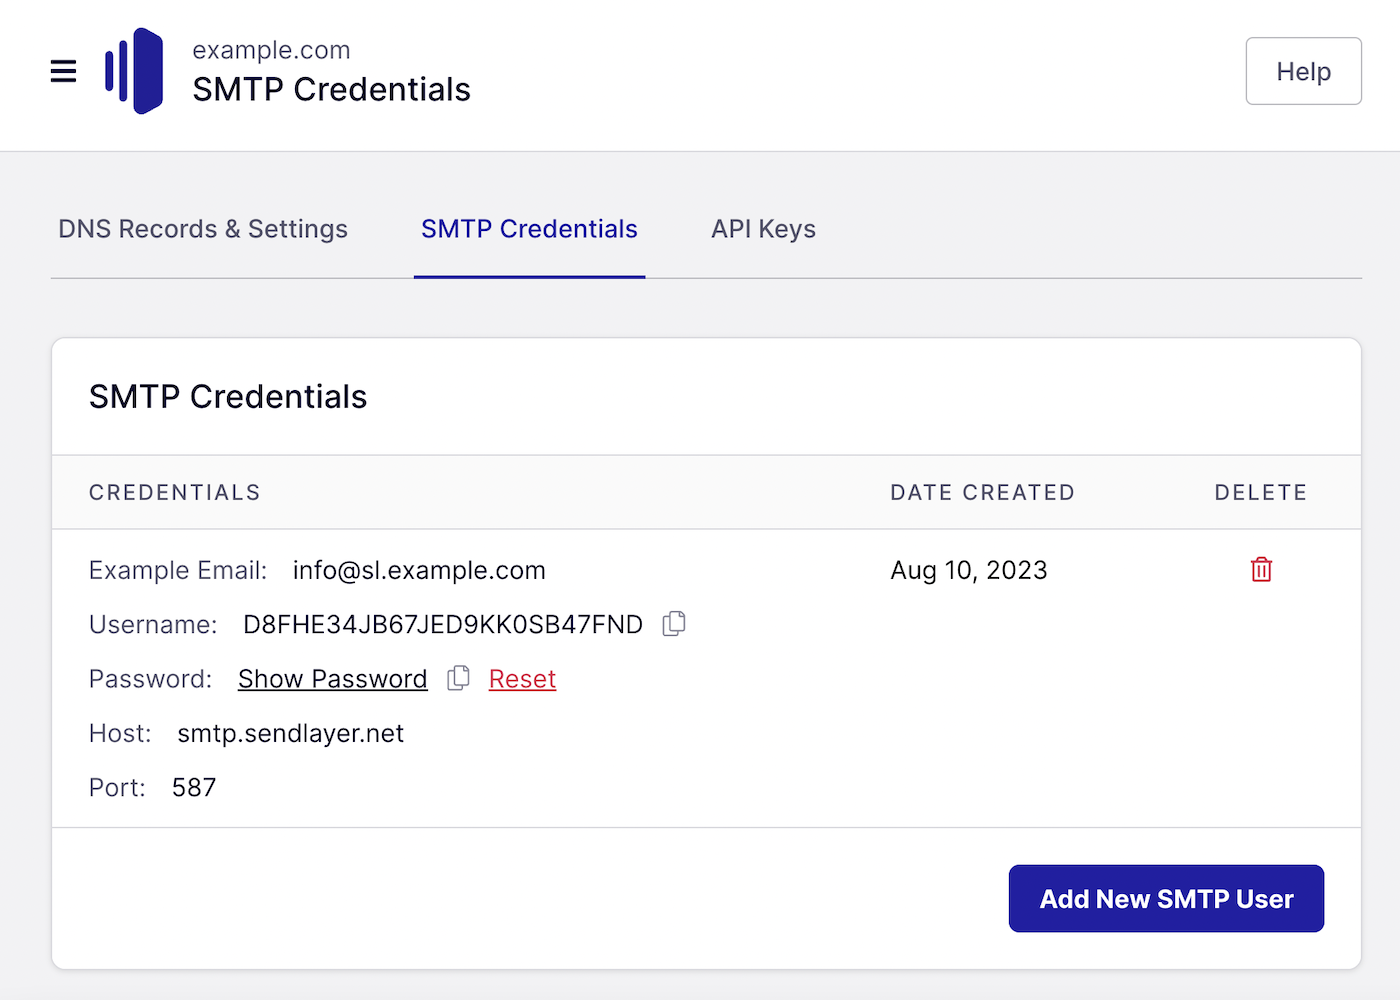
Now, all you need to do is copy and paste the credentials across from your SendLayer settings into your Help Scout mailbox settings.
Setting Up SMTP in Help Scout
To use these SMTP credentials in your Help Scout account, go to your Help Scout dashboard in a new browser tab, open your mailbox, and click the cog icon to access the settings menu. Click on Outgoing Email.
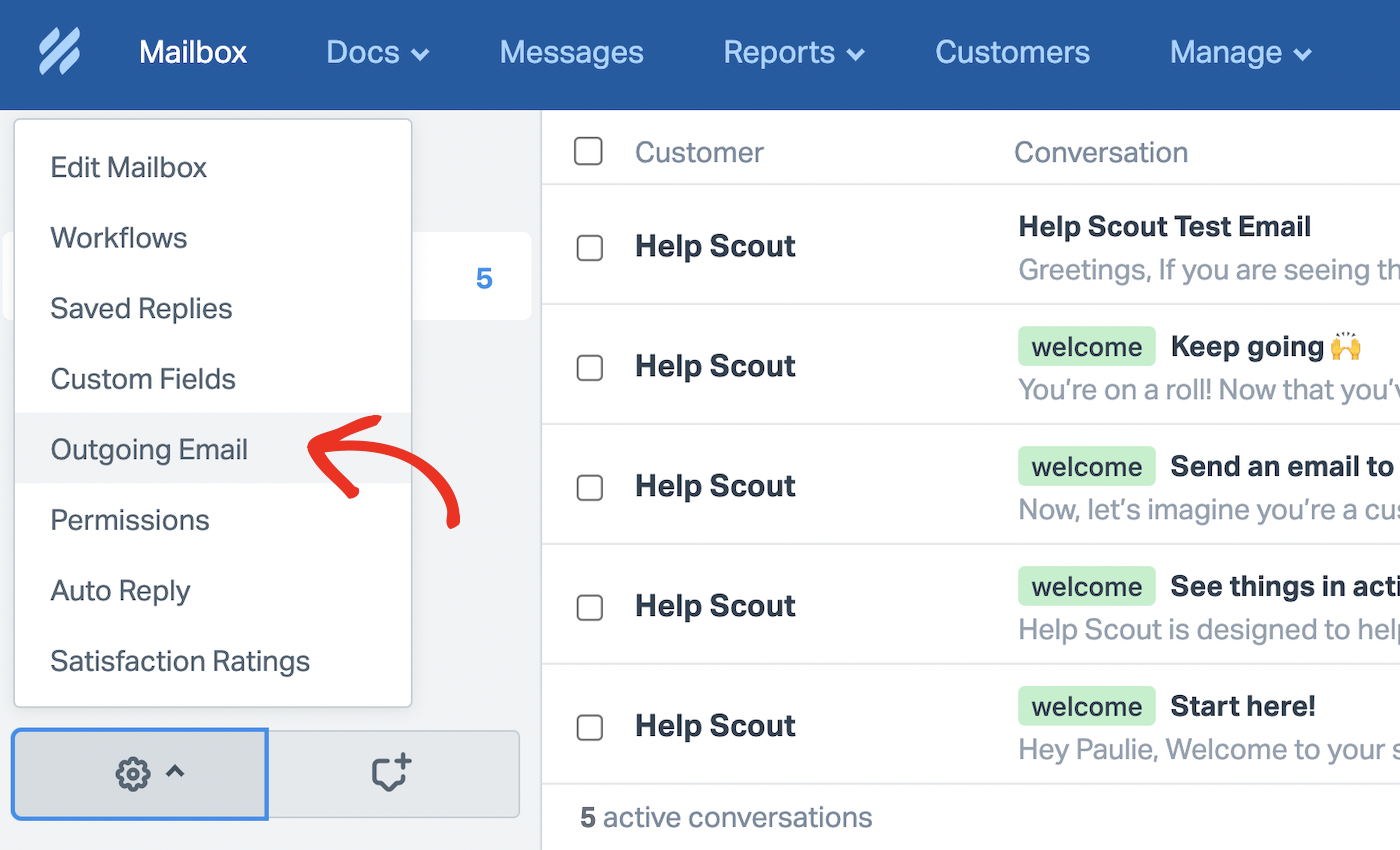
Click the option to Use custom SMTP.
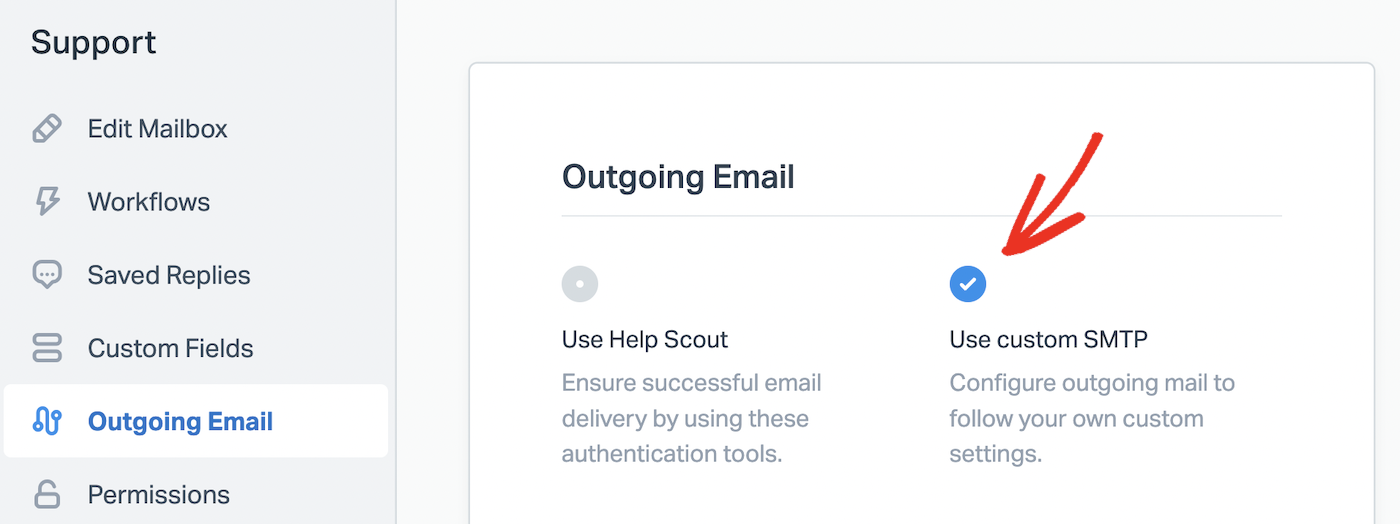
A dropdown menu will appear under the outgoing email options. Choose Send with other SMTP.
Fill out the following data for the SMTP settings:
- Outgoing Server field: smtp.sendlayer.net
- Username field: Copy and paste the username from your SendLayer dashboard
- Password field: Copy and paste the password from your SendLayer dashboard
- Port field: 587
- Security field: TLS
Finally, click the Test Connection button.
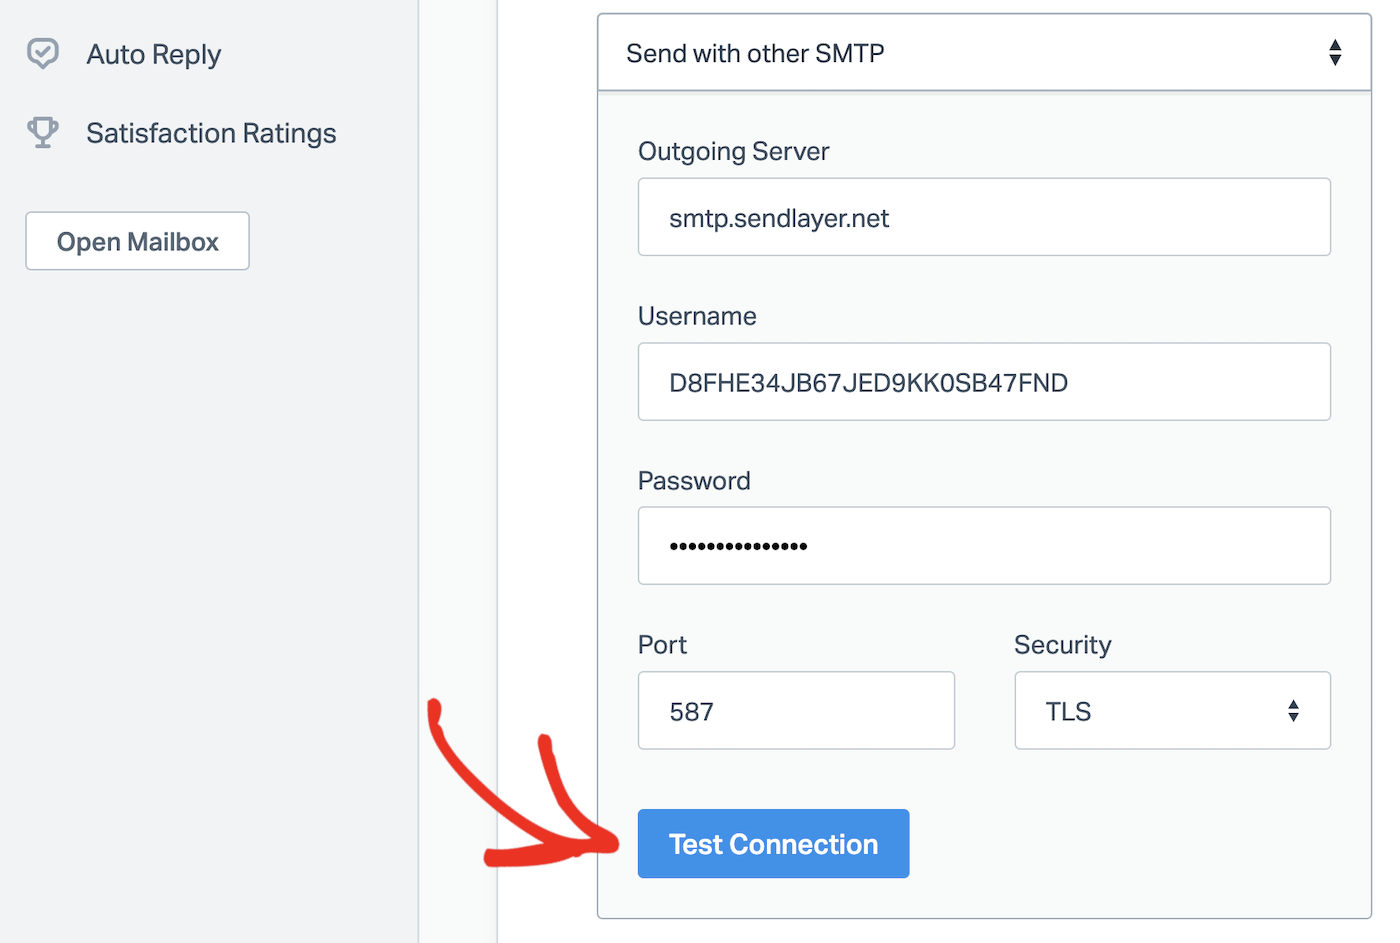
If everything is set up correctly, you should see a message confirming the connection is working.

Make sure to scroll down and click the Save button before leaving the settings page.
And that’s it! You’ve now successfully set up Help Scout to send messages from your domain with SendLayer SMTP to ensure your emails are delivered.
You can return to your Help Desk dashboard. The second step of the Setup Guide, Connect Your Email, is now complete, and you can continue on to the next step.
5. Help Scout Beacon Live Chat Widget Tutorial
Help Scout isn’t only a help desk ticketing system. It also offers the option to set up live chat on your website with automated answers to common questions and the opportunity to send targeted instant messages to your customers.
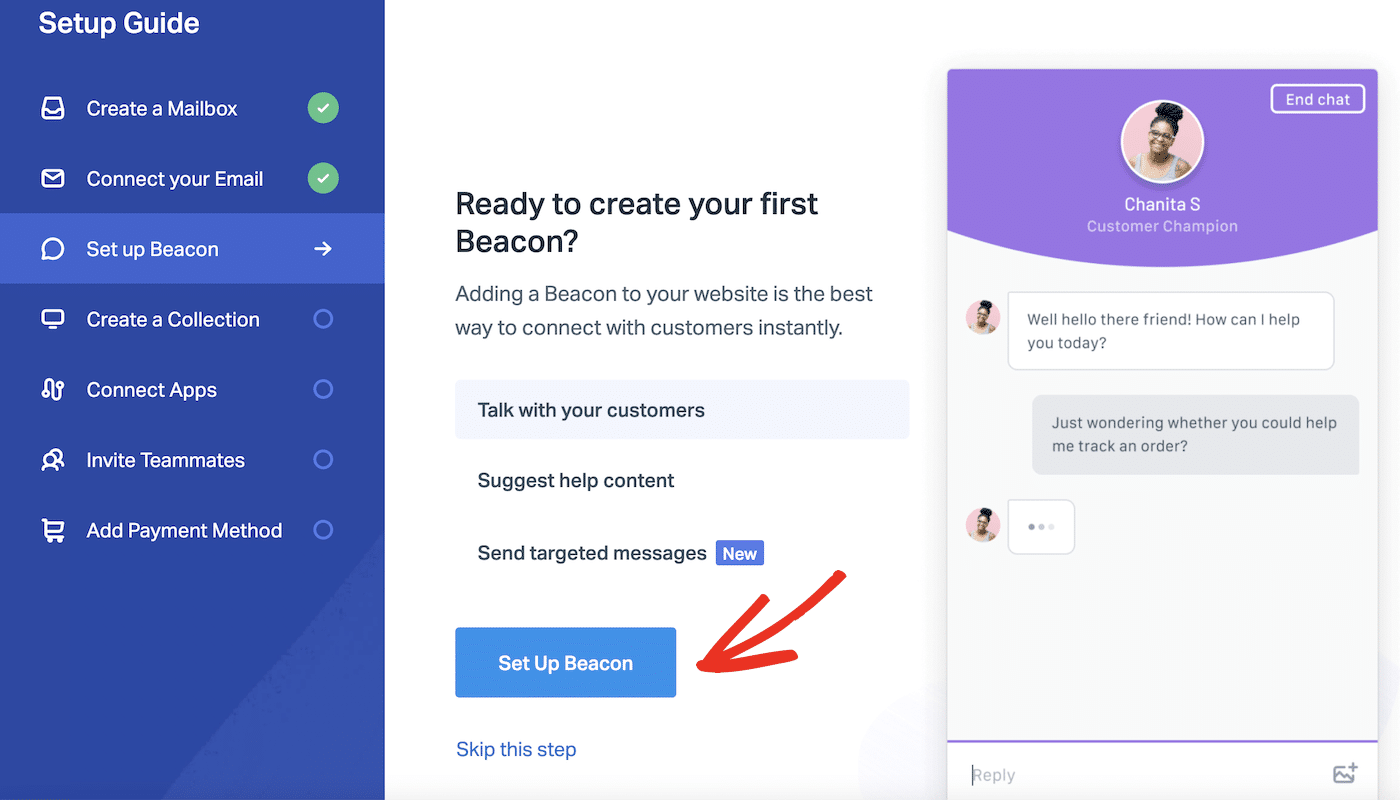
To get started with Beacon, click the Set Up Beacon button on your dashboard. You can also opt to skip Beacon setup if you won’t be using this feature.
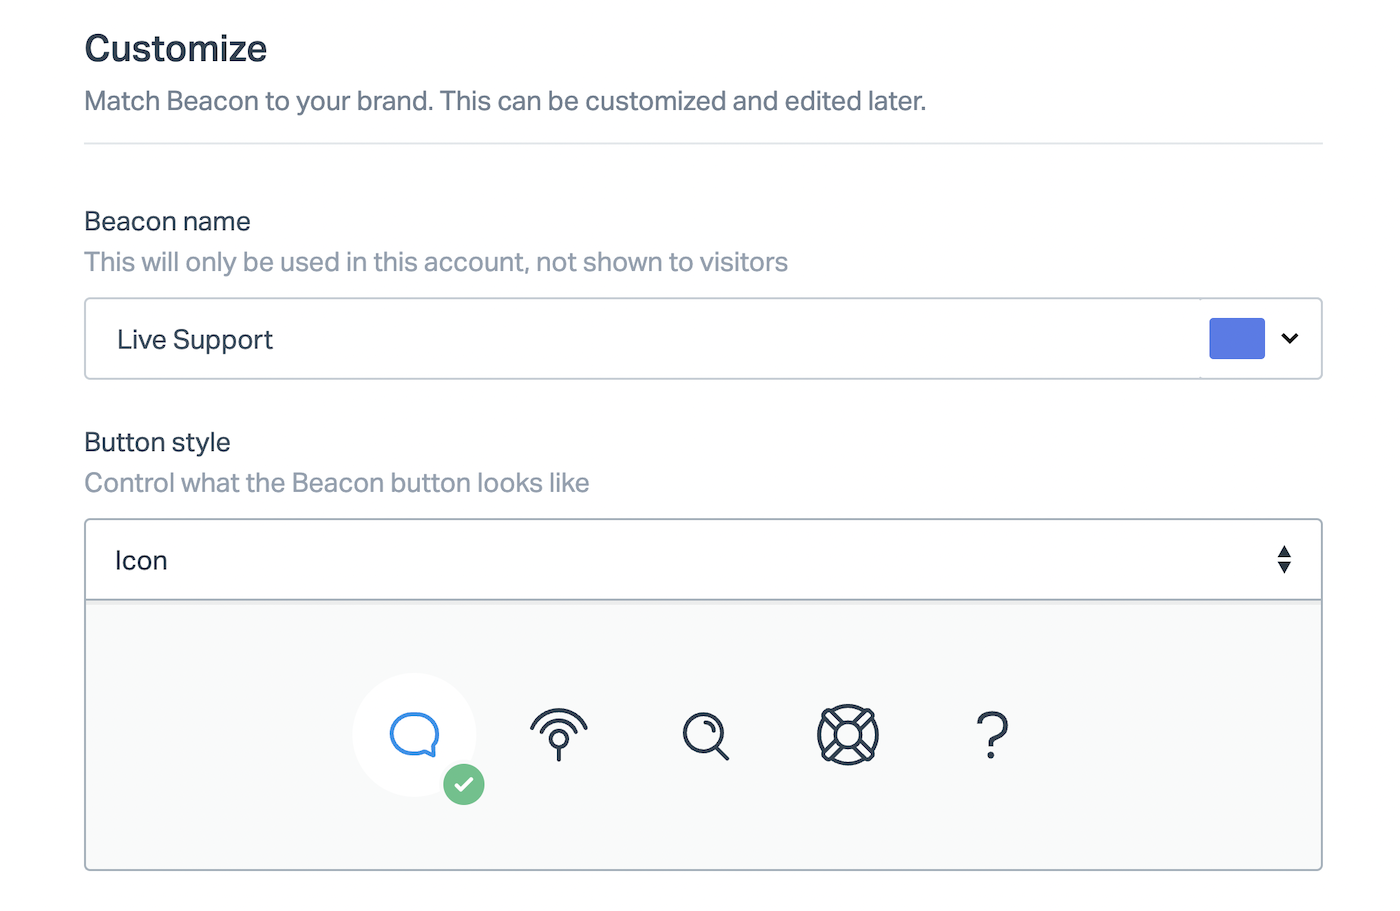
Start by entering a name for your Beacon (this won’t be shown to customers) and choosing a color for the widget that matches your site. You can also choose a button style for opening the widget. Scroll down and click the Next button to continue.
Next, choose the options for your Beacon chat widget.
Beacon Options and Settings
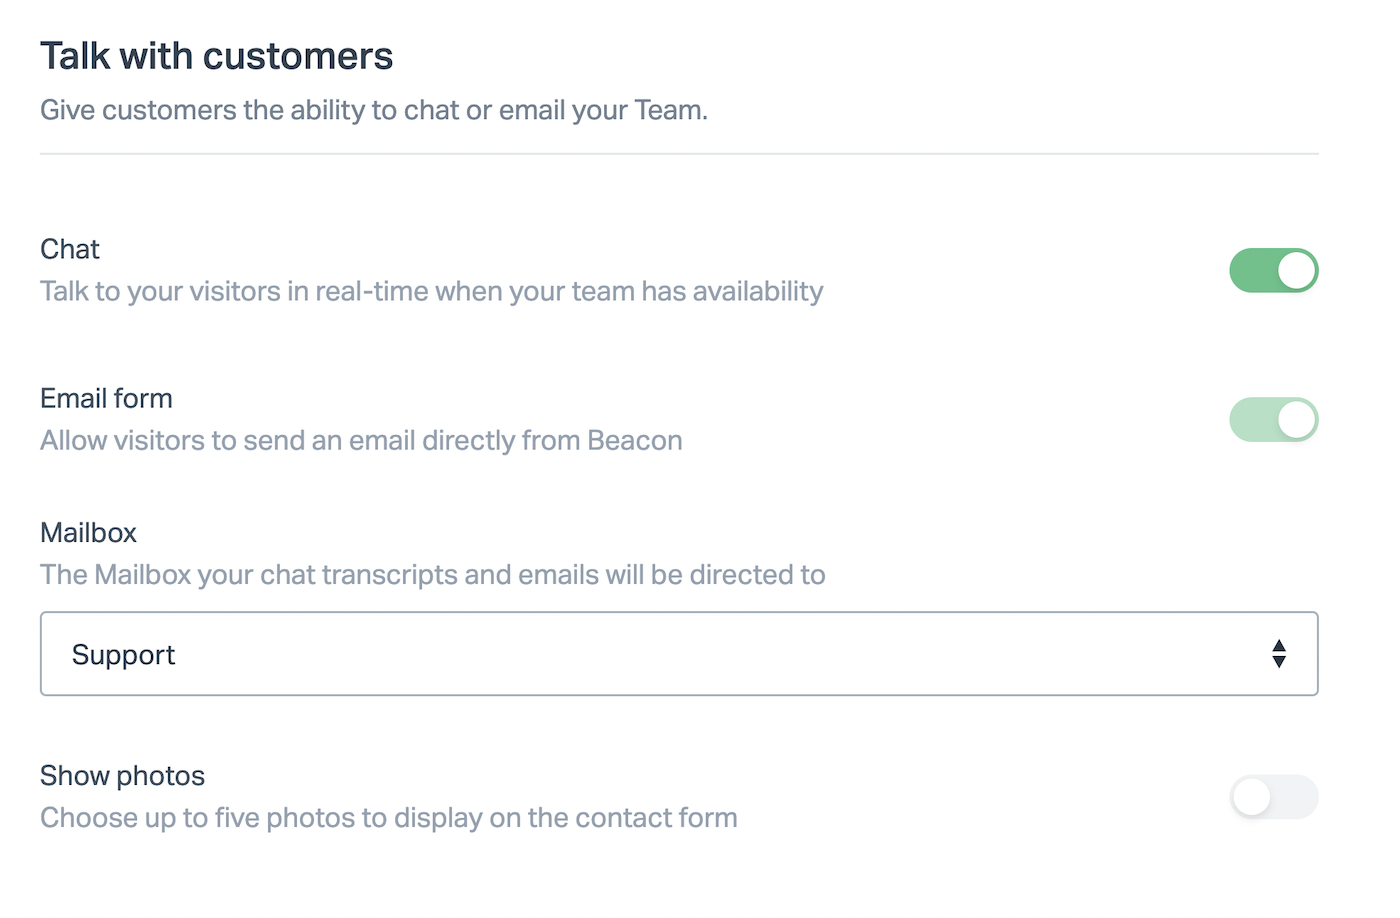
You have the following options, which you can activate or deactivate as you wish:
- Chat: Allow live chat with your support team during your office hours.
- Email form: Allow users to send email directly from Beacon.
- Show photos: If activated, this will show up to 5 user profile photos of your support team.
You also need to select the mailbox where you want to send chat transcripts and emails.
Scroll down and click the Next button when you’ve finished with these settings.
If you’ve added Docs to your site, you can also link to these directly from Beacon. We’ll cover more about Docs in the next section.
Adding Beacon to Your Website
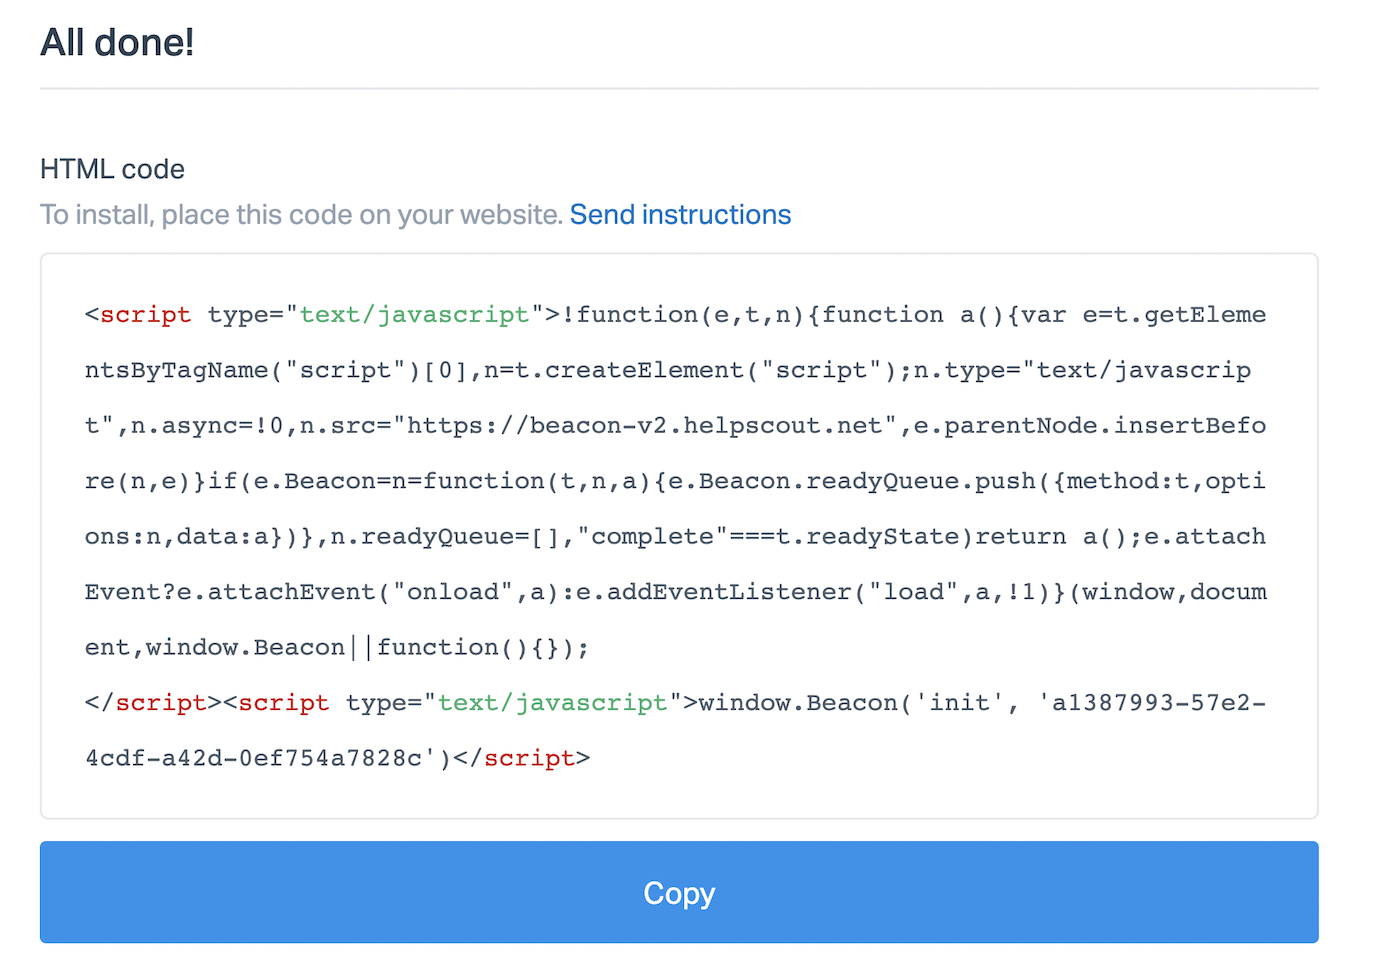
Help Scout will give you a code snippet to put on your website. Just click the button to Copy the code and paste it into your website code. If your site is running on WordPress, you can follow this guide on how to add JavaScript to your WordPress site.
If you’re not confident about editing the code of your website, Help Scout also helpfully includes a link to send instructions. If you click this link, you can send an email directly to your web developer or IT team with all the information they need.
It’s as simple as that! You now have a fully-functioning chat widget on your site, which should look something like this:
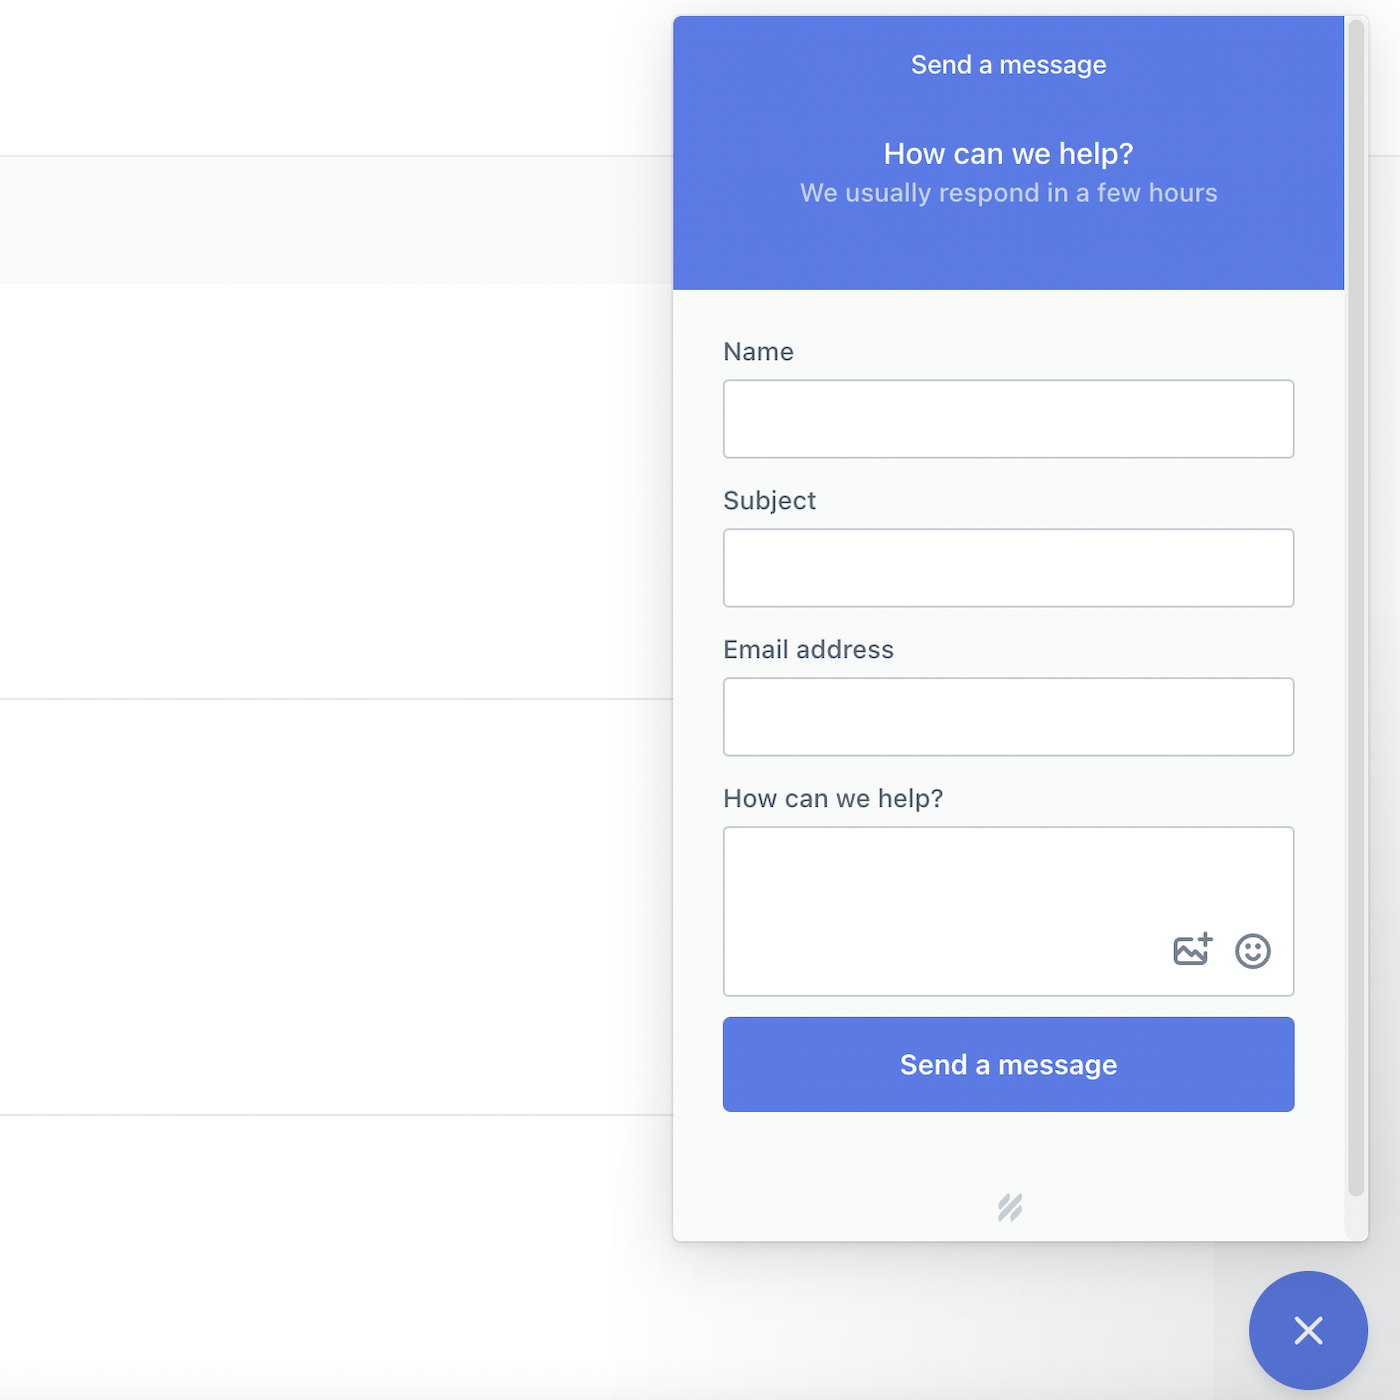
Your customers and users can now send support messages directly from your website, and you’ll manage everything in your Help Scout mailbox, so you don’t need to worry about any messages getting lost.
There’s a lot more you can do with Beacon, but for now, let’s go back to your Help Scout dashboard to continue with the setup guide.
6. Set Up Your Knowledge Base
Within Help Scout, there’s also an easy way to create and organize support articles with answers to frequently asked questions. This knowledge base is called Docs.
By providing a self-service support system in the form of a knowledge base, customers can search for answers to their problems and often fix issues themselves. This will reduce the load on your support team.
Support agents can also direct customers to these articles for common requests, saving time and making your support system more efficient.
Creating a Docs Collection (Knowledge Base)
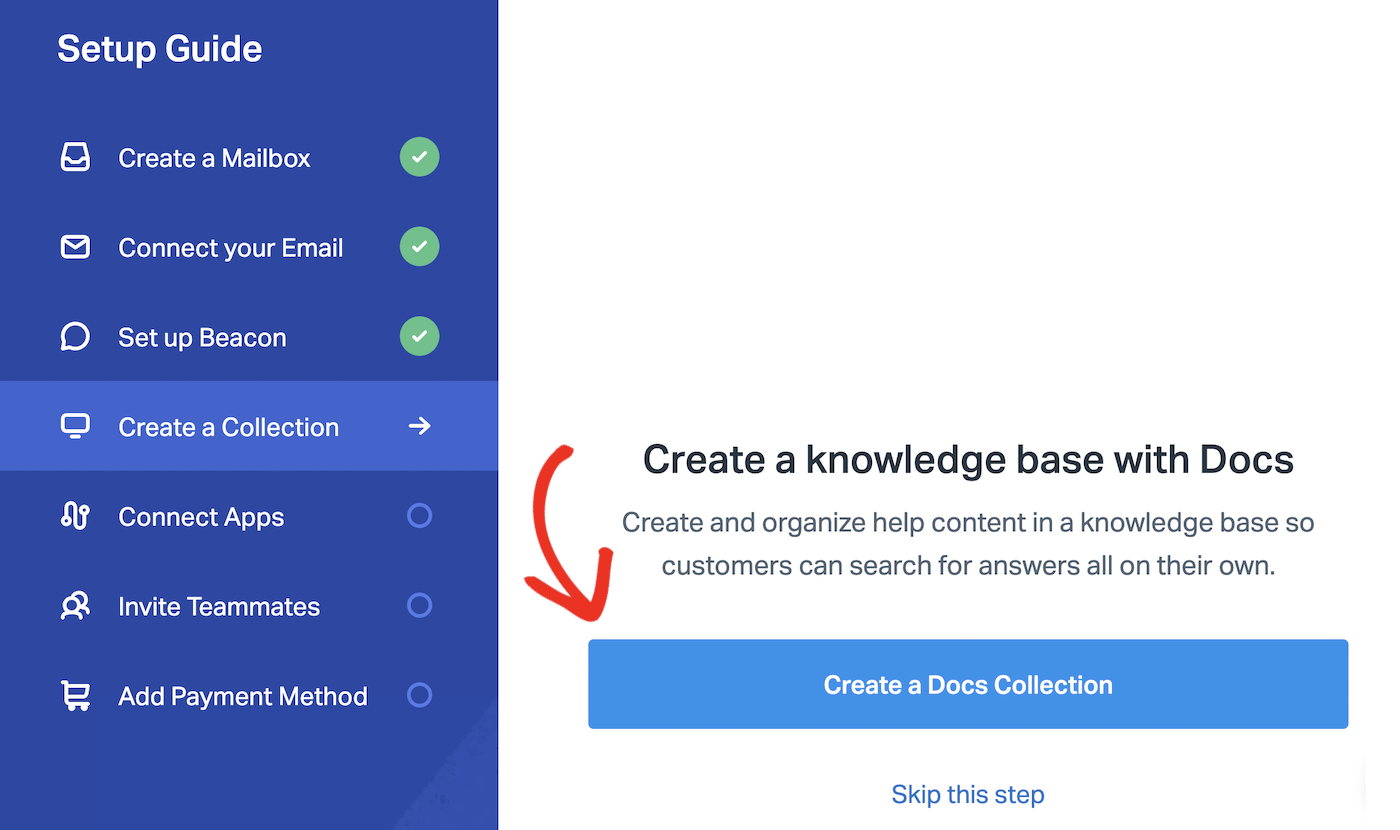
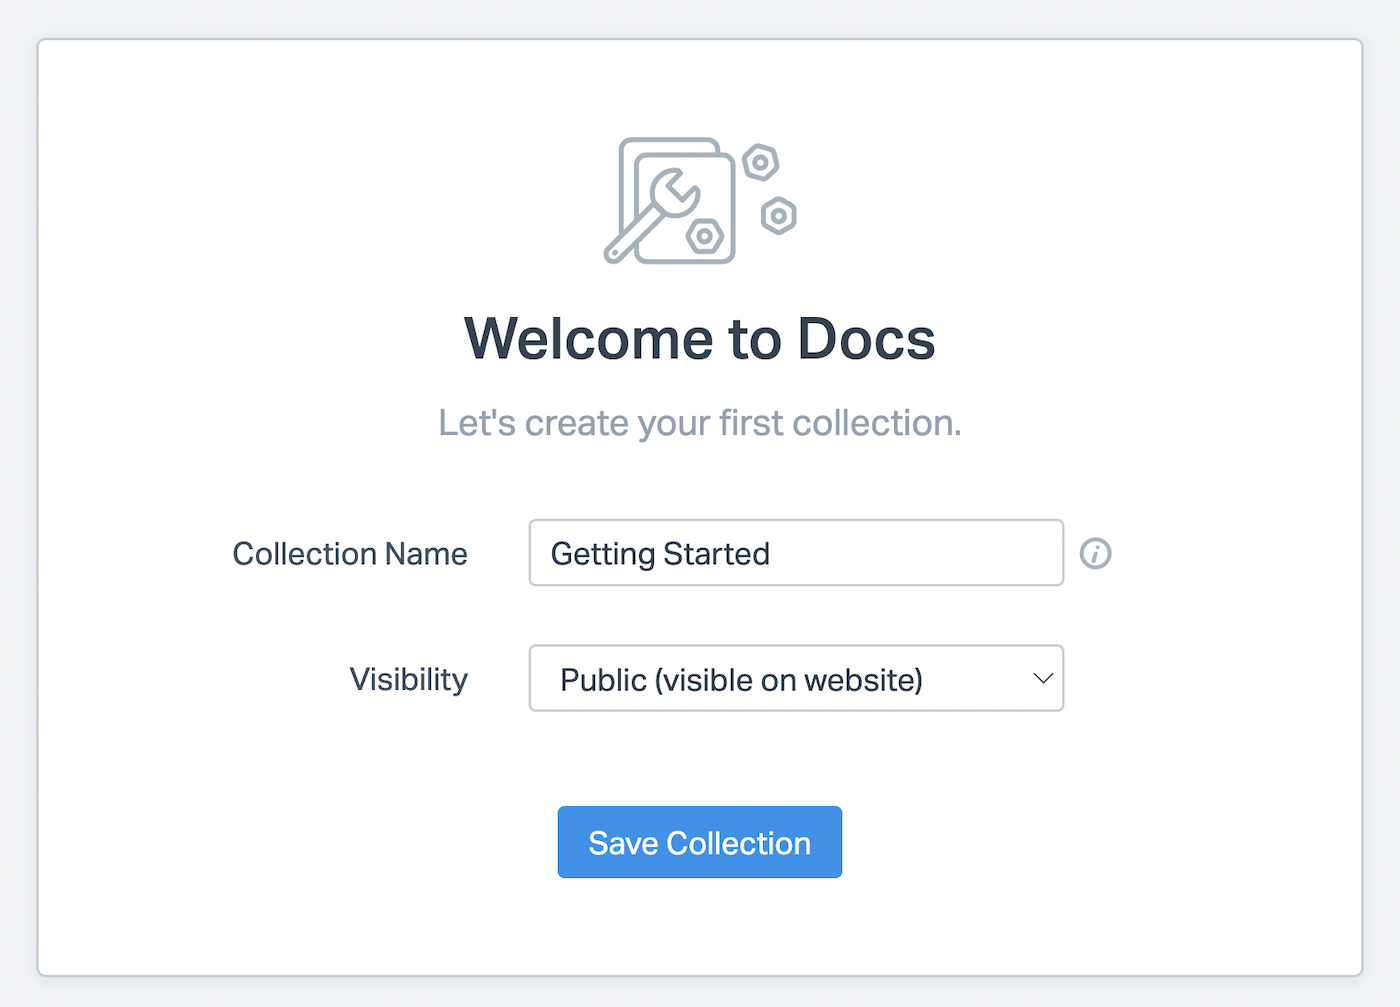
To get started with Docs, click the Create a Docs Collection button on the setup guide.
Choose a name for your first collection and set whether you want to make it public or private (visible only to Help Scout users).
Collections are essentially a way to organize your help documents into categories, so think about the best way to categorize your support articles. But don’t worry too much about this, as you can always rearrange and rename your collections later.
Click the Save Collection button when you’re ready.
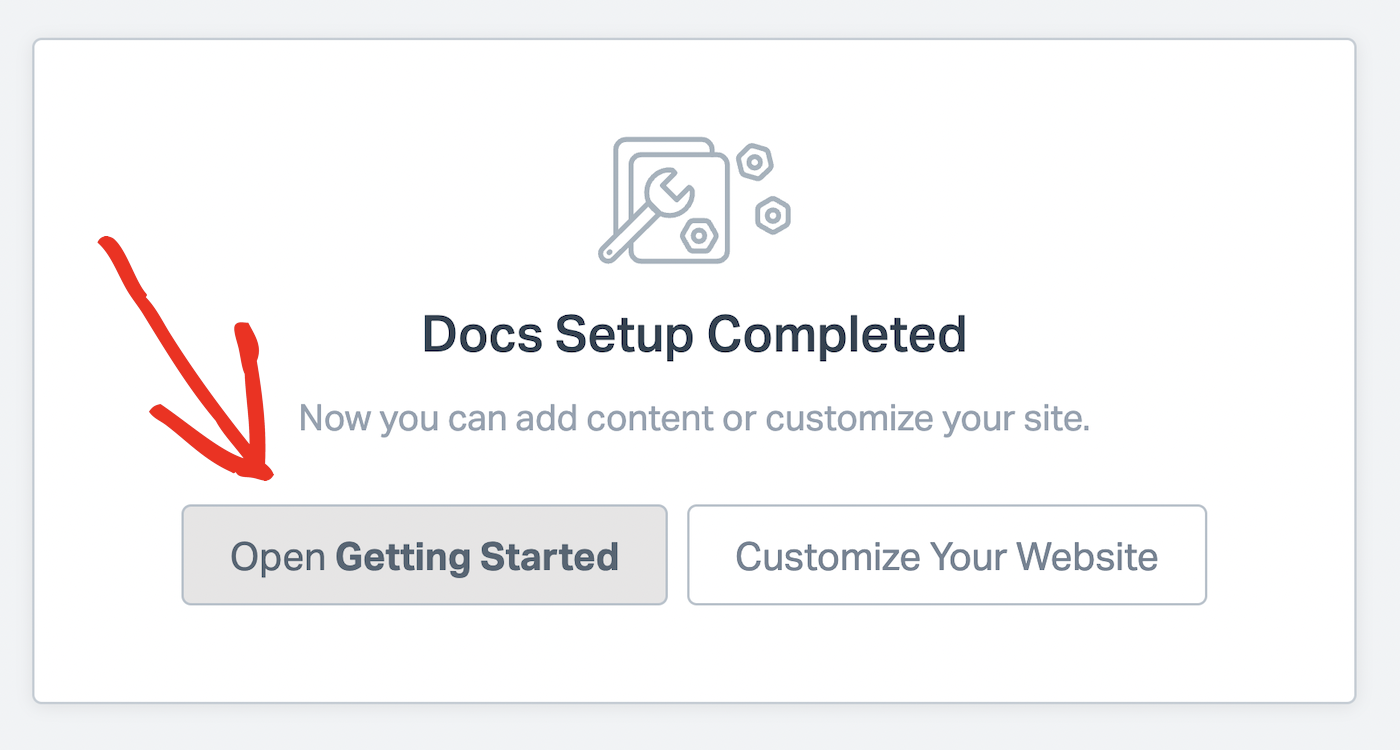
Click the Open button for the collection you just created to add content to it.
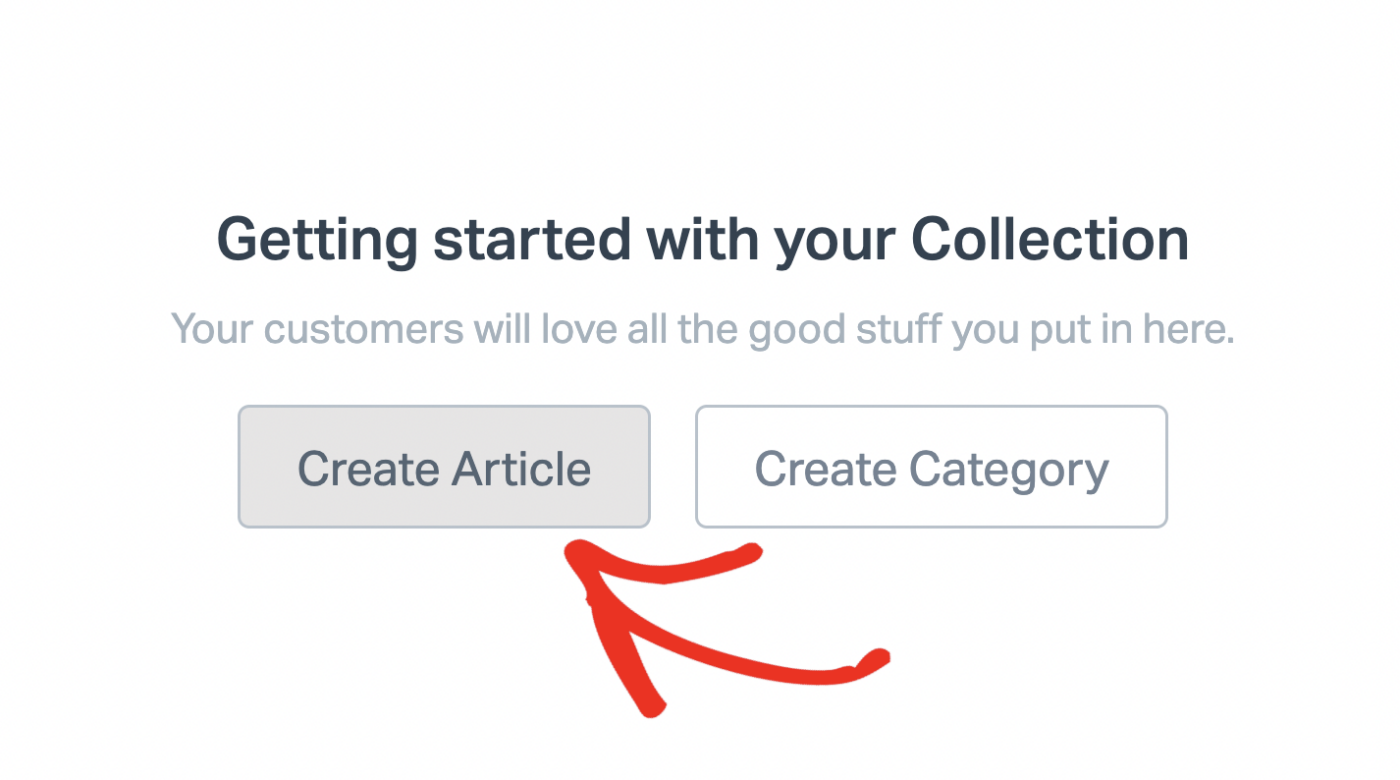
You can then click the Create Article button to add your first support document.
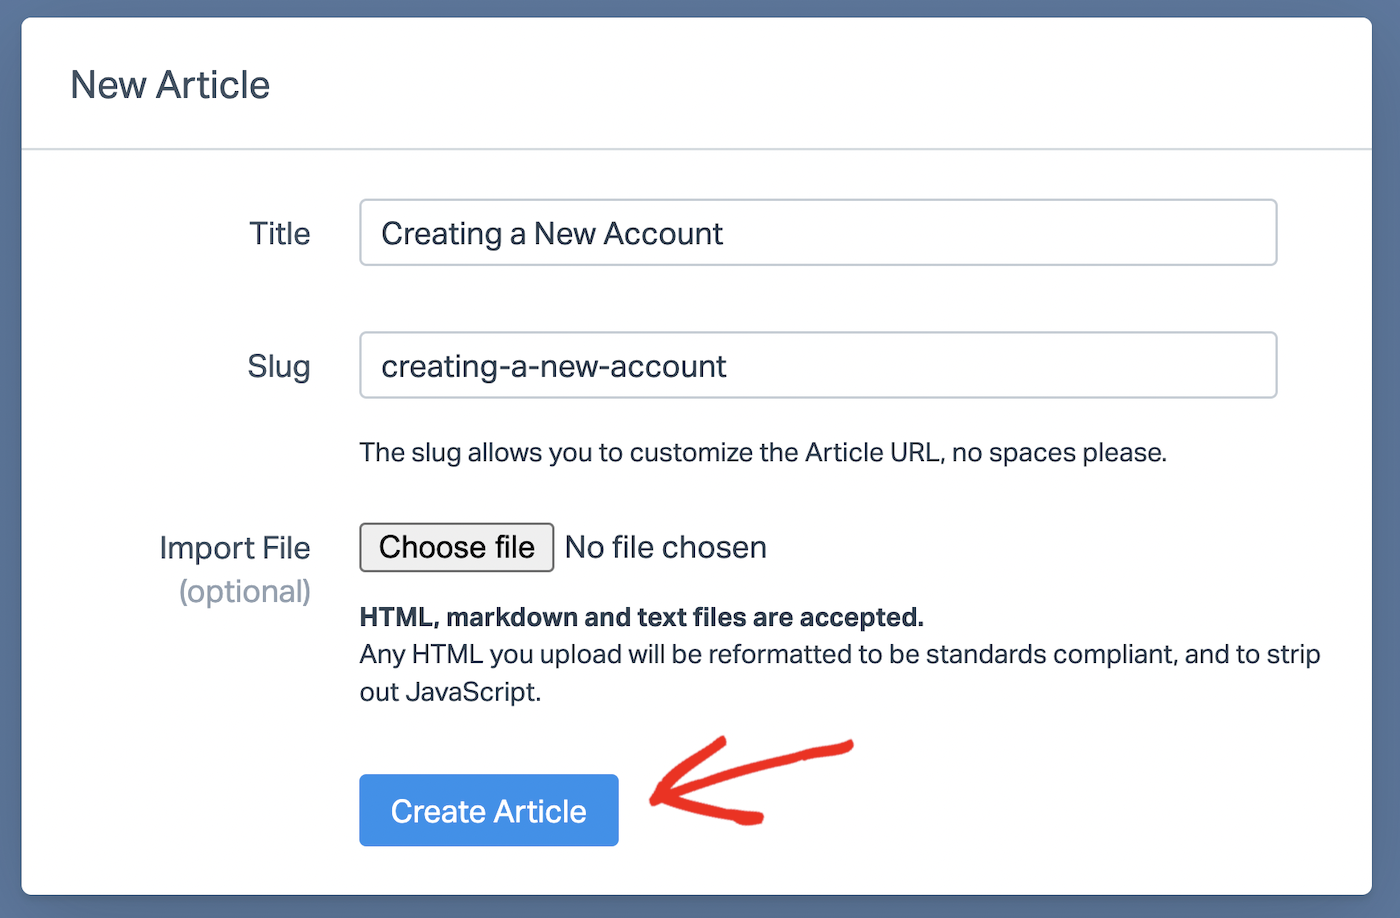
The next step is to create a title and slug for your article, and if you already have the document written, you can import the file. If you want to write your article directly in Help Scout, importing a file is optional. Click the Create Article button when you’re ready.
If you haven’t imported a file, this will take you to the Help Scout document editor, where you can directly type your articles and add images, code blocks, and formatting such as headings, lists, blockquotes, and tables. When you’re finished editing your document, click the Publish button to make it viewable on your Help Scout account.
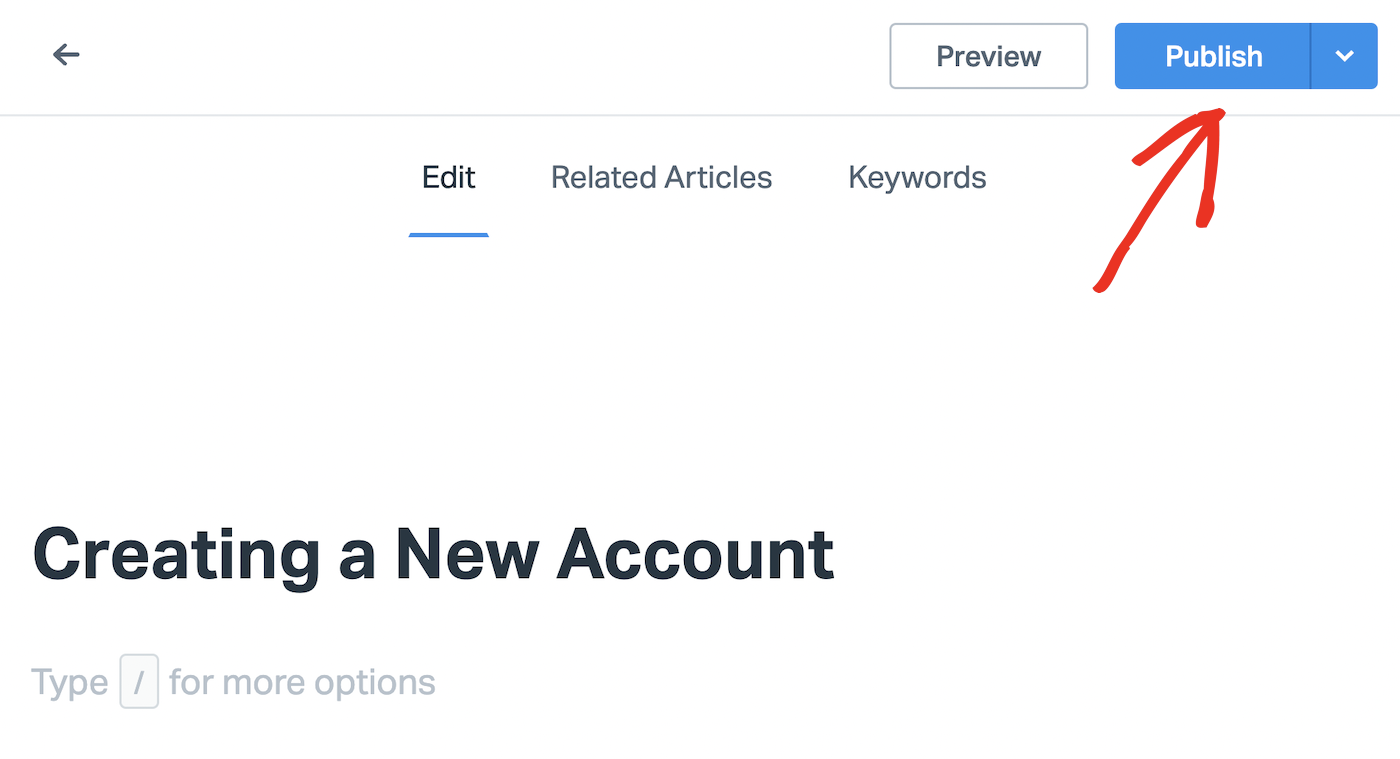
You can add new articles to your Docs or customize your knowledge base at any time by navigating to Manage » Docs in your Help Scout dashboard.
7. Integrating With Third-Party Apps
You can connect Help Scout to over 50 apps to streamline your workflow and provide better support.
Go back to your Help Scout dashboard to continue with the setup guide, and click the Browse Apps button to see which apps you can connect to.
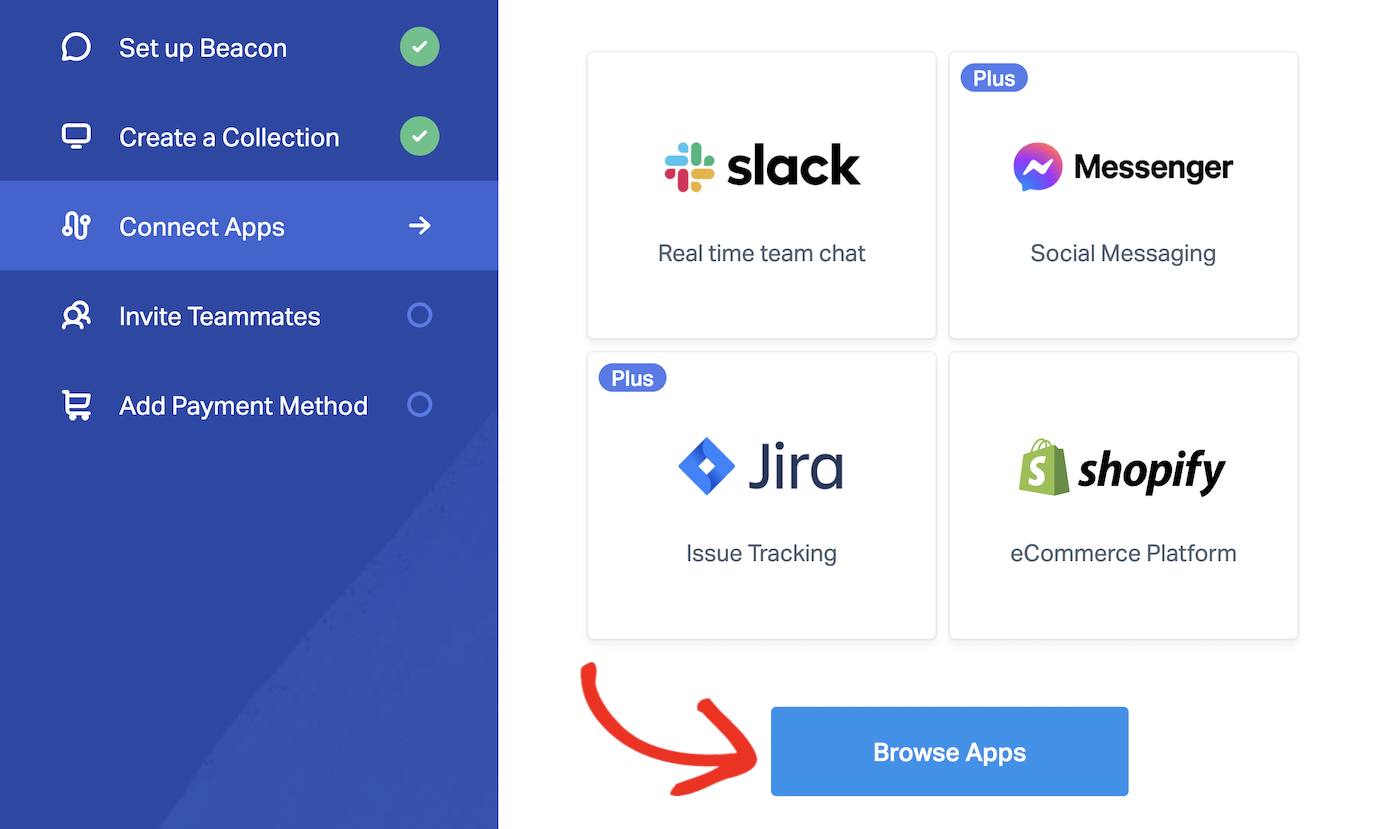
Some examples of the apps you can connect to include:
- Email marketing: Campaign Monitor, Constant Contact, Mailchimp
- CRM: Hubspot, Salesforce, Highrise
- Analytics: Kissmetrics, Databox, Mixpanel
- Ecommerce: WooCommerce, Magento, Shopify
- Automation: Uncanny Automator, Zapier
- Communication: Messenger, Slack
You can also build your own custom integrations with the Help Scout open API.
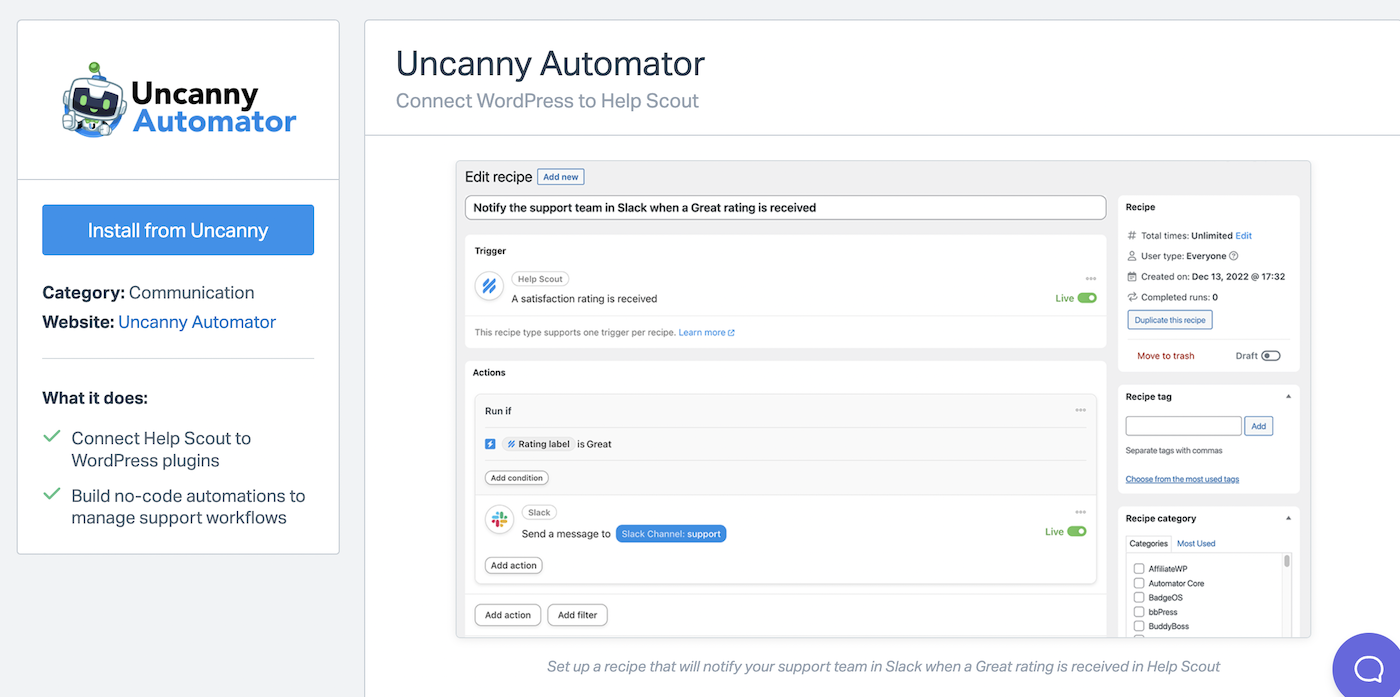
Clicking on any app will take you to a page explaining more about what you can do when you connect, and a button to install the app.
Hang in there, we’re almost done!
8. Add Team Members
Help Scout is designed for customer support teams, so you can go ahead and add the rest of your team as additional users. Click the Add New User button to get started.
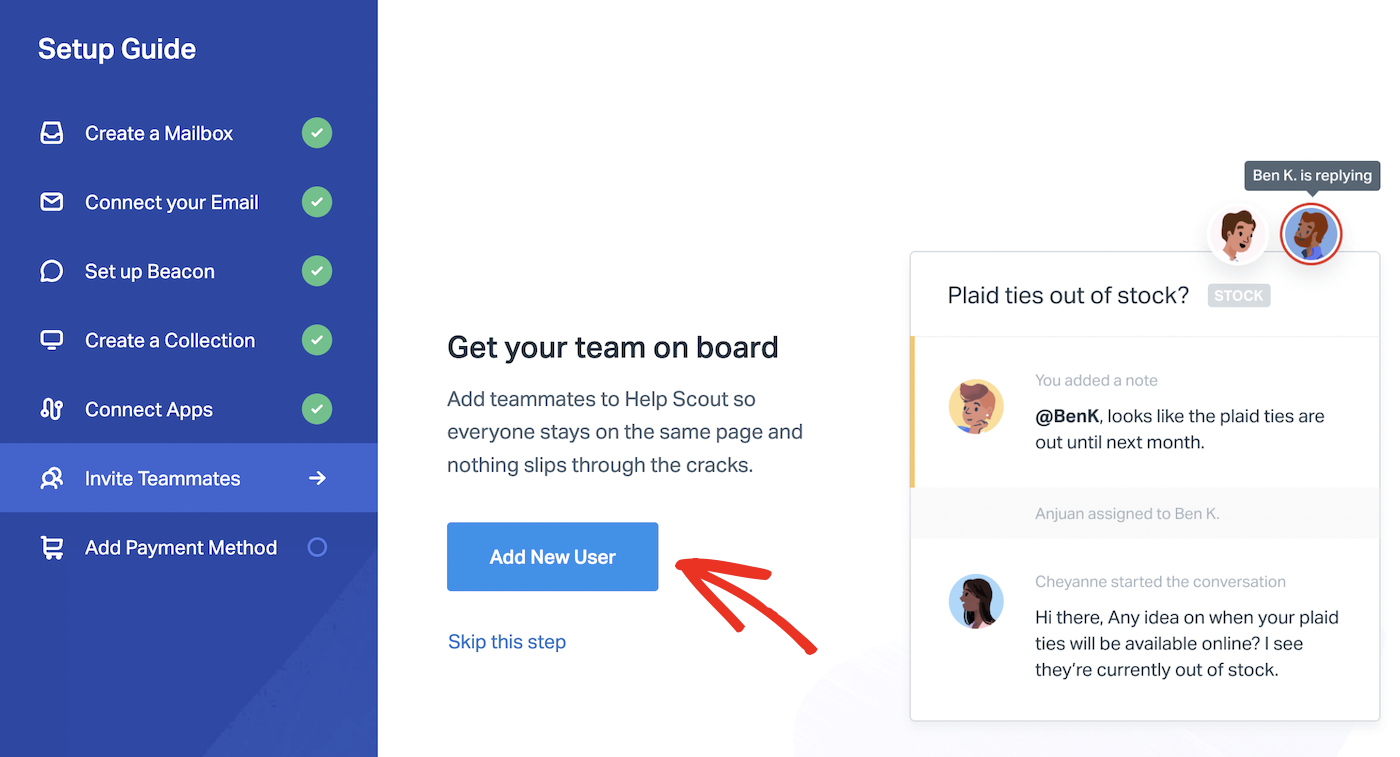
Fill out the form to add a new user’s details and send an email invitation to join Help Scout. Click the Create User button when you’ve filled out all the information.
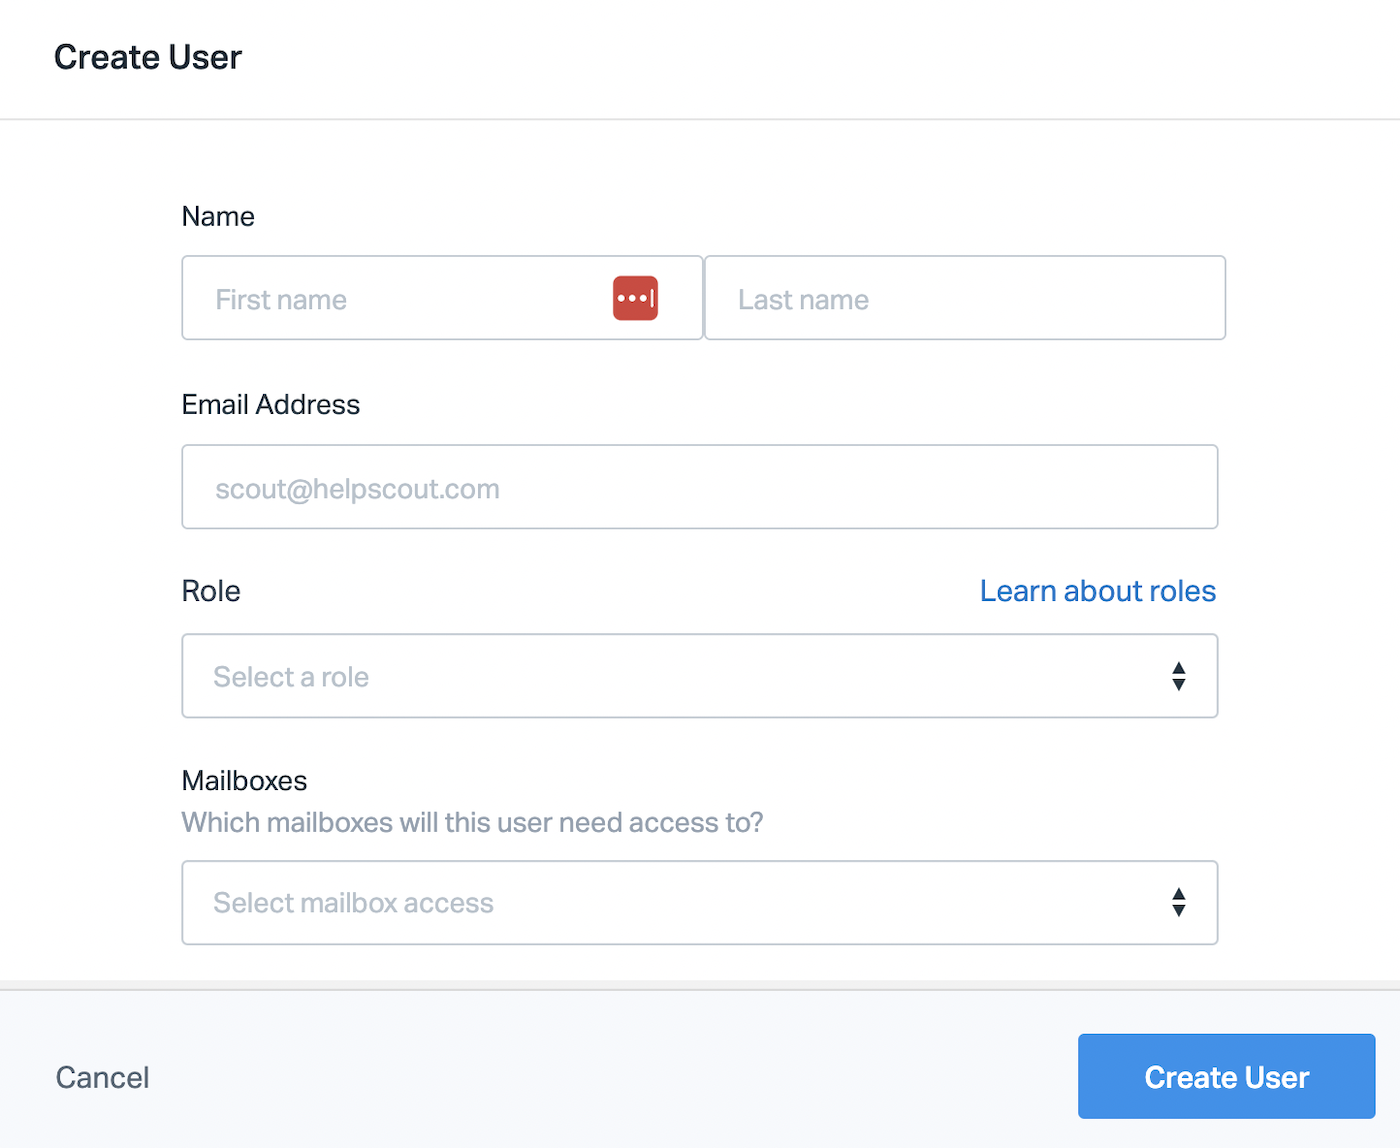
You can edit users, including personal and work information, user roles (Account Owner, Administrator, User, etc.), notifications, and more at Manage » Users in your Help Scout dashboard.
9. Download the Help Scout Mobile App
If you want to be able to manage support requests while you’re on the go, the Help Scout mobile app for iOS and Android is a must.
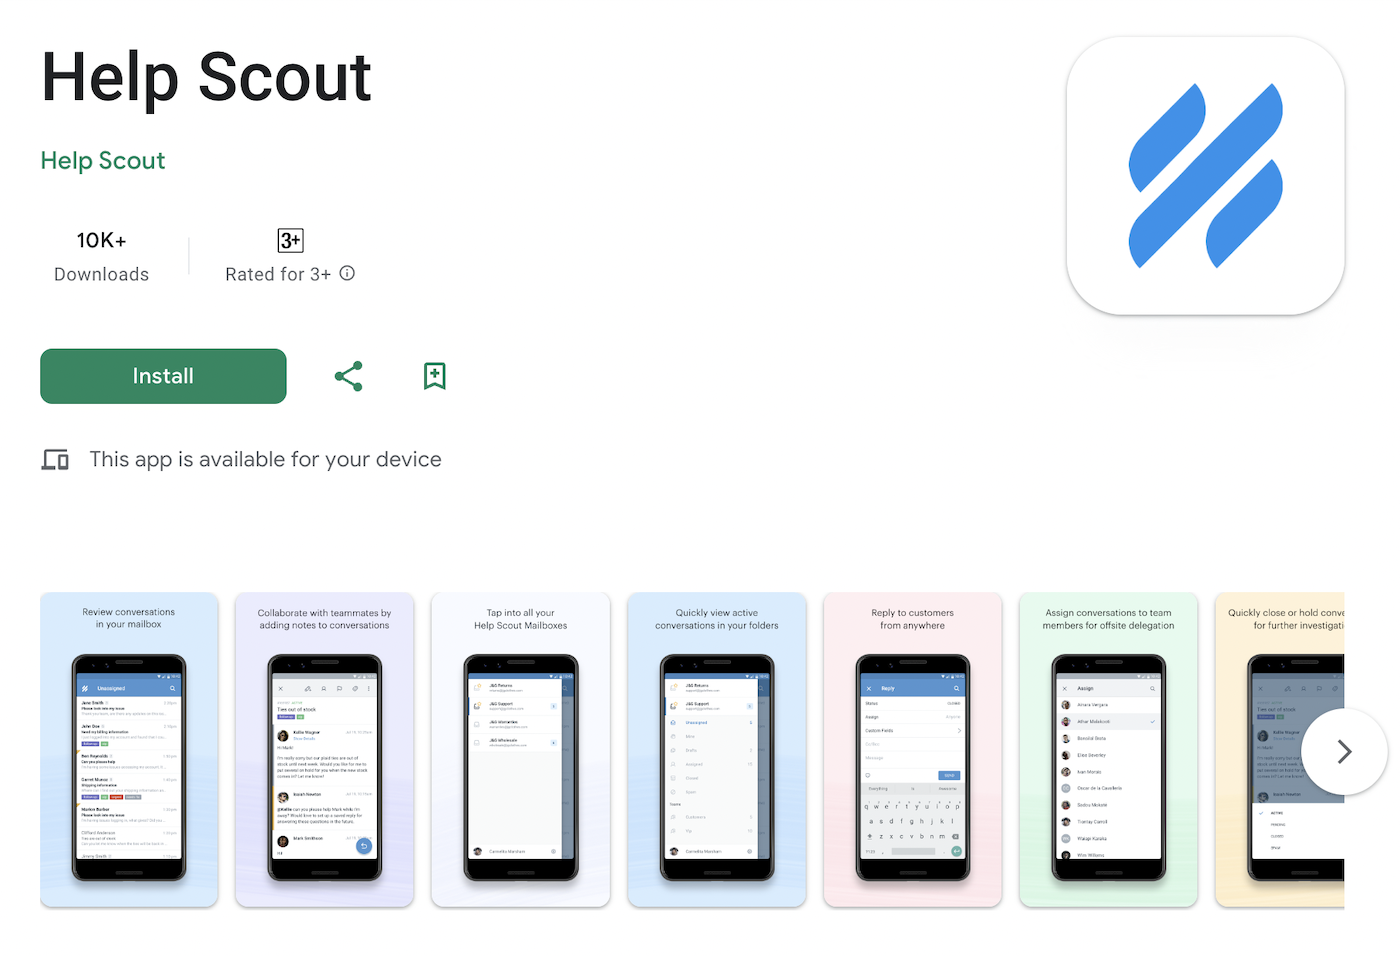
You can download the app for free from the Apple App Store or the Google Play Store.
Once you’ve downloaded and installed the app on your mobile device, you can log in with your Help Scout username and password, and you’ll be able to respond to messages, change the status of conversations, communicate with your team, access customer information, and more.
Plus, if you activate alerts on the app, you’ll always be able to respond to support requests quickly, no matter how small your team is.
If you’ve got this far, congratulations! Your Help Scout account is now completely set up and ready to use.
To avoid any interruption to your plan at the end of your free trial, make sure you add a payment method and confirm the plan you want to select after the end of the trial.
FAQs
Is Help Scout easy to use?
Help Scout is very easy to use, even if you have no experience using help desk software or working with customer support tickets. Help Scout’s familiar, email-like interface means it’s intuitive for both customers and support agents.
Is Help Scout a ticketing system
Help Scout works like a customer service ticketing system, but it’s designed to provide a more “human” approach to providing support. Customers never see a ticket number, instead, Help Scout groups messages into a conversation like normal emails. This “shared inbox” type of system is similar to other platforms like Zoho Team Inbox and Front customer service platform.
Is Help Scout free?
You can get started with Help Scout’s free 15-day trial, which gives you full access to all the features of the platform. After your free trial, you can choose a Help Scout plan starting from $20 per user, per month.
How do I forward email to Help Scout?
You can adjust your mail settings to automatically forward support emails to your Help Scout email address. As soon as they arrive in your Help Scout mailbox, the platform will take care of the rest.
Why are my Help Scout emails not being received?
If you’re experiencing email deliverability issues with Help Scout, it may be because your customer’s email service is blocking them or marking them as spam. The easiest way to solve this problem is to use the SMTP servers of a transactional email service like SendLayer to handle your outgoing email. SendLayer authorizes your domain and uses state-of-the-art email infrastructure to optimize the deliverability of your Help Scout emails.
That’s it! Now you know how to set up your Help Scout account
Next, would you like to learn about how to monitor your outgoing support emails from Help Scout?
SendLayer includes an email log that makes it easy to see which emails have been delivered, opened, or failed. Check out our guide to the SendLayer email log for more information.
Ready to send your emails in the fastest and most reliable way? Get started today with the most user-friendly and powerful SMTP email delivery service. SendLayer Business includes 5,000 emails a month with unlimited mailing lists and premium support.
