


Are your emails going to spam, or are people just ignoring them? Knowing for sure saves you from guessing at fixes that don’t matter.
Your email service shows what it sent, but not where it landed. You can’t open a recipient’s spam folder, so test a real message first.
In this guide, I’ll walk you through testing an email with SendLayer’s free Email Detective.
How to Tell if Your Emails Are Going to Spam
To check, send a real message to a free spam checker like Email Detective. It checks SPF, DKIM, DMARC, blocklists, and the spam score for that message.
Seed inboxes and mailbox provider dashboards then show where mail actually lands over time.
Each method answers a different question. Here’s how they compare:
| Method | What it shows | Cost | Best for |
|---|---|---|---|
| Spam and authentication checker | SPF, DKIM, DMARC, blocklists, and spam score for one message | Free | Finding why spam filters might catch a message |
| Seed inboxes | Where a message lands at Gmail, Outlook, and Yahoo | Free (manual) or paid tools | Checking real inbox placement |
| Mailbox provider dashboards | Your domain’s spam rate over time | Free | Spotting trends once you send steady volume |
I start with a checker every time. It catches a broken record in a couple of minutes.
Sending a test to your own Gmail isn’t a fair check on its own.
Your inbox already knows you. It may treat your mail differently than a stranger’s inbox would.
How to Test Your Email With Email Detective
Email Detective checks one real email and tells you what might push it into spam. Here’s how to run a test from start to finish.
Step 1: Get Your One-Time Test Address
Open Email Detective in your browser. The page shows a unique, one-time email address for your test.

Click Copy to grab the address. You’ll need to send your test email to the address you just copied.
Step 2: Send a Real Email Through Your Usual Sending Path
After copying the address, send your test from the same system that sends your real email. If you test from a different path, you’re testing the wrong setup.
Use a real subject and body, like an actual password reset or order email. A one-line “test” message can skew the content checks.
Here are 3 common ways to send it.
Option A: The SendLayer API
If your app is built using custom code, then you can send a request directly to an email API like SendLayer. Here is an example of a quick test send with a cURL request.
Replace the To address with your Email Detective address:
curl --request POST \
  --url https://console.sendlayer.com/api/v1/email \
  --header "Authorization: Bearer $SENDLAYER_API_KEY" \
  --header 'Content-Type: application/json' \
  --data '{
  "From": { "name": "Example Store", "email": "[email protected]" },
  "To": [ { "email": "[email protected]" } ],
  "Subject": "Your order #1042 has shipped",
  "ContentType": "Text",
  "PlainContent": "Hi Sam, your order is on its way. Track it from your account page."
}'
Keep your API key in an environment variable, not in the command itself. The From address must use a domain you’ve authorized in SendLayer.
Note: For more details on using the SendLayer API, be sure to check our developer documentation.
Option B: Any SMTP Client or App
Most apps and frameworks can send over SMTP. Here’s a short Python example using SendLayer’s SMTP settings:
import os
import smtplib
from email.message import EmailMessage

msg = EmailMessage()
msg["From"] = "[email protected]"  # must be on your authorized domain
msg["To"] = "[email protected]"  # your Email Detective address
msg["Subject"] = "Your order #1042 has shipped"
msg.set_content("Hi Sam, your order is on its way.")

with smtplib.SMTP("smtp.sendlayer.net", 587) as server:
    server.starttls()
    server.login(os.environ["SENDLAYER_USER"], os.environ["SENDLAYER_PASS"])
    server.send_message(msg)
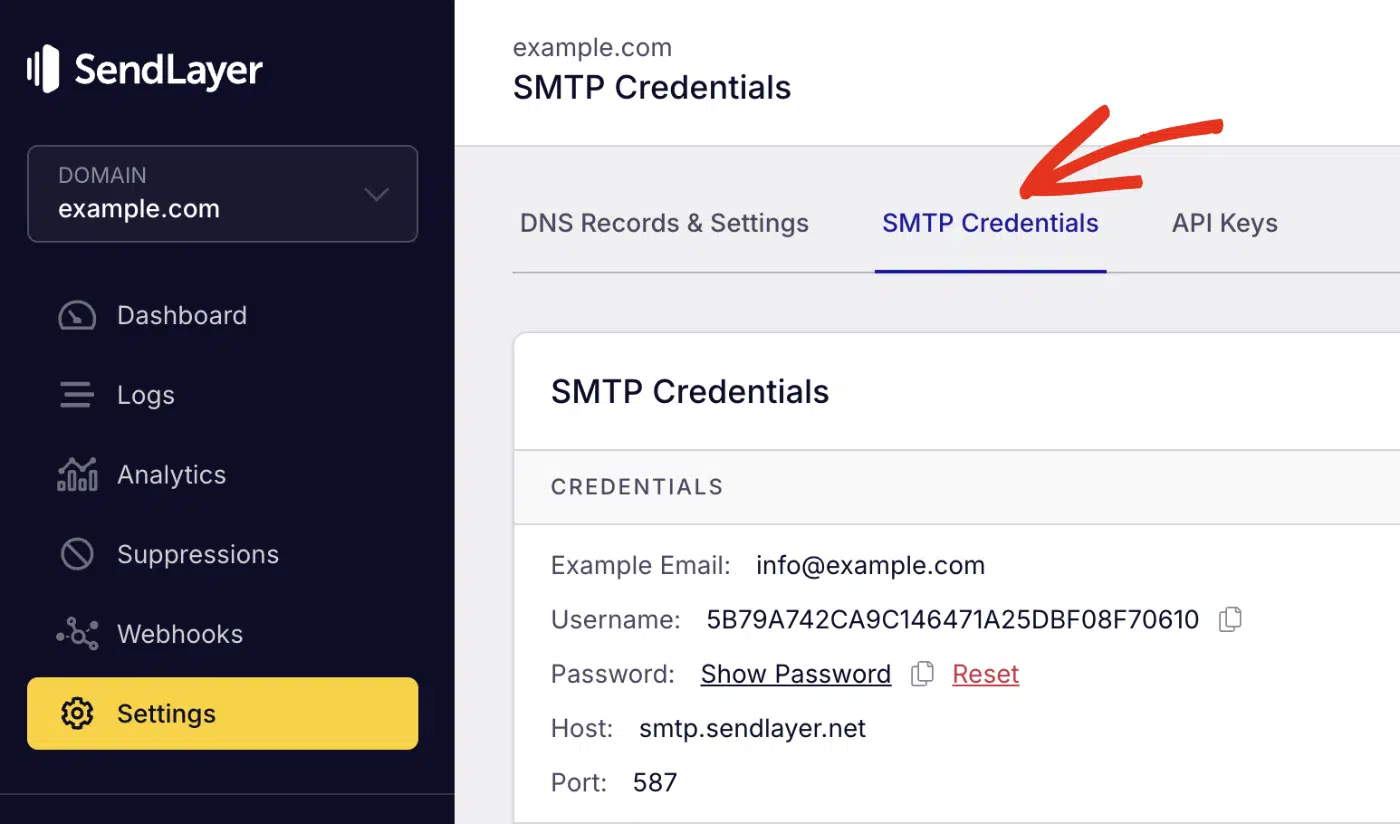
These are the settings any other SMTP client needs:
Host:        smtp.sendlayer.net
Port:        587 (STARTTLS)
Username:    your SendLayer SMTP username
Password:    your SendLayer SMTP password
You’ll find your username and password under Settings » SMTP Credentials in your SendLayer dashboard.
If you’re building with Python, our guide on sending emails with Python contains all the details you’ll need to add email sending to your app.
Option C: Gmail or Google Workspace
Sending from a normal mailbox? Compose a new email to the test address.
This tests your mailbox provider’s setup, not your app’s.
Step 3: Wait for the Report to Load
Go back to the Email Detective tab and leave it open. The page keeps checking for your email while it shows Waiting for your email…
Most tests arrive within a minute or two. Some servers hold a first message for a few minutes, so be patient.
If nothing arrives after 15 minutes, the test times out. Check the address for a typo, then send again.
Step 4: Check Your Overall Score
When your email arrives, you’ll see the Email Deliverability Results page. At the top, you’ll see a score out of 10 and a label from Excellent to Very Poor.

Below the score, a short line sums up the result. Badges show whether Authentication, Blacklist, and Spam passed. The basic report doesn’t need an account.
For the full breakdown, enter your email address and click Email me the report. Then open the link in that email, and the full report unlocks on the page.

Once it unlocks, the Analysis explains your score in plain language.

What the Email Detective Report Checks
The report has 4 sections. Here’s what each one covers:
| Section | What it checks | What a pass looks like |
|---|---|---|
| Email Summary | From, subject, received time, HELO, Peer IP, email size, and your SPF, DKIM, and DMARC results | SPF Aligned, DKIM Aligned, and DMARC Pass, with a HELO and Peer IP from your sending service |
| Blacklist Checks | Your domain and sending IP on public blocklists | Not Listed on every check |
| Spam Checks | SpamAssassin rules that fired, with a total score | A total well under 5.0 |
| Analysis | A plain-language list of what to fix | Nothing left to fix |

I usually check the Email Summary first. If the HELO or Peer IP is someone other than your email service, then you tested the wrong path.
How to Fix the Most Common Failed Checks
Each failed check points to a specific fix. Find the label from your report below.
No SPF Record or SPF Failed
Your domain hasn’t authorized the server that sent this message. Add your email service to your SPF record.
Read Also: How SPF, DKIM, and DMARC Work
No DKIM Signature or DKIM Failed
Your sending service isn’t signing the message for your domain. In SendLayer, authorize your domain and add the DKIM records it gives you.
No DMARC Record
Your domain has no DMARC policy. Publish one, starting with p=none so you get reports without blocking anything:
_dmarc.example.com TXT "v=DMARC1; p=none; rua=mailto:[email protected]"
DMARC passes when SPF or DKIM aligns with your From domain. The current DMARC standard, RFC 9989, defines this rule.
Your Domain or IP Is on a Blocklist
Follow that list’s removal steps, then fix whatever got you listed. Our guide to email blacklists covers both.

Spam Score Over the 5.0 Threshold
Your content triggered too many spam rules. Rework the flagged content, then test again.

Read Also: Spam Trigger Words to Avoid
The Test Email Never Arrives
After 15 minutes, the test times out. Check the test address for a typo, then send again.
If it still doesn’t arrive, your sending service may be blocking or deferring the message. Check its logs for a bounce.
Most of these fail together when mail goes out unauthenticated. I recommend sending through an authenticated email service instead. SendLayer signs your mail with DKIM for your own domain once you authorize it.
After any fix, send a fresh test. DNS changes can take a few minutes to a few hours to show up.
What a Spam Test Can’t Tell You
A spam test checks one message, not your whole sending reputation.
A good score means your setup is sound. It doesn’t promise every email hits the inbox.
Here’s what a single test can’t show you:
- Real inbox placement: Gmail, Outlook, and Yahoo each filter differently. Use seed inboxes to see where mail actually lands.
- Engagement: Opens, replies, and complaints shape your reputation over time. One test can’t measure that.
- Trends: A one-off test won’t catch a slow decline. Google Postmaster Tools shows your spam rate at Gmail over time. You can sign in at postmaster.google.com.
Pro Tip: Rerun the test after every DNS change and every new sending tool. That’s when most authentication problems start.
Frequently Asked Questions
Here are quick answers to common questions about checking for spam.
How do I check if my email is going to spam without a tool?
Create free accounts at Gmail, Outlook, and Yahoo. Send your email to each one and see which folder it lands in. Then open the message headers to see the SPF, DKIM, and DMARC results.
Why is my email suddenly going to spam?
A sudden change usually means something broke. Common causes are an updated DNS record, a new sending tool, or a blocklist listing. Our guide to why emails go to spam covers each cause.
What spam score is too high?
SpamAssassin uses 5.0 as its default spam threshold. Email Detective’s Spam Checks section flags scores above 5.0. Aim to keep your total well below it.
Is Email Detective free?
Yes. You can run a test and see the basic scores without an account. The full report is free too. Email Detective just asks for your email address to send you the link.
Does passing the test mean my emails will reach the inbox?
Not always. Passing means your authentication, blocklist, and content checks are healthy. Inbox placement also depends on your reputation and how recipients engage with your mail.
That’s it! Now you know how to check if your emails are going to spam.
Did your test flag a problem you’re not sure how to fix? Our guide to why your emails are going to spam covers each cause. It walks through every fix step by step.
