Are you having trouble setting up your OpenCart mail settings? Configuring your email is a step of store setup that’s easy to overlook, but it’s a critical part of ensuring your online retail business runs smoothly.
In this guide, I’ll walk you through the steps to set up email in OpenCart, including SMTP settings and how to customize your email templates to improve communication with your customers.
Why Configuring Your OpenCart Mail Settings Is Important
If you leave the mail settings in their default configuration after you install OpenCart, you might be lucky and have no problems sending emails from your store.

However, it’s a good idea to take the time to customize your mail settings and use an SMTP server to manage your site emails for several reasons.
By default, OpenCart uses the PHP mail() function. Sending emails this way is often problematic as the messages are not secure or authenticated, and there’s a good chance they will be refused or blocked as spam by the receiving mail server (Google and Yahoo are now blocking unauthenticated email.)
Because of its security issues, many web hosts block the PHP mail() function. If this is the case, your OpenCart emails will fail to send completely.
On top of this, you also have limited control over your emails, minimal information about email delivery rates and failures, and PHP mail() is not designed to handle large volumes of email as your business grows.
For these reasons, I recommend using custom SMTP settings in OpenCart from the start, preferably using a transactional email service designed for the needs of eCommerce sites, like SendLayer.
Using a Transactional Email Service and Custom SMTP With OpenCart
Using a reliable transactional email service is the best way to ensure your emails reach your customers’ inboxes without fail.
You can choose any email service, but if you’re not already subscribed to an SMTP service, it’s well worth giving SendLayer a try. The service offers a free trial so you can test it out for your first 200 emails, and plans start from just $5 a month, making it ideal for small businesses on a budget.

These prices are correct at the time of writing, but click here to see the current prices.
SendLayer is designed to offer a fast, secure, and reliable email service for eCommerce websites and other websites and apps that send transactional emails.
Some of the advantages you’ll benefit from when you sign up include:
- Improved deliverability: SendLayer monitors its service carefully and includes features like a suppression list and bounce management to ensure a good IP reputation for maximum deliverability.
- Fast email delivery: If there’s anything that will put a customer off shopping in your online store again, it’s waiting around for order confirmations and other important emails. SendLayer’s superior email infrastructure ensures your critical transactional emails are delivered right away.
- Scalability: As your business grows, so do your email needs. With SendLayer it’s simple and easy to scale up your plan when you need to send more emails.
- Protect your domain reputation: SendLayer ensures all emails you send through the platform are properly authenticated and sends email from a subdomain to protect your primary domain from spam complaints and blocklists.
- Analytics: Detailed email analytics including open and click-through rate, bounce rates, and spam complaints help you to optimize your email content and monitor deliverability issues.
Once you’ve signed up for a SendLayer account and authorized your email domain, you can find your SMTP credentials in your dashboard. For now, let’s continue with configuring your OpenCart email settings.
How To Configure OpenCart Mail Settings
First things first, log into your OpenCart admin panel with your admin username and password. On your dashboard, you can see an overview of your orders and navigate through your site settings using the menu on the left.

Step 1: Accessing OpenCart Mail Settings
Once you’re in, navigate to System » Settings in the main menu. This will take you to a list of your stores.
Select the store you want to configure the email settings for and click the Edit button (it looks like a pencil.)

Click on the Mail tab to access the email settings.

Step 2: Configuring OpenCart Mail Settings
Now that you’re in the Mail tab, you’ll see several fields that need to be configured. Here’s a breakdown:
Mail Engine: Choose SMTP
Leave the Mail Parameters setting and scroll down to the SMTP settings.
Here, you’ll enter the credentials for your SMTP email service. If you’re using SendLayer, you can find these settings in your dashboard under Settings » SMTP Credentials.
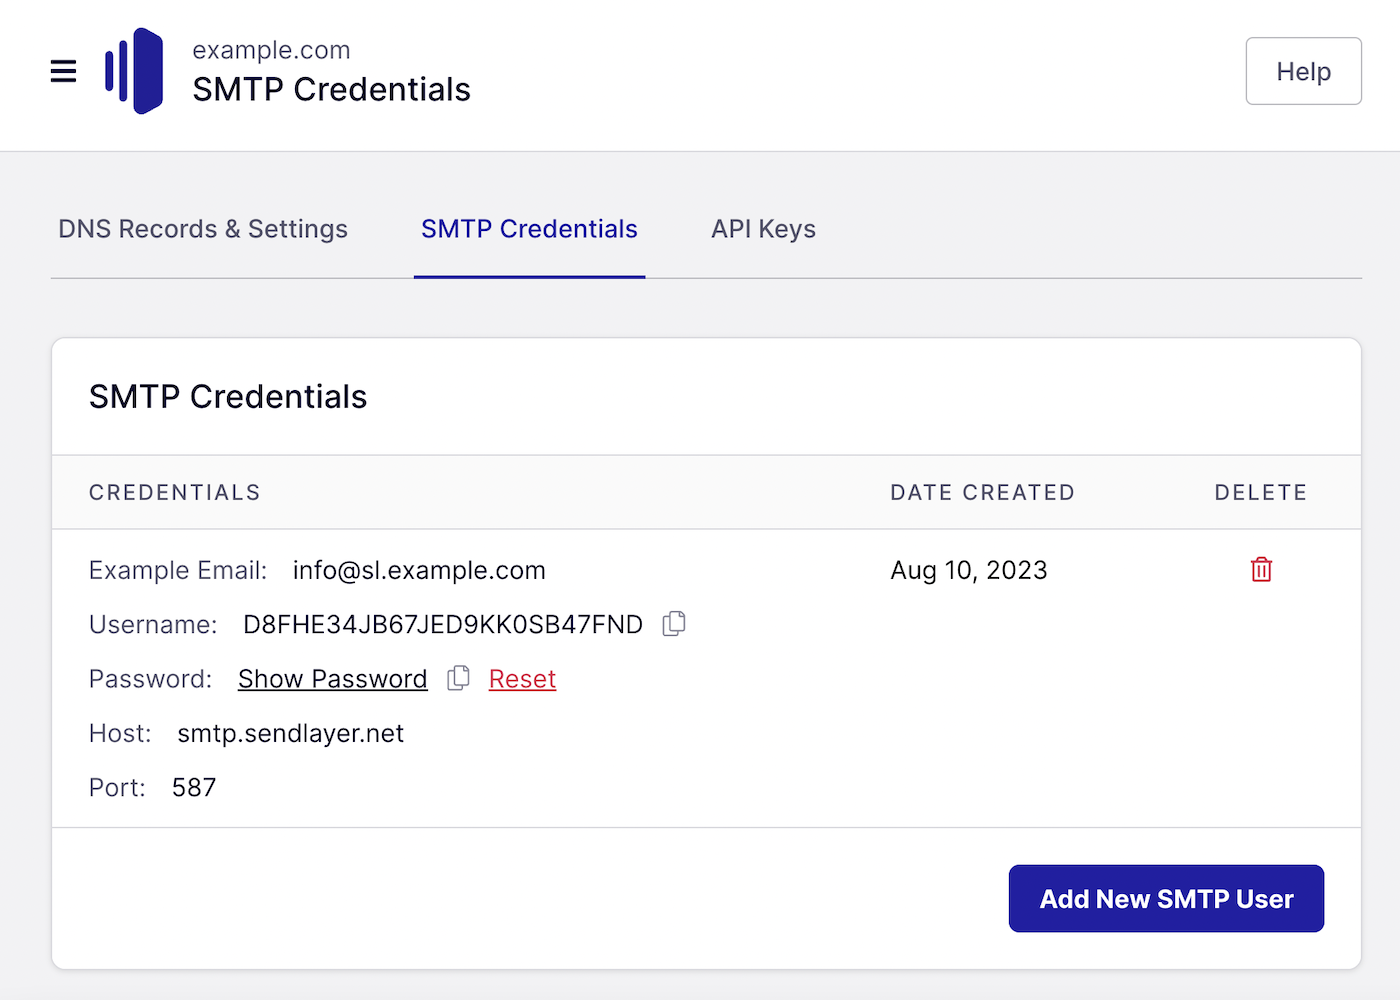
Fill out the SMTP settings as follows:
- Hostname: tls://smtp.sendlayer.net
- Username: Copy and paste the username from your SendLayer dashboard
- Password: Copy and paste the username from your SendLayer dashboard
- Port: 587

You can leave the timeout setting as the default (5 seconds) unless you’re having issues with timeout message when the site is generating issues. If this is the case, you can experiment with setting a longer timeout. This will give the server more time to send emails before displaying an error message.
Additional Mail Parameters
These settings are optional but can be configured as needed for advanced settings.
- Alert Mail: With this setting, you can enable admin email alerts for user and affiliate account registrations, new orders, and submitted reviews.
- Additional Alert Mail: Add email addresses where you want to receive alerts (in addition to the main site admin email.)
After filling in these details, don’t forget to click the Save button in the top right corner to save your settings.
Step 3: Testing Your Email Configuration
Before you go live, it’s crucial to test your email configuration to ensure everything works perfectly.
OpenCart doesn’t come with a built-in email test function, but you can test your email settings easily while your site is in production by placing a test order.
Go to the front end of your store, add an item to your shopping basket and complete checkout. Use cash on delivery as the payment option to avoid entering payment details.
You could also register a new account to test your email settings.
Check your inbox to make sure you receive the notification email.

Customizing OpenCart Email Templates
OpenCart allows you to customize email templates to align with your brand. You can download an extension to edit these templates, but most options are premium extensions. Here’s how you can do it for free:
- Locate the Language Folder: Navigate to your OpenCart installation directory and go to catalog/language/your-language-folder/.
- Find Email Templates: You’ll see several .tpl files corresponding to different email types (e.g., order.tpl, forgotten.tpl).
- Edit Templates: You can open these files in a text editor and customize the HTML content as per your requirements. Ensure you don’t remove the markup that pulls in dynamic data (e.g., {order_id}, {firstname}).
- Save and Upload: After editing, save the files and upload them back to the server.
And that’s it! Now you know how to configure OpenCart mail settings and email templates.
OpenCart Email FAQs
Can I use my Gmail account as an SMTP server in OpenCart?
Yes, you can use your Gmail account for your custom SMTP settings in OpenCart, but it’s generally not recommended for several reasons. Gmail limits the number of emails you send each day, which might cause issues as your store grows. Emails from Gmail also look less professional as they show your Gmail address instead of your business domain.
How do I change my email address in OpenCart?
You can edit your admin email address in your store settings, under the General tab. Enter the new email address you want to use, and remember to click Save to apply the settings.
Why are my OpenCart emails not being delivered?
The most common reason for emails from your OpenCart site not being delivered is because you’re using PHP mail instead of SMTP. Follow the directions above to set up SMTP email. If you’re still having problems, double-check that your SMTP hostname, username, password, and port are correctly entered and make sure you haven’t exceeded your email sending limits for your email provider. If all looks good, it’s worth to check your email domain to see if its been blacklisted.
How can I make sure my OpenCart emails aren’t being marked as spam?
Make sure you’re using the SMTP mail protocol with proper authentication. Set up DKIM, SPF, and DMARC records for your domain. It’s also recommended to use a reputable transactional email service like SendLayer to improve deliverability.
Can I send bulk emails using OpenCart?
OpenCart is not designed for sending bulk marketing emails. For bulk email campaigns, consider using a dedicated email marketing service. For transactional emails (order confirmations, notifications), using a service like SendLayer ensures reliable delivery and compliance with email sending best practices.
That’s it! Now you know how to configure OpenCart mail settings.
Next, would you like to learn how to keep repeat customers? Check out our guide on reducing customer churn with emails for more information.
