When building a backend service, you’ll often need to add email-sending functionality to your web app. You’ve come to the right place if you’re looking to send emails in Go.
I’ve built email systems for Go applications for years, from simple notification scripts to production apps handling thousands of emails daily. The method you choose makes all the difference.
This guide covers three approaches to send email in Go: net/smtp for basic sending, Gomail for easier implementation, and the SendLayer Go SDK for scalable delivery.
You’ll get working code for plain text, HTML emails, attachments, and multiple recipients. Let’s dive in.
Understanding Email Sending Options in Go
When you’re working with email in Go, there are two main ways to send messages:
SMTP: Direct Sending
SMTP (Simple Mail Transfer Protocol) is the traditional way to send email. With Go’s standard net/smtp package, you can connect directly to an SMTP server and send emails without needing third-party SDKs.
Email APIs: Simplified Integration
Transactional email service providers like SendLayer, Postmark, and Amazon SES provide an abstraction over raw SMTP, making it easier to manage features such as authentication, retries, and analytics.
How to Send Email in Golang With SMTP and API
Prerequisites
Below are some requirements you’ll need to follow along with this guide:
- Golang is installed on your machine
- Basic programming knowledge
- SMTP provider
If you’re using SendLayer, you’ll need to authorize your sending domain. This step is essential to improve your site’s email deliverability.
Setting Up a Golang Project
You’ll need to install Go (Golang) on your machine if you haven’t already. Go supports Windows, macOS, and Linux. The installation steps may vary a little depending on your operating system.
Their official documentation includes specific instructions for various Operating Systems on installing Go.
After installing Go, open a terminal window and create a new directory using the command:
mkdir email-app
Next, navigate into the directory and create a new file:
cd email-app && touch sendEmail.go
Then open the folder in your favorite code editor (I’m using VS Code).
Once you’ve opened it, you’re ready to start sending emails in Go.
Method 1: Send Email Using net/smtp (Native Go)
Go’s standard library includes the net/smtp package for sending emails. This is the most basic approach and doesn’t require external dependencies.
Here’s an example of sending a basic email with the native Go package.
package main

import (
    "fmt"
    "net/smtp"
)

func main() {
    // SMTP server configuration
    smtpHost := "smtp.example.com"
    smtpPort := "587"

    // Sender credentials
    from := "[email protected]"
    password := "your-smtp-password"
    username := "your-smtp-username"

    // Recipient
    to := []string{"[email protected]"}

    // Message
    message := []byte("Subject: Test Email from Go\r\n" +
        "\r\n" +
        "This is a test email sent using net/smtp in Go.\r\n")

    // Authentication
    auth := smtp.PlainAuth("", username, password, smtpHost)

    // Send email
    err := smtp.SendMail(smtpHost+":"+smtpPort, auth, from, to, message)
    if err != nil {
        fmt.Println("Error:", err)
        return
    }

    fmt.Println("Email sent successfully!")
}
You’ll need to update smtpHost and smtpPort with your email provider’s credentials. Also, you’ll need to update username, password, and from with your personal SMTP details.
For Gmail SMTP, you’ll need to create an app-specific password. The username is the same as your Gmail address.
While net/smtp works for basic email, it lacks convenience features such as automatic MIME encoding and attachment handling. For production apps, Gomail or an SDK is recommended.
In the next sections, we’ll cover both SMTP using Gomail and API sending methods.
Method 2: Send Emails With SMTP in Go
This section, we’ll use the Gomail package, a third-party library for sending email.
Sending Plain Text Emails
To get started, you’ll need to install the package on your machine. To do so, open a terminal window, then navigate to your Go project directory and run the command:
go get gopkg.in/mail.v2
Once the installation completes, open the sendEmail.go file we created earlier and paste the snippet below:
package main

import (
	"fmt"
    "gopkg.in/gomail.v2"
)

func main() {
	// Initializing the email method
    msg := gomail.NewMessage()

	// Setting email headers
    msg.SetHeader("From", "[email protected]")
    msg.SetHeader("To", "[email protected]")
    msg.SetHeader("Subject", "Email Sent From Go With SendLayer SMTP!")

	// Setting Email body
    msg.SetBody("text/plain", "This is an example of a plain text message sent using Go")

	// Setting up SMTP dialer
    dialer := gomail.NewDialer("smtp.sendlayer.net", 587, "your-smtp-username", "your-smtp-password")

	// Sending the email
    if err := dialer.DialAndSend(msg); err != nil {
		fmt.Println("Error:", err)
        panic(err)
    } else {
		fmt.Println("Email sent successfully")
	}
}
Here is what the code does:
First, we import the gomail package we just installed. The gomail.NewMessage() line initializes the email module.
Then we configure the email headers using the msg.SetHeader() method. This is where you’ll specify the sender, recipient, and email subject.
Next, we use the msg.SetBody() method to write the actual message. It accepts 2 parameters: the message format and the message string.
After configuring the email headers and body, we use the gomail.NewDialer() module to set the SMTP server settings. You’ll need to replace the details in the snippet above with your actual SMTP server details.
I’m using SendLayer SMTP credentials for this tutorial. But the code works with any SMTP provider you use. You just need to replace the SMTP credentials with the one from your provider.
Retrieve Your SMTP Credentials
If you decide to use SendLayer as well, here’s how to retrieve your credentials. Start by logging in to your account dashboard and navigating to the Settings » SMTP Credentials screen.
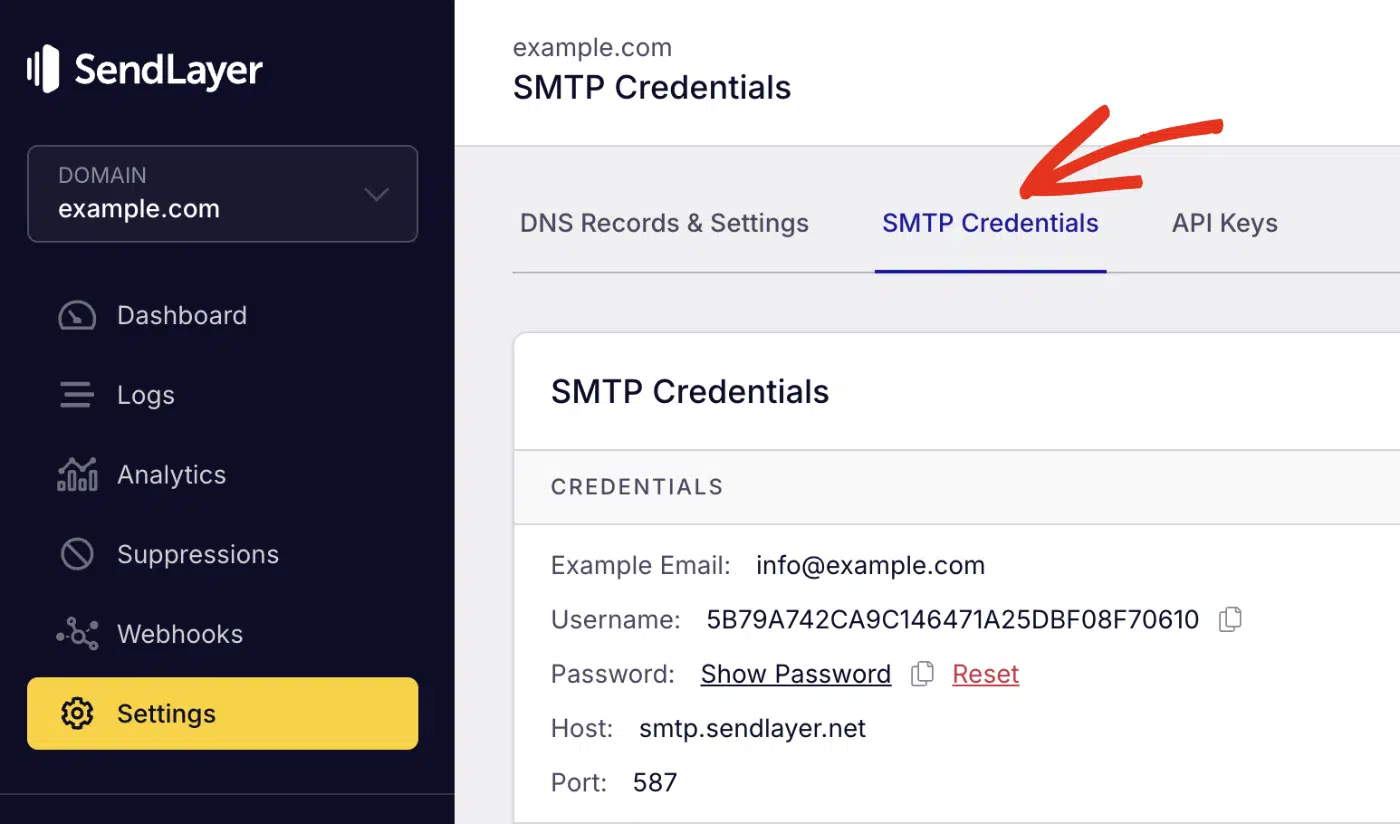
After that, be sure to replace the dummy details with your actual username and password.
Finally, use the dialer.DialAndSend() method to send the email message. The method accepts one parameter, which is the message object. In our example, the parameter is stored in the msg variable.
Send HTML Emails in Go
Gomail also allows you to send HTML emails. To do so, you’ll need to specify the format as HTML in the msg.SetBody() line of code.
msg.SetBody("text/html", `
        <html>
            <body>
                <h2>This is a Test Email from Golang</h2>
                <p><b>Hello!</b> This test HTML email was sent using SendLayer SMTP server</p>
            </body>
        </html>
    `)
Email best practices often suggest having a plain text version of your email message. This will serve as a fallback for email clients that do not support HTML emails.
You can implement this by using the AddAlternative() module. Here is an updated version of our initial code.
package main

import (
	"fmt"
    "gopkg.in/gomail.v2"
)

func main() {
	// Initializing the email method
    msg := gomail.NewMessage()

	// Setting email headers
    msg.SetHeader("From", "[email protected]")
    msg.SetHeader("To", "[email protected]")
    msg.SetHeader("Subject", "Email Sent From Go With SendLayer SMTP!")

	// Setting Email body
    msg.SetBody("text/plain", "This is an example of a plain text message sent using Go")

   // HTML Email version
   msg.AddAlternative("text/html", `
        <html>
            <body>
                <h2>This is a Test Email from Golang</h2>
                <p><b>Hello!</b> This test HTML email was sent using SendLayer SMTP server</p>
            </body>
        </html>
    `)

	// Setting up SMTP dialer
    dialer := gomail.NewDialer("smtp.sendlayer.net", 587, "your-smtp-username", "your-smtp-password")

	// Sending the email
    if err := dialer.DialAndSend(msg); err != nil {
		fmt.Println("Error:", err)
        panic(err)
    } else {
		fmt.Println("Email sent successfully")
	}
}
Send Emails To Multiple Recipients
To send emails to multiple recipients, simply append the recipient email address(es) to the recipient header:
	// Setting email headers
    msg.SetHeader("From", "[email protected]")
    msg.SetHeader("To", "[email protected]", "[email protected]", "[email protected]")
    msg.SetHeader("Subject", "Email Sent From Go With SendLayer SMTP!")
Send Email With Attachments in Golang
You can also include attachment files in your email messages using the .Attach() method. This method accepts one parameter, which is a string containing the path to the attachment file. Here’s an updated version of the code:
package main

import (
	"fmt"
    "gopkg.in/gomail.v2"
)

func main() {
	// Initializing the email method
    msg := gomail.NewMessage()

	// Setting email headers
    msg.SetHeader("From", "[email protected]")
    msg.SetHeader("To", "[email protected]")
    msg.SetHeader("Subject", "Email Sent From Go With SendLayer SMTP!")

   // HTML Email
   msg.SetBody("text/html", `
        <html>
            <body>
                <h2>This is a Test Email from Golang</h2>
                <p><b>Hello!</b> This test HTML email was sent using SendLayer SMTP server</p>
            </body>
        </html>
    `)

   // Golang send email with attachment function
   msg.Attach("path/to/file.pdf")

	// Setting up SMTP dialer
    dialer := gomail.NewDialer("smtp.sendlayer.net", 587, "your-smtp-username", "your-smtp-password")

	// Sending the email
    if err := dialer.DialAndSend(msg); err != nil {
		fmt.Println("Error:", err)
        panic(err)
    } else {
		fmt.Println("Email sent successfully")
	}
}
Send a Test Email in Go
After creating your email function, testing it to ensure it’s properly configured is important. To do so, simply run the .go file you created in a terminal window:
go run sendEmail.go
You should see a success notification in the terminal. Go ahead and check the email inbox of the recipient you specified.

Congratulations! You’ve successfully built an email notification system in your Golang application.
SMTP vs API: Which Should You Use?
Choosing between SMTP and an email API depends on your use case. Here’s how they compare:
| Feature | SMTP (net/smtp, Gomail) | Email API (SendLayer SDK) |
|---|---|---|
| Setup Complexity | Medium – requires SMTP config | Easy – just your API key |
| Deliverability | Depends on server reputation | High – managed infrastructure |
| Scalability | Limited by SMTP server | Highly scalable |
| Analytics | None | Opens, clicks, bounces |
| Error Handling | Manual retry logic needed | Automatic retries |
| Webhooks | Not available | Real-time event notifications |
| Best For | Small apps, testing | Production, high volume |
For most production Go applications, an email API provides better reliability and features. Let’s see how to implement it.
Method 3: Send Email in Go via API
While SMTP works well for smaller projects, using an email API offers better performance and reliability. It also includes features such as webhook management and event tracking.
You can send emails either by making direct API calls to the email endpoint or using an SDK. For this tutorial, I’ll use the SDK approach as it includes additional features like error handling, attachment encoding and simplified request format.
To get started, you’ll first need to install the SendLayer Golang SDK using the go get command:
go get github.com/sendlayer/sendlayer-go
The package requires an active API key for authentication and authorization. Here’s how to create/retrieve your API key in SendLayer.
Retrieve Your API Key
To retrieve your API key, log in to your SendLayer account. Once you’re logged in, click the Settings menu and select the API Keys tab.
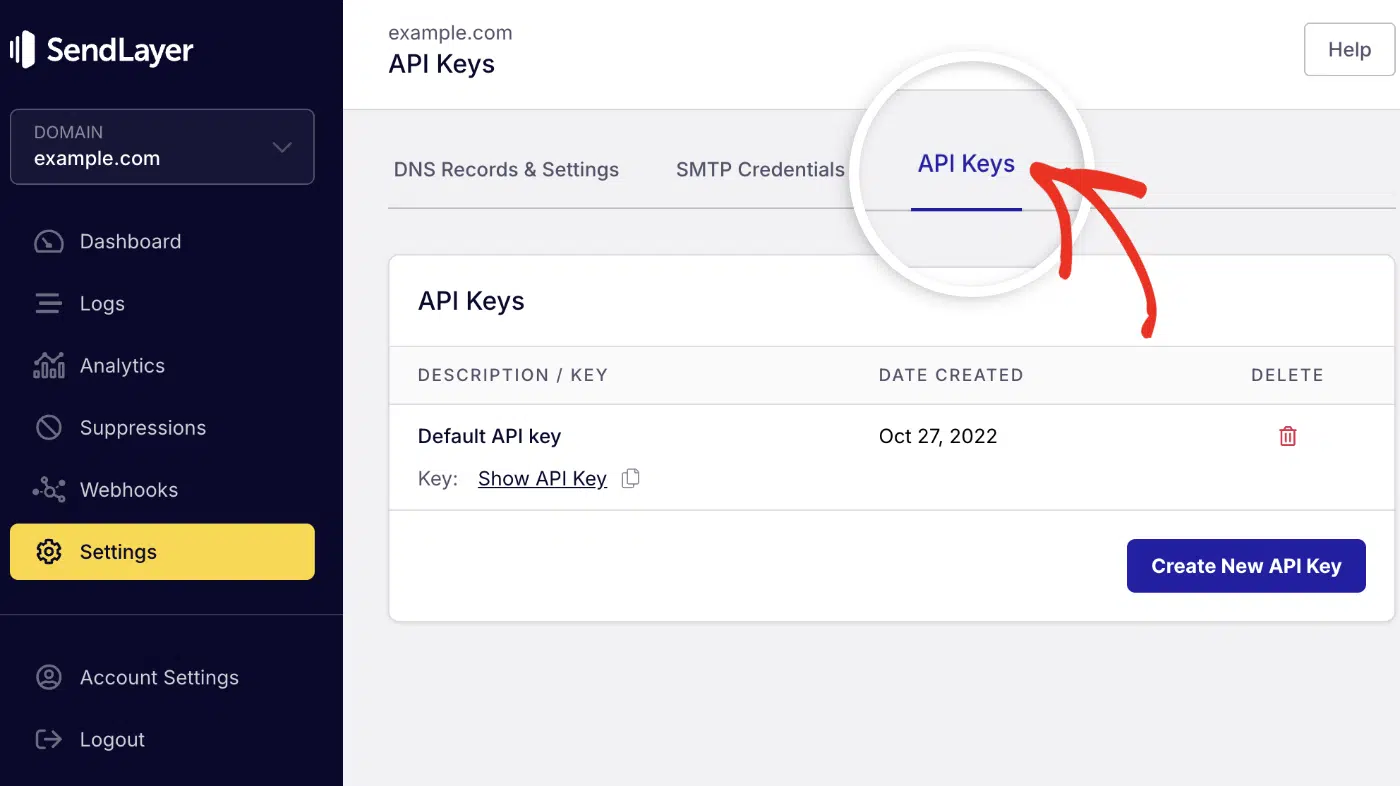
Then click the copy icon next to Default API key to copy it.

After retrieving your API key, create a .env file in the root directory of your project and paste the API key into the file.
API_KEY=your-sendlayer-api-key
I’m using environment variables to store the API key. This prevents you from accidentally exposing sensitive credentials on version control systems.
Pro Tip: Make sure to include the .env file in your project’s .gitignore to prevent it from being pushed along with other project files.
Send Email via API Using SendLayer SDK
To send an email with the Golang SDK, you’ll first need to initialize the client with your API key. Then call sl.Emails.Send() with a SendEmailRequest object containing the email parameter.
package main

import (
    "fmt"
    "log"
    "os"

    "github.com/sendlayer/sendlayer-go"
)

func main() {
    // Initialize the client with your API key
	apiKey := os.Getenv("API_KEY")
	if apiKey == "" {
		fmt.Println("Please set API_KEY environment variable")
		os.Exit(1)
	}

    sl := sendlayer.New(apiKey)

    // Send an email
    resp, err := sl.Emails.Send(&sendlayer.SendEmailRequest{
        From:    "[email protected]",
        To:      "[email protected]",
        Subject: "Test Email",
        Text:    "This is a test email",
    })
    if err != nil {
        log.Fatal(err)
    }

    fmt.Println("Email sent! Message ID:", resp.MessageID)
}
Code breakdown
The SDK requires an active API key to initialize it before you can send an email.
After initializing the package, configure the email parameters. The SDK accepts multiple parameters. However, the following are required:
TextorHtml: Either HTML or plain text email contentFrom: Sender email addressTo: A string or list of email recipient(s)Subject: The email subject line
The sl.Emails.Send() method handles the email request with the email parameters as an argument.
When you run the file, you’ll see the MessageID printed in the console if the email is successfully sent. You should also receive an email in the recipient’s email inbox.

Sending HTML Emails with the SDK
To send HTML emails, set the Html field in the request payload.
package main

import (
    "fmt"
    "log"
    "os"

    "github.com/sendlayer/sendlayer-go"
)

func main() {
    // Initialize the client with your API key
	apiKey := os.Getenv("API_KEY")
	if apiKey == "" {
		fmt.Println("Please set API_KEY environment variable")
		os.Exit(1)
	}

    sl := sendlayer.New(apiKey)

    // Send an HTML email
    resp, err := sl.Emails.Send(&sendlayer.SendEmailRequest{
        From:    "[email protected]",
        To:      "[email protected]",
        Subject: "Test Email",
        Text:    "Plain text fallback",
        Html:    "<html><body><p>This is a test email sent with the <a href=\"https://sendlayer.com\">SendLayer</a> API!</p></body></html>",
    })
    if err != nil {
        log.Fatal(err)
    }

    fmt.Println("Email sent! Message ID:", resp.MessageID)
}
Note: You can include both Text and Html parameters to have both plain text and HTML versions of your email.
Send Emails to Multiple Recipients
SendLayer API also supports sending emails to multiple users, including “CC” and “BCC” email addresses. To do so, use the EmailAddress object to add the list of recipients, including Cc and Bcc.
package main

import (
    "fmt"
    "log"
    "os"

    "github.com/sendlayer/sendlayer-go"
)

func main() {
    // Initialize the client with your API key
	apiKey := os.Getenv("API_KEY")
	if apiKey == "" {
		fmt.Println("Please set API_KEY environment variable")
		os.Exit(1)
	}

    sl := sendlayer.New(apiKey)

    // Send to multiple recipients
    resp, err := sl.Emails.Send(&sendlayer.SendEmailRequest{
        From: sendlayer.EmailAddress{
            Email: "[email protected]",
            Name:  "Paulie Paloma",
        },
        To: []sendlayer.EmailAddress{
            {Email: "[email protected]", Name: "Recipient 1"},
            {Email: "[email protected]", Name: "Recipient 2"},
        },
        Subject: "Sending Emails to Multiple Recipients",
        Html:    "<p>This is a <strong>test email</strong>!</p>",
        Text:    "This is a test email!",
        Cc:      []sendlayer.EmailAddress{{Email: "[email protected]", Name: "CC Recipient"}},
        Bcc:     []sendlayer.EmailAddress{{Email: "[email protected]", Name: "BCC Recipient"}},
        ReplyTo: sendlayer.EmailAddress{Email: "[email protected]", Name: "Reply To"},
    })
    if err != nil {
        log.Fatal(err)
    }

    fmt.Println("Email sent! Message ID:", resp.MessageID)
}
Send Email with Attachments via API in Go
You can also send emails with file attachments. To attach files to your email, use the Attachments field in the SendEmailRequest object.
package main

import (
    "fmt"
    "log"
    "os"

    "github.com/sendlayer/sendlayer-go"
)

func main() {
    // Initialize the client with your API key
	apiKey := os.Getenv("API_KEY")
	if apiKey == "" {
		fmt.Println("Please set API_KEY environment variable")
		os.Exit(1)
	}

    sl := sendlayer.New(apiKey)

    // Send email with attachments
    resp, err := sl.Emails.Send(&sendlayer.SendEmailRequest{
        From: sendlayer.EmailAddress{Email: "[email protected]", Name: "Paulie Paloma"},
        To: []sendlayer.EmailAddress{
            {Email: "[email protected]", Name: "Recipient"},
        },
        Subject: "Email with Attachment",
        Html:    "<p>Please find the attached document.</p>",
        Attachments: []sendlayer.Attachment{
            {Path: "path/to/file.pdf", Type: "application/pdf"},
        },
    })
    if err != nil {
        log.Fatal(err)
    }

    fmt.Println("Email sent! Message ID:", resp.MessageID)
}
The SDK handles file encoding, so you’ll only need to set Path to your local file path or hosted file URL. Then set the file Type (MIME type).
SendLayer SDK supports both local and remote file attachments and allows you to add multiple attachment files.
After updating the snippet, be sure to test your email module to ensure it is working. Here’s what the email looks like with a file attached.

Best Practices for Sending Emails in Go
These are some industry recommendations for sending emails in Go.
Use Goroutines for Async Sending
Never block your main application flow when sending emails:
// Bad - blocks execution
err := sendEmail(recipient)

// Good - sends asynchronously
go func() {
    if err := sendEmail(recipient); err != nil {
        log.Printf("Failed to send email: %v", err)
    }
}()
Validate Email Addresses
If you’re using the built-in net/mail package, always validate before sending:
import "net/mail"

func validateEmail(email string) error {
    _, err := mail.ParseAddress(email)
    return err
}
However, API sending methods, such as the SendLayer Go SDK, include email validation by default. This means that all email addresses, including the sender’s and recipient’s, are validated before the request is sent.
4. Use Environment Variables
Never hardcode credentials. Use environment variables to store sensitive details. In your code, you can access the environment variable with the os.Getenv method. Here’s an example:
import "os"

apiKey := os.Getenv("SENDLAYER_API_KEY")
if apiKey == "" {
    log.Fatal("SENDLAYER_API_KEY not set")
}
FAQs – Send Email in Golang
These are answers to some of the top questions we see about sending emails with Golang.
How do I handle email bounces and delivery failures when sending emails in Go?
With SMTP, you need to process bounce messages manually. However, email APIs often provide tools and webhooks for managing bounces and delivery failures. Check our tutorial to learn more about managing webhooks in SendLayer.
Can I send emails asynchronously in Go to improve application performance?
Yes! You can use goroutines and channels to send emails asynchronously in the background.
What are the advantages of using an API-based service over SMTP in Go?
Using a transactional email service improves deliverability. Some providers also offer built-in analytics and handle bounces. They scale better than direct SMTP for high-volume sending. You can check our guide for details about the different sending methods (SMTP vs APIs).
Can I send email in Golang without SMTP?
Yes! You can connect your Golang app to an API-based email service like SendLayer. Then send your emails through the API.
How do I send HTML email in Go?
Here’s how to send HTML emails in Go using the three methods covered in this tutorial:
Gomail: UseSetBody("text/html", htmlContent)- SendLayer SDK: Set the
Htmlfield in theSendEmailRequestobject. net/smtp: Set the MIME headers toContent-Type: text/html.
That’s it! Now you know how to send emails in Golang with SMTP or API.
Next, would you like to learn about the various types of email bounce? Check out our tutorial on hard bounce vs soft bounce emails for more information.
If you work with Ruby, check out our guide on sending email in Ruby on Rails using ActionMailer and SendLayer SMTP.