
Do you want to add email functionality to your Vue.js application? To send email in Vue, you’ll need a backend or serverless function that holds your email credentials and calls an email service like SendLayer.
Vue runs in the browser, so it can’t safely send email on its own. I’ll show you the secure, reliable way to do it.
After integrating email into several Vue and Nuxt apps, I’ve found the API approach avoids the security traps of client-side sending. You keep your API key on the server. Your Vue app just sends a request to your own endpoint.
In this guide, you’ll set up SendLayer, build a backend route, and wire up a contact form. You’ll also send transactional email and fix the most common errors.
- Can you send email directly from Vue?
- How to send email in Vue
- How do you set up SendLayer for your Vue app?
- How do you send email from a Vue backend route?
- How do you build a contact form in Vue that sends email?
- How do you send transactional email (reset, receipt, verify) in Vue?
- How do you troubleshoot emails not sending in Vue?
- Frequently Asked Questions
Can you send email directly from Vue?
No, not safely. Vue runs in the browser, so any SMTP credentials or API key in your client code is exposed. Anyone can open the browser’s developer tools and read it.
That means you can’t send email straight from a Vue component. Instead, you need a backend or serverless function. It holds the key and calls your email service for you.
That split keeps your secrets safe. Your Vue app sends form data to your own endpoint. The endpoint talks to SendLayer and returns the result.
Warning: Never put an API key, SMTP password, or token in Vue source code. Anything shipped to the browser is public. Treat it as readable by anyone.
How to send email in Vue
You need a small stack: a Vue project, a backend, and an email service. Each piece has one job. Together, they keep your credentials off the client.
Prerequisites
Here’s what you’ll need before you start:
- A Vue 3 project: Any setup works, whether it’s Vite, the Vue CLI, or Nuxt.
- A backend you control. A Nuxt server route, an Express server, or a serverless function (Vercel or Netlify) all work.
- A SendLayer account. The free plan sends 200 emails.
- A verified sending domain. You’ll add SPF and DKIM records to prove you own it.
SPF and DKIM are DNS records that prove your domain is allowed to send email. SPF lists which servers can send for you. DKIM adds a signature that mailbox providers can verify.
Note: No backend yet? A Nuxt server route is the fastest option. Nuxt bundles your Vue frontend and a Node server into a single project.
How do you set up SendLayer for your Vue app?
You can set up SendLayer by getting your API key and authenticating your sending domain. Both take a few minutes. You only do this once per project.
Note: If you’re using SendLayer, then you must verify and authenticate your sending domain before proceeding. Unverified domains are the top reason emails land in spam. For more information, see our tutorial on authorizing your domain.
How do you get your SendLayer API key?
Your API key lives in the SendLayer dashboard. Follow these steps to find it:
Log in to your SendLayer account and navigate to Settings » API Keys.
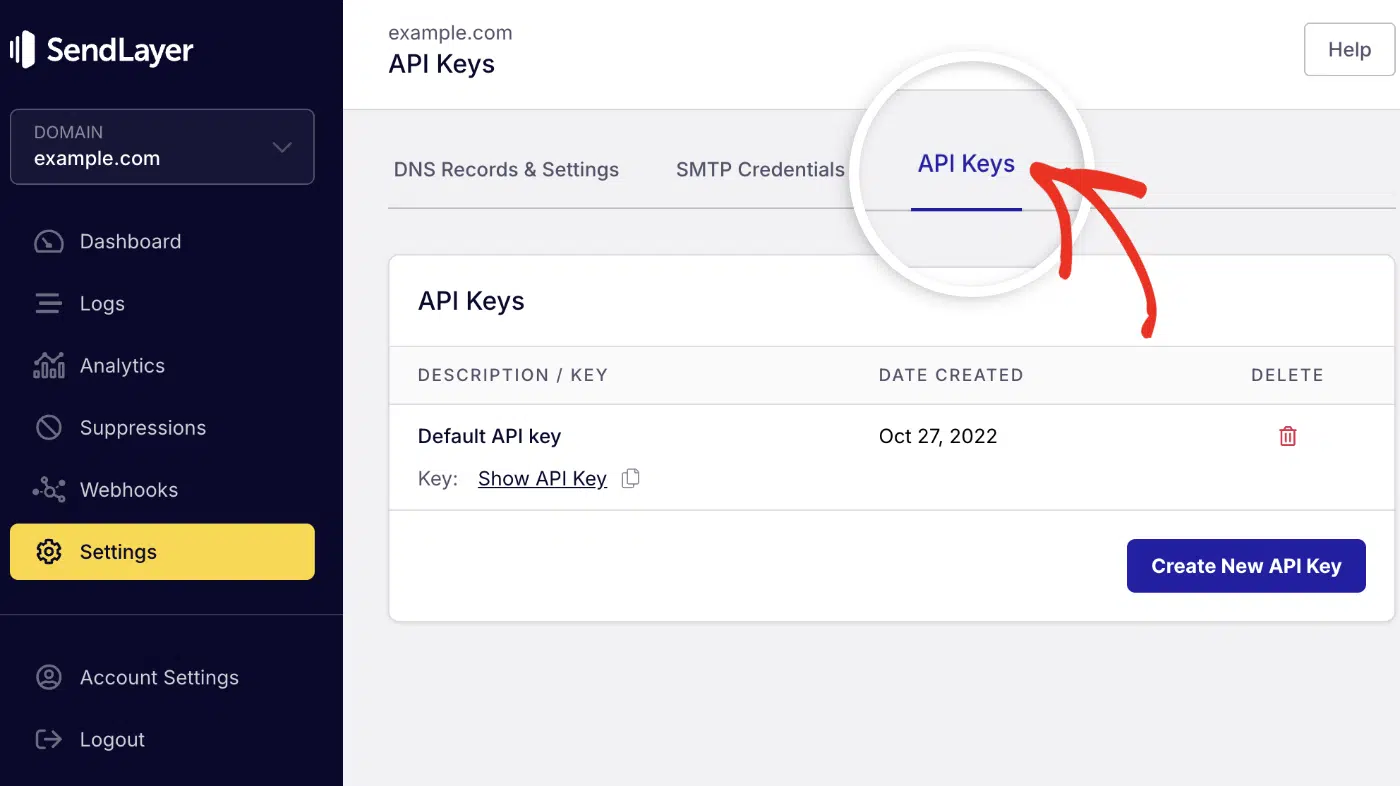
You’ll see your API key listed there. Go ahead and click the copy icon to copy your key.

You should see your full key ready to copy. Keep it private. You’ll store it in an environment variable, never in your Vue code.
How do you send email from a Vue backend route?
You can send email from a backend route by calling the SendLayer SDK with your API key. Your Vue component never touches the key. It just POSTs data to the route.
First, install the SDK and store your key. Run this in your project root:
npm install sendlayer
Then add your key to a .env file. Keep this file out of version control:
# .env (server-side only, never commit this file)
SENDLAYER_API_KEY=your_sendlayer_api_key_here
How do you build the send-email API endpoint?
The endpoint reads the request body, calls SendLayer, and returns a result. Here’s a Nuxt 3 server route at server/api/send-email.post.ts:
// server/api/send-email.post.ts
import { SendLayer } from 'sendlayer'

export default defineEventHandler(async (event) => {
  // Read the form data sent from your Vue component
  const body = await readBody(event)

  // Initialize SendLayer with the key from your env var (server-side only)
  const sendlayer = new SendLayer(process.env.SENDLAYER_API_KEY)

  try {
    // Send the email through SendLayer
    await sendlayer.Emails.send({
      from: { name: 'My Vue App', email: '[email protected]' },
      to: body.to,
      subject: body.subject,
      text: body.message,
    })

    return { success: true }
  } catch (error) {
    // Return a clean error so the frontend can show a message
    return { success: false, error: 'Email failed to send.' }
  }
})
The route runs on the server. The key stays hidden from the browser. The from address must use your verified domain.
Prefer Express? The logic is the same. Here’s the core handler:
// server.js (Express): same idea, different framework
import express from 'express'
import { SendLayer } from 'sendlayer'

const app = express()
app.use(express.json())

app.post('/api/send-email', async (req, res) => {
  // Key loaded from process.env, never sent to the client
  const sendlayer = new SendLayer(process.env.SENDLAYER_API_KEY)

  try {
    await sendlayer.Emails.send({
      from: { name: 'My Vue App', email: '[email protected]' },
      to: req.body.to,
      subject: req.body.subject,
      text: req.body.message,
    })
    res.json({ success: true })
  } catch (error) {
    res.json({ success: false, error: 'Email failed to send.' })
  }
})

app.listen(3000)
Note: In Nuxt 3, you can also access this via useRuntimeConfig().sendlayerApiKey if you’ve defined it in nuxt.config.ts under runtimeConfig.
How do you call the endpoint from a Vue component?
Your Vue component calls the endpoint with fetch. It sends the data as JSON and reads the response. Here’s a Vue 3 <script setup> example:
<script setup>
import { ref } from 'vue'

const status = ref('')

async function sendEmail() {
  status.value = 'sending'

  // POST to your own backend route, not to SendLayer directly
  const res = await fetch('/api/send-email', {
    method: 'POST',
    headers: { 'Content-Type': 'application/json' },
    body: JSON.stringify({
      to: '[email protected]',
      subject: 'Hello from Vue',
      message: 'This email was sent through SendLayer.',
    }),
  })

  const data = await res.json()
  status.value = data.success ? 'sent' : 'error'
}
</script>

<template>
  <button @click="sendEmail">Send Email</button>
  <p v-if="status === 'sent'">Email sent!</p>
  <p v-if="status === 'error'">Something went wrong.</p>
</template>
The component knows nothing about your API key. It only talks to /api/send-email. That’s the whole point of the split.
How do you build a contact form in Vue that sends email?
You build a contact form by binding inputs with v-model and posting them to your backend route. The same /api/send-email endpoint handles it. Add basic validation and a status message.
Here’s a complete Vue 3 contact form:
<script setup>
import { ref } from 'vue'

// Form fields bound with v-model
const name = ref('')
const email = ref('')
const message = ref('')
const status = ref('')

async function submitForm() {
  // Basic validation before sending
  if (!name.value || !email.value || !message.value) {
    status.value = 'invalid'
    return
  }

  status.value = 'sending'

  const res = await fetch('/api/send-email', {
    method: 'POST',
    headers: { 'Content-Type': 'application/json' },
    body: JSON.stringify({
      to: '[email protected]',
      subject: `New message from ${name.value}`,
      message: `${message.value}\n\nReply to: ${email.value}`,
    }),
  })

  const data = await res.json()
  status.value = data.success ? 'sent' : 'error'
}
</script>

<template>
  <form @submit.prevent="submitForm">
    <input v-model="name" type="text" placeholder="Your name" />
    <input v-model="email" type="email" placeholder="Your email" />
    <textarea v-model="message" placeholder="Your message"></textarea>
    <button type="submit" :disabled="status === 'sending'">
      {{ status === 'sending' ? 'Sending...' : 'Send' }}
    </button>

    <p v-if="status === 'invalid'">Please fill in all fields.</p>
    <p v-if="status === 'sent'">Thanks! Your message was sent.</p>
    <p v-if="status === 'error'">Sorry, something went wrong.</p>
  </form>
</template>
The form disables the button while sending. It shows clear feedback for each state. Users always know what’s happening.

How do you send transactional email (reset, receipt, verify) in Vue?
Transactional email is a message triggered by a user action, like a password reset, receipt, or email verification. A contact form sends you a message. Transactional email sends one to your user.
Use an HTML email template for password resets and receipts
These emails usually need HTML for buttons and styling. Use the html field instead of text with the SendLayer SDK. You can include both for better delivery.
Here’s a backend snippet that sends a password-reset email:
// server/api/send-reset.post.ts
import { SendLayer } from 'sendlayer'

export default defineEventHandler(async (event) => {
  const body = await readBody(event)

  // Key stays on the server, loaded from your env var
  const sendlayer = new SendLayer(process.env.SENDLAYER_API_KEY)

  const resetLink = `https://yourapp.com/reset?token=${body.token}`

  await sendlayer.Emails.send({
    from: { name: 'My Vue App', email: '[email protected]' },
    to: body.email,
    subject: 'Reset your password',
    // HTML version for the styled button and link
    html: `
      <h1>Reset your password</h1>
      <p>Click the button below to set a new password.</p>
      <a href="${resetLink}">Reset Password</a>
    `,
  })

  return { success: true }
})
Pro Tip: Adding a plain-text version helps deliverability. Some mail clients prefer text. Include both text and html when you can.
Trigger this route from your app after the user requests a reset. The token comes from your auth logic. If you need a full password reset flow, our Node.js guide walks through it. Keep that logic on the server too.
How do you troubleshoot emails not sending in Vue?
Most failures come from three issues: a missing API key, an unauthenticated domain, or a broken request to your backend. Here’s how to fix each one.
1. API key not loaded (undefined env var): Your SDK call fails because process.env.SENDLAYER_API_KEY is empty. Check that your .env file sits in your project root. Restart your dev server after editing it, since env vars load at startup.
2. Emails land in spam: That usually means your domain isn’t authenticated. Add the SPF and DKIM records in SendLayer and verify them. Make sure your from address uses that verified domain.
3. CORS or 405 errors: A 405 means your route doesn’t accept the method you used. Confirm your file is named send-email.post.ts so it handles POST. For Express, check that the route method matches your fetch call.
Important: Check the SendLayer dashboard event logs when a send fails. They show whether the request reached SendLayer and why it bounced.
Frequently Asked Questions
These are answers to some of the most common questions we see about sending emails in Vue.js.
Can you send email from Vue without a backend?
Not safely. Vue runs in the browser, so any credentials in your code are exposed to users. For secure transmission, you’ll need a backend or a serverless function to store the key. It calls the email service on your behalf.
If you need to send email without a backend, you can use tools like EmailJS to handle emails. EmailJS handles the backend logic and you’ll only need to connect your site to their API.
Why shouldn’t I put my email API key in Vue code?
Because Vue ships to the browser, and anyone can read that code. A leaked key lets others send email as you and burn your quota. Keep the key in a server-side environment variable instead. Your Vue app should only call your own endpoint.
How do I send a contact form submission to email in Vue?
Bind your form fields with v-model, then POST them to a backend route with fetch. The route calls SendLayer with your API key and sends the email. Show a status message so users know it worked. The form earlier in this guide does exactly that.
Can I use Nodemailer in Vue?
Not in Vue itself, since Nodemailer needs a Node server and can’t run in the browser. You can install it via npm install nodemailer in your backend project. Many developers prefer an email API like SendLayer for simpler setup and better deliverability. Working in Next.js instead? See our guide to sending email in a Next.js app with Nodemailer.
How do I send email in Nuxt?
Create a server route in the server/api folder, like send-email.post.ts. Call the SendLayer SDK there with your API key from an env var. Your Vue pages POST to that route with fetch. Nuxt runs the route on the server, so your key stays safe.
That’s it! Now you know how to send emails in Vue.js.
If you’re using a different JavaScript framework, then check out the following guides:
