
One of the most common features modern web applications require is email notifications. If you’re looking to send emails from your Next.js application, you’ve come to the right place.
Whether you’re building a contact form, an order confirmation system, or a newsletter signup, sending transactional emails is a common feature in many web applications. Modern frameworks like Next.js make it easy to create email functionality and send emails with React components.
In this guide, you’ll learn how to send emails in Next.js. I’ll also show you a practical use case by building a contact form to allow users to contact you through your app.
Let’s jump right in!
How to Send Emails in Next.js with SMTP
Prerequisites
To follow along with this tutorial, you’ll need to have the following in place:
- Node.js and npm installed
- Next.js installed on your machine. This tutorial uses Next.js v15 or above
- Basic understanding of Next.js and React
- An email service provider. I’m using SendLayer for this tutorial. But the steps are similar regardless of your email provider.
One of the reasons I use SendLayer is that it automatically protects your domain reputation by sending your emails through a subdomain. SendLayer also offers affordable pricing options and lets you get started for free. This is ideal for developers to test their email functionality during development.
After creating your SendLayer account, you’ll need to add and verify your sending domain. This step is essential to improve your site’s email deliverability.
With that, you’re all set up and ready to send your first email through your Next.js application.
Set up a Nextjs Project
Next.js is an extension to the React library. It includes additional features that allow users to build fully functional web apps that support both client and server actions.
For example, you’ll need to implement an email backend with a server like Express.js before you can send emails in React. However, with Next.js, you can implement the email backend without the need for a third-party backend.
While this tutorial assumes you already have a Next.js project set up, I’ll do a quick run-through on how to get started with Next.js. You can skip to the sending email with Next.js section if you have an existing project.
To install Next.js, open a terminal window and run the command below.
npx create-next-app@latest
You’ll be presented with some prompts to configure your installation. I’ll use the default options, so you can go ahead and click Enter for each of the prompts.
What is your project named? … next-email-api
Would you like to use TypeScript? … No / (Yes)
Would you like to use ESLint? … No / (Yes)
Would you like to use Tailwind CSS? … No / (Yes)
Would you like your code inside a `src/` directory? … (No) / Yes
Would you like to use App Router? (recommended) … No / (Yes)
Would you like to use Turbopack for `next dev`? … No / (Yes)
Would you like to customize the import alias (`@/*` by default)? … (No) / Yes
Note: Next.js supports both the App Router (recommended) and the Pages Router. This tutorial uses the App Router, but the email functionality works similarly with both routing systems. If you’re migrating from an older Next.js project using Pages Router, the main difference will be in how you structure your API routes.
After choosing your installation options, create-next-app will install the required dependencies for your project in the folder you specified as the project name.
Once the installation completes, navigate to the project directory using the command:
cd next-email-api
You can start the development server using the command:
npm run dev
This will make your Next.js web app available locally for previewing changes in real-time. When you open the local server (usually localhost:3000), you’ll see the default page.

Congratulations! You’ve successfully installed Next.js.
Understanding Next.js Project Structure
Now let’s explore the file structure a little before proceeding. To do so, open the project in a code editor. I’m using VS Code editor, but you can use any editor.
Below is an example of the default file structure that create-next-app will contain:
next-email-api/
|── app/
│   |── favicon.ico
│   |── globals.css
│   |── layout.tsx
│   |── page.tsx
│  └── page.module.css
|── public/
│   |── file.svg
│  └── …other svg files
|── .gitignore
|── eslint.config.mjs
|── jsconfig.json
|── package.json
|── README.md
└── next.config.ts
The app/ directory contains all the files and pages that are rendered to the users. The page.tsx file within the app directory corresponds to the index/home page. Each folder you create within this directory corresponds to a URL path.
For example, if you’d like to create a contact page for your Next app, you can do so by creating a contact folder within the app directory. You’ll also need to create a page.tsx file within the contact directory that’ll contain the content for the page.
Okay! Enough about Next.js file structure. Let’s get started on implementing the function for sending emails with Nextjs.
Step 1: Install Nodemailer and Configure Environment Variables
Nodemailer is a popular SMTP library for Node.js that connects your JavaScript web app to an SMTP server. It’s relatively easy to configure and includes additional features like sending emails to multiple recipients and including attachment files to emails.
To get started, you’ll need to install Nodemailer as a dependency for your Next.js app. To do so, open a terminal window and navigate into your project’s directory. Then run the command below:
npm install nodemailer
After the installation completes, create a .env.local file in the root of your Next.js project and add your email credentials. Next.js will automatically make the environment variables available during runtime.
SMTP_HOST=smtp.sendlayer.net
SMTP_PORT=587
SMTP_USER=your-smtp-username
SMTP_PASS=your-smtp-password
[email protected]
Tip: Make sure to include the .env.local file in your project’s .gitignore. This ensures you’re not exposing private credentials such as SMTP passwords in your code.
You’ll need to update the SMTP credentials above to match your actual details.
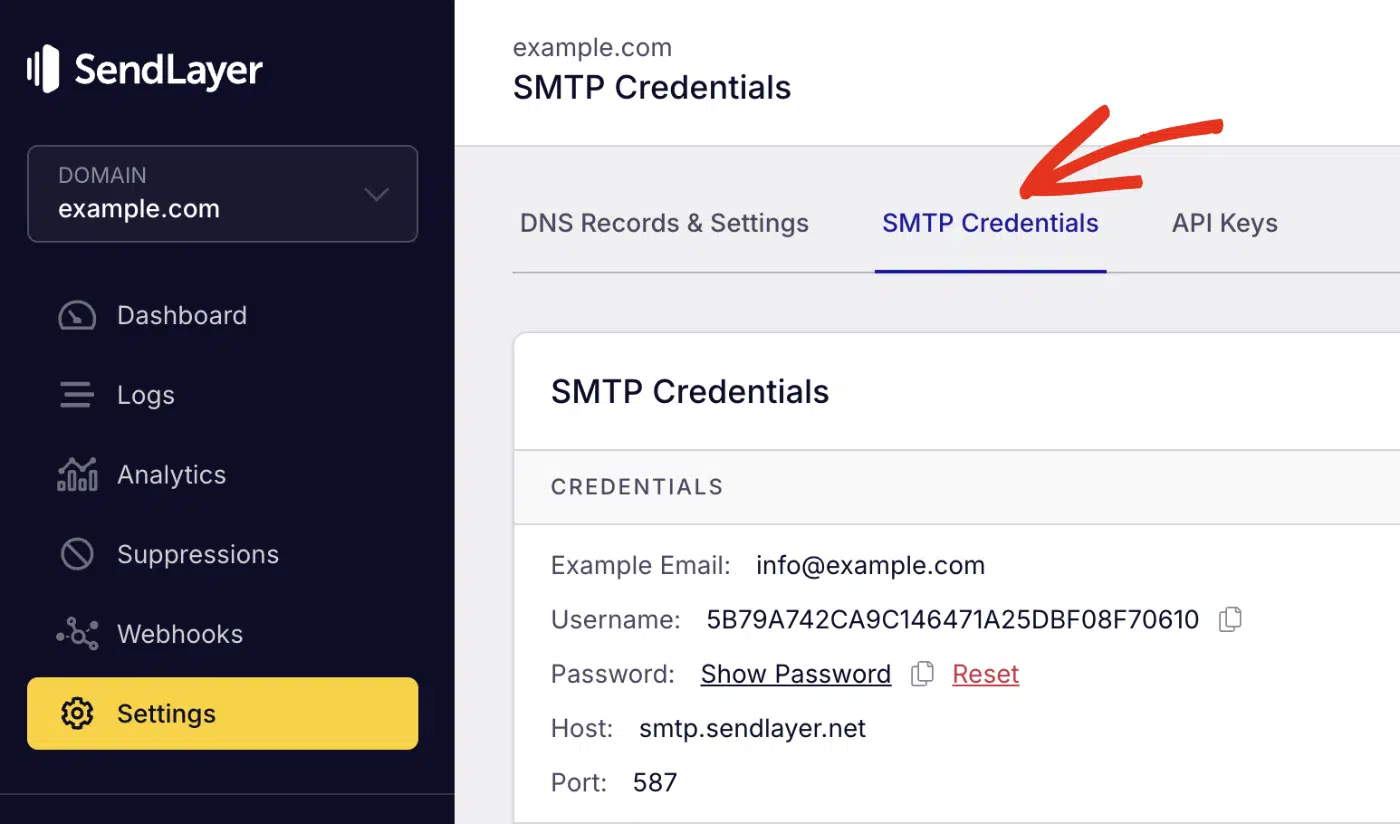
If you’re using SendLayer, you can access your SMTP credentials from your account dashboard by navigating to Settings » SMTP Credentials.
Note: In SendLayer, your sender email needs to be at the domain you’ve authorized. For instance, if you authorized example.com, your sender email should include @example.com.
Step 2: Create an API Route to Send Emails
One of the impressive features about building with Next.js is that it supports both client and server components. You can define API routes within your project in the app/api directory.
Let’s create a route.js file within the following directories:
app/api/contact/route.js
Naming the file route.js ensures Next.js treats the file as an API endpoint. After creating the file, add the following snippets to it:
import nodemailer from 'nodemailer';
import { NextResponse } from 'next/server';

export async function POST(request) {

  const body = await request.json();
  const { name, email, message } = body;

  // Check that all required parameters are parsed
  if (!name || !email || !message) {
    return NextResponse.json(
      { message: 'Missing required fields' },
      { status: 400 }
    );
  }

  try {
    // Initializing the SMTP connection
    const transporter = nodemailer.createTransport({
      host: process.env.SMTP_HOST,
      port: process.env.SMTP_PORT,
      auth: {
        user: process.env.SMTP_USER,
        pass: process.env.SMTP_PASS,
      },
    });

   // Define email content
   const mailOptions = {
      from: process.env.FROM_EMAIL,
      to: '[email protected]', // Enter recipient email
      subject: `New message from ${name}`,
      text: `Email: ${email}\n\n${message}`,
   }

    // Function to send the email
    await transporter.sendMail(mailOptions);

    return NextResponse.json(
      { message: 'Email sent successfully' },
      { status: 200 }
    );
  } catch (error) {
    console.error('Email sending error:', error);
    return NextResponse.json(
      { message: 'Failed to send email' },
      { status: 500 }
    );
  }
}
Code breakdown
First, we import the nodemailer and NextResponse libraries. NextResponse is a utility for handling API responses.
Since we are sending a request, we specify the endpoint as a "POST" request in the function name.
Then we check that the API request contains a body object. Then parse the JSON body to strip the name, email, and message parameters.
The line nodemailer.createTransport() initializes the SMTP server using the credentials we stored in the .env.local file. With Next.js, you can directly access environment variables using the process.env.ENV_NAME syntax.
After that, we store the email data in the mailOptions variable. This is where you’ll define options like the sender, recipient(s), subject and email content.
Then, we call the transporter.sendMail() function to send the email using the SMTP transporter we configured.
In our implementation, I also added error handling using JavaScript’s try catch syntax.
Send HTML Emails
In the example above, we used text for plain text emails. Nodemailer also lets you send HTML emails. Here’s an updated version of the snippet above that supports HTML content.
// ...Other code snippets

   const mailOptions = {
      from: process.env.FROM_EMAIL,
      to: '[email protected]', // Enter recipient email
      subject: `New message from ${name}`,
      html: `<p><strong>Email:</strong> ${email}</p><p>${message}</p>`,
   }

    // Function to send the email
    await transporter.sendMail(mailOptions);
You can also add a text object to the mailOptions if you’d like to serve as a backup.
Tip: Adding a plain text version of your email ensures your email content is visible, especially on email clients that do not support HTML content in emails.
Send Email to Multiple Recipients
Nodemailer allows you to send emails to multiple recipients. This is particularly useful when building a contact form, and you need to send a copy of the message to both the site owner and the user.
To send emails to multiple recipients in Next.js, you’ll simply need to append the recipient’s email address to the to object in the mailOptions variable. Here’s an example:
   // ... Other code snippets

   const mailOptions = {
      from: process.env.FROM_EMAIL,
      to: `[email protected], [email protected], ${email}`,
      subject: `New message from ${name}`,
      html: `<p><strong>Email:</strong> ${email}</p><p>${message}</p>`,
   }

    // Function to send the email
    await transporter.sendMail(mailOptions);
Send Email With Attachments
Another feature that email client supports is file attachments. Fortunately, nodemailer lets you attach single or multiple files when sending emails.
To include attachments to your email, simply add the attachments list to the mailOptions parameter. Then specify the filename and path as objects. Here’s an example:
// ...Other code snippets

   // Define email content
   const mailOptions = {
      from: process.env.FROM_EMAIL,
      to: '[email protected]', // Enter recipient email
      subject: `New message from ${name}`,
      html: `<p><strong>Email:</strong> ${email}</p><p>${message}</p>`,
      attachments: [
            {
                filename: 'file.pdf',
                path: './path/to/file.pdf'   // Update with the correct path to your file
            }
      ]
   }

    // Function to send the email
    await transporter.sendMail(mailOptions);
You can include multiple files to the attachments list. Simply add a new object and specify the filename and path parameters:
// ...Other code snippets

   // Define email content
   const mailOptions = {
      from: process.env.FROM_EMAIL,
      to: '[email protected]', // Enter recipient email
      subject: `New message from ${name}`,
      html: `<p><strong>Email:</strong> ${email}</p><p>${message}</p>`,
      attachments: [
            {
                filename: 'file.pdf',
                path: './path/to/file.pdf'   // Update with the correct path to your file
            },
            {
                filename: 'image.png',
                path: './path/to/image.png'
            }
      ]
   }

    // Function to send the email
    await transporter.sendMail(mailOptions);
Pro Tip: Attachment files often increase the size of the email message. I recommend verifying the maximum file size and supported file extensions your email provider allows. This will help you prevent emails from failing due to unsupported file extension or exceeding the file limit.
Step 3: Create a Simple Contact Form (Optional)
After creating the API route to send emails in your Next app, you can use it in the frontend. There are different use cases for the email backend we just created. For instance, you could create a welcome email template for new user registration.
For this tutorial, I’ll create a simple contact form component to allow users to send emails to the site admin.
To do so, create a new component in the following directory:
components/ContactForm.tsx
After that, copy and paste the code below into the ContactForm file.
'use client'
import { useRef, useState } from 'react';

export default function ContactForm() {
  const formRef = useRef<HTMLFormElement>(null);
  const [status, setStatus] = useState<{
    type: 'idle' | 'loading' | 'success' | 'error';
    message: string;
  }>({ type: 'idle', message: '' });

  const handleSubmit = async (e: React.FormEvent<HTMLFormElement>) => {
    e.preventDefault();
    setStatus({ type: 'loading', message: 'Sending...' });

    try {
      const formData = new FormData(e.currentTarget);
      const data = {
        name: formData.get('name'),
        email: formData.get('email'),
        message: formData.get('message'),
      };

      const res = await fetch('/api/contact', {
        method: 'POST',
        headers: { 'Content-Type': 'application/json' },
        body: JSON.stringify(data),
      });

      if (!res.ok) {
        throw new Error('Failed to send message');
      }

      setStatus({ type: 'success', message: 'Message sent successfully!' });
      formRef.current?.reset();
    } catch (error) {
      setStatus({
        type: 'error',
        message: 'Failed to send message. Please try again.'
      });
    }
  };

  return (
    <form ref={formRef} onSubmit={handleSubmit} className="space-y-4 max-w-md mx-auto p-6">
      <div className="space-y-2">
        <label htmlFor="name" className="block text-sm font-medium">Name</label>
        <input id="name" name="name" type="text" required className="w-full px-3 py-2 border rounded-md focus:outline-none focus:ring-2 focus:ring-blue-500" placeholder="Your name"  />
      </div>

      <div className="space-y-2">
        <label htmlFor="email" className="block text-sm font-medium">Email</label>
        <input id="email" name="email" type="email" required className="w-full px-3 py-2 border rounded-md focus:outline-none focus:ring-2 focus:ring-blue-500" placeholder="[email protected]" />
      </div>

      <div className="space-y-2">
        <label htmlFor="message" className="block text-sm font-medium">Message</label>
        <textarea id="message" name="message" required rows={4} className="w-full px-3 py-2 border rounded-md focus:outline-none focus:ring-2 focus:ring-blue-500" placeholder="Your message" />
      </div>

      <button type="submit" disabled={status.type === 'loading'} className="w-full bg-blue-500 text-white py-2 px-4 rounded-md hover:bg-blue-600 focus:outline-none focus:ring-2 focus:ring-blue-500 focus:ring-offset-2 disabled:opacity-50 disabled:cursor-not-allowed">
        {status.type === 'loading' ? 'Sending...' : 'Send Message'}
      </button>

      {status.message && (
        <p
          className={`text-sm ${
            status.type === 'error'
              ? 'text-red-500'
              : status.type === 'success'
              ? 'text-green-500'
              : 'text-gray-500'
          }`}
        >
          {status.message}
        </p>
      )}
    </form>
  );
}
Code breakdown
In the snippet above, you’ll notice I added the 'use-client' keyword at the top of the component. The reason is that recent versions of Next.js treat all components as server components by default.
To create a client component, you’ll need to explicitly specify it using the keyword. This step is necessary because we’re using the useRef and useState React hooks.
The formRef variable references the form element for direct DOM manipulation. The status state variable manages the form’s submission state with TypeScript types. Below are the types I defined in the snippet.
- idle: Initial state
- loading: During form submission
- success: After successful submission
- error: If submission fails
The handleSubmit function is where we make the API request to the /api/contact/ endpoint that contains our email API.
In Next.js, you can directly call the fetch() function and specify the required parameters like the request type, URL, headers, and request body.
The request body is obtained from the form data and parsed as a JSON object.
In the return statement, we are simply rendering an HTML form element. We use the ref and onSubmit event handlers to target the form data and handle form submissions.
Tip: If you’re building a contact form, you need to consider adding CAPTCHA to your form to prevent bot submissions. See our tutorial to learn more about preventing spam on contact forms.
Step 4: Send a Test Email in Next.js
After creating your email API, I recommend sending a test email to ensure it functions properly. To get started, you’ll first need to start the development server:
npm run dev
There are different ways to send a test email. You can make an API call using cURL or through a third-party app like Postman. You can also use the API directly on your site’s frontend.
For this tutorial, I’ll use the contact form component we created above to send a test email. To start, create a page.jsx file within the following directory:
app/contact/page.jsx
After that, import the form component using the command below:
import ContactForm from "@/app/components/ContactForm";
Then add the component to your page. Here’s the entire snippet for the contact page:
import ContactForm from '@/app/components/ContactForm';

function Contact() {
  return (
    <div className=' h-screen items-center justify-center '>
        <h1 className='text-4xl font-bold text-center'>Contact Us</h1>
        <ContactForm />
    </div>
  )
}

export default Contact;
After that, open your browser and navigate to localhost:3000/contact. You should see the contact page component rendered in the browser.

Go ahead and fill out the form and send the message. You’ll see a success alert if everything is working properly.

The email should also be sent to the recipient’s inbox.

FAQs — Send SMTP Emails Using Next.js
These are answers to some of the top questions about sending emails in Next.js
How do you send emails directly from HTML?
The easiest way to send emails directly from HTML is with the mailto: protocol. This lets you configure email messages from the client. Alternatively, you can use a third-party library like EmailJS to directly send email from your frontend.
Can I send email with JavaScript?
Yes! You can send emails with JavaScript through a backend library like Nodemailer or using transactional email services like SendLayer. Our guide on sending emails in JavaScript covers the various sending options.
That’s it! You’ve now learned how to send emails in Next.js using an SMTP server.
This guide has shown you how to implement email functionality via an SMTP server. But you can also use an email API to send your Next.js emails. Check out our tutorial on sending emails in JavaScript for more details.