Do you want to know how set up a Magento store to sell products online?
Magento is a free platform designed for building eCommerce sites. Built on PHP, it’s a popular alternative to WordPress as it offers more power and flexibility for building large online stores.
It can be tricky to set up Magento if you haven’t used it before. But with our simple guide, you can build your eCommerce site, configure SMTP email settings to ensure important order confirmations and other transactional emails reach the inbox and customize your store so it looks and works the way you want it to.
How to Set Up a Magento Store
Before you get started with the general setup, you’ll need to install Magento on your web server.
Some web hosts offer one-click installation of Magento from the control panel. We highly advise taking advantage of this option or choosing a host that offers pre-installed Magento hosting, as it can be a rather tricky and lengthy experience unless you have advanced server setup experience and are comfortable working from the command line.
Also note that as Magento has specific hosting and memory requirements, you may need to opt for VPS, cloud, or dedicated server hosting. Before you commit to a web hosting contract, make sure that the hosting plan you’ve chosen supports Magento.
If your web host doesn’t offer pre-installation or one-click setup or you want to install on a local server, you’ll need to download and install Magento manually. Seek advice from your hosting provider or another professional if you’re unsure of any of the steps.
To note: Magento Open Source vs. Commerce
There are two main versions of Magento eCommerce platforms: Open source and Commerce (now Adobe Commerce). This tutorial refers to Magento Open Source, which is free to download and use. Adobe Commerce is a paid service aimed at larger businesses.
Step 1: Configure Basic Store Settings
The first step is to log into the admin panel for your Magento website.
This will most likely be located at www.yoursite.com/admin but the exact URL will depend on how the Magento setup was configured. If your host installed Magento for you, they should provide this URL along with the admin username and password for your new store.

Enter your admin username and password and click the Sign in button.
Once you’re in your admin dashboard, you can see an overview of your sales (this will be empty on a fresh install unless you’ve installed the Magento sample data) and a menu that lets you navigate to your products, customers, and various settings.

Navigate to Stores » Configuration in the sidebar. Here you can configure all the essential settings for your store.

In the General settings, you can choose the location of your store, time zone, weight units (metric or imperial), and weekend days.

Scroll down to Store Information. Here you can add all the details of your store such as its name, phone number, operating hours, address, and VAT number.

When you’ve finished adding your store details, remember to click the Save Config button at the top of the screen to save your settings.
In the Web settings, you can adjust some of the technical configuration of how your site is set up, including URL format, the default page for the home page, 404 not found error page, and other pages, the layout of product and category pages, and other various technical settings.

Continue going through the settings to choose your store’s default currency and currency conversion and store email addresses.
Step 2: Configure SMTP Email Settings
By default, Magento uses the PHP mail function, which can be unreliable. As it’s crucial that both you and your customers receive email notifications for new order notifications, new account registrations, shipping confirmations, and other important information, setting up SMTP email is essential.
It’s not possible to set custom SMTP settings in the base Magento installation, but there are several SMTP Magento extensions that add this functionality.
For this tutorial, we’ll use the Magento 2 SMTP extension by Mageplaza.
This is a free extension that’s compatible with many SMTP mail services. You can use any SMTP service you wish, but for optimal reliability, we recommend SendLayer.
SendLayer is a dedicated SMTP service with a focus on reliability and scalability. When you use SendLayer to send your Magento emails, your emails will be delivered quickly and hit the inbox every time thanks to built-in domain reputation and spam filter protection
Sign Up for a SendLayer Account
To get started with SendLayer, see our guide to creating your account. You can choose any plan that is suitable for your needs, or get started with the free account if you want to try out the service first.
Once you’ve created an account with SendLayer, you’ll need to add your store domain to your account. SendLayer will authorize your domain for sending emails by creating DNS authentication records that allow receiving mail servers to confirm that messages really came from your store.
Authorize Your Domain
While this email authentication may have been considered optional in the past, it’s now essential as mail providers like Yahoo and Google are blocking unauthenticated emails.
You can follow our complete guide to authorizing your domain, which will take you through the steps of adding your domain name to your SendLayer account and getting it authorized.
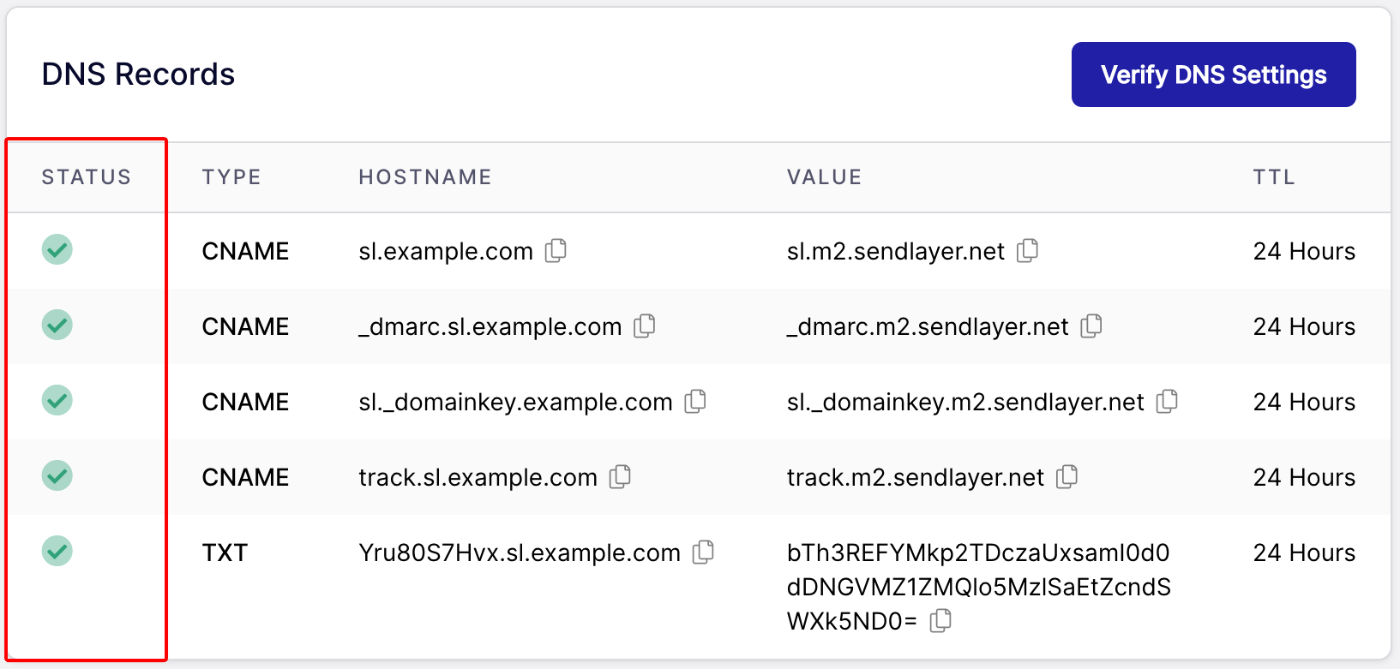
Once your domain has been successfully authorized, you can use the settings provided by SendLayer to configure the SMTP email settings in your Magento account.
Install the Magento 2 SMTP Extension
There are 3 ways to install the extension to your Magento store:
- Download the extension .zip file and upload the files to your hosting account
- Install via Composer from the command line
- Install from the Magento Marketplace
You can see full details of the different installation methods at the Mageplaze website.
The recommended installation method is via the command line. To install Magento 2 SMTP with this method, run the following commands:
composer require mageplaza/module-smtpphp bin/magento setup:upgradephp bin/magento setup:di:compilephp bin/magento setup:static-content:deployValidate the Extension
Once the extension is installed, you’ll see a new Mageplaze Extensions section in the settings. You’ll need to activate the extension before you can use it by registering with Mageplaza. Enter your name and email address and click the Activate Now button to continue.

You should see a message saying that the extension has been activated.

Configure the Magento 2 SMTP Extension
Enable the extension by choosing Yes from the dropdown. We also advise turning on the email log. This will allow you to monitor and troubleshoot emails sent from your Magento store. You can also set the number of days to keep email logs for and enter emails to blacklist from sending if you wish.

Add Your SMTP Server Details
In another browser tab, log into your SendLayer account and navigate to Settings. Click on SMTP credentials to access the information you need.
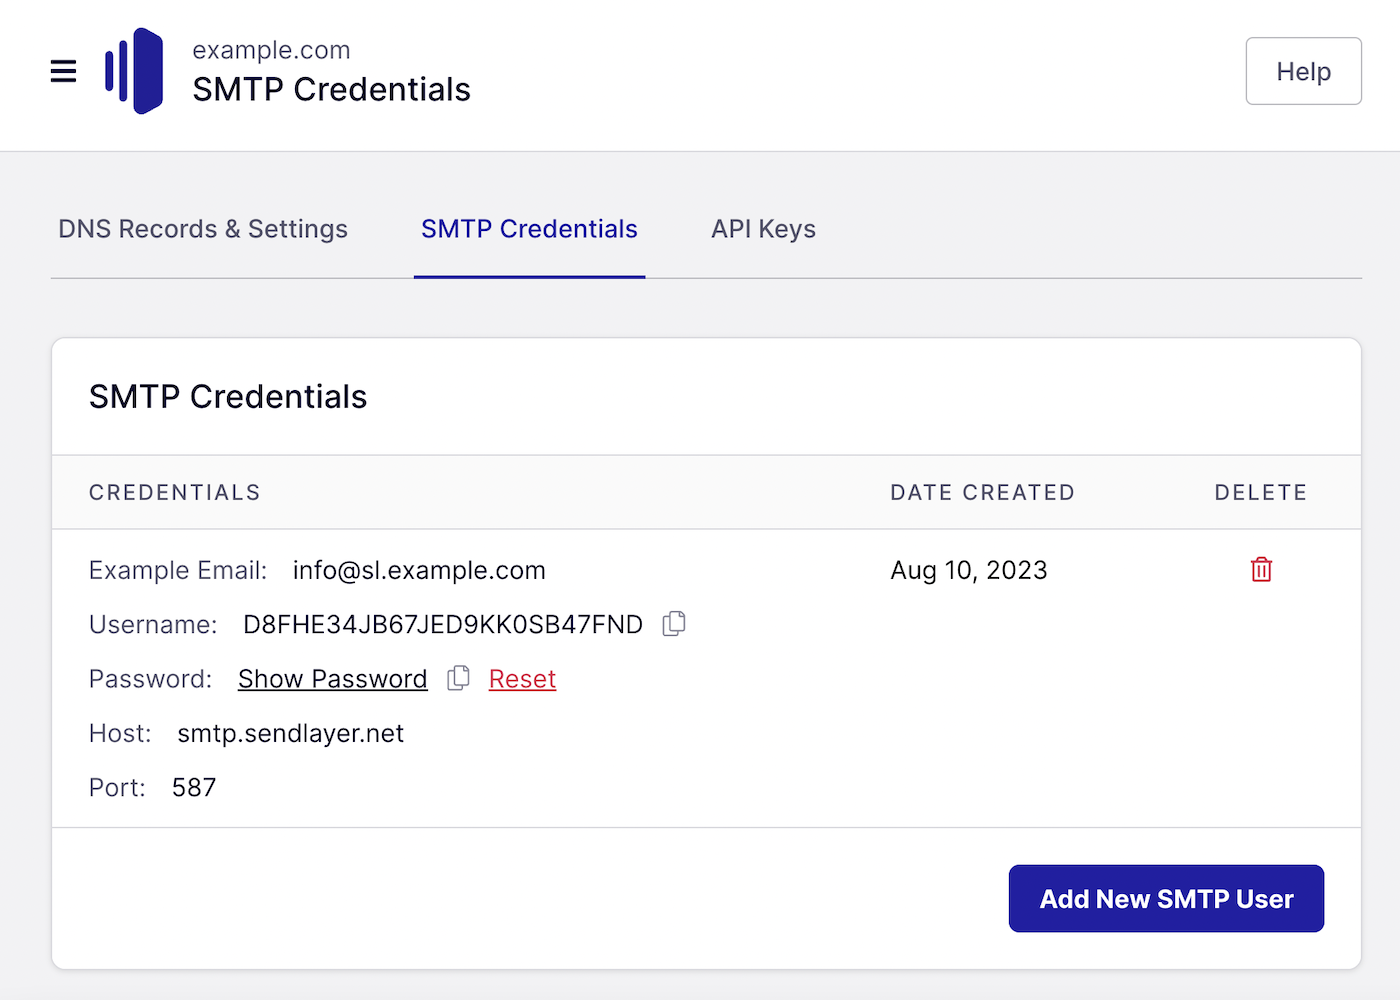
Now you can enter your SendLayer SMTP details in the SMTP Configuration Options as follows:
- Host: smtp.sendlayer.net
- Port: 587
- Protocol: We recommend TLS
- Authentication: Login
- Username: copy and paste the username from your SendLayer dashboard
- Password: copy and paste the password from your SendLayer dashboard
- Return path email: you can leave this blank unless you want to define a different email to receive replies.

Send a Test Email
To make sure your SMTP email settings are configured correctly, scroll down to enter an email address to receive a test email and click the Test Now button.

You should see a popup confirming the email was sent successfully.

Check your inbox to make sure you have received the email.

Finally, click the Save Config button at the top of the screen to save your settings.

Now SMTP email is successfully set up and all the emails sent from your Magento store will also be stored in a log.
View Your Email Log
You can access your email log by navigating to Store » SMTP Email Logs.

Here you can see all the emails sent from your site, the sender and recipient, the status, and the time and date they were sent. You can also view individual emails, resend them, or delete them.

Monitoring your store emails regularly is a good way to spot any deliverability issues. If you’re using SendLayer, you can also use the email Log in SendLayer.
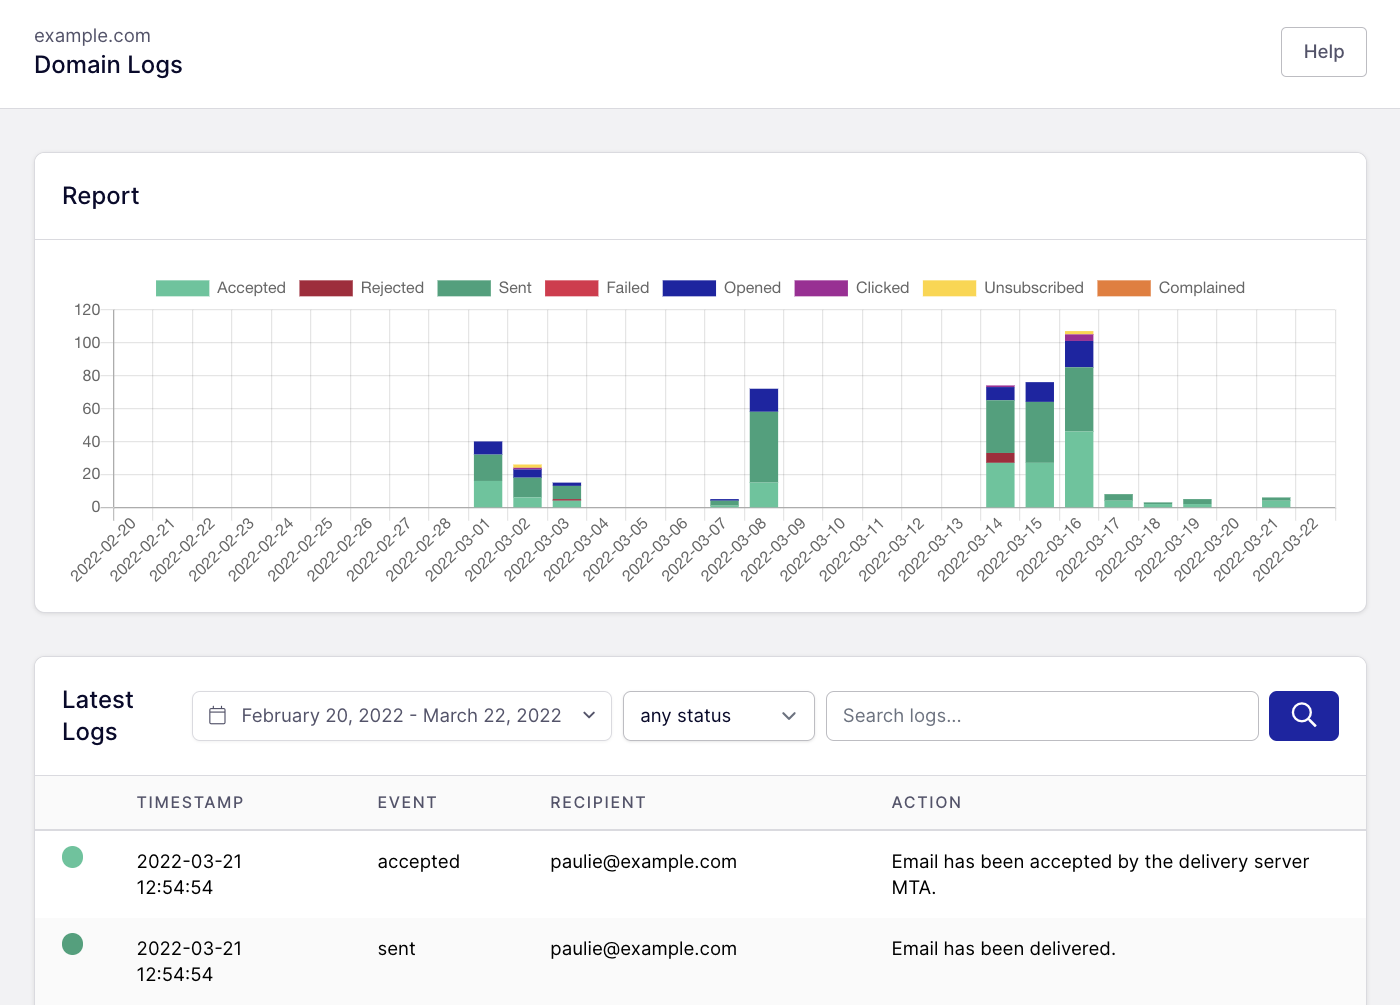
The SendLayer email log includes additional reports and information about email status, as well as showing you if emails have been opened or clicked.
Step 3: Customize Email Templates
Magento comes with several transactional email and newsletter templates, which you can customize to meet your needs.
You can find these templates in Marketing » Email Templates.
Click the Add New Template button to set up a new template.

Choose the template you want to customize and click the Load Template button.

You can now name your template and customize the text as you wish. Check out our guide to improving transactional email design if you need some ideas.

Step 4: Customize the Design of Your Store
When you first install Magento, it will look very plain.

If you’ve installed the Magento sample data, your Magento site will look more like an actual online store.

However, you don’t have to stick to this design. Magento has hundreds of free and paid templates available, so you can choose one to suit the style and theme of your store.
It used to be simple to browse and install templates from the Magento dashboard. Sadly this is no longer the case and you’ll need to either download the files and transfer them to your web host manually, or install with Composer on the command line.
Not all themes are available via Composer, so for this tutorial, we’ll demonstrate how to install a theme by manually copying the files
Download a Magento Theme
You can find a theme on Adobe Marketplace or other theme marketplaces such as ThemeForest and Creative Market. Themes are also available on GitHub. If you want something bespoke, you could hire a Magento development expert to create a custom theme for you.
Once you’ve found a theme that’s suitable for your store, download the theme zip file.
Extract the zip file and upload the files to your Magento file system. Copy the files to the app/ and pub/ folders, keeping the file original file structure.
Install Your New Theme
Put Magento into developer mode by running the command
$ php bin/magento deploy:mode:set developerDisable the Magento cache and install the theme with the following two commands:
$ php bin/magento cache:disable$ php bin/magento setup:upgradeIn your Magento admin dashboard, navigate to Content » Design Configuration and click the Edit link next to the store view.

Choose the theme you want to use in the dropdown.

Click the Save Configuration button and head over to the front end of your store to see how it looks.

You can customize the layout and design of individual pages by navigating to Content » Pages and choosing Edit from the Action dropdown menu.

Here you can change the heading text, adjust the meta title and description of each page for search engine optimization (SEO) to improve search engine ranking, and choose a different layout if you wish.

Step 5: Add Products
Click on the Catalog option in your Magento admin menu to add new products and categorize them.
The product page gives you an overview of your entire product inventory, including the name of the product, product type, SKU, price, stock quantity, date last updated, and a thumbnail for easy identification.

Click the Add Product button to add a new product. Fill out the product details, set up configurable products with multiple options such as colors, add images and videos, select related products, and other relevant information.

The Categories page allows you to set up nested categories and configure how they’re displayed.

Once you’ve added your products, it’s time to set up shipping and payments.
Step 6: Configure Shipping and Delivery Options
You can edit the delivery options available in your store by navigating to Store » Configuration » Sales » Delivery Methods.
On this page, you can set up shipping options such as flat rate, free, In-store, and a choice of delivery couriers. You can set conditions for each shipping option (such as order amount or country) as well as the price.

Step 7: Set Up Payments
You’ll also find the Payment Methods screen under Store » Configuration » Sales.
Magento integrates with PayPal and Braintree Payment gateways. You can also enable other payment options such as check or money order, bank transfer, or cash on delivery.

You can also enable or disable zero subtotal checkout, which will allow customers to order free items.
Step 8: Launch Your Store
You’re now well on your way to having a fully functioning Magento eCommerce store.
It’s worth spending some time exploring the other settings in Magento to understand its full functionality for marketing integrations, reports, and hundreds of extensions.
Happy selling!
FAQs
As a transactional email provider, we’re often asked for advice on choosing and setting up an eCommerce platform. Here are some of the most common questions we’re asked about Magento:
Which one is better – Magento or Shopify?
Magento and Shopify both have their pros and cons. Shopify is much easier for beginners to create a website, and comes with a huge range of apps to extend its functionality if you want to create a multi vendor marketplace or sell digital products. Magento requires a high level of technical skill to install and configure. But it’s a good option for powering large eCommerce sites with lots of products or if you want to set up a multi-store envrionment.
Is Magento good for beginners?
Magento has a steep learning curve and we wouldn’t recommend it to beginners. WooCommerce is a much simpler option to install and set up if you want a self-hosted open-source option for building an eCommerce website, or you could consider setting up a BigCommerce site, which offers flexibility and power in an easy-to-use platform. Alternatively, you could opt for managed Magento hosting or outsourced development services to have the software set up and managed for you.
What is Magento called now?
Magento was acquired by Adobe in 2018. The Magento Commerce platform was subsequently rebranded as Adobe Commerce. However, the open source platform (previously Magento Community Edition) is still known as Magento.
What are the Magento hosting requirements?
Magento should be installed on a server running the latest version of Apache or NGINX, MySQL or equivalent database, and PHP. Magento also needs at leas 2GB of RAM to run efficiently. Because of this requirement, it can’t be installed on most shared web hosting, and so Magento hosting tends to be significantly more expensive than WordPress hosting. You’ll also need an SSL certificate to improve your store security and ensure your customer data is protected.
Is Magento oudated?
Many people consider Magento to be an outdated platform as its popularity has decreased significantly in recent years. However, Magento is still a solid and powerful platform that’s highly scalable and offers advanced security and SEO features. However, Magento is now not as accessible as it was in the past due to increased server needs and the phasing out of easy wizard-style installers. The remaining Magento community mainly consists of serious developers. Unfortunately, its waning popularity means there are fewer themes and extensions being developed too.
That’s it! Now you know how to set up your Magento Store
Next, would you like to learn how to sell digital products on Shopify? Check out our tutorial on setting up Downloadable Digital Assets (DDA) on Shopify for more information.
