Do you want to sell digital products on Shopify?
Shopify handles digital goods through apps. You can use the free Digital Downloads app for the basics, or an app like Downloadable Digital Assets (DDA) for file protection and custom email delivery.
If you’re not familiar with Shopify and DDA, it can be a little overwhelming to set up your online store for the first time.
To help you out, we’ve put together this tutorial to walk you through the entire process, from signing up for a Shopify account to improving your store security, monitoring your sales and downloads, and setting up SMTP email.
Can You Sell Digital Products on Shopify?
Shopify is primarily a platform for selling physical goods. But you can also list digital products for sale and make them available for direct download using Shopify’s Digital Downloads app.
While Digital Downloads offers the basic functionality you need to sell digital products online, many digital product store owners prefer to use a more advanced app like DDA.
DDA offers a user-friendly interface for listing and selling your digital products with improved file protection and email features.
One thing to keep in mind: digital products don’t need shipping. You’ll turn off the shipping setting when you add each product. Depending on where you sell, you may still need to charge tax, such as VAT on digital goods in the EU.
Selling Digital Products on Shopify: How To Set Up Your Store
If you want to sell online with no experience, Shopify is a great platform to get started.
Shopify is simple to set up and easy to manage, even if you have no technical knowledge or previous experience building online stores or websites.
If you already have a Shopify store and want to transition into selling digital products, you can skip to step 2 of this tutorial. But if you’re starting from scratch, the first step is to sign up for a Shopify account.
1. Sign Up for a Shopify Account
Shopify lets you set up a store and get started for free if you want to try the platform before committing to a monthly payment.
Let’s get started by heading over to Shopify.com and clicking the Start free trial button.

Start by selecting your level of experience with running an online store, then click the Next button.

Next, choose where you want to sell products. If you just want to set up an online store, select “An online store”. If you also want to sell products on third-party marketplaces, your blog, social media, or in person, Shopify has tools for these, too.

After that, choose the type of products you’ll be selling. Go ahead and choose the Digital products option. This will set up your store for selling digital products on demand from the start.

Next, set the location of your store. This is important to help calculate shipping rates and taxes.

Now you can create your Shopify account. You can use your email address or sign in with one of your existing accounts for Google, Apple, or Facebook.

Sit back and relax while Shopify sets up your account!
After a couple of minutes, you’ll be directed to your new Shopify dashboard.

Congratulations! You now have your very own Shopify store. The next step is to get your online store all set up and ready to sell digital products.
The main difference between a store selling physical products and one selling digital products is that digital products are made available to shoppers directly after a purchase.
To add this feature to your store, you’ll need to extend the base functionality of Shopify by installing a digital product app.
2. Install the Downloadable Digital Assets (DDA) App
If you’ve just set up your Shopify store, you can click on the Browse digital product apps button.

This will take you to a list of Shopify’s recommended apps. However, rather than installing one of these apps, click the link to go to the Shopify app store, which lists hundreds of apps to add more features to your Shopify store.
If you already had a Shopify store set up prior to following this tutorial, you can go directly to the Shopify app store and install Downloadable Digital Assets (DDA).
We recommend DDA because it offers more control over your email and file security than other digital download apps.
Why Use DDA to Sell Digital Products on Shopify?
Email is crucial for the operation of any eCommerce store, as you need to communicate with your customers to confirm orders, send shipping notifications, and other important account and order updates.
If you’re selling digital products, it’s even more important to make sure emails sent from your store reach the recipient’s inbox quickly. As digital products are delivered electronically, shoppers expect to be able to access their purchases instantly.
This is the main reason we advise installing the DDA Shopify app, as it gives you the option to set custom SMTP settings for your email. This means you can opt to use an SMTP email delivery service like SendLayer, which will improve the speed, reliability, and deliverability of your store emails and provide a better customer experience.
Add the Downloadable Digital Assets App to Your Shopify Store
Once you’re on the Shopify app store, search for the app by typing “DDA” into the search bar and hitting enter.

Click the app listed as DDA – Digital Downloads.

Click the Install button on the DDA app listing to install the app to your Shopify store.

DDA offers a 7-day free trial so you can try it out before committing to a paid plan. There is also a free plan available, which offers up to 1GB of storage and the option to attach one file per product. Paid plans start from $9 a month and include additional features such as thank you page downloads, order expiry, extra file protection, and reports.
Click the Install app button to confirm installation of the app to your Shopify store.

Choose the DDA plan that suits your needs best. We recommend the Premium plan, as it allows you to use your own email address for sending store emails.

Check the details of your free trial, payment amounts, and dates, and click the Approve button. You should see a welcome screen with some information on getting started.

And that’s it! DDA is now installed and active on your store. You can go ahead and continue with setup and add some digital products to your store.
3. Add Digital Products to Your Shopify Store
Let’s start as suggested by uploading some products to your store.
Click the Upload link under step 1 of the Getting Started section.
On this page, you can upload the digital files you want to sell. You’ll still need to create products to attach them to in your Shopify store.
You can either bulk-upload products or upload them one by one.
To upload the digital products you want to sell, simply drag them into the upload area. You can also use the Upload your files button or the Add a link button if your files are already online.

Once your products have finished uploading, go back to your Shopify admin page to add them to your store.
To do so, navigate to Products in the dashboard menu and click the + Add product button.

Fill out the title and description of your product.

Scroll down to the pricing section and set the price for your item. We don’t need to add any media files, because you’ll be attaching the product to the file you already uploaded to the DDA app.

As this is not a physical product, you don’t need to track inventory, so uncheck the Track quantity option. Also, uncheck the This is a physical product option under shipping.

Once you’ve finished entering all the details of your product, click the Save button to add it to your store. Repeat this process for all your digital products.
After you’ve added all your products, you’ll need to return to your DDA admin dashboard to link the products to the files you uploaded.
Navigate to the Products page from the menu. You’ll see the products you added to Shopify are already listed here.

To attach the files you uploaded to DDA, click the name of the product, choose the relevant file from the dropdown, and click the Attach button.

Repeat this process to add the files to all your products.
4. Set Up Email for Your Digital Products Store
The next step is to ensure your email is configured correctly to use custom SMTP.
In your DDA dashboard, navigate to Settings » Email settings and choose the option to Send emails from your email address using SMTP.

To fill out the SMTP settings, you’ll need to find details of your email provider’s SMTP server.
Alternatively, you can use a third-party SMTP mail provider like SendLayer. SendLayer is designed specifically for the needs of eCommerce stores and other websites that need to send transactional emails.
Sign Up for SendLayer
SendLayer improves the deliverability of emails sent from your Shopify store to ensure that they hit the recipient’s inbox and aren’t marked as spam.
When you sign up for a SendLayer account, the platform will authorize your domain for sending email. This is essential if you’ll be sending emails to users on platforms like Gmail, as they now block emails sent from unauthorized domains.
SendLayer creates a subdomain to send emails from. This protects the reputation of your primary domain so if you ever inadvertently end up on any spam blacklists, it will only affect the subdomain and not the parent domain.
To get started with SendLayer, follow our documentation on creating a SendLayer account. You can then add the domain of your Shopify store that you want to send emails from and follow the steps to authorize your domain for maximum email deliverability.
After you’ve followed the instructions to add SendLayers DNS records to your domain, you’re all set. It may take 24-48 hours for the DNS changes to take effect.
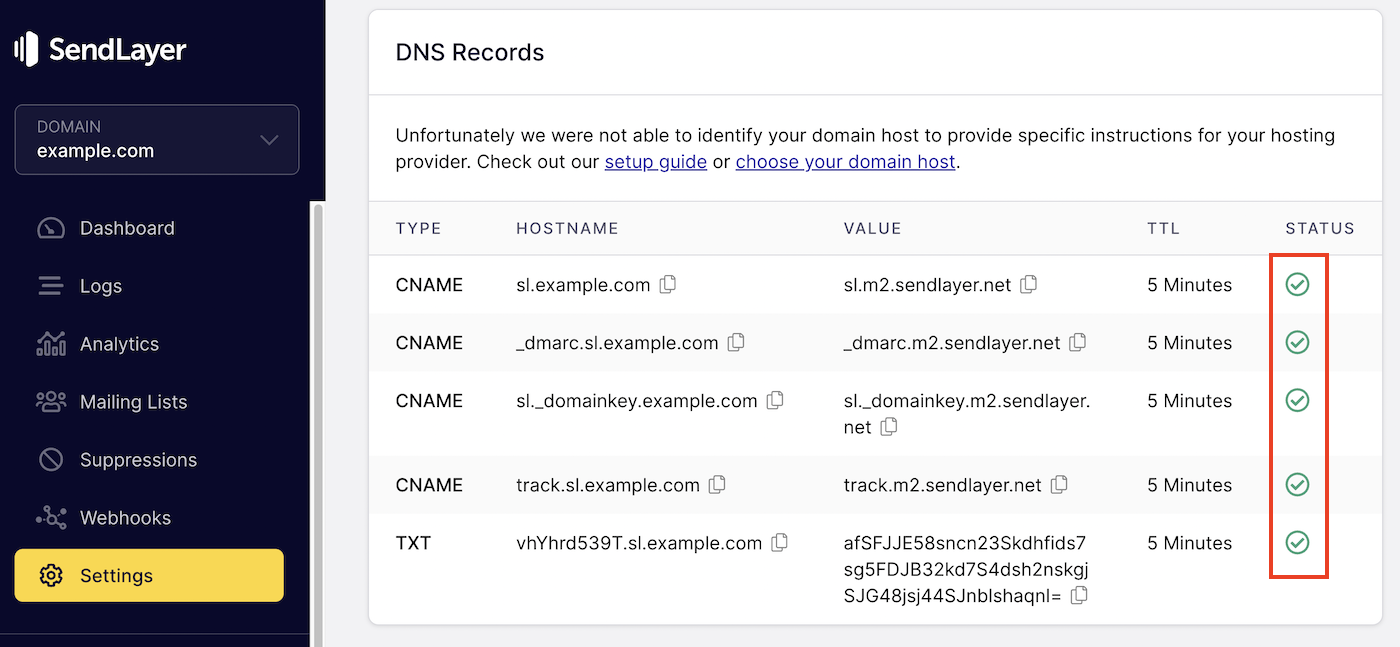
When you see a green checkmark next to your DNS records in your SendLayer dashboard, you’re ready to use your account for sending emails.
Add SendLayer SMTP Details to DDA
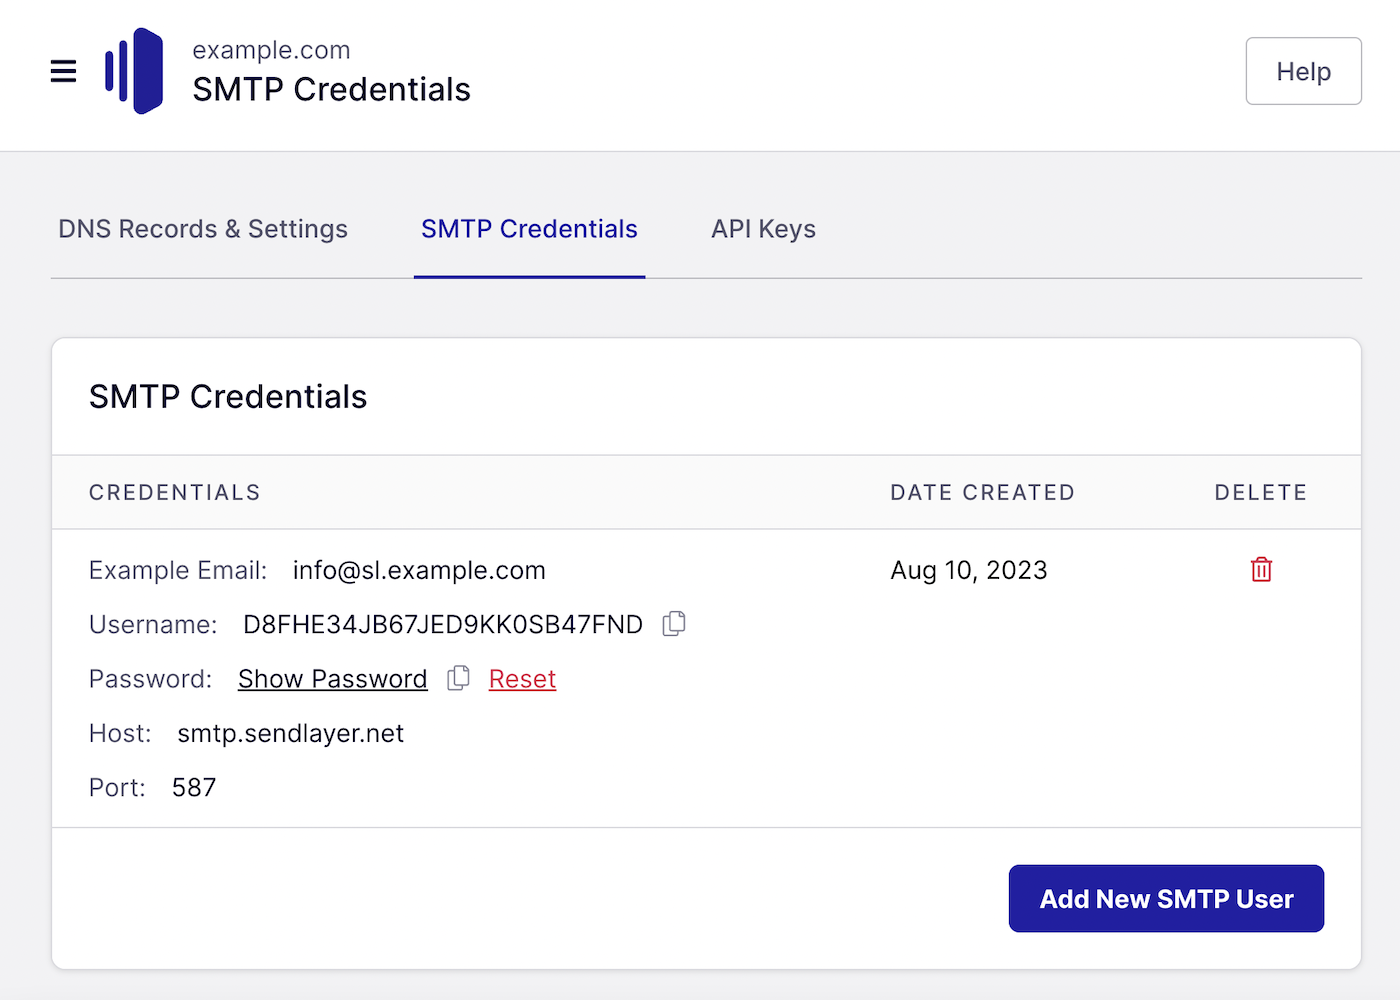
You’ll find the SMTP credentials for your SendLayer account on the Settings page, under SMTP credentials.
Keep this page open in a separate browser tab so you can access it easily and go back to your DDA email settings page.
Fill out the DDA SMTP email settings as follows:
- Send from email address: The email address you want to send your Shopify emails from. The domain of this email should match the one you’ve added to SendLayer.
- Username: Copy and paste the Username from SendLayer.
- Password: Copy and paste the Password from SendLayer
- Host: smtp.sendlayer.net
- Port: 587
- Encryption: TLS

Finally, click the Save button to save your settings.
DDA will send a verification email to your address, so check your mailbox to make sure you received it.

Finally, don’t forget to click the Verify button in the email to activate your SMTP settings.
5. Customize Email Templates
DDA gives you the option to customize both the language and style of your store emails.
You can access the email templates by navigating to Settings » Edit email templates
There are three templates for fulfillment emails, file replacement emails, and pre-order emails.
To get started, you can customize the text of the From name and the email subject.

You can also edit the body of the email using the editor in visual or HTML mode. DDA includes smart tag links in the editor so you can easily personalize the email with the customer’s name, order number, unique download link, and other information.
If you want to add your store logo to your emails, you can do this easily by adding the image URL to the email template.
First, upload your logo to your Shopify store by navigating to Content » Files on your Shopify dashboard. Click the Upload files button, upload your logo, and copy the link.
Once you’ve copied the link, go back to your DDA email template and click the image button on the editor.

Paste the image link into the Source field of the popup and adjust the dimensions of the logo. Click the Save button.

The image will now be inserted in the email, and you can center it if you wish.
When you’re happy with your email template, click the Save button.

You can now click the Send Test Email to send an email to your mailbox and make sure everything looks ok.

Great job! Here’s how our new email template looks:

6. Set Download Limitations
DDA allows you to set limits on the number of times a customer can download their purchases. You can find this setting in Settings » Limitations for downloads in your DDA dashboard.

There are various restrictions you can set on this page including:
- The number of times an asset can be downloaded
- The number of days a download link is valid from purchase before expiring
- Block downloads if Shopify fraud analysis is medium or high
- Restrict downloads to a set number of IP addresses to prevent link sharing
Once you’ve changed any settings on this page, remember to click the Save button.
7. Launch Your Store
You’ve now finished setting up everything in DDA and you can go back to your Shopify store to complete general setup.
Before you make your store live, you might want to choose a different store theme, connect your custom domain, and set up Shopify payments.
Once you’re ready, you can publish your store and start making sales immediately!
The great thing about a digital product store is that there is no stock to manage and no orders to send out. Everything is managed automatically via the store platform and email so it can act as a passive income source with no effort needed from you after the initial setup.
If customers are not receiving their order emails or emails are delayed, this will disrupt the entire business model, so it’s really important to make sure you’re using a reliable SMTP email service like SendLayer.
Frequently Asked Questions
These are answers to some of the most common questions users ask about selling digital products on Shopify.
Can you sell digital products on Shopify?
Yes. Shopify supports digital goods through apps. The free Digital Downloads app covers the basics. Apps like Downloadable Digital Assets (DDA) add file protection, custom emails, and download limits.
How much does it cost to sell digital products on Shopify?
You need a Shopify plan, which starts at $39 a month. The Digital Downloads app is free. DDA has a free plan, with paid plans starting at $9 a month.
How much does Shopify take from each sale?
With Shopify Payments on the Basic plan, you pay about 2.9% plus 30¢ per online sale. There’s no extra Shopify fee on top when you use Shopify Payments.
How do customers receive a digital product?
They get an email with a secure download link right after checkout. That’s why a reliable email service like SendLayer matters for a digital store.
Is Shopify worth it for digital products?
It’s a strong choice if you want a hosted store, secure delivery, and room to grow. For selling a single file, a simpler tool may be enough.
Do digital products need shipping settings?
No. Turn off the “This is a physical product” setting so Shopify skips shipping. You may still owe tax, like EU VAT, on digital goods.
That’s it! Now you know how to sell digital products on Shopify.
Next, would you like to set up a multivendor marketplace on Shopify? Check out our tutorial on how to send email from your Shopify marketplace with SMTP for more information.
