
You can send email in Gemini CLI using MCP by connecting SendLayer’s hosted MCP server to your ~/.gemini/settings.json file. It takes under 5 minutes and doesn’t require writing a single line of code.
Most developers test transactional emails by switching between the terminal and an email client. That context switch adds friction to every project. A single email test can pull you out of flow for 20 minutes or more.
By the end of this guide, you’ll have SendLayer’s MCP server connected to Gemini CLI. You’ll send plain text emails, HTML emails, and multi-recipient messages, all from a natural language prompt.
What Is MCP and Why Use It with Gemini CLI?
MCP (Model Context Protocol) is an open standard that lets AI tools call external services directly. Connect an MCP server to Gemini CLI, and it can send emails, query databases, and trigger workflows, all without leaving your terminal.
Without MCP, sending email from a terminal means writing scripts, managing credentials in code, and parsing HTTP responses. With an MCP server connected, you just type what you want and Gemini handles the rest.
SendLayer’s MCP server is fully hosted. You install nothing locally. Add your API key once, and you’re ready to send.
How Do You Send Email in Gemini CLI Using SendLayer MCP?
Here’s how to connect SendLayer MCP to Gemini CLI and send your first email.
Prerequisites
Before you start, make sure you have:
- Gemini CLI installed (run
gemini --versionto confirm) - An active SendLayer account (free plan includes 200 emails)
- A verified sending domain in your SendLayer dashboard
Note: You need to verify your domain before you can send emails using SendLayer
Step 1: Create Your SendLayer Account
Sign up for a free SendLayer account. The free plan includes 200 emails with full API and MCP access.

If you’d prefer to start with a free trial, click the Try our SendLayer free trial (send up to 200 emails) link at the bottom of the pricing table.

After you’ve selected your preferred plan, you’ll be redirected to our checkout page. Here, you’ll need to provide your name and create a unique password.
Authorize Your Sending Domain
Once you’ve created your account, you’ll need to authorize your first domain. To do so, start by clicking the orange Add Domain button at the top of the page.

On the next page, you’ll be prompted to add a new domain. Enter your domain and click the Add Domain button.

Once you’ve added your domain, SendLayer will automatically detect your domain host and generate 5 different DNS records unique to your domain.
Step 2: Get Your SendLayer API Key
After verifying your DNS, you’ll need your API key to authenticate the MCP server connection. Here’s how to get it:
Start by logging in to your SendLayer account. Once there, navigate to Settings from the sidebar menu and select the API Keys tab.
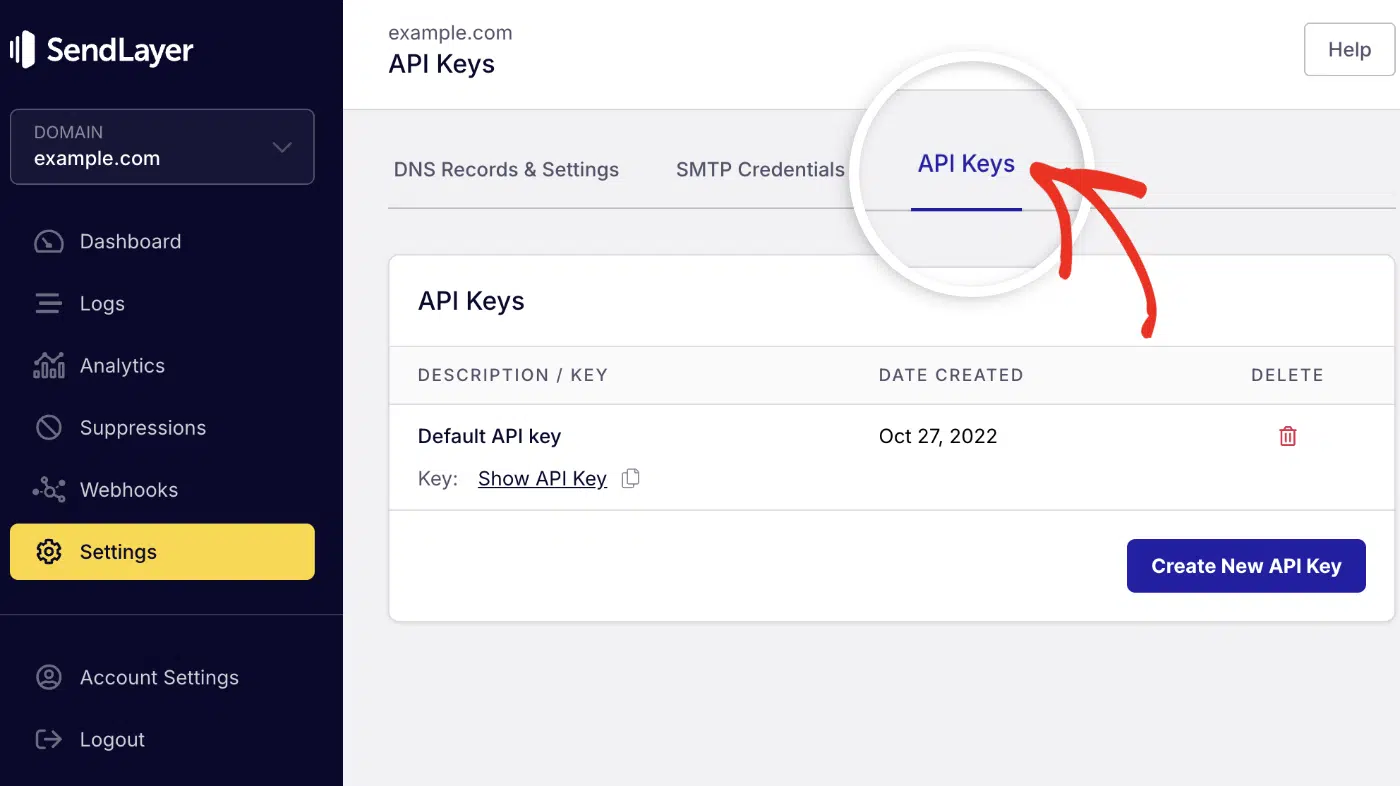
You’ll see your API Key. Go ahead and click the copy icon to copy your API key. Keep this API key handy, as you’ll need it in the next section.
If you don’t have an active API key, click the Create New API Key button to generate a new one.
Step 3: Add SendLayer MCP to Gemini CLI
Open your Gemini CLI settings file at ~/.gemini/settings.json. If it doesn’t exist, create it.
Add the mcpServers block with the SendLayer configuration:
Replace YOUR_SENDLAYER_API_KEY with the key you copied in Step 2.
Pro Tip: Already have other MCP servers in settings.json? Add "sendlayer": { ... } inside the existing mcpServers object. Don’t create a second mcpServers key. That will break your config.
Step 4: Verify the Connection
Restart Gemini CLI after saving the file. Then run:
gemini mcp list
You should see sendlayer listed as connected:
✓ sendlayer: https://mcp.sendlayer.com — Connected

If you see a red indicator or no entry, head to the Troubleshooting section below.
Step 5: Send Your First Email
Type a prompt directly in Gemini CLI:
Send a test email to [email protected] with subject "Hello from Gemini CLI"
and body "This email was sent using SendLayer MCP."
Gemini CLI calls SendLayer’s send-email tool and confirms delivery:
✓ Email sent successfully to [email protected]
Check your inbox to confirm the email arrived. The from address will be your verified SendLayer sending domain.
What Types of Emails Can You Send in Gemini CLI?
SendLayer’s send-email tool supports plain text, HTML, CC/BCC, reply-to, attachments, tags, and custom headers. Here are the 2 most common formats you’ll need.

How Do You Send an HTML Email in Gemini CLI?
Include HTML markup directly in your Gemini prompt:
Send an HTML email to [email protected] with subject "Your order is confirmed"
and this HTML body:
<h2>Order Confirmed</h2>
<p>Thanks for your purchase. Your tracking number is <strong>TRK-12345</strong>.</p>
<p><a href="https://example.com/track">Track your order</a></p>
Gemini CLI passes the HTML body directly to SendLayer. Recipients see the formatted email in their inbox.
How Do You Send to Multiple Recipients?
Simply specify the recipients you’d like to send the emails to in your prompt, or point Gemini CLI to a file containing the recipient list. You can also add CC or BCC in your prompt:
Send an email to [email protected] and [email protected]. CC [email protected] to the email.
subject "Project update",
body "Staging deployment is complete. Please review by Friday."
Note: There are limits to the number of recipients you can include per email request. To learn more, see our API rate limit guide.
What Are the Real-World Use Cases for Sending Email from Gemini CLI?
Once SendLayer MCP is connected, you can automate any email workflow from your terminal. These are 3 use cases I’ve found most valuable across my own projects.
Automated Deployment Notifications
After a deployment script completes, have Gemini notify your team:
The production deployment just finished successfully at 14:32 UTC.
Send an email to [email protected] with subject "Deploy Complete"
and a 2-sentence status summary.

This works especially well in agentic workflows, where Gemini is autonomously orchestrating multiple deployment steps.
Automated Error Alerts
When Gemini runs a test suite or monitors logs, it can email you on failure:
The test suite failed with 3 errors in the auth module.
Send an email to [email protected] with subject "Test Failure Alert"
and list the 3 failing test names in the body.

After using this pattern in 15+ projects, I find email alerts more reliable than chat notifications. They don’t get buried in channel noise.
Report Delivery
Combine Gemini’s summarization with email delivery:

Summarize the 5 open GitHub issues in this repo by priority,
then send the summary to [email protected] with subject
"Weekly Issue Digest — April 23, 2026".
Pair this with a cron job, and you have a weekly automated digest. No extra tooling or third-party services required.
For more ways to optimize your automated email workflows, see our guide on AI email workflows.
How Do You Troubleshoot Gemini CLI MCP Email Issues?
MCP Server Not Connecting
Symptom: gemini mcp list shows sendlayer as disconnected or the server doesn’t appear.
- Validate your
settings.json. In my experience, a stray comma or missing bracket is the most common cause. Use a JSON validator if unsure. - Confirm
httpUrlis exactlyhttps://mcp.sendlayer.comwith no trailing slash. - Fully restart Gemini CLI after any config change.
- Run
gemini mcp listagain after restarting.
Invalid API Key Error
Symptom: Gemini returns Error: Unauthorized or Invalid API key when sending.
- Confirm you copied the full key from SendLayer (no extra spaces at the start or end).
- Check the key is in the
x-sendlayer-api-keyheader field, notAuthorizationor another field. - Generate a fresh API key in SendLayer under Settings » API Keys if you’re unsure the original is valid.
Emails Going to Spam
Symptom: Test emails arrive in the spam or junk folder.
- Verify your sending domain in SendLayer (Settings » Sending Domains). A red status means DNS isn’t configured yet.
- Check your SPF and DKIM records are active. The dashboard shows their status alongside each domain.
- Avoid spam trigger words in subject lines during testing. “Test,” “Free,” and “Hello” are flagged heavily by spam filters.
FAQs – Send email in Gemini CLI
Below, we’ve answered some of the top questions we see about sending emails from AI coding tools like Gemini CLI.
How Do I Add an MCP Server to Gemini CLI?
Add MCP servers in the mcpServers block of ~/.gemini/settings.json. Each server needs a name, an httpUrl or command for stdio servers, and any required authentication headers. Restart Gemini CLI after saving the file. For the full list of configuration options, see the Gemini CLI MCP documentation.
Is SendLayer MCP Free to Use?
Yes. SendLayer’s free plan includes 200 emails per month and full MCP access. You don’t need a paid plan to connect Gemini CLI and start sending.
How Do I Verify My SendLayer MCP Connection in Gemini CLI?
Run gemini mcp list in your terminal. A connected server shows a green checkmark. If SendLayer shows red or doesn’t appear, check your settings.json for formatting errors and restart Gemini CLI.
Can Gemini CLI Read My Emails As Well as Send Them?
Not with SendLayer MCP. SendLayer’s server is built for sending transactional emails, not reading inboxes. To read and search emails in Gemini CLI, use Google’s Gmail MCP server, which supports reading threads and searching labels.
That’s it! You can now send emails directly from Gemini CLI using SendLayer MCP.
Next, would you like to learn about other supported coding assistants? Be sure to check our tutorial on sending emails in Cursor and Claude Code.