Are you building a web application and need to send emails through your FastAPI backend server?
Email notifications are among the most crucial aspects of building a web application. Whether it’s for user registration emails, password resets, or a simple contact form, email sending functionality is a must-have for any FastAPI web application.
In this post, I’ll show you how to build an email API to send emails with the FastAPI framework.
How to Send Emails in FastAPI
Prerequisites
Before we jump into the code, let’s make sure you’re set up for success. I’ll assume you have a foundational understanding of:
- Python: You should be comfortable with Python syntax, functions, and data types
- FastAPI: A basic grasp of creating routes, using Pydantic models, and running a FastAPI application is necessary
- An email service provider: I’ll use SendLayer for this tutorial. But this tutorial works with any email service provider
After creating your SendLayer account, make sure to authorize your domain. This step is essential to improve your site’s email deliverability. With that, you’re all set up and ready to send your first FastAPI email.
Setting Up the FastAPI Project
First things first, let’s get a clean Python FastAPI project up and running. If you already have one, you can skip to the sending email section of this guide.
To start, open your terminal, create a new directory for your project, and navigate into it.
mkdir fastapi_email
cd fastapi_email
Now, let’s create and activate a virtual environment.
# For macOS/Linux
python3 -m venv venv
source venv/bin/activate

# For Windows
python -m venv venv
.\venv\Scripts\activate
With our environment active, we need to install FastAPI and an ASGI server like Uvicorn to run it. I also added python-dotenv and Pydantic to the installation command. The dotenv library allows us to secure sensitive credentials as environment variables, and Pydantic lets us create models for our route.
pip install fastapi uvicorn python-dotenv "pydantic[email]"
After the installation completes, create a main.py inside your project’s directory. This will be the entry point for our application. Let’s start with a simple “Hello World” endpoint to ensure everything is working correctly.
# main.py
from fastapi import FastAPI

app = FastAPI()

@app.get("/")
def read_root():
      return {"message": "Welcome to the FastAPI Email Demo!"}
Now, run the application using Uvicorn in a terminal window.
uvicorn main:app --reload
The --reload flag automatically restarts the server whenever you make changes to your code. If you open your browser and navigate to http://127.0.0.1:8000, you should see our welcome message.

You can navigate to http://127.0.0.1:8000/docs to see the interactive API documentation provided by Swagger UI.

This is one of my favorite features of FastAPI. It provides automatic documentation that’s perfect for testing, especially when you need to send email in FastAPI JSON format, as it generates the request form for you.
Great! Our foundation is laid. Now, let’s get to the main event.
Method 1: Sending Emails in FastAPI Using SMTP
SMTP, or Simple Mail Transfer Protocol, is the standard internet protocol for sending electronic mail. Using SMTP directly gives you full control over the process, but it also comes with more responsibility.
Python’s standard library includes a powerful module called smtplib, which allows us to communicate directly with an SMTP server.
Step 1: Configuring SMTP Settings
To send an email, you need credentials for an SMTP server. For this example, we’ll use SendLayer’s SMTP server. But you can use any SMTP provider you want.
To get started with SendLayer, you’ll need to access the login credentials for your SMTP account.
For this, log in to your SendLayer account and select the Settings sidebar menu. Then select the SMTP Credentials tab.
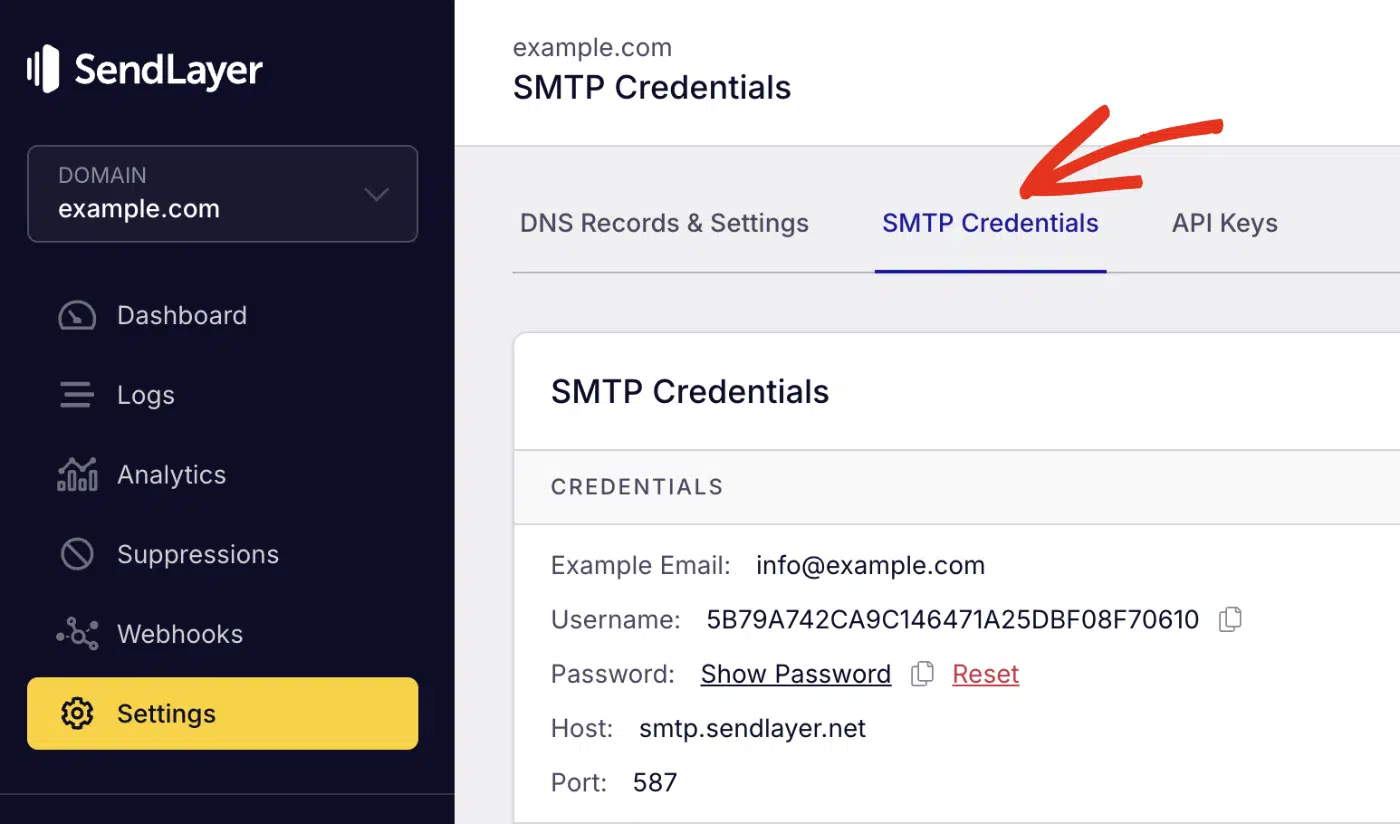
You’ll see the SMTP credentials required to use SendLayer’s SMTP server. The Host and Port number are the same for all users. However, the Username and Password details are unique to your SendLayer account.
Create a .env file and store your SMTP credentials inside it.
EMAIL_HOST=smtp.sendlayer.net
EMAIL_PORT=587
EMAIL_USER=your-sendlayer-username
EMAIL_PASS=your-sendlayer-password
[email protected]
Be sure to replace the details with your actual SMTP credentials.
Step 2: Implementing Email Sending with smtplib
Let’s write a function to handle the email sending logic. For this, I’ll create an email_service.py file to handle the email logic.
# email_service.py (add these imports)
import smtplib
from email.mime.text import MIMEText
from email.mime.multipart import MIMEMultipart
from dotenv import load_dotenv
import os

# Load environment variables
load_dotenv()

EMAIL_HOST = os.getenv("EMAIL_HOST")
EMAIL_PORT = os.getenv("EMAIL_PORT")
EMAIL_USER = os.getenv("EMAIL_USER")
EMAIL_PASS = os.getenv("EMAIL_PASS")
SENDER_EMAIL = os.getenv("SENDER_EMAIL")


def send_email_smtp(recipient: str, subject: str, body: str, is_html: bool = False):
    """
    Send an email using SMTP.

    Args:
        recipient: The recipient's email address
        subject: The subject of the email
        body: The body content of the email
        is_html: Whether the body content is HTML

    Returns:
        bool: True if email is sent successfully, False otherwise
    """

    # Create the email message
    msg = MIMEMultipart()
    msg['From'] = SENDER_EMAIL
    msg['To'] = recipient
    msg['Subject'] = subject
    msg.attach(MIMEText(body, 'plain' if not is_html else 'html'))

    try:
        # Connect to the SMTP server
        # We use a 'with' statement to ensure the connection is automatically closed
        with smtplib.SMTP(EMAIL_HOST, EMAIL_PORT) as server:
            server.starttls()  # Secure the connection with TLS
            server.login(EMAIL_USER, EMAIL_PASS)
            server.sendmail(SENDER_EMAIL, [recipient], msg.as_string())
        print(f"Email sent successfully to {recipient}")
        return True
    except Exception as e:
        print(f"Failed to send email. Error: {e}")
        return False
Code Breakdown
- MIMEMultipart & MIMEText: These classes help us construct an email message that conforms to the MIME standard. MIMEMultipart is the main container, and we attach a MIMEText part for the body. This structure also makes it easy to add HTML content or attachments later.
- smtplib.SMTP(): This creates an instance of the SMTP client, connecting to the specified server and port.
- with statement: This is crucial. It ensures that the connection to the SMTP server is properly closed, even in the event of errors.
- server.starttls(): This command upgrades our insecure connection to a secure one using TLS encryption. It’s a vital security step.
- server.login(): We authenticate with the server using the SMTP username and password stored in the .env file.
- server.sendmail(): This is the command used to send the email.
- Error Handling: We use Python’s
try...exceptblock to catch potential issues like incorrect credentials, network problems, or server-related errors.
Python’s smtplib package allows you to send emails to multiple recipients, include attachments, and much more. We’ve covered this in detail in a previous tutorial. Be sure to check our sending emails in Python tutorial for more details.
Step 3: Creating an Email Endpoint
Now, let’s integrate this email functionality into our FastAPI application by updating main.py:
# main.py

from fastapi import FastAPI, HTTPException, Body
from pydantic import BaseModel, EmailStr
from email_service import send_email_smtp

app = FastAPI(title="Email Sender API")

class EmailRequest(BaseModel):
    email: EmailStr
    subject: str
    body: str
    is_html: bool = False

@app.get("/")
async def root():
    return {"message": "Welcome to the Email Sender API"}

@app.post("/send-email/")
async def send_email_endpoint(email_req: EmailRequest):
    """
    Send an email using SMTP.
    """
    success = send_email_smtp(
        recipient=email_req.email,
        subject=email_req.subject,
        body=email_req.body,
        is_html=email_req.is_html
    )

    if not success:
        raise HTTPException(status_code=500, detail="Failed to send email")

    return {"message": f"Email sent to {email_req.email}"}

if __name__ == "__main__":
    import uvicorn
    uvicorn.run("main:app", host="127.0.0.1", port=8000, reload=True)
Here, we use a Pydantic BaseModel to define our email model. This is used to specify the required parameters for the route. We use Pydantic’s EmailStr class to add basic email format validation to the request.
The send_email_endpoint() function handles the API requests to the email route. It accepts the body parameter, which is an abstraction of the EmailRequest model.
Within the function, we call our email function, send_email_smtp(). Recall that our email function accepts 4 arguments. In our implementation, we destructure the input from the API request and map them to the required parameters in our email function.
Step 4: Sending a Test Email
After building your email functionality and adding it to a FastAPI route, you can integrate it on Frontend libraries like React or Next.js.
You can also call the API via cURL or interact with it via the auto-generated Swagger API docs. Here’s how to send a test email through the Swagger doc page:
Start by initializing your FastAPI app with the command below:
python main.py
This command is valid because we’ve initialized the uvicorn server within the main.py file. Using the uvicorn main:app --reload command would work as well.
With the server running, navigate to localhost:8000/docs in your browser. You’ll see the new endpoint you created in the Swagger page.

From there, click the Try it out button to send a test request.

After that, update the Request body field with your email parameters.

Then scroll down and click the Execute button.

You should see a 200 success response if everything is working properly.

Go ahead and check your email inbox for a message from your FastAPI app.

Congratulations! You’ve successfully built a working SMTP email server in FastAPI.
Method 2: Send Emails with FastAPI Using API
For most production applications, using a dedicated third-party email service is the recommended path. These services are experts in email deliverability. They handle all the complexities of SMTP servers, reputation management, and scaling for you.
Benefits include:
- Higher Deliverability: Their core business is making sure emails reach the inbox.
- Scalability: They can handle sending thousands or millions of emails without a sweat.
- Analytics: Get detailed reports on open rates, click rates, and bounces.
- Simple APIs: They provide clean, easy-to-use APIs that are much simpler than raw SMTP.
For this example, I’ll use SendLayer to build an API-based email functionality in our FastAPI server.
Integrating with SendLayer
SendLayer is a modern email API for developers that’s incredibly simple to integrate. They offer a flexible pricing plan and let you get started for free.
One of the standout features of SendLayer is its domain reputation protection. It automatically creates a subdomain for your email sending activities. This means your main domain remains protected from any potential deliverability issues. This helps to maintain your sender reputation so your emails stay out of the spam folder.
To use SendLayer, you’ll need to create or retrieve your API key. For this, log in to your SendLayer account. Once you’re logged in, click the Settings sidebar menu and select the API Keys tab.
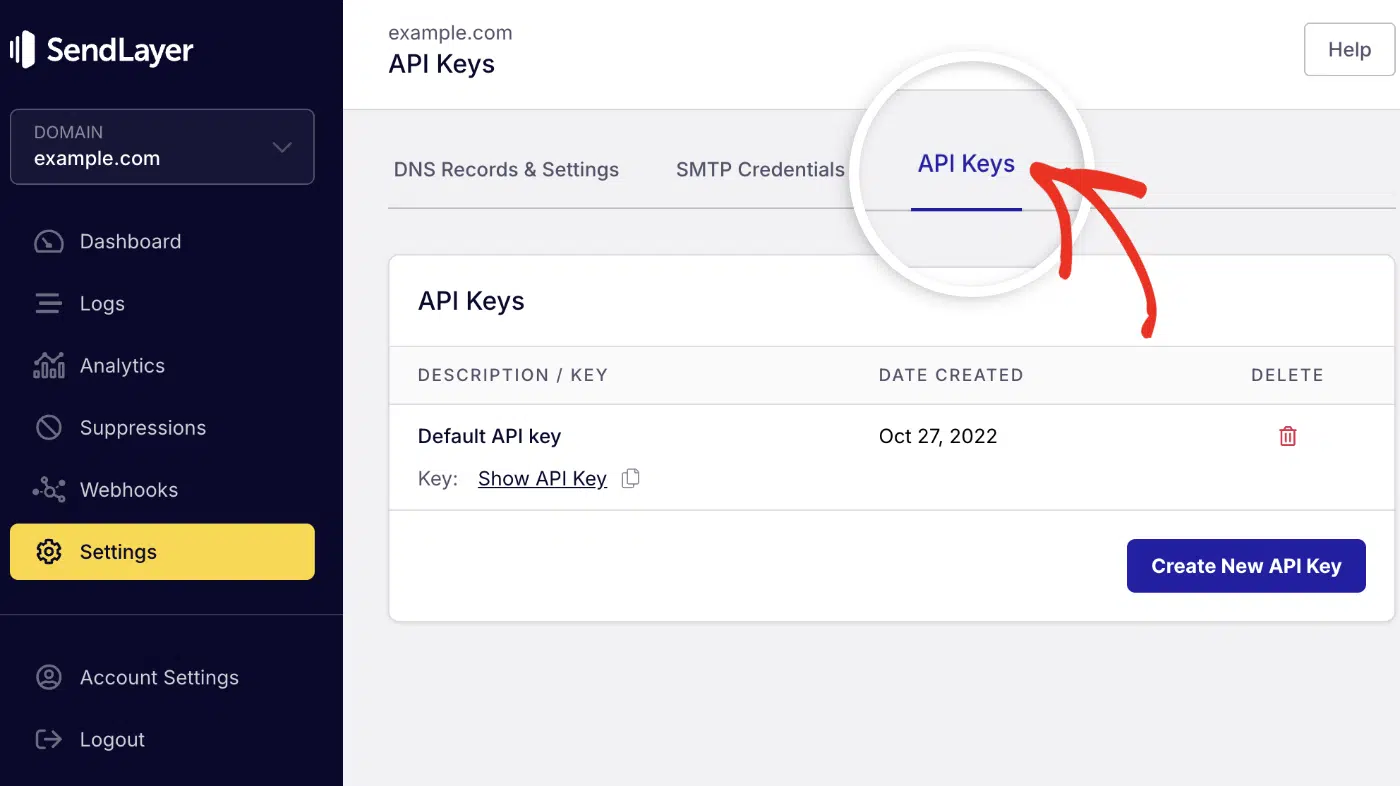
Then click the copy icon next to Default API key to copy it.

After copying the API key, return to your code editor and add it to the .env file.
SENDLAYER_API_KEY=your-api-key
[email protected]
Note: The sender email domain needs to match the domain you authorized in your SendLayer account. For instance, if you authorized example.com in SendLayer, the from email needs to use @example.com extension.
Once done, you’ll need to install the SendLayer Python SDK as a requirement for your project:
pip install sendlayer
Sending HTML Emails in FastAPI with SendLayer SDK
Sending an email with SendLayer is refreshingly straightforward. In a real-world application, you’d typically generate your email content from HTML templates using an engine like Jinja2. This allows you to create a dynamic FastAPI email template.
Let’s create a new sendlayer_service.py file and add our email logic to it.
# sendlayer_service.py

from sendlayer import SendLayer
from dotenv import load_dotenv
import os

load_dotenv()

api_key = os.getenv("SENDLAYER_API_KEY")

sendlayer = SendLayer(api_key)

def sl_send_email(recipient: str, subject: str, body: str, is_html: bool = False):
    """
    Send an email using Sendlayer API.

    Args:
        recipient: The recipient's email address
        subject: The subject of the email
        body: The body content of the email
        is_html: Whether the body content is HTML

    """

    params = {
        "sender": os.getenv("SENDER_EMAIL"),
        "to": recipient,
        "subject": subject,
        "html": body if is_html else None,
        "text": body if not is_html else None
    }

   # sending mail using FastAPI and SendLayer SDK
    try:
        response = sendlayer.Emails.send(**params)
        return response
    except Exception as e:
        print(f"Failed to send email. Error: {e}")
Look at how much cleaner that is! We define our parameters in a dictionary and call sendlayer.Emails.send(). SendLayer’s SDK handles the rest. The email params will be parsed as arguments when calling the sl_send_email() function.
Creating a Route to Use the Email Function
With the email functionality in place, what’s left to do is create a new route and call the sl_send_email() function inside the new post route. To do so, open the main.py file and add the following code to create a new route.
from fastapi import FastAPI, HTTPException, Body
from pydantic import BaseModel, EmailStr
from sendlayer_service import sl_send_email      # import the sendlayer email function

app = FastAPI(title="Email Sender API")

# create an endpoint request
class SendlayerEmailRequest(BaseModel):
    recipient: EmailStr
    subject: str
    body: str
    is_html: bool = False

@app.get("/")
async def root():
    return {"message": "Welcome to the Email Sender API"}

# new route to send emails via SendLayer SDK
@app.post("/send-api-email/")
async def send_api_email(email_req: SendlayerEmailRequest):
    """
    Send an email using Sendlayer API.
    """
    success = sl_send_email(
        recipient=email_req.recipient,
        subject=email_req.subject,
        body=email_req.body,
        is_html=email_req.is_html
    )

    if not success:
        raise HTTPException(status_code=500, detail="Failed to send email")

    return {"message": success}

if __name__ == "__main__":
    import uvicorn
    uvicorn.run("main:app", host="127.0.0.1", port=8000, reload=True)
In the code above, we first import the email function (sl_send_email()) from the sendlayer_service.py file. The SendlayerEmailRequest model in the code above is used to define the request schema.
We use this schema to define the type of object the API route should accept. Within the send_api_email() function, we call the email function. Mapping the request body parameters to the arguments the function requires.
Send Email to Multiple Recipients
SendLayer SDK also supports sending emails to multiple recipients, including “CC” and “BCC” email addresses. To send to multiple recipients, update the request schema to allow a list of EmailStr type.
# main.py
# ... other code snippets

class SendlayerEmailRequest(BaseModel):
    recipient: list[EmailStr]   # change the type to support list of email strings
    subject: str
    body: str
    is_html: bool = False
Then, when using the API, you can pass the recipients in a comma-separated string list. If you’re passing the email addresses directly within the email service, you’ll simply need to update the params object.
# sendlayer_service.py
# ... Other code snippets

   params = {
        "sender": os.getenv("SENDER_EMAIL"),
        "to": [
             {"name": "Recipient 1", "email": "[email protected]"},
             {"name": "Recipient 2", "email": "[email protected]"}
         ],
        "subject": subject,
        "html": body if is_html else None,
        "text": body if not is_html else None,
        "cc": ["[email protected]"],
        "bcc": [
             {"name": "BCC ", "email": "[email protected]"}
         ],
    }
Just be sure to update the email addresses to match the recipient addresses you’d like to send to.
Tip: SendLayer includes limits on the number of recipients you can include for each API request. See our developer documentation to learn about these limits.
Send Emails With Attachments in FastAPI
SendLayer API also supports sending emails with attachments. Here is the updated params object.
# sendlayer_service.py
# ... Other code snippets

   params = {
        "sender": os.getenv("SENDER_EMAIL"),
        "to": [
             {"name": "Recipient 1", "email": "[email protected]"},
             {"name": "Recipient 2", "email": "[email protected]"}
         ],
        "subject": subject,
        "html": body if is_html else None,
        "text": body if not is_html else None,
        "attachments": [
             {
               "name": "path/to/file.pdf ",
              "type": "application/pdf"
             }
         ],
    }
In the updated file, I added attachments to the params object. Within the attachment list, you’ll specify a dictionary with the path and type of the file you wish to attach.
The path object is a string with the path to the file you wish to attach. SendLayer’s SDK supports both local and remote file attachments. The type object is the MIME type for the file you’re attaching.
Tip: Not sure what MIME type to specify, see Mozilla’s guide to media types for more details.
You can attach multiple files to emails on your site. To do so, simply duplicate the attachment object within the list, separating each object with a comma.
Best Practices for Email Sending in FastAPI
Now that you know the “how,” let’s talk about the “how to do it right.”
1. Secure Your Credentials with Environment Variables
Never commit API keys, passwords, or other secrets to your version control (like Git). The standard practice is to use environment variables.
You can use the python-dotenv package to make this easy during development:
pip install python-dotenv
After installing the package, create a .env file in your project root and add all sensitive credentials there:
# .env file
MAIL_USERNAME=your-smtp-username
MAIL_PASSWORD=your-smtp-password
[email protected]
SENDLAYER_API_KEY=your_api_key
Now, you can load these securely in your application:
# main.py
from dotenv import load_dotenv
import os

load_dotenv() # Loads variables from .env file

# Example for ConnectionConfig
conf = ConnectionConfig(
            MAIL_USERNAME = os.getenv("MAIL_USERNAME"),
            MAIL_PASSWORD = os.getenv("MAIL_PASSWORD"),
            # ... rest of the config
  )

# Example for SendLayer API
sendlayer = SendLayer(os.getenv("SENDLAYER_API_KEY"))
Pro Tip: Remember to add your .env file to your .gitignore!
2. Handle Exceptions and Errors Gracefully
Network connections can fail. APIs can go down. Your code should be resilient. Always wrap your email-sending logic in try...except blocks. Log the errors using Python’s logging module so you can diagnose problems in production.
3. Validate Email Addresses
Pydantic’s EmailStr is great for basic email format validation. For more robust validation (e.g., checking if the domain exists), you might consider a validation service or library.
Additionally, most third-party email packages like SendLayer’s Python SDK include email validation for the sender, recipient, and other email addresses, including CC and BCC addresses.
FAQs – Send Email in FastAPI
How can I send emails asynchronously in FastAPI?
You can send emails asynchronously by using FastAPI’s BackgroundTasks. This adds the email-sending function to a background queue, allowing your API endpoint to immediately return a response to the user without waiting. This is the recommended approach for any potentially slow task to ensure a non-blocking, responsive API.
Is it possible to send bulk emails using FastAPI?
Yes, but it should almost always be done as a background task. For large volumes, it is highly recommended to use a third-party service that has a dedicated bulk sending API. They are optimized for this and can manage throttling and recipient lists much more efficiently than a manual loop in your application.
How can I ensure my emails are not marked as spam?
Ensuring emails are not marked as spam is a multi-step process.
- Authentication: Properly set up SPF, DKIM, and DMARC records for your sending domain.
- Reputation: Use a reputable third-party email service like SendLayer.
- Content: Avoid spammy words, broken HTML, or large images with little text in your email message.
- Engagement: Provide clear unsubscribe links and regularly clean your email lists.
That’s it! Now you know how to send email using FastAPI with SMTP and through an email API.
If you’re using a different Python framework and would like to learn how to send emails through your web app. Our guides on sending emails in Django and Python Flask will help you get started.