


If you want to send emails from Firebase Functions in production, you need more than just working code. You’ll also need reliable delivery.
Firebase doesn’t include a built-in mail server, so every email you send must go through an external provider. Most tutorials show how to wire up Gmail SMTP, but that approach often breaks at scale.
In this guide, you’ll learn how to build a Firebase Cloud Function that sends email using Nodemailer and SendLayer SMTP.
You’ll also learn how to send HTML emails with attachments and use Firebase’s Trigger Email extension. Let’s begin!
- What do you need before sending email from Firebase Functions?
- How to send emails with Firebase Functions and Nodemailer
- How to send HTML emails with attachments
- How do you use the Firebase Trigger Email extension instead?
- How to send email in Firebase using Email API
- Why do Firebase emails go to spam, and how do you fix it?
- Why isn’t your Firebase Function sending email?
- Frequently Asked Questions
Can Firebase Functions send email on their own?
No. Firebase Functions can’t send email on their own, because Firebase has no built-in SMTP server or mail transport. A Cloud Function is simply a backend code that runs on demand. To actually deliver a message, it has to hand off to an email service.
You have three main routes, compared below.
| Method | Best for | Code needed | Setup effort |
|---|---|---|---|
| Nodemailer + SMTP | Full control, any provider | Yes | Low |
| Trigger Email extension | No-code, event-driven sends | Minimal | Medium |
| Provider REST API | High volume, blocked SMTP ports | Yes | Low |

We’ll cover the SMTP route first. It’s the most portable and the easiest to reason about.
What do you need before sending email from Firebase Functions?
You need a Blaze-plan Firebase project, Node 22 or newer, the Firebase CLI, and an email provider account. Outbound network requests are the catch. The free Spark plan blocks them, so a Cloud Function can’t reach any external SMTP host.
Prerequisites
Here’s the checklist before you write any code:
- Firebase project on the Blaze plan. Blaze is pay-as-you-go and still has a free tier. Outbound email needs it. See the Firebase pricing docs for details.
- Node.js 18+ installed locally.
- Firebase CLI installed and authenticated.
- A SendLayer account for reliable SMTP credentials.
Install the CLI and sign in:
npm install -g firebase-tools
firebase login
Then initialize Cloud Functions in your project folder:
firebase init functions
Pick JavaScript when prompted and let it install dependencies. You’ll get a functions/ folder with an index.js file.
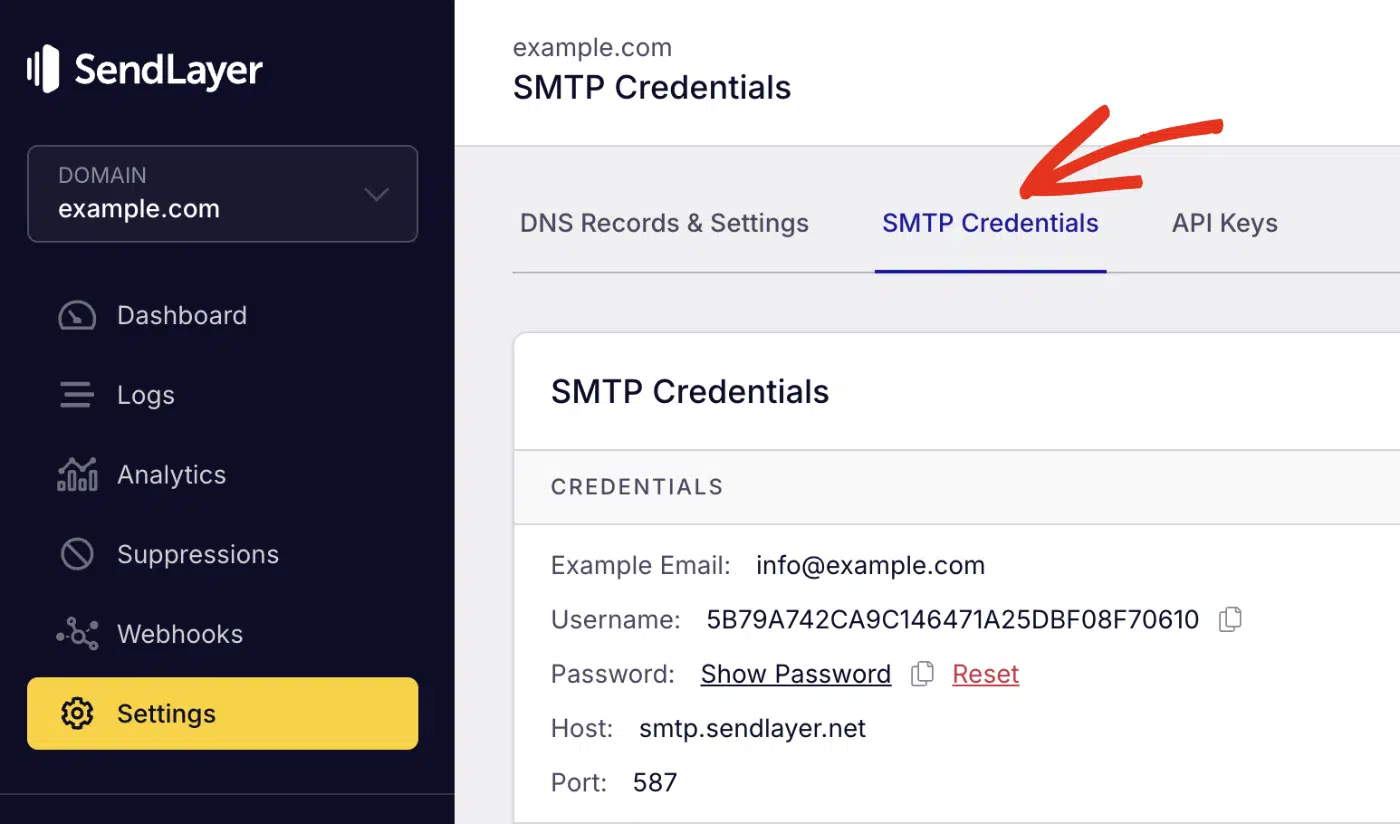
Pro Tip: Grab your SMTP credentials now. In your SendLayer dashboard, go to Settings » SMTP Credentials and copy the username and password. You’ll need them in the next step.
How to send emails with Firebase Functions and Nodemailer
To send emails in Firebase with Nodemailer, you’ll need to create a transporter with your SMTP details. After that, call it inside a Cloud Function. Nodemailer handles the SMTP handshake. Your function just supplies the message.
Here’s how to do it:
Step 1: Install Nodemailer
Install Nodemailer in your functions folder, then store your SMTP login as a secret. Never hardcode credentials in your code.
Move into the folder and add the package:
cd functions
npm install nodemailer
Now store your SendLayer credentials as Firebase secrets. That keeps them out of your source code and your Git history:
firebase functions:secrets:set SENDLAYER_USER
firebase functions:secrets:set SENDLAYER_PASS
Each command prompts you to paste the value. Firebase encrypts it and injects it at runtime.
Warning: The old functions.config() approach is deprecated. Use defineSecret with Cloud Functions v2, as shown below. It’s more secure and won’t break on newer runtimes.
Step 2: Create the Cloud Function
Create an HTTP function that builds a transporter and sends one message. Open functions/index.js and replace its contents:
const { onRequest } = require("firebase-functions/v2/https");
const { defineSecret } = require("firebase-functions/params");
const nodemailer = require("nodemailer");

// Bind the SMTP credentials you stored as secrets
const SENDLAYER_USER = defineSecret("SENDLAYER_USER");
const SENDLAYER_PASS = defineSecret("SENDLAYER_PASS");

exports.sendEmail = onRequest(
  { secrets: [SENDLAYER_USER, SENDLAYER_PASS] },
  async (req, res) => {
    // Connect to SendLayer over SMTP
    const transporter = nodemailer.createTransport({
      host: "smtp.sendlayer.net",
      port: 587,        // use 465 if you set secure: true
      secure: false,    // 587 uses STARTTLS
      auth: {
        user: SENDLAYER_USER.value(),
        pass: SENDLAYER_PASS.value(),
      },
    });

    try {
      await transporter.sendMail({
        from: '"Your App" <[email protected]>',
        to: "[email protected]",
        subject: "Hello from Firebase Functions",
        text: "This email was sent from a Cloud Function.",
      });
      res.status(200).send("Email sent");
    } catch (err) {
      console.error("Send failed:", err);
      res.status(500).send("Email failed to send");
    }
  }
);
A few notes on this code:
- Port
587withsecure: falseuses STARTTLS. That’s the safe default. For the difference between ports, see this guide on SMTP ports. - The
fromaddress must use a domain you’ve authenticated in SendLayer. - The
try/catchblock logs failures so you can debug them later.
Note: See our tutorial on sending emails in JavaScript to learn more about using Nodemailer.
Step 3: Deploy and test the function
Deploy the function with one command, then call its URL. Run this from your project root:
firebase deploy --only functions
The terminal prints your function’s URL when it finishes. It looks like https://sendemail-xxxx.run.app. Open that URL in a browser, or test it with curl:
curl https://sendemail-xxxx.run.app
You should see Email sent, and the message should arrive within seconds. Check your SendLayer dashboard logs to confirm delivery.
Note: The first deploy asks Firebase to grant the secrets to your function. Approve it. Without access, SENDLAYER_USER.value() returns empty and the send fails.
How to send HTML emails with attachments
You send HTML and attachments by adding html, cc, and attachments fields to your sendMail call. Nodemailer accepts them in the same object. Swap the message body for this version:
await transporter.sendMail({
  from: '"Your App" <[email protected]>',
  to: "[email protected]",
  cc: "[email protected]",
  subject: "Your receipt is ready",
  html: `
    <h1>Thanks for your order</h1>
    <p>Order <strong>#1024</strong> is confirmed.</p>
  `,
  attachments: [
    { filename: "receipt.pdf", path: "./receipts/receipt.pdf" },
  ],
});
Key points for this pattern:
- html replaces
textfor rich formatting. You can include both as a fallback. - cc and bcc accept a string or an array of addresses.
- attachments takes an array. Each item needs a
filenameand apathorcontent.
Pro Tip: Keep inline CSS simple. Many email clients strip <style> blocks and external stylesheets. Style with inline attributes for reliable rendering.
How do you use the Firebase Trigger Email extension instead?
Use the official Trigger Email extension when you want a no-code path. It watches a Firestore collection and sends an email every time you add a document. You write to the database, and the extension does the SMTP work.
Here’s how to install and configure the extension:
In the Firebase console, go to Extensions and install Trigger Email from Firestore.

Then choose a project to install the extension on and confirm your billing details.

Next, choose Username & Password as the Authentication Type.

Then set the SMTP connection URI to your SendLayer credentials: smtp://USER:[email protected]:587.
Note: Make sure to replace USER and PASS with your actual SMTP credentials from the SendLayer dashboard.
Name the collection it should watch, for example, mail.
After that, scroll down and click the Install extension button.

It usually takes 3-5 minutes to finalize the installation and setup
Now trigger a send from anywhere in your app by adding a document:
const admin = require("firebase-admin");
admin.initializeApp();

await admin.firestore().collection("mail").add({
  to: ["[email protected]"],
  message: {
    subject: "Hello from the extension",
    html: "This email was triggered by a Firestore write.",
  },
});
The extension reads the to and message fields, sends the email, and writes the delivery status back to the same document. It’s a clean fit for event-driven sends, like a welcome email on signup.
How to send email in Firebase using Email API
You can send emails through an email API by making an HTTPS request from your function to the provider’s endpoint.
This method doesn’t require using SMTP credentials. Particularly useful for email clients that block outbound SMTP.
Store your API key as a secret, then post the message. Node 18+ includes fetch globally:
firebase functions:secrets:set SENDLAYER_API_KEY
const { onRequest } = require("firebase-functions/v2/https");
const { defineSecret } = require("firebase-functions/params");

const SENDLAYER_API_KEY = defineSecret("SENDLAYER_API_KEY");

exports.sendEmailApi = onRequest(
  { secrets: [SENDLAYER_API_KEY] },
  async (req, res) => {
    const response = await fetch("https://console.sendlayer.com/api/v1/email", {
      method: "POST",
      headers: {
        "Authorization": `Bearer ${SENDLAYER_API_KEY.value()}`,
        "Content-Type": "application/json",
      },
      body: JSON.stringify({
        From: { name: "Your App", email: "[email protected]" },
        To: [{ email: "[email protected]" }],
        Subject: "Hello from Firebase Functions",
        ContentType: "HTML",
        HTMLContent: "<p>Sent via the SendLayer API.</p>",
      }),
    });

    if (response.ok) {
      res.status(200).send("Email sent");
    } else {
      res.status(500).send("Email failed to send");
    }
  }
);
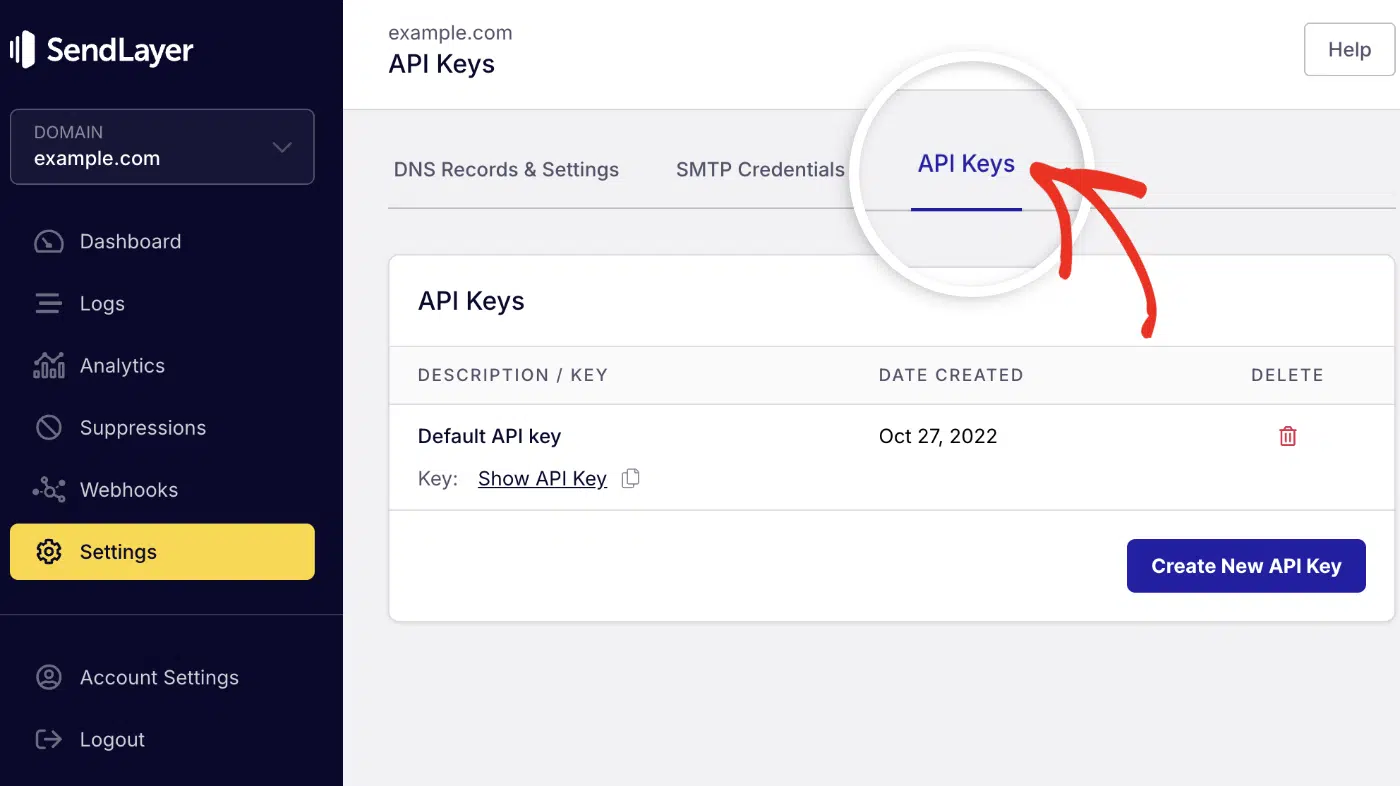
To get your API key, log in to your SendLayer account. Once you’re logged in, click the Settings menu and select the API Keys tab.
Find the full request schema and endpoints in the SendLayer API docs. The API route is a good choice when your host blocks SMTP ports or you send at high volume.
Why do Firebase emails go to spam, and how do you fix it?
Firebase emails end up in spam when the sending domain isn’t authenticated. Mailbox providers check for SPF, DKIM, and DMARC records before trusting a message. Miss them, and even perfect code lands in the junk folder.

Three fixes solve most delivery problems:
- Authenticate your domain. Add SPF, DKIM, and DMARC records. Learn how in this guide on email authentication.
- Skip Gmail SMTP for production. Gmail limits sends and flags automated mail, which is a big reason Gmail blocks these messages.
- Use a transactional provider. SendLayer signs your mail and sends from a reputable IP, so you don’t manage that yourself.
When a send fails outright, read the response code. This reference on SMTP error codes explains what each one means.
Why isn’t your Firebase Function sending email?
Most Firebase email failures come from three causes: the wrong billing plan, missing secret access, or blocked ports. Here’s how to fix each.
- The function can’t reach the SMTP server. The Spark plan blocks outbound connections. Upgrade to Blaze. If you’re already on Blaze and it still fails, your host may block port 587. Switch to the REST API route above.
- Authentication failed (a 535 error). Your SMTP username or password is wrong or empty. Re-run
firebase functions:secrets:setand redeploy so the function picks up the values. - Emails send but never arrive. That’s a deliverability problem, not a code problem. Check your domain authentication and read the SMTP response code.
Pro Tip: Read live errors with firebase functions:log. It streams the exact exception from your last send, which is faster than guessing.
Frequently Asked Questions
These are answers to some of the top questions developers ask about sending emails in Firebase.
Can Firebase Functions send email for free?
The Cloud Function itself needs the Blaze plan, which has a free monthly tier for invocations. You pay only if you exceed it. The email provider is separate. SendLayer’s free plan includes 200 emails, so a small app can run at no cost.
Does Firebase have a built-in SMTP server?
No. Firebase has no SMTP server or mail service. You connect an external provider through Nodemailer, the Trigger Email extension, or an email API. Firebase only runs your code and triggers.
Why are my Firebase Function emails going to spam?
Almost always, it’s missing authentication. Without SPF, DKIM, and DMARC records on your sending domain, mailbox providers can’t verify you. Authenticate your domain and send from a provider with a strong IP reputation.
Should I use the Trigger Email extension or Nodemailer?
Use Nodemailer when you want full control over the message and logic in code. Use the extension when you prefer a no-code, event-driven flow tied to Firestore writes. Both use the same SMTP provider underneath.
That’s it! Now you know how to set up and send emails in Firebase.
If you automate email from other tools too, this guide on sending email in n8n uses the same SendLayer setup.
