
Do you want to send emails directly from the terminal in your Codex environment?
As an email deliverability expert building automated systems, I’ve wasted countless hours on email workflows. Testing transactional emails meant constantly switching between my IDE and email clients. This friction adds up quickly across every project.
After testing SendLayer’s MCP server integration, I discovered a better approach. You can now send email with Codex using simple natural-language commands. No app switching or manual formatting is required.
In this tutorial, I’ll show you how to automate email sending with OpenAI’s Codex in under 5 minutes.
What Is SendLayer MCP?
SendLayer MCP is a hosted server that connects AI tools to SendLayer’s email delivery API. It uses the Model Context Protocol (MCP). MCP is a standard that lets AI tools call external services using plain-language instructions.
You don’t write API code. You just tell Codex what to send, and SendLayer MCP handles the request.
MCP Tools Available in SendLayer
| Tool | What it does |
|---|---|
send-email | Sends a message (plain text or HTML) with CC/BCC, reply-to, tags, and attachments |
get-events | Queries email delivery events with optional filters |
list-webhooks | Shows all registered webhooks on your account |
create-webhook | Sets up a new webhook endpoint |
delete-webhook | Removes a webhook by its ID |
Prerequisites
- OpenAI Codex installed (CLI or VS Code extension — both work)
- Your SendLayer API key (we’ll grab it in Step 2 below)
- A terminal with access to your shell environment
All 5 tools are available as soon as you connect the MCP server.
How to Connect SendLayer MCP to OpenAI Codex
The whole setup takes 4 steps. No local installation is needed. SendLayer MCP is a hosted HTTP server, so Codex connects to it directly over the web.
Step 1: Create Your SendLayer Account
To begin creating a new SendLayer account, head over to the pricing page and select your preferred plan by clicking on the Get Started button.
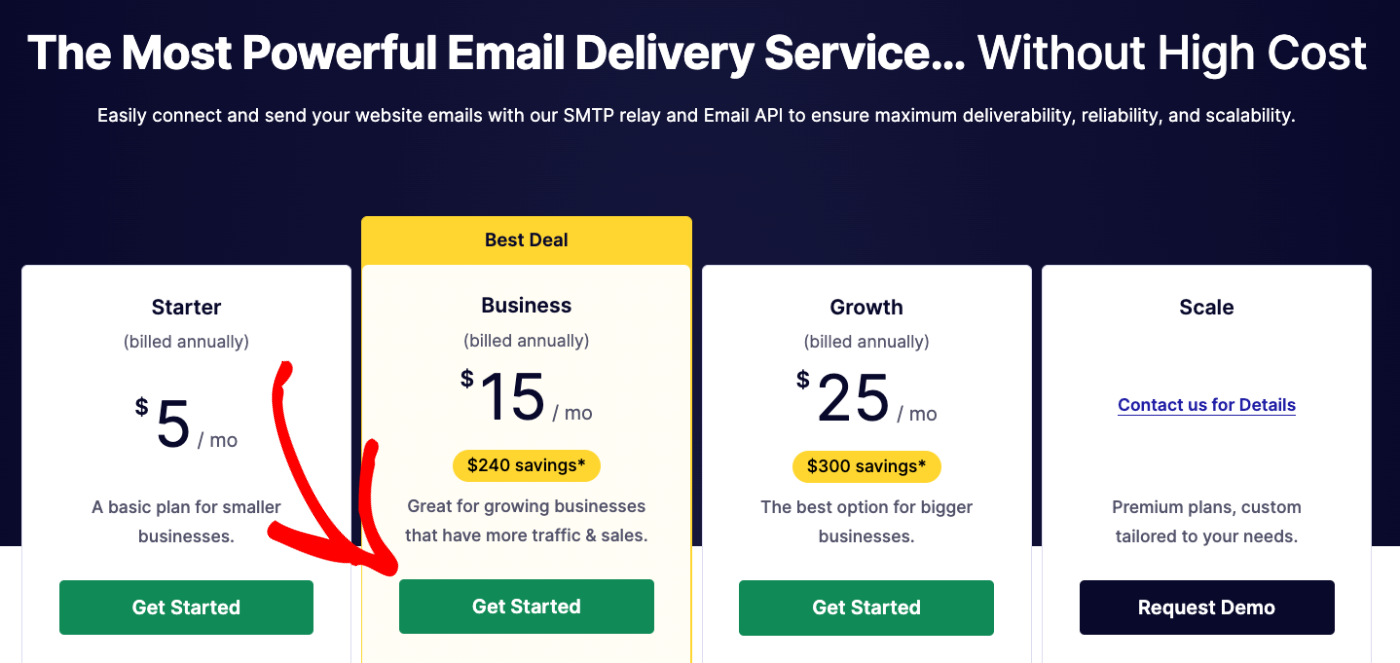
If you’d prefer to start with a free trial, click the Take SendLayer for a free trial (send up to 200 emails) link at the bottom of the pricing table.

After selecting your preferred plan, you’ll be redirected to the checkout page. Here, you’ll need to provide your name and create a unique password.
Authorize Your Sending Domain
Once you’ve created your account, you’ll need to authorize your first domain. For this, click the Add Domain button at the top of the page.

Next, enter your domain and click the Add Domain button.

Once you’ve added your domain, SendLayer automatically detects your domain host and generates 5 different DNS records unique to your domain.
If SendLayer doesn’t detect your domain host, you’ll see the general DNS configuration for your domain.

You can click the choose your domain host link to select your domain host from the available options.

You’ll need to add these DNS records to your domain host.
Step 2: Retrieve Your API Key
After verifying your DNS, you’ll need your API key to authenticate the MCP server connection.
For this, log in to your SendLayer account. Once there, go to Settings from the sidebar menu and select the API Keys tab.
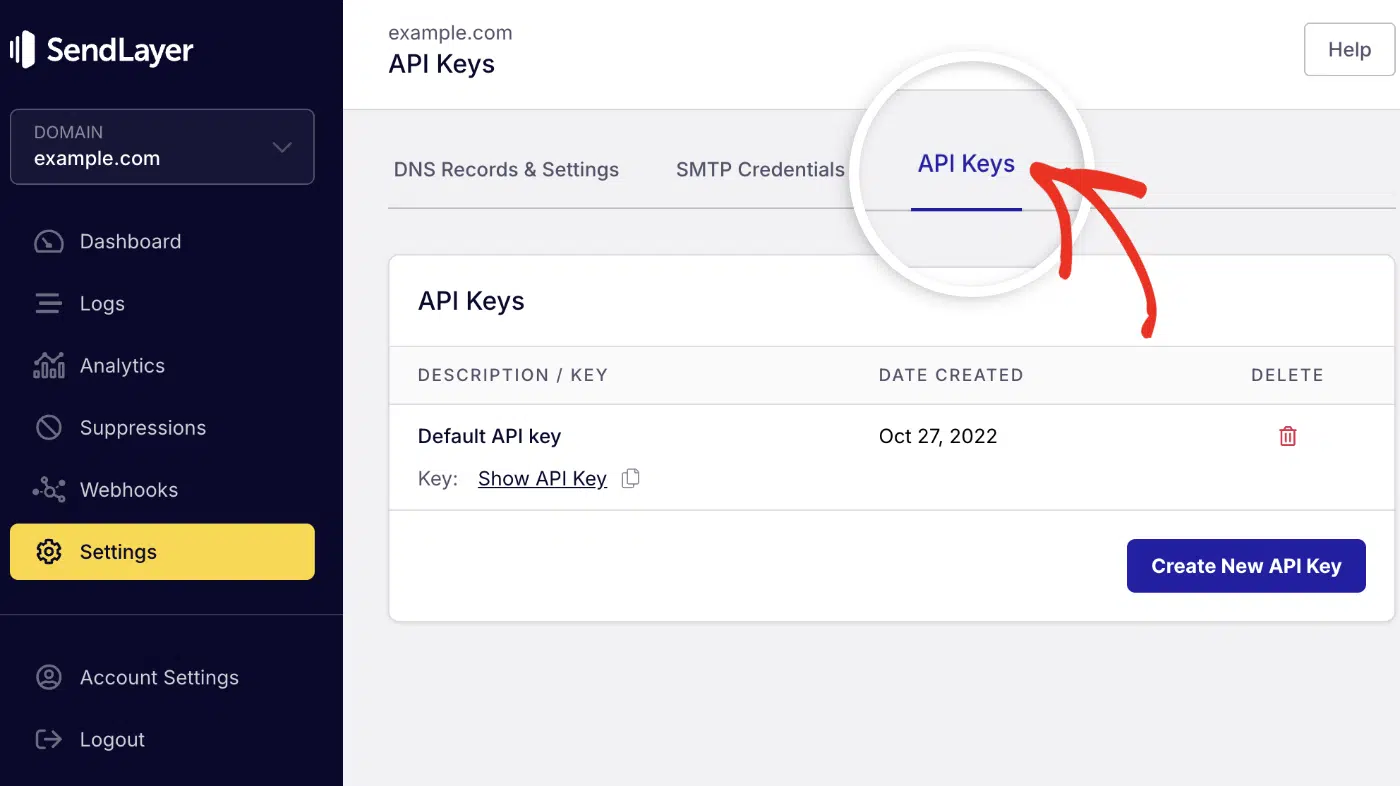
Click the copy icon next to your key to copy it to your clipboard.

Step 3: Store Your API Key as an Environment Variable
One thing I like about Codex is that it enforces best practices. It suggests storing sensitive credentials as environment variables. That way you won’t accidentally commit it to version control platforms like GitHub.
Before adding the MCP server, we’ll need to export the SendLayer API key as an environment variable. To do so, open your terminal and run:
export SENDLAYER_API_KEY="your-api-key-here"
Pro Tip: Never hardcode your API key in config.toml. Anyone with access to that file could use your SendLayer account.
This would add the environment variable only to the current terminal session. This means, you’ll need to export it again each time you open a new terminal.
To make this permanent across sessions, add the export SENDLAYER_API_KEY line to your ~/.bashrc or ~/.zshrc file, then reload it. Here’s how to do it:
Navigate to the ~ directory:
cd ~
After that, use the command below to edit the bash config:
nano ~/.zshrc
This will open up the bash config file. Go ahead and add the export line to the file.
export SENDLAYER_API_KEY="your-api-key-here"
Then press Ctrl+O and press Enter to save your changes.
Once done, reload the terminal
source ~/.zshrc
Pro Tip: Verify the variable is set before continuing. Run printenv SENDLAYER_API_KEY. It should print your key.
Step 4: Add SendLayer MCP to Your Codex config.toml
To add a new MCP server, open your terminal and paste the command below:
codex mcp add sendlayer --url https://mcp.sendlayer.com --bearer-token-env-var SENDLAYER_API_KEY
This will retrieve the API key from the environment variable at runtime.
Codex stores MCP server settings in a config.toml file. The global version lives at ~/.codex/config.toml.
You can alternatively add the MCP server configuration directly into the config.toml file.
To do so, open the file using nano ~/.codex/config.toml. Then add this block:
[mcp_servers.sendlayer]
url = "https://mcp.sendlayer.com"
bearer_token_env_var = "SENDLAYER_API_KEY"
That’s all the config you need. The url points to SendLayer’s hosted MCP server. The bearer_token_env_var field tells Codex to read your API key from the environment at runtime.
Note: The bearer_token_env_var field holds the variable name, not the actual key value. Codex looks up the key from your environment when it runs.
Step 5: Verify the Connection
Open your terminal and run:
codex mcp list
You should see sendlayer in the list of active MCP servers.
If you’re running Codex in the terminal UI, you can also type /mcp to view active servers. Once sendlayer appears in either view, you’re connected and ready to send.
How to Send Your First Email from Codex
Open Codex and switch to Agent mode. You don’t need to write any email code or call any APIs directly.
Sending a Plain Text Email
Type a prompt like this:
Send an email to [email protected] with the subject “Build complete” and the body “The latest build finished without errors.”
Codex will call the SendLayer MCP send-email tool and deliver the message. The whole thing takes a few seconds.

Sending an HTML Email
The send-email tool supports HTML bodies too. Ask Codex to compose one for you:
Send an HTML email to [email protected] with the subject “Weekly Report”. The body should have a heading “Your Weekly Summary” and a bullet list with these items: 142 new signups, $8,400 in revenue, 3 support tickets resolved.
Describe the structure you want in your Codex prompt. It’ll compose and send the HTML without any extra setup on your end.
Real-World Automation Use Cases
Now that you know the basics, let’s explore practical automation scenarios. Here are three that work well in practice.
Build Failure Notifications
Ask Codex to scan your CI output and alert the team if anything went wrong:
Read the last 30 lines of build.log. If there are any errors, send an email to [email protected] with the subject “Build Failed” and include the error details in the message body.

This replaces a custom notification script with a single prompt. Codex reads the log, checks for failures, and sends the alert.
Automated Report Delivery
Codex can generate a summary from your data and email it directly:
Read
report.csvand summarize total sales broken down by region. Email the summary to [email protected] with the subject “Weekly Sales Report” and today’s date in the subject line. CC [email protected] to the email.

You get a formatted report delivered to the recipient’s inbox, including the CC email address, without writing any Python or setting up a cron job.
Subscription Renewal Reminders
Point Codex at a user list and let it handle the filtering and sending:
Read users.json. Find everyone whose subscription expires within the next 7 days. Send each of them a reminder email through SendLayer with the subject “Your subscription is expiring soon.”
Codex filters the list, drafts a message for each user, and sends each email. No email library required.

SendLayer also handles transactional emails like password reset emails and order confirmations. All are sendable through the same MCP tool.
Once your automations are running, you can optimize your automated email workflows to improve open rates and deliverability.
Project-Scoped vs Global MCP Configuration
Codex supports 2 locations for config.toml, and which one you use depends on your workflow.
| Config type | File path | When to use |
|---|---|---|
| Global | ~/.codex/config.toml | Personal projects and solo work |
| Project-scoped | .codex/config.toml in your repo | Team workflows with a shared MCP setup |
Note: Project-scoped configs only load in trusted projects. Codex will prompt you to trust a project before reading its local config.
The config block is the same either way:
[mcp_servers.sendlayer]
url = "https://mcp.sendlayer.com"
bearer_token_env_var = "SENDLAYER_API_KEY"
Use global config if you’re working solo and want SendLayer available in every Codex session. Use project-scoped config if your whole team should share the same MCP setup. Just make sure each developer sets SENDLAYER_API_KEY in their own shell profile.
Pro Tip: For team setups, commit .codex/config.toml to version control. Keep SENDLAYER_API_KEY out of it. Each developer sets the variable in their own ~/.bashrc or ~/.zshrc.
Troubleshooting
When I first set this up, a couple of issues came up that are easy to miss. Here are the 3 most common problems and how to fix them.
SendLayer MCP Doesn’t Appear in codex mcp list
This usually means Codex can’t find your config.toml or the file has a syntax error. Check that:
- The file is at
~/.codex/config.toml(or.codex/config.tomlin a trusted project) - The
[mcp_servers.sendlayer]block uses the exact TOML syntax shown above - There are no stray characters or missing quotes
API Key Not Found at Runtime
If Codex can’t authenticate with SendLayer, the most likely cause is that SENDLAYER_API_KEY isn’t set in the current shell session.
Run printenv SENDLAYER_API_KEY to check. If it’s empty, add the export command to your shell profile and run source ~/.zshrc.
Emails aren’t reaching the inbox
If the send-email tool runs without errors but emails don’t arrive, check your SendLayer account for domain authentication. SendLayer requires your sending domain to have DNS records (SPF, DKIM) set up before emails can be delivered.
For more information, see the authorizing your domain guide.
From Email Not Specified
SendLayer requires a valid from email that uses the same domain as the one you authorized when setting up your account.
In some cases, the MCP server might automatically set one based on your authorized domain, for example, [email protected]. Otherwise, specify a sender domain by updating your email prompt to include the desired sender.
FAQs –– Send Email with Codex
These are answers to some of the top questions we see regarding automating email sending in Codex.
Does SendLayer MCP work with Codex CLI and the Codex VS Code extension?
Yes. Both Codex CLI and the VS Code extension share the same config.toml file. Once you add SendLayer MCP to your config, it’s automatically available in both environments.
How do I keep my SendLayer API key secure in Codex?
Store your key as an environment variable and reference it with bearer_token_env_var in your config. Never paste the raw key into config.toml. That file might end up in version control, where others could access it.
Is SendLayer MCP free to use?
Yes! The MCP server doesn’t require an additional subscription to use. Once you have an active SendLayer account, you can connect the MCP server with your API key.
That’s it! You can now send transactional emails with Codex and the SendLayer MCP server.
Want to see how SendLayer MCP works in other AI tools? Check out the guides for Cursor IDE, Claude Code, and Gemini CLI.
