


What is a webhook, and why does every developer tool seem to offer one? Webhooks let your app react the moment an email bounces, a payment clears, or code ships.
Email APIs like SendLayer’s are great for sending messages. But when a password reset email bounces, your app won’t know unless it keeps retrying.
In this guide, I’ll explain how webhooks work using email as an example. You’ll also watch a real one arrive in your terminal.
What Is a Webhook?
A webhook is an automatic HTTP message that one app sends to another when an event happens. The sending app pushes the details to a URL you choose.
Your app doesn’t have to ask for them.
For example, SendLayer can tell your app the moment an email bounces. It sends the details to your webhook URL right away.
A Simple Way to Picture It
Think of a webhook like a doorbell. You don’t check the porch every 5 minutes for a package.
The doorbell rings when it arrives.
Checking the porch over and over is called polling. A webhook is the doorbell.
Key Webhook Terms, Explained
- Event: Something that happens, like an email being delivered, opened, or bounced.
- Webhook URL (endpoint): The address in your app that receives the message. For example,
https://yourapp.com/webhooks/sendlayer. - Payload: The data inside the message. It’s usually JSON, a simple text format for structured data.
- HTTP POST: The type of web request that carries the payload. It’s the same kind a browser sends when you submit a form.
- Polling: Asking an API for updates on a schedule, instead of waiting to be told.
How Webhooks Work, Step by Step
Webhooks work in 4 steps: subscribe, watch, notify, and react. Here’s how that looks with email:
- Setup: You give SendLayer a webhook URL and pick an event, like
bounce. - Monitoring: SendLayer watches your emails for that event.
- Notification: When an email bounces, SendLayer sends the event data to your URL.
- Processing: Your app reads the data and acts on it, like marking the address invalid.

Your webhook URL has to be public. SendLayer sends the request over the internet, so it can’t reach localhost on your laptop.
That’s why testing webhooks needs one extra tool. I’ll show you how later in this guide.
What a Webhook Payload Looks Like
A webhook payload is the JSON data the provider sends to your URL. It tells your app what happened, to which message, and when.
Here’s the payload SendLayer sends when an email bounces:
{
  "Signature": {
    "Timestamp": 1758100959,
    "Token": "c0a6c82bdde01faab7e857",
    "Signature": "3d1bf89405e4b71ed80bc240cd512aa7ed9db9dcfb17"
  },
  "EventData": {
    "Event": "bounced",
    "EventType": "failed",
    "Domain": "example.com",
    "MessageID": "4331c06-2d1d-4387-969e-697835",
    "BouncedEmailAddress": {
      "EmailAddress": "[email protected]",
      "Status": "smtp;550 5.1.1 User Unknown",
      "DiagnosticCode": "5.1.1 (bad destination mailbox address)"
    },
    "Reason": "smtp;550 5.1.1 User Unknown",
    "Code": "5.1.1 (bad destination mailbox address)"
  }
}
This is the request body, which is the part your app works with. Here’s what each field means:
| Field | What it tells you |
|---|---|
Signature | A timestamp, token, and signature. |
EventData.Event | What happened. Here, bounced |
EventData.EventType | The broader result. A bounce is a failed delivery |
EventData.Domain | Your sending domain |
EventData.MessageID | The ID of the email this event belongs to |
BouncedEmailAddress.EmailAddress | The address that bounced |
BouncedEmailAddress.Status | The receiving server’s reply. 550 5.1.1 means the mailbox doesn’t exist |
Reason and Code | The same bounce reason, ready to log or show |
A 5.1.1 code is a hard bounce. Don’t email that address again. Our guide to hard and soft bounces explains the other codes.
Open and click events are shorter. They add the recipient’s To address and an IPAddress:
{
  "EventData": {
    "Event": "opened",
    "Domain": "example.com",
    "MessageID": "4331c06-2d1d-4387-969e-697835",
    "To": "[email protected]",
    "IPAddress": "10.30.126.18"
  }
}
Note: The event names in payloads are past tense (bounced, opened, delivered). When you subscribe, you use the short names (bounce, open, delivery).
Webhooks vs. APIs (Polling)
The difference between a webhook and an API is who starts the conversation. With an API, your app asks for data.
With a webhook, the provider sends it to you when something changes.

| API (polling) | Webhook | |
|---|---|---|
| Who starts it | Your app | The provider |
| When data arrives | When you ask | As soon as the event happens |
| Wasted requests | Many, when nothing changed | None |
| What you need | An API key | A public URL |
| Good for | Reports, history, one-off checks | Reacting to events right away |
Here’s how to poll with the SendLayer CLI. This asks for up to 5 failed emails:
sendlayer events list --event failed --limit 5
That’s fine for a quick check or a daily report. But to catch every bounce right away, you’d run it constantly.
A webhook tells you instead.
Webhooks and APIs also work together. You usually create a webhook by calling the provider’s API. Our guide to SMTP vs. API explains how an email API works.
Common Webhook Examples
Webhooks show up anywhere one app needs to react to another. Email is an easy place to start.
Email Events (Delivered, Opened, Bounced)
SendLayer offers webhooks for 6 email events. Here’s what each one is good for:
| Event | When it fires | What you might do |
|---|---|---|
delivery | The email reached the recipient | Mark an order email as sent |
open | The recipient opened the email | Track engagement |
click | The recipient clicked a link | Update a lead’s score in your CRM |
bounce | The email bounced | Flag or remove the address |
unsubscribe | The recipient unsubscribed | Stop future emails to them |
complaint | The recipient marked it as spam | Alert your support team |
A delivered event isn’t the same as an accepted one. Our guide on how to check email delivery status explains the difference.
Email webhooks matter most for transactional emails like receipts and password resets. If one fails, your app can try another channel.
Payments, Code, and Chat Apps
Lots of other tools use webhooks too:
- Payments: Stripe notifies your store when a payment succeeds, allowing you to ship the order.
- Code: GitHub tells your build server when someone pushes code, so it can run tests.
- Chat: Slack posts a message to a channel when another app sends it a webhook.
How to Create Your First Webhook
A quick way to see a webhook is to receive one on your own computer. We’ll use the SendLayer CLI and ngrok.
You won’t need to build or deploy a server.
Prerequisites
You’ll need these before you start:
- SendLayer account: An active account and your API key
- Node.js 18+: Or the standalone CLI download
- ngrok account: A free ngrok account, to give your computer a public URL
Don’t have a SendLayer account? You can start with the free trial, which lets you send up to 200 emails.
Step 1: Install the SendLayer CLI
These steps use SendLayer CLI version 0.1.1. If a flag behaves differently in a later version, check sendlayer --help.
Open your terminal (Terminal on macOS and Linux, PowerShell on Windows). Then install the CLI with npm:
npm install -g sendlayer-cli
If you don’t have Node.js, download the archive for your system from the latest GitHub release.
Extract it. Then move the sendlayer file (sendlayer.exe on Windows) into a folder on your PATH. That’s a folder your terminal searches for commands, like /usr/local/bin on macOS and Linux.
Next, log in and paste your API key when asked:
sendlayer login
To get your API key, log in to your SendLayer account. Once you’re logged in, click the Settings menu and select the API Keys tab.
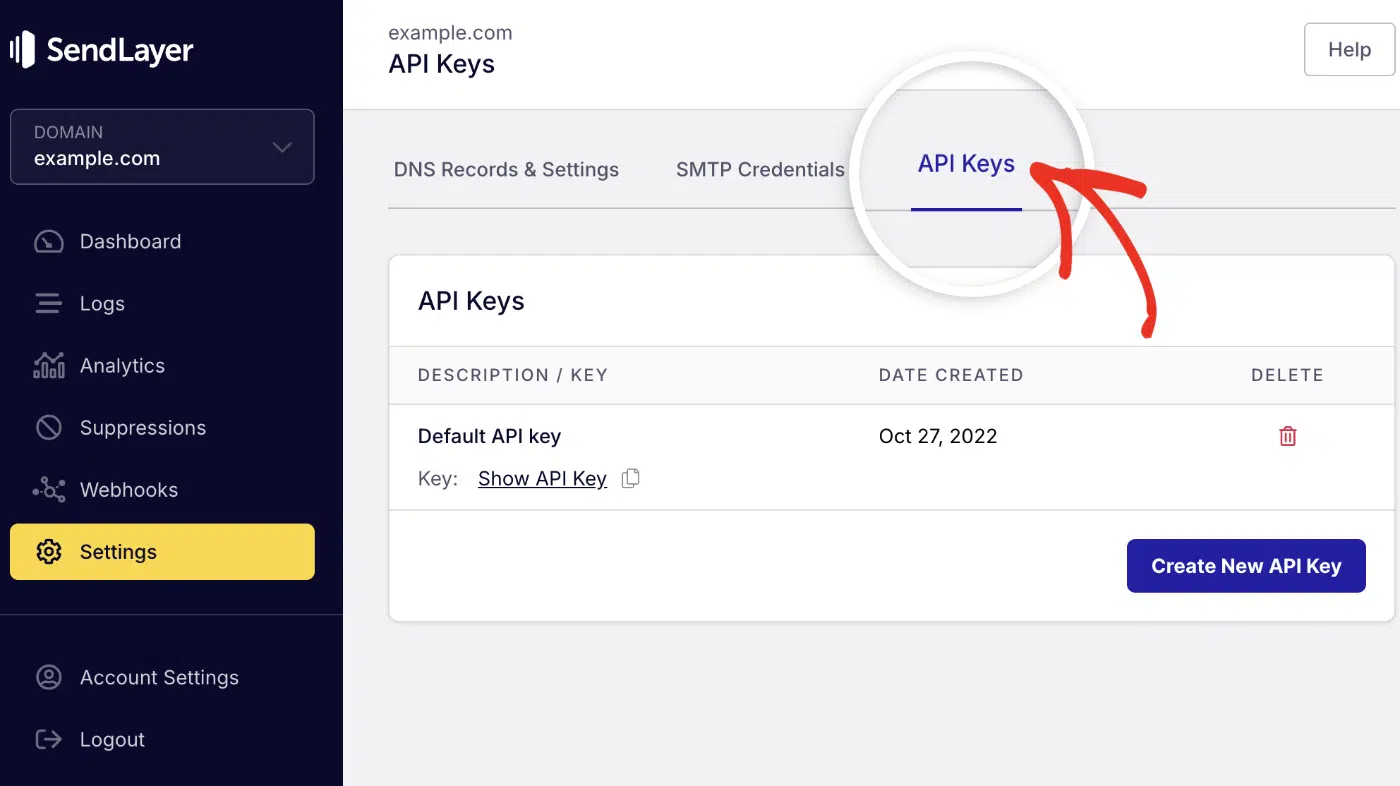
Then click the copy icon next to your key to copy its value.

Step 2: Open a Public Tunnel With ngrok
A tunnel gives your computer a temporary public HTTPS address. Anything sent to it reaches a port on your machine.
First, install ngrok from its download page. Then copy your auth token from the ngrok dashboard and save it:
ngrok config add-authtoken YOUR_AUTH_TOKEN
Now start a tunnel to port 4000, the CLI’s default:
ngrok http 4000
ngrok shows a Forwarding URL like https://abc123.ngrok-free.dev. Copy it, and leave this terminal open.
Step 3: Listen for Webhook Events
Open a second terminal window. Start the listener with your ngrok URL:
sendlayer webhooks listen \
  --public-url https://abc123.ngrok-free.dev \
  --events delivery,bounce
The CLI creates one SendLayer webhook for each event you listed.
When it’s ready, you’ll see ✓ Listening. Press Ctrl+C to stop.

Step 4: Send a Test Email and Watch the Events Arrive
Open a third terminal and send yourself an email. Use an address on your authorized domain for --from:
sendlayer emails send \
  --from [email protected] \
  --to [email protected] \
  --subject "Webhook test" \
  --text "Watching for events."
Switch back to the listener. Within about a minute, a new line appears with the event’s payload.
Look for "Event":"delivered" inside it. The CLI shortens long payloads, so you’ll see the start of the JSON.

When you’re done, press Ctrl+C in the listener. The CLI deletes every webhook it created.
If it ever crashes, the next run offers to clean up the leftovers.
Optional: Forward Events to Your Own App
Want to pass events to an app you’re building? Here’s a tiny Node.js app that receives them.
Save it as server.js and run npm install express. Then start it with node server.js:
// server.js: logs each SendLayer webhook it receives
const express = require('express');
const app = express();

app.use(express.json()); // parse the JSON payload

app.post('/webhooks/sendlayer', (req, res) => {
  const event = req.body.EventData;
  console.log(`${event.Event} for message ${event.MessageID}`);
  res.sendStatus(200); // tell the sender it arrived
});

app.listen(3000, () => console.log('Listening on port 3000'));
With the app running, restart the listener with --forward-to. The CLI sends each payload on to your app, unchanged:
sendlayer webhooks listen \
  --public-url https://abc123.ngrok-free.dev \
  --events delivery,bounce \
  --forward-to http://localhost:3000/webhooks/sendlayer
Create a Permanent Webhook for Production
For a live app, point a webhook at your real HTTPS endpoint. This sends bounce events to it:
sendlayer webhooks create --url https://yourapp.com/webhooks/sendlayer --event bounce
Each webhook watches one event, so repeat the command for each event you need. To see them all, run:
sendlayer webhooks list

You can’t edit a webhook once it exists. To change one, run sendlayer webhooks delete <id> and create it again.
You can also manage webhooks with the SendLayer API.
Webhook Best Practices
A good webhook endpoint is secure, fast, and safe to call twice. Keep these in mind:
- Use HTTPS: The payload holds email addresses, so encrypt it in transit.
- Reply fast: Return a
200status right away. Do slow work, like database updates, after you reply. - Expect repeats: SendLayer retries when your endpoint is down. The same event can arrive twice. For one-time events like delivered or bounced, check the
MessageIDandEventpair before acting. - Watch delivery health:
sendlayer webhooks listshows each webhook’s status. The API also returnsLastResponseCode, the last status code your endpoint sent back. - Confirm the sender: Anyone who finds your URL could send it fake data. Many providers sign payloads so you can check that a request is real. SendLayer includes a
Signatureobject, but it doesn’t document how to verify it yet.
Frequently Asked Questions
Here are answers to common questions about webhooks.
Are webhooks free?
Webhooks are just HTTP requests, so receiving them costs nothing extra.
With SendLayer, you set them up in your account. The emails you send count toward your plan.
What is a webhook URL?
A webhook URL is the address in your app that receives webhook messages. It must be public and should use HTTPS, like https://yourapp.com/webhooks/sendlayer.
Is a webhook the same as an API?
No. With an API, your app asks for data when it wants it.
With a webhook, the provider sends data to your app when an event happens.
What happens if my webhook endpoint is down?
SendLayer retries sending the event when your endpoint is unavailable. The API’s LastResponseCode and LastResponseTryCounter fields show how recent deliveries went.
Can I test webhooks without a server?
Yes. SendLayer CLI includes a webhook test suite. Once you’ve installed the CLI, run sendlayer webhooks listen with an ngrok tunnel, and events will print in your terminal.
You don’t need to build or deploy anything.
That’s it! Now you know what a webhook is and how to receive one.
If you’d like to learn more about how SendLayer webhooks work, be sure to check our webhooks documentation. Our CLI tool guide covers all the available commands and use cases for the SendLayer CLI.
