Are you looking for a quick-start Customer.io tutorial to help you automate your marketing messages as quickly as possible?
Customer.io Journeys is a marketing automation platform that allows you to send automated campaigns, transactional messages, and one-time broadcasts to your customers via email, push notifications, in-app messages, Slack messages, and SMS messages.
If you’re considering using Customer.io and you want to get an idea of how easy it is to use, or you’ve already signed up and want to hit the ground running, we’ve put together this step-by-step tutorial for beginners to get you started.
1. Sign Up for Customer.io
Head over to Customer.io and choose the plan that’s most suitable for you. You can also sign up for a 14-day free trial to evaluate the platform before committing to a paid plan.

You can click the Pricing option in the menu to see the available plans or click the Request Demo button to sign up for a free trial.
When you create your account, you’ll be asked for some basic details about your company and how you intend to use Customer.io.
Once you’ve completed the account signup process, you’ll be taken to your dashboard where you can continue to set up your account.

The first time you sign into Customer.io you’ll see a setup checklist. Following the steps in this list will help to guide you through the setup process.
You will also need to complete the setup checklist before your account can be verified. When your account is unverified you’ll be able to test features such as adding people, creating data-driven segments, creating emails, and other messages but you won’t be able to send messages until your account is verified.
You can watch the video to get an overview of how Customer.io works and click the Get started button when you’re ready to continue.

3. Start The Customer.io Tutorial With Your First Message
Choose a workflow template to get started with your first message or click Start with a newsletter to try out the platform with a single one-off email.

Enter a name for your newsletter, scroll down, and click the Create Newsletter button.
Here, you can either choose a segment or condition to control who the message goes out to, or send the message to everyone in a workspace.
As we’re just testing out the platform right now, choose Everyone in workspace. (When you’re sending live messages, you should only do this in very special circumstances, as it will send the email to everyone – even unsubscribes.)

Click the Save & Next button to continue.
At this point, you have the option to set a conversion goal, or you can select No goal to continue without one. Click the Save & Next button to continue.

You can then choose the channel you want to send the message via. Customer.io supports emails, in-app messages, push notifications, SMS messages, and webhooks. For now, we’ll select Email.
Next, you need to add some content to your test email. Click the name of your email to go to the content editor.

In the email content editor, you can choose rich text to create a basic email (you can also edit the HTML code directly to adjust the formatting) or choose a pre-built template.
Select the template you want to use for your email campaign and click Create email.

You can customize this email template in the drag-and-drop editor and add your content.
Select a From name and email address for your test newsletter, enter a Subject, and edit the content if you wish. Click the Save button when you’re done.

Click the Back to Content link to return to the wizard.

You have the option to set up A/B testing before completing your email setup with up to 8 variations of your original message.
Then, click the Next button to continue to the final review before you can send your first email.

However, you won’t be able to send your email until you’ve completed the rest of the account setup checklist and requested for your account to be verified.
4. Integrate Your Data
Click Integrate your data to continue onto the next step of the setup wizard.
Customer.io supports various methods for real-time data integration including API, Data Pipelines (CDP), JavaScript, and direct database connection to add users to your contact list, or you can upload a CSV file to add people on your mailing list and event data.

Importing Data Via CSV
To import a CSV file, you’ll need the entries to have an id or an email address to import people. Drag and drop your file or click the buttons to upload or import directly from Google Sheets.

Once you’ve uploaded the file, you can name your import, choose how you want to add and update people and click the Next button to complete integration.

Ensure the fields are mapped to the Customer.io database correctly, make any corrections or changes to how your data is imported, and click the Next button to continue.

Customer.io will validate your data and give you the option to add these people to an existing segment or create a new one. You can then click Complete import.

Importing Data From Forms
Let’s also set up a data integration for a form.

When you select forms from the real-time integration options, you can choose from a number of form options. You can choose the form platform you’re already using, or if you’re setting up a new form on a WordPress site, we suggest using the WPForms plugin, which is one of Customer.io’s recommended providers.

To integrate events from your form, select Custom forms and enter the URL of the page where your form is embedded and click the Scan for forms button.

Customer.io should automatically detect the form. If you have more than one form on the page, you will need to select the form you want to integrate.

Click the Choose Form button and decide how you want to map the form fields across to your Customer.io database.

Click Set Up Form and Customer.io will generate a code snippet for you to include in the page where your form is located.

Once you’ve included the code snippet, your form submissions should automatically be captured in your Customer.io database.
5. Set Up Messaging Channels
The next step is to configure settings for the messaging channels you want to use. Let’s start with email.
Select Email from the list of available channels and click the Set up my channel button.

Here, you’ll need to enter details of the sending domain you’ll be using to send emails from Customer.io.
Add your sending domain and the from addresses you want to use on emails (you can add multiple addresses and choose the one you want to use when you create an email.)

Setting Up Custom SMTP
You have the option either use Customer.io to send email on your behalf or you can use your own SMTP server.
We recommend setting up custom SMTP for a few reasons:
- No need to warm up domain if you’re already an established sender: Moving your email to Customer.io means you’ll essentially be starting from scratch with a new email domain. You’ll be treated as new sender by email service providers, and you’ll have to slowly increase the volume of emails you send over time to build your sender reputation.
- More control: When you transition your email to Customer.io, you’ll be using their IPs for sending emails, which are shared with other users. If these IPs are added to a blocklist due to complaints that may be caused by another user on the same IP, your emails will be affected too.
- Data consistency: If you’ve been using an SMTP provider like SendLayer for a while, you’ll already have historical data on engagement, bounce rates, and other information that’s important for deliverability. If you change to Customer.io to manage your email, you’ll need to import your data and metrics manually (along with existing suppression lists) to ensure your deliverability is not impacted.
- More affordable: Customer.io has an allotted email account for each plan. If you want to send more emails than this using their mail servers, you’ll have to upgrade your plan. However, if you’re using your own SMTP servers, you can send as many emails as you want.
- Link tracking is still available: Even if you’re using your own SMTP servers, Customer.io will still track email opens and clicks and keep a full copy of each email you send.
Sign Up for an SMTP Service
If you’re not already using a dedicated SMTP service for your email, you may want to consider signing up for SendLayer. SendLayer is a dedicated SMTP delivery service that you can use to send email from any app or service that supports custom SMTP.
While Customer.io SMTP can be used only for sending emails via Customer.io, you can use SendLayer to handle emails sent from your site built on WordPress, Joomla, Magento, WooCommerce, BigCommerce, and many other platforms.
SendLayer is a transactional email service with powerful features to protect the reputation of your sender domain in the long term and track email deliverability and engagement.
Plans are very affordable for small businesses and entrepreneurs, starting at just $5 a month, and you can try out the service with a free trial that allows you to send up to 200 emails.
Once you’ve signed up for SendLayer and authorized your domain, you can copy across your SMTP credentials to set up your email in Customer.io.
Customize SMTP Settings in Customer.io
You can find the custom SMTP settings in Customer.io by clicking the cog icon in the top right corner and selecting Workspace Settings.

Next, scroll down to the Messaging settings and select Email.

Select the Custom SMTP tab and click the Add Custom SMTP Server button.

Choose Other SMTP from the dropdown.

Click the Continue to set up button.

Here, you can copy your SMTP credentials from your SendLayer dashboard under Settings » SMTP Credentials.
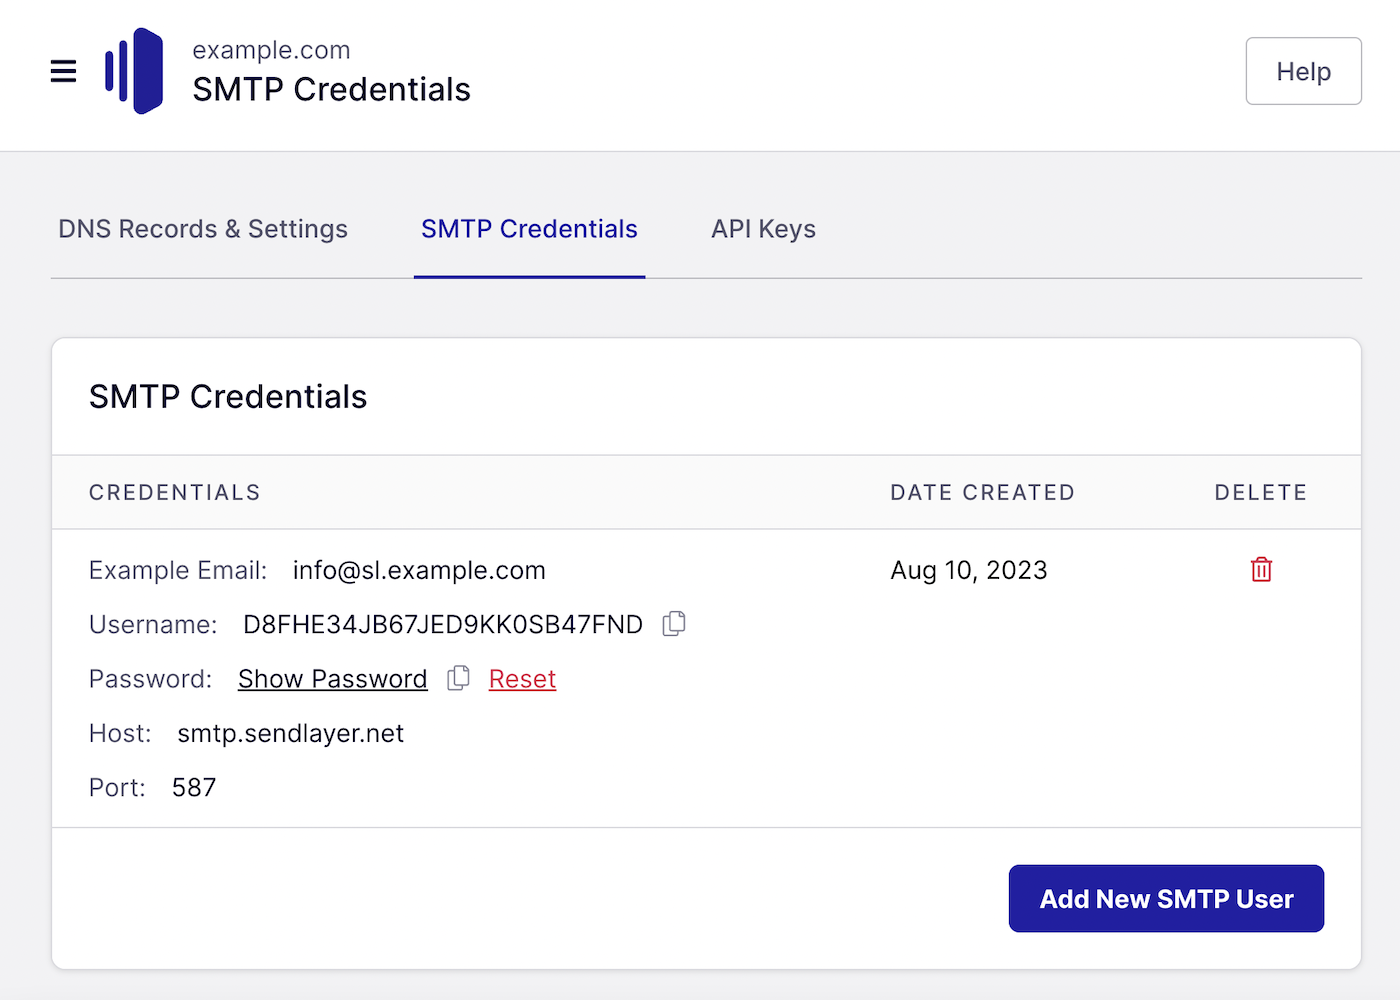
Enter the SMTP details as follows:
- Address: smtp.sendlayer.net
- Port: 587
- Authentication: Login
- SMTP Login: copy and paste the Username from your SendLayer dashboard
- Password: Copy and paste the Password from your SendLayer dashboard

Once you’ve entered all this information, click the Finish set up button.
If you’ve entered everything correctly, you should see a popup confirming custom SMTP setup was successful.

Customer.io displays sending domains using custom SMTP as unverified.

However, as verification is handled by SendLayer (or the SMTP provider you’re using), this will not prevent you from sending emails.
6. Verify Your Account and Send Your First Message
And that’s it! You’ve now completed all the necessary steps to set up Customer.io and you can start setting up automations and sending messages!
Customer.io verifies all accounts manually, so you’ll have to request for your account to be reviewed before you can send your first message.
While this step is covered in the setup wizard for domains authenticated through Customer.io, you’ll need to contact the support team and ask to be verified if you’re using custom SMTP.
Click the Need help? Link on the top right of your dashboard to send a message to technical support. You’ll need to include details of your company website, use cases explaining how people subscribe to your messages and when you contact them, and an example of the email marketing and transactional messages you intend to send through the platform.
A support team member will contact you to request further information if necessary, and your account should be verified shortly.
Once your account has been verified, you’re good to go! You can start sending emails from Customer.io and set up some other messaging channels such as push notifications or in-app messages if you wish.
FAQs
What kind of customer data can I track with Customer.io?
Customer.io allows you to track a wide variety of customer data, including but not limited to user behavior on your website/app, demographic information, purchase history, and custom event data. This data can be used to create personalized customer segments and trigger specific campaigns.
Can I create automated email campaigns in Customer.io?
Yes, Customer.io specializes in creating automated email campaigns. You can set up workflows that trigger emails based on customer actions, such as signing up, making a purchase, or abandoning a cart. These workflows can be customized with conditional logic and personalized content.
How does A/B testing work in Customer.io?
A/B testing in Customer.io involves creating two or more variations of an email or message and sending them to a portion of your audience. Customer.io tracks the performance of each variation, allowing you to compare open rates, click-through rates, and other metrics to determine the most effective version.
How do I segment my customers in Customer.io?
In Customer.io, you can segment your customers based on their behavior, demographics, or custom attributes. The platform allows you to create dynamic segments that update in real-time as customers meet the criteria you’ve set, such as recent activity, purchase history, or location.
That’s it! Now you know how to set up Customer.io
Next, would you like to learn about how to improve your transactional emails? Check out our tutorial on transactional email design for more information.
